Vertically Driven Products Tema (MENSTAFIX002G_MAZDA1)
Instruction Manual for Menabo Tema Roof Bars
Model: Tema (MENSTAFIX002G_MAZDA1) | Brand: Vertically Driven Products
1. Introduction
This manual provides comprehensive instructions for the safe and correct installation, operation, and maintenance of your Menabo Tema Roof Bars. Please read this manual thoroughly before installation and keep it for future reference. Proper installation and use are crucial for your safety and the longevity of the product.
2. Safety Information
- Always adhere to the maximum load capacity of 50 kg for the roof bars and your vehicle's roof load limit, whichever is lower.
- Ensure all fastening components are securely tightened before each journey. Regularly check tightness during long trips.
- Distribute the load evenly on the roof bars.
- Avoid sudden braking, acceleration, or sharp turns when carrying a load on the roof bars.
- Be aware that the vehicle's height and handling characteristics will change with roof bars and loaded items. Adjust driving style accordingly.
- Do not use the roof bars if your vehicle has integrated roof rails or fixed points not compatible with this model. This product is designed for vehicles without existing roof rails.
3. Package Contents
Before beginning installation, verify that all components are present and undamaged. The package should include:
- 2 x Menabo Tema Roof Bars
- 4 x Mounting Feet with clamps
- All necessary fastening hardware (bolts, washers, tools if applicable)
- Instruction Manual

Image 3.1: Overview of Menabo Tema Roof Bars and components.
This image displays the complete set of Menabo Tema Roof Bars, including the two main bars and the four mounting feet, ready for installation on a vehicle. The design emphasizes the sleek, black finish and the robust construction of the system.
4. Setup and Installation
The Menabo Tema Roof Bars are designed for easy installation. Follow these steps carefully:
4.1 Vehicle Compatibility
These roof bars are compatible with Mazda Cx-30 5-door models from 2019 onwards. Important: These roof bars are specifically designed for vehicles without existing roof rails or fixed mounting points. Attempting to install on vehicles with incompatible roof types may result in damage or unsafe operation.

Image 4.1: Diagram illustrating compatible and incompatible roof types. The left side shows a smooth roof without fixed points, which is compatible. The right side shows a roof with integrated rails, marked with an 'X' and 'NO', indicating incompatibility.
This diagram visually clarifies that the roof bars are intended for vehicles with a smooth roofline, lacking any pre-installed fixed points or rails. It explicitly warns against installation on vehicles equipped with such features.
4.2 Bar Profile and Dimensions
The Tema FE profile ensures an aerodynamic design, minimizing air resistance and reducing fuel consumption.

Image 4.2: Diagram showing the cross-sectional profile of the Tema FE roof bar. Key dimensions are provided: Y (height) is 30 mm, and Z (width) is 48 mm.
This image provides a technical illustration of the roof bar's profile, highlighting its aerodynamic shape and precise dimensions, which are important for compatibility with various accessories.
4.3 Mounting Steps
- Prepare the Vehicle: Ensure the roof surface is clean and dry where the mounting feet will be placed.
- Assemble the Bars: Attach the mounting feet to each roof bar. Ensure they are loosely fitted to allow for adjustment.
- Position the Front Bar: Carefully place the front roof bar onto the vehicle's roof. Refer to your vehicle's specific manual for recommended front bar placement (distance from windshield). Adjust the feet to align with the roof edges.
- Position the Rear Bar: Place the rear roof bar onto the vehicle's roof. Maintain the specified distance (A1 and A2) between the front and rear bars as indicated in the diagram below. This distance is crucial for stability and load distribution.
- Secure the Mounting Feet: Once positioned correctly, tighten the clamps of the mounting feet securely to the vehicle's door frame or designated mounting points. Ensure a firm, stable fit without over-tightening.
- Final Check: After tightening, gently attempt to move the bars to confirm they are rigidly attached. Re-check all bolts and clamps.

Image 4.3: Detailed installation diagram showing the placement of front (X) and rear (Y) roof bars. It illustrates how to measure and ensure correct spacing (A1 and A2) between the bars for optimal stability and load distribution.
This visual guide is essential for understanding the precise positioning and measurement requirements during the installation process, ensuring the roof bars are mounted safely and effectively.
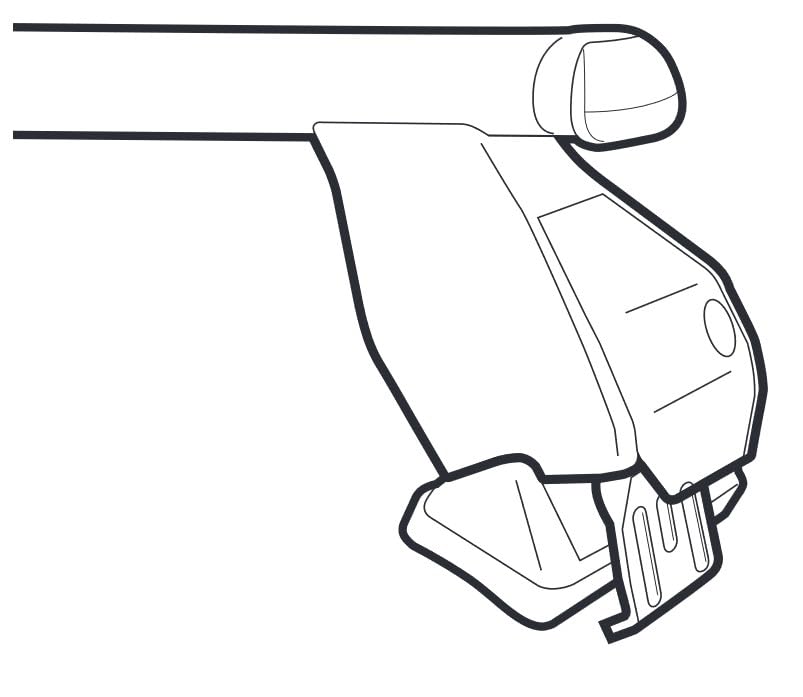
Image 4.4: Close-up view of a single mounting foot, showing its design and how it interfaces with the roof bar and the vehicle's roof edge. This detail highlights the secure clamping mechanism.
This image provides a clear view of the mounting foot's construction, which is critical for understanding how the roof bars attach to the vehicle and ensuring a secure fit.
5. Operation
Once installed, your Menabo Tema Roof Bars are ready for use. Consider the following when operating:
- Loading: Place items centrally on the bars and secure them using appropriate straps or tie-downs. Ensure no part of the load obstructs your view or interferes with vehicle operation.
- Weight Limit: Never exceed the maximum load capacity of 50 kg. This includes the weight of the roof bars themselves and any accessories (e.g., roof box, bike carrier).
- Driving: Be mindful of increased wind resistance and a higher center of gravity when driving with loaded roof bars. Reduce speed, especially in strong winds or when cornering.
- Clearance: Remember the added height of your vehicle when entering garages, car washes, or low-clearance areas.
6. Maintenance
Regular maintenance will ensure the longevity and safe operation of your roof bars:
- Cleaning: Clean the roof bars regularly with mild soap and water. Avoid abrasive cleaners or solvents that could damage the finish.
- Inspection: Periodically inspect all components for signs of wear, corrosion, or damage. Pay close attention to the mounting feet, clamps, and bar integrity.
- Tightness Check: Re-tighten all bolts and clamps periodically, especially after the first few uses and before long trips.
- Storage: If not in use for extended periods, it is recommended to remove the roof bars and store them in a dry place to prevent unnecessary wear and exposure to elements.
7. Troubleshooting
Here are some common issues and their solutions:
- Noise/Whistling: Ensure all components are tightly secured. Check if any accessories are causing excessive wind noise. The aerodynamic design of Tema bars minimizes this, but external factors can contribute.
- Loose Bars: Re-tighten all mounting bolts and clamps. If the problem persists, inspect the mounting feet for damage or improper installation.
- Difficulty Installing: Refer to the installation diagrams and ensure your vehicle is compatible (no existing roof rails). Double-check the correct positioning of front and rear bars.
8. Specifications
| Feature | Specification |
|---|---|
| Brand | Vertically Driven Products |
| Model | Tema |
| Manufacturer Part Number | MENSTAFIX002G_MAZDA1 |
| Item Weight | 4.7 Kilograms |
| Product Dimensions (L x W x H) | 120 x 8 x 10 cm |
| Maximum Load Capacity | 50 kg |
| Vehicle Service Type | Car |
| Foldable | No |
9. Warranty and Support
For warranty information or technical support, please refer to the documentation provided at the point of purchase or contact your retailer. Keep your proof of purchase for any warranty claims.
Ask a question about this manual
Ask about setup, troubleshooting, compatibility, parts, safety, or missing instructions. Manuals+ will review the question and use this page’s manual context to help answer it.