Introduction
This manual provides detailed instructions for the installation, operation, and maintenance of the ZEKOLO Makerbase MKS Robin Nano V1.2 3D Printer Control Board. The MKS Robin Nano V1.2 is a 32-bit motherboard designed for 3D printers, supporting Marlin2.0 firmware and compatible with TFT 3.5-inch touch screens. Please read this manual thoroughly before using the product to ensure proper functionality and safety.
Product Overview
The MKS Robin Nano V1.2 is a high-performance control board for 3D printers, offering enhanced processing capabilities and broad compatibility. It integrates various interfaces for stepper motor drivers, heaters, fans, and endstops, providing a comprehensive solution for 3D printer control.
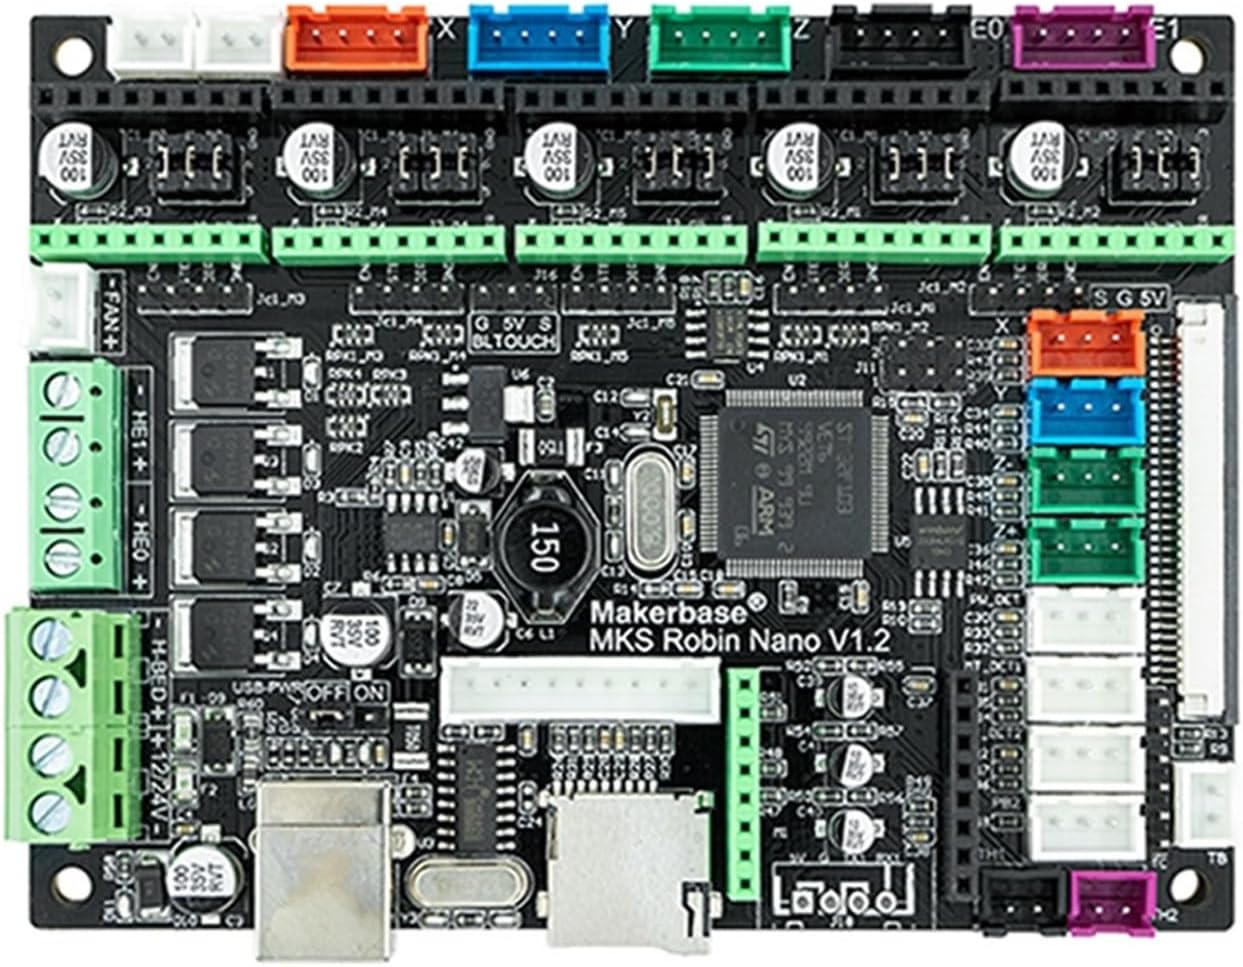
Figure 1: Makerbase MKS Robin Nano V1.2 Control Board. This image displays the main control board with various connectors for power, stepper motors, heaters, and other peripherals.
Setup and Installation
1. Component Identification
Before installation, familiarize yourself with the components of your MKS Robin Nano V1.2 package. Depending on your specific package, it may include the control board, stepper motor drivers (e.g., A4988, TMC2209), a TFT 3.5-inch touch screen, and a WiFi module.

Figure 2: MKS Robin Nano V1.2 Control Board with five stepper motor drivers and heatsinks. This image shows the main board populated with stepper motor drivers, ready for integration into a 3D printer system.
2. Stepper Driver Installation
- Ensure the control board is powered off and disconnected from any power source.
- Carefully insert each stepper motor driver into its designated slot on the MKS Robin Nano V1.2 board. Pay close attention to the orientation of the driver to prevent damage. The small potentiometer on the driver typically faces away from the board's edge.
- Attach the heatsinks to the top of each stepper motor driver for proper heat dissipation.
3. TFT Touch Screen Connection
If your package includes a TFT 3.5-inch touch screen, connect it to the dedicated TFT port on the MKS Robin Nano V1.2 board using the provided ribbon cable. Ensure the cable is securely seated in both the screen and the board connectors.

Figure 3: MKS Robin Nano V1.2 Control Board paired with a TFT 3.5-inch touch screen. This image illustrates the control board and the display unit, showing how they might be connected in a 3D printer setup.
4. Firmware Installation (Marlin2.0)
The MKS Robin Nano V1.2 supports Marlin2.0 firmware. To install or update the firmware:
- Download the appropriate Marlin2.0 firmware for MKS Robin Nano V1.2 from the official Makerbase GitHub repository or other trusted sources.
- Configure the firmware settings according to your 3D printer's specifications (e.g., stepper drivers, endstops, bed size).
- Compile the firmware using a suitable IDE (e.g., VS Code with PlatformIO).
- Copy the compiled firmware file (typically a .bin file) to the root directory of a microSD card.
- Insert the microSD card into the MKS Robin Nano V1.2 board's card slot.
- Power on the board. The firmware will automatically update. The board's LED indicators may show activity during the update process.
- Once the update is complete, remove the microSD card and restart the board.
For detailed open-source files and instructions, refer to the Makerbase GitHub repository.
Operating Instructions
1. Powering On and Initial Boot
Connect the MKS Robin Nano V1.2 board to a stable 12V-24V DC power supply. Ensure all connections are secure before powering on. The TFT screen, if connected, should display the boot screen and then the main interface.
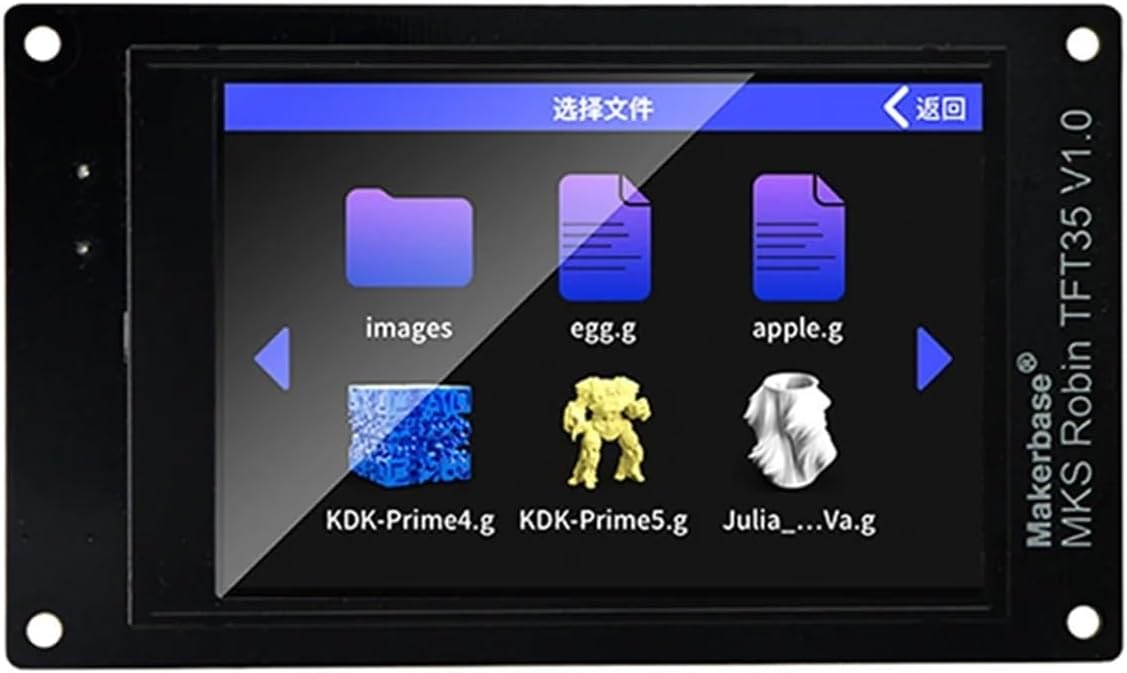
Figure 4: MKS Robin TFT35 V1.0 Touch Screen displaying file selection interface. This image shows the user interface of the touch screen, typically used for selecting print files and controlling the 3D printer.
2. Loading G-code Files
- Prepare your 3D model using a slicing software and save it as a G-code file.
- Copy the G-code file to a microSD card.
- Insert the microSD card into the slot on the TFT touch screen or the main board (depending on your setup and firmware configuration).
- Navigate through the TFT screen interface to select and load your desired G-code file for printing.
3. Basic Printer Control
The TFT touch screen provides an intuitive interface for controlling your 3D printer. Common functions include:
- Home Axes: Moves all axes to their home positions.
- Move Axes: Allows manual movement of X, Y, and Z axes.
- Extruder Control: Heats the hotend and extrudes/retracts filament.
- Bed Temperature: Sets and monitors the heated bed temperature.
- Print Status: Displays current print progress, time remaining, and temperatures.
- Pause/Cancel Print: Controls ongoing print jobs.
Maintenance
1. Firmware Updates
Regularly check the Makerbase GitHub repository for new firmware versions. Updating firmware can introduce new features, improve performance, and fix bugs. Follow the firmware installation steps outlined in the "Setup and Installation" section.
2. Cleaning
Keep the control board and its components free from dust and debris. Use a soft brush or compressed air to gently clean the board. Ensure the board is powered off and disconnected before cleaning.
3. Stepper Driver Inspection
Periodically inspect stepper motor drivers and their heatsinks to ensure they are securely attached and free from excessive dust buildup, which can impede cooling.
Troubleshooting
- Board Not Powering On:
Check power supply connections and ensure the power supply is providing the correct voltage (12V-24V DC). Verify that the power supply is functional.
- Stepper Motors Not Moving:
Confirm stepper drivers are correctly installed and oriented. Check motor wiring connections. Verify that the firmware is configured for the correct stepper drivers and motor types. Adjust Vref on drivers if necessary.
- TFT Screen Not Displaying:
Ensure the ribbon cable connecting the TFT screen to the board is securely attached at both ends. Check for any damage to the cable. Verify that the firmware supports the connected TFT screen model.
- Firmware Update Failure:
Ensure the .bin file is correctly named and placed in the root directory of a properly formatted (FAT32) microSD card. Try a different microSD card. Verify the firmware version is compatible with your board.
- Printer Malfunctions:
Consult the Marlin firmware documentation and the Makerbase GitHub repository for specific error codes or unexpected behavior. The 3D printing community forums are also valuable resources for troubleshooting.
Specifications
| Feature | Detail |
|---|---|
| Model | MKS Robin Nano V1.2 |
| Processor | 32-bit ARM Cortex-M3 |
| Firmware Support | Marlin2.0 |
| Display Support | TFT 3.5 Inch Touch Screen |
| Stepper Driver Support | A4988, TMC2209, and others (depending on configuration) |
| Input Voltage | 12V-24V DC |
| Item Weight | 1.76 ounces (approx. 50g) |
| Package Dimensions | 1.18 x 0.79 x 0.39 inches (approx. 3 x 2 x 1 cm) |
| Item Model Number | 9875 |
Warranty and Support
This product is typically covered by a standard manufacturer's warranty against defects in materials and workmanship. Please refer to your purchase documentation or contact your retailer for specific warranty terms and conditions.
For technical support, firmware updates, and community resources, please visit the official Makerbase GitHub repository:
The open-source nature of this product means a vibrant community often provides extensive support and modifications. Engaging with these communities can be beneficial for advanced users.