CHARMAID CD11144DK-VJ
CHARMAID Ladder Vanity Desk Set (Model CD11144DK-VJ) - Assembly and User Manual
Brand: CHARMAID | Model: CD11144DK-VJ
1. Introduction
This manual provides detailed instructions for the assembly, operation, and maintenance of your CHARMAID Ladder Vanity Desk Set. Please read all instructions carefully before beginning assembly and retain this manual for future reference.

Image: The CHARMAID Ladder Vanity Desk Set, showcasing its compact design and integrated stool.
2. Safety Information
To ensure safe use and prevent injury or damage, please observe the following:
- Always assemble the unit on a soft, clean surface to prevent scratches.
- Ensure all parts are securely fastened before use. Do not overtighten screws.
- Do not stand or sit on the desk unit itself. The included stool is designed for seating.
- Utilize the anti-toppling device to secure the desk to a wall, especially in households with children or pets, to prevent accidental tipping.
- Keep small parts away from children during assembly.
- Regularly check all connections to ensure they remain tight.
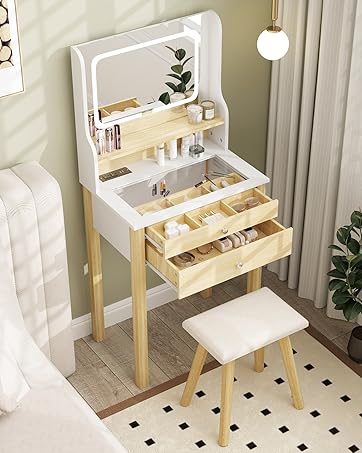
Image: Detail showing the anti-toppling device for wall attachment and the robust X-shaped metal frame for stability.
3. Package Contents
Before beginning assembly, verify that all components and hardware are present. Refer to the assembly video for visual identification of parts.
3.1. Parts List (Refer to Assembly Video for numbered parts)
- Panels: (1) Top Shelf Side Panel, (2) Top Shelf Base Panel, (3) Back Panel, (4) Side Panel, (5) Side Panel, (6) Back Panel, (7) Side Panel, (8) Main Base Panel, (9) Internal Dividers, (10) Front Panel, (11) Mirror Panel.
- Metal Frames: (12) Horizontal Bar, (13) Horizontal Bar, (14) Horizontal Bar, (15) Ladder Frame, (16) Ladder Frame, (17) Stool Horizontal Bar, (18) Stool Frame Side, (19) Stool Mesh Shelf, (20) Crossbar.
- Stool Cushion: (21) Cushioned Stool Seat.
3.2. Hardware List (Refer to Assembly Video for lettered hardware)
- Screws: A*13, B*22, D*4, E*22, F*6, L*12, N*4.
- Other Fasteners: C*1 (Nut), G*6 (Cam Lock), H*14 (Wooden Dowel).
- Mechanisms: J*2 (Hinges), K*1 (Gas Spring/Lift Mechanism).
- Accessories: I*8 (Adjustable Foot Pads), M*2 (Anti-Toppling Straps).
- Tools: S3 (Allen Key), S4 (Allen Key), 10# (Wrench).
4. Assembly Instructions
Follow these steps carefully. It is recommended to have a second person assist with certain steps.
Assembly Video Guide
Video: A detailed assembly guide for the Ladder Vanity Desk Set. This video demonstrates each step of the construction process, including attaching components and securing hardware. It is provided by Giantex, the seller.
4.1. Assemble the Main Desk Frame
Step 1: Attach Foot Pads to Ladder Frames. Insert adjustable foot pads (I*4) into the bottom ends of the main ladder frames (15, 16). (Refer to video: 0:08 - 0:16)
Step 2: Connect Ladder Frame Sections. Join the horizontal bars (13, 14) to the vertical ladder frames (15, 16) using screws (A*8). (Refer to video: 0:17 - 0:27)
4.2. Assemble the Desk Compartment Unit
Step 3: Construct Side Panels. Attach side panel (7) to the main base panel (8) using screws (E*2) and wooden dowels (H*2). (Refer to video: 0:28 - 0:38)
Step 4: Add Front Panel. Secure the front panel (10) to the partially assembled unit using screws (D*2) and wooden dowels (H*2). (Refer to video: 0:39 - 0:49)
Step 5: Insert Internal Dividers. Place the internal dividers (9) into the slots, then secure the remaining side panels (4, 5) using screws (E*8) and wooden dowels (H*4). (Refer to video: 0:50 - 1:19)
Step 6: Attach Back Panel. Fasten the back panel (6) to the compartment unit using screws (F*6) and wooden dowels (H*4) and cam locks (G*6). (Refer to video: 1:20 - 1:46)
Step 7: Install Flip-Top Mirror. Attach the mirror panel (11) to the compartment unit using hinges (J*2) and screws (L*12). (Refer to video: 1:47 - 2:18)
4.3. Integrate Desk Unit with Frame
Step 8: Assemble Top Shelf. Connect the top shelf side panel (1) to the top shelf base panel (2) using screws (E*2) and wooden dowels (H*2). (Refer to video: 2:19 - 2:27)
Step 9: Attach Desk Unit to Ladder Frames. Carefully align the assembled desk compartment unit and the top shelf with the ladder frames. Secure them using screws (E*10) and bolts (B*10). (Refer to video: 2:28 - 2:48)
Step 10: Install Crossbars. Attach the two crossbars (20*2) to the back of the ladder frames using screws (A*5) and nuts (C*1) to enhance stability. (Refer to video: 2:49 - 3:00)
Step 11: Install Anti-Toppling Device. Secure the anti-toppling straps (M*2) to the top shelf and the wall using the provided screws and anchors. (Refer to video: 3:01 - 3:11)
4.4. Assemble the Stool
Step 12: Assemble Stool Frame. Attach foot pads (I*4) to the stool frame sides (18*2). Connect the stool frame sides with the horizontal bars (17*2) and the mesh shelf (19) using screws (B*8). (Refer to video: 3:12 - 3:39)
Step 13: Attach Stool Cushion. Secure the cushioned stool seat (21) to the assembled stool frame using screws (B*4). (Refer to video: 3:40 - 3:50)
Assembly is now complete.
5. Operating Instructions
5.1. Using the Flip-Top Mirror
The vanity desk features a flip-top mirror. Gently lift the mirror panel to reveal the mirror and the internal storage compartments. When not in use, lower the mirror panel to create a flat desktop surface, suitable for use as a writing desk or for displaying items.

Image: The flip-top mirror in its open position, showing the organized storage space beneath.
5.2. Utilizing Storage Compartments and Shelves
The desk includes four internal compartments beneath the flip-top mirror, ideal for organizing cosmetics, jewelry, and small accessories. Two open shelves above the desk provide additional space for decorative items, books, or frequently used products.

Image: A closer look at the four internal compartments and the two open shelves, demonstrating their capacity for various items.
5.3. Using the Cushioned Stool
The included stool features a soft padded cushion for comfortable seating. The bottom mesh shelf provides convenient storage for items like books or small bags. The foot pads on the stool can be adjusted to customize the height for optimal comfort.
6. Maintenance
- Cleaning: Wipe surfaces with a dry, soft cloth. Avoid abrasive cleaners or harsh chemicals that may damage the finish.
- Inspection: Periodically check all screws and connections to ensure they are tight. Retighten if necessary.
- Mirror Care: Clean the mirror with a standard glass cleaner and a soft, lint-free cloth.
- Stool Cushion: Spot clean the cushioned stool with a mild detergent and damp cloth as needed.
7. Troubleshooting
- Unit Wobbles:
- Ensure all screws are tightened securely.
- Adjust the foot pads on the bottom of the desk and stool to compensate for uneven flooring.
- Verify that the anti-toppling device is properly installed and secured to the wall.
- Mirror Does Not Close Properly:
- Check for any obstructions in the storage compartments that might prevent the mirror from closing flush.
- Inspect the hinges for proper alignment and tightness.
- Missing Parts:
- Carefully re-check all packaging materials.
- Contact CHARMAID customer support with your model number and a description of the missing part.
8. Specifications
| Feature | Detail |
|---|---|
| Model Number | CD11144DK-VJ |
| Brand | CHARMAID |
| Color | Rustic Brown & Black |
| Desk Dimensions (L x W x H) | 23.5 inches x 15.5 inches x 64.5 inches (15.5"D x 23.5"W x 64.5"H) |
| Stool Dimensions (L x W x H) | 17 inches x 12 inches x 16.5 inches |
| Item Weight | 52.5 pounds |
| Frame Material | MDF, Engineered Wood, Metal |
| Seat Material Type | Padded |
| Assembly Required | Yes |
| Product Care Instructions | Wipe with Dry Cloth |

Image: Dimensional diagram illustrating the measurements of the vanity desk and accompanying stool.
9. Warranty and Support
For warranty information or customer support regarding your CHARMAID Ladder Vanity Desk Set, please refer to the documentation included with your purchase or contact the seller directly. Keep your purchase receipt and model number (CD11144DK-VJ) handy for faster service.
The seller for this product is Giantex. You can typically find their contact information on your order details page or through the retailer's customer service portal.