MEEFIX iPhone 14 and 14 Plus
MEEFIX Internal Magnet Replacement for MagSafe Charging - Installation Guide
For iPhone 14 and iPhone 14 Plus
Product Overview
This MEEFIX Internal Magnet Replacement is designed to restore MagSafe-compatible wireless charging and accessory attachment functionality to your iPhone 14 or iPhone 14 Plus. It includes strong adhesive for secure installation.
Key Features:
- Restore MagSafe-compatible Functionality: Specifically designed for iPhone 14 and 14 Plus back covers to enable wireless charging and accessory attachment.
- Easy Installation: Features strong adhesive for simple and secure attachment.
- Precise MagSafe Alignment: Engineered for accurate magnetic connection, ensuring optimal charging and accessory performance.
- Reliable Wireless Charging: Facilitates seamless wireless charging with MagSafe chargers and accessories.
- DIY Repair Essential: A crucial component for restoring full phone functionality.
Setup and Installation
Important: Professional installation is recommended. Proceed with caution. Ensure your device is powered off before beginning any repair.
Required Tools (Not Included):
- Pentalobe screwdriver
- Phillips screwdriver
- Heat gun or hairdryer
- Suction cup
- Opening picks/tools
- Tweezers
- Adhesive remover (optional)
Installation Steps:
- Prepare the Device: Power off your iPhone. If the back glass is damaged, carefully remove any loose glass fragments.
- Remove Back Cover (if necessary): If replacing the entire back cover, follow standard procedures to safely remove the old back cover. If only replacing the internal magnet, access the internal components as required.
- Locate and Remove Old Magnet: Identify the existing MagSafe charging coil and magnet assembly. Carefully remove any heat shields or adhesive securing it.
- Clean the Surface: Ensure the area where the new magnet will be placed is clean and free of any old adhesive residue.
- Position the New Magnet: The MEEFIX replacement magnet comes with pre-installed adhesive. Carefully align the magnet with the designated area on the back cover or internal frame of your iPhone 14/14 Plus.
- Secure the Magnet: Once aligned, firmly press the magnet into place to ensure the adhesive creates a strong bond.
- Reassemble Device: Carefully reassemble your iPhone, ensuring all components are correctly connected and secured.
- Test Functionality: Power on your iPhone and test the MagSafe charging and accessory attachment to confirm proper installation.
Video: Demonstrates the removal of the heat shield and the wireless NFC charging magnet from an iPhone. This video provides a visual reference for locating and detaching the existing MagSafe components.

Image: The MEEFIX internal magnet replacement part, showing the pre-installed adhesive and the magnetic ring. This image illustrates the component ready for installation.
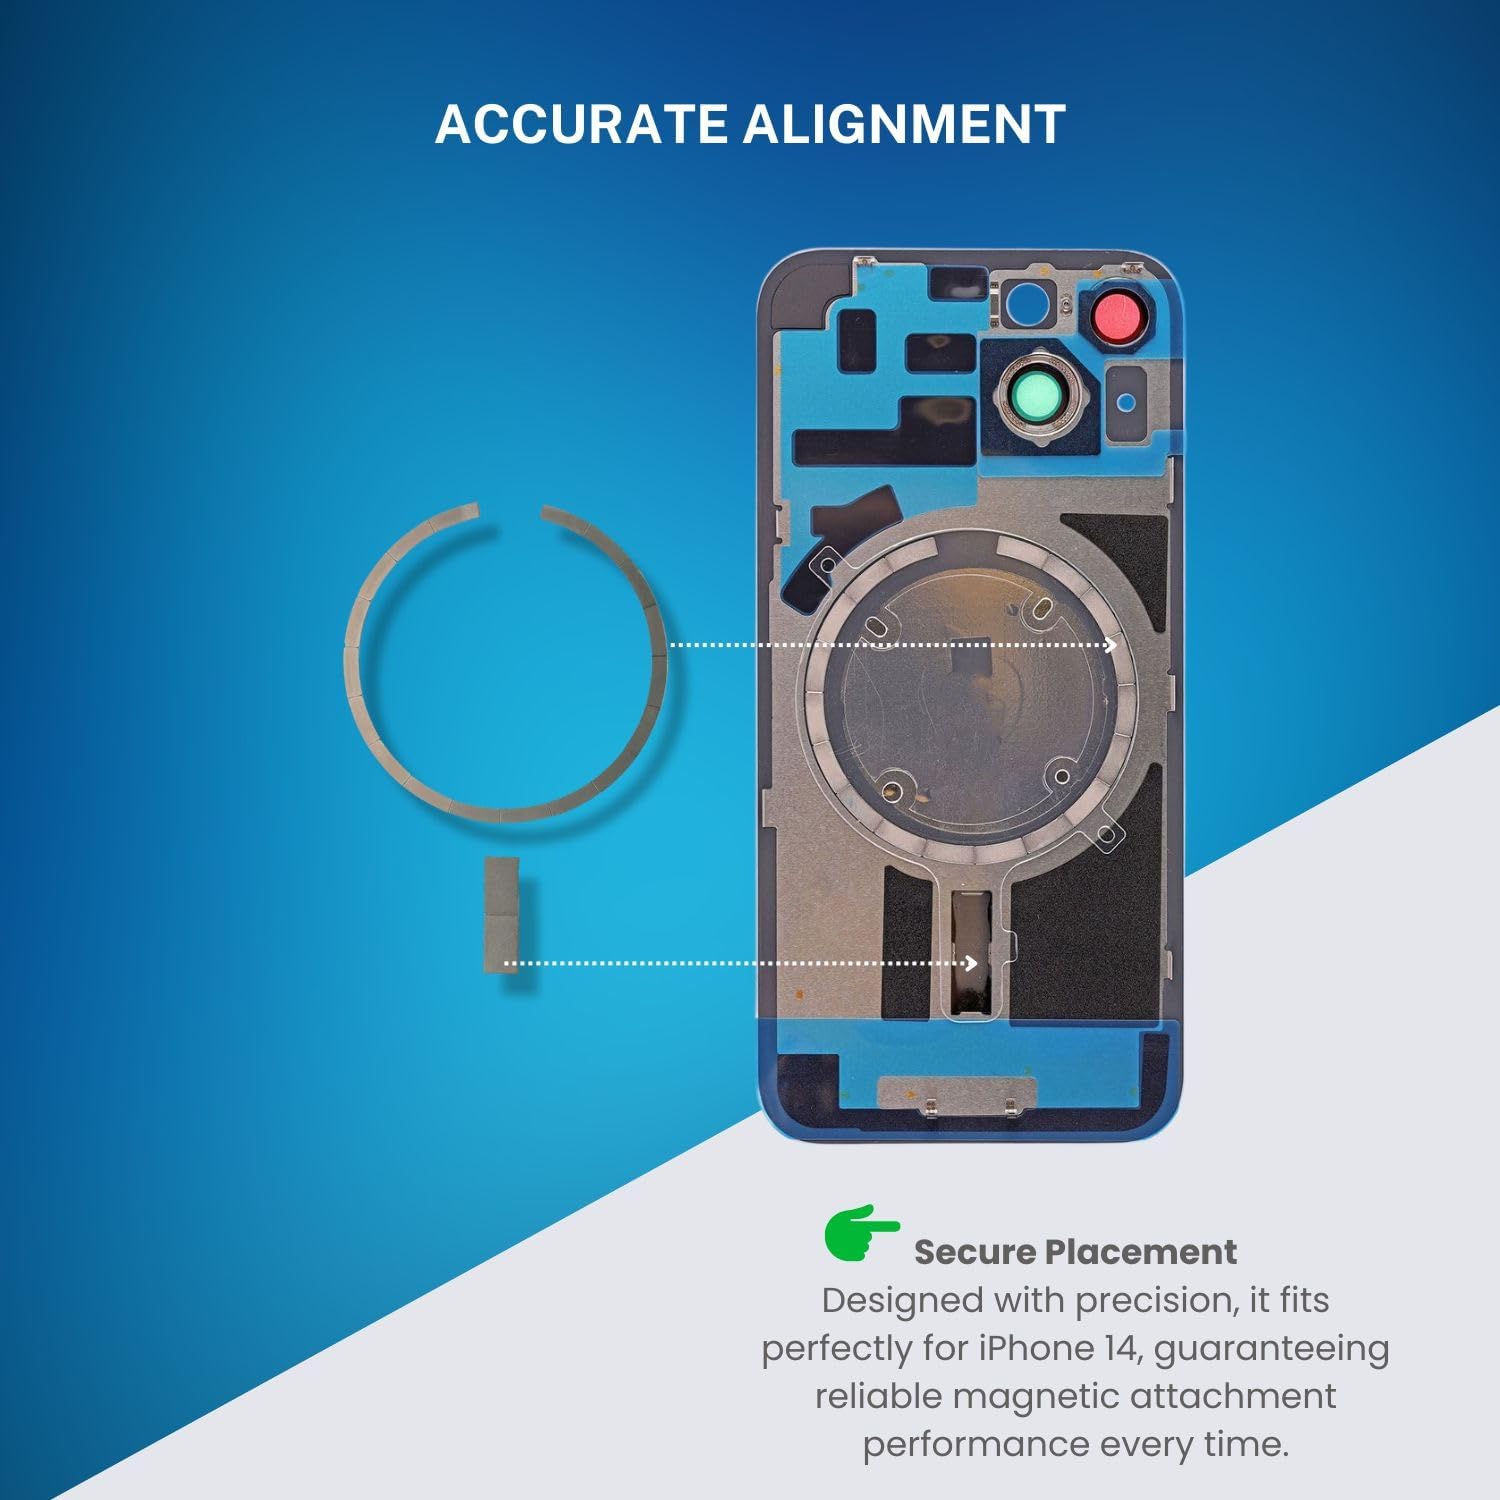
Image: A diagram illustrating the precise alignment of the MagSafe magnet within the iPhone's internal structure. This visual aids in correct positioning during installation.

Image: A visual representation of the seamless integration process, showing the new magnet being placed into the iPhone's back cover. This demonstrates how the part fits into the device.
Operating the Restored MagSafe Functionality
After successful installation of the MEEFIX Internal Magnet Replacement, your iPhone 14 or 14 Plus will regain its MagSafe capabilities. This means you can:
- Utilize MagSafe Wireless Chargers: Place your iPhone on any MagSafe-compatible wireless charger for efficient and secure power transfer. The magnet ensures optimal alignment for charging.
- Attach MagSafe Accessories: Connect various MagSafe accessories, such as wallets, battery packs, or car mounts, which will magnetically snap into place.
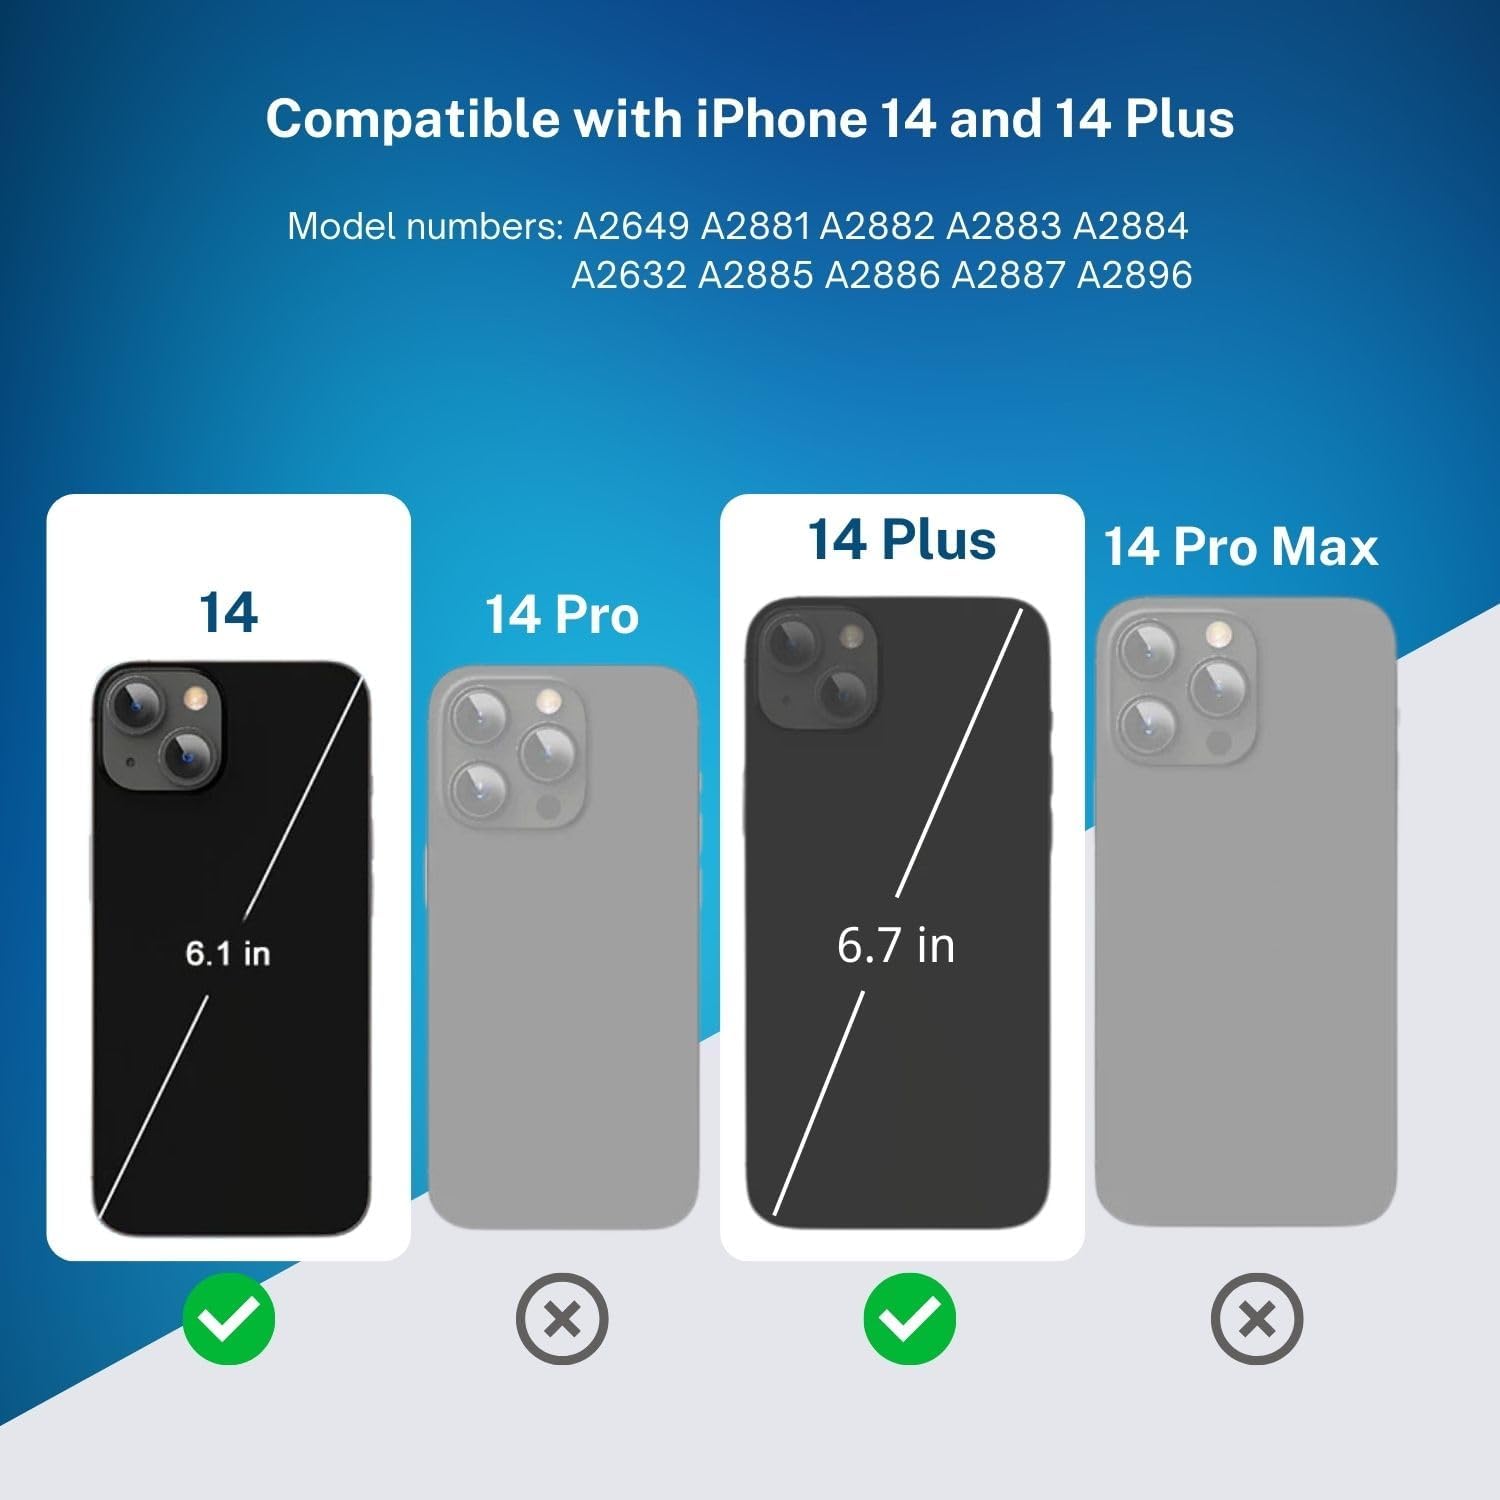
Image: An illustration depicting the seamless magnetic connection between an iPhone and a MagSafe accessory, highlighting the restored functionality. This image shows the product in use after installation.
Maintenance
The MEEFIX Internal Magnet Replacement is designed for durability and requires minimal maintenance once installed. To ensure continued optimal performance:
- Avoid Excessive Force: Do not apply excessive force or pressure to the back of your iPhone, especially around the MagSafe area, as this could dislodge the magnet or damage the adhesive.
- Keep Clean: Periodically clean the exterior of your iPhone and MagSafe accessories to prevent dust or debris from interfering with magnetic connections.
- Protect from Drops: While the magnet is securely installed, protecting your phone from drops and impacts is always recommended to prevent damage to internal components.
Troubleshooting
If you encounter issues after installing the MEEFIX Internal Magnet Replacement, consider the following:
- MagSafe Not Working:
- Check if the magnet is correctly aligned and securely adhered. Re-open the device if necessary to verify placement.
- Ensure the MagSafe charger or accessory is functional and compatible with your iPhone model.
- Restart your iPhone.
- Weak Magnetic Connection:
- Verify that no debris or foreign objects are between the iPhone and the MagSafe accessory.
- Confirm the magnet is fully seated and the adhesive has cured properly.
- Wireless Charging Issues:
- Ensure the wireless charger is powered on and functioning correctly.
- Remove any thick cases that might interfere with wireless charging.
- Check for proper alignment of the iPhone on the charging pad.
- Device Damage During Installation:
- If you suspect damage occurred during installation, it is recommended to seek professional repair services.
Specifications
| Feature | Detail |
|---|---|
| Brand | MEEFIX |
| Compatible Devices | iPhone 14, iPhone 14 Plus |
| Included Components | Internal Magnet Replacement |
| Special Feature | Strong magnetic, Pre-installed adhesive |
| Item Weight | 0.32 ounces |
| Package Dimensions | 4.7 x 2.7 x 0.1 inches |
| Model Number | For iPhone 14 and 14 Plus |
| ASIN | B0CMCYJLT4 |

Image: A compatibility chart indicating that the product is suitable for iPhone 14 and 14 Plus models, along with specific model numbers. This confirms device compatibility.
Warranty and Support
Warranty Information: Specific warranty details for this MEEFIX product are not provided within this manual. Please refer to the manufacturer's official website or contact their customer service for comprehensive warranty terms and conditions.
Customer Support: For further assistance, technical support, or inquiries regarding this product, please contact MEEFIX customer service through their official channels. Contact information can typically be found on the product packaging or the MEEFIX brand website.