Ralcam Articulating Borescope B0CMC6J8T5
Ralcam Articulating Borescope Inspection Camera User Manual
Model: Articulating Borescope (ASIN: B0CMC6J8T5)
Brand: Ralcam
1. Introduction
This user manual provides comprehensive instructions for the safe and effective operation, maintenance, and troubleshooting of your Ralcam Articulating Borescope Inspection Camera. This advanced industrial endoscope is designed for detailed visual inspection in hard-to-reach areas, featuring a flexible, articulating probe, a high-resolution display, and robust construction. Please read this manual thoroughly before using the device to ensure optimal performance and longevity.
2. Product Overview and Features
The Ralcam Articulating Borescope is equipped with a range of features to facilitate professional inspection tasks.
Key Components and Articulation

Figure 2.1: The Ralcam Articulating Borescope, showing the main unit with 4.5-inch IPS LCD screen and the flexible probe with its two-way 180° articulation capability. The articulation allows the camera tip to bend and navigate complex spaces.
High-Resolution Display and Camera

Figure 2.2: Close-up of the 4.5-inch IPS screen, providing a clear 1920x1080 resolution display for detailed inspection. This screen offers a significant visual improvement over smaller, lower-resolution displays.

Figure 2.3: Illustration of the 2-megapixel camera sensor and the arrangement of 8 adjustable LED lights at the probe tip, ensuring clear visibility in dark environments. The image also highlights the 30FPS frame rate and 1080P video capability.
Probe Design and Durability

Figure 2.4: The flexible snake tube probe, featuring two-way 180° steering for precise navigation. The probe is constructed with durable tungsten wire braid material, enhancing its resilience and longevity. The focal length range is indicated as 40mm-70mm.

Figure 2.5: The IP68 waterproof rating of the probe tip, allowing for inspection in wet or submerged environments without damage. This feature is crucial for plumbing, automotive, and marine applications.
Battery and Safety Features

Figure 2.6: The integrated 6000mAh high-capacity rechargeable battery, providing extended operating time for prolonged inspection tasks.

Figure 2.7: The unique high-temperature protection feature. The device operates normally below 85°C, displays a warning between 85°C and 90°C, and automatically powers off above 90°C to prevent damage.
Package Contents and Controls

Figure 2.8: The complete package contents, typically including the main borescope unit, flexible probe, USB charging cable, and user manual.
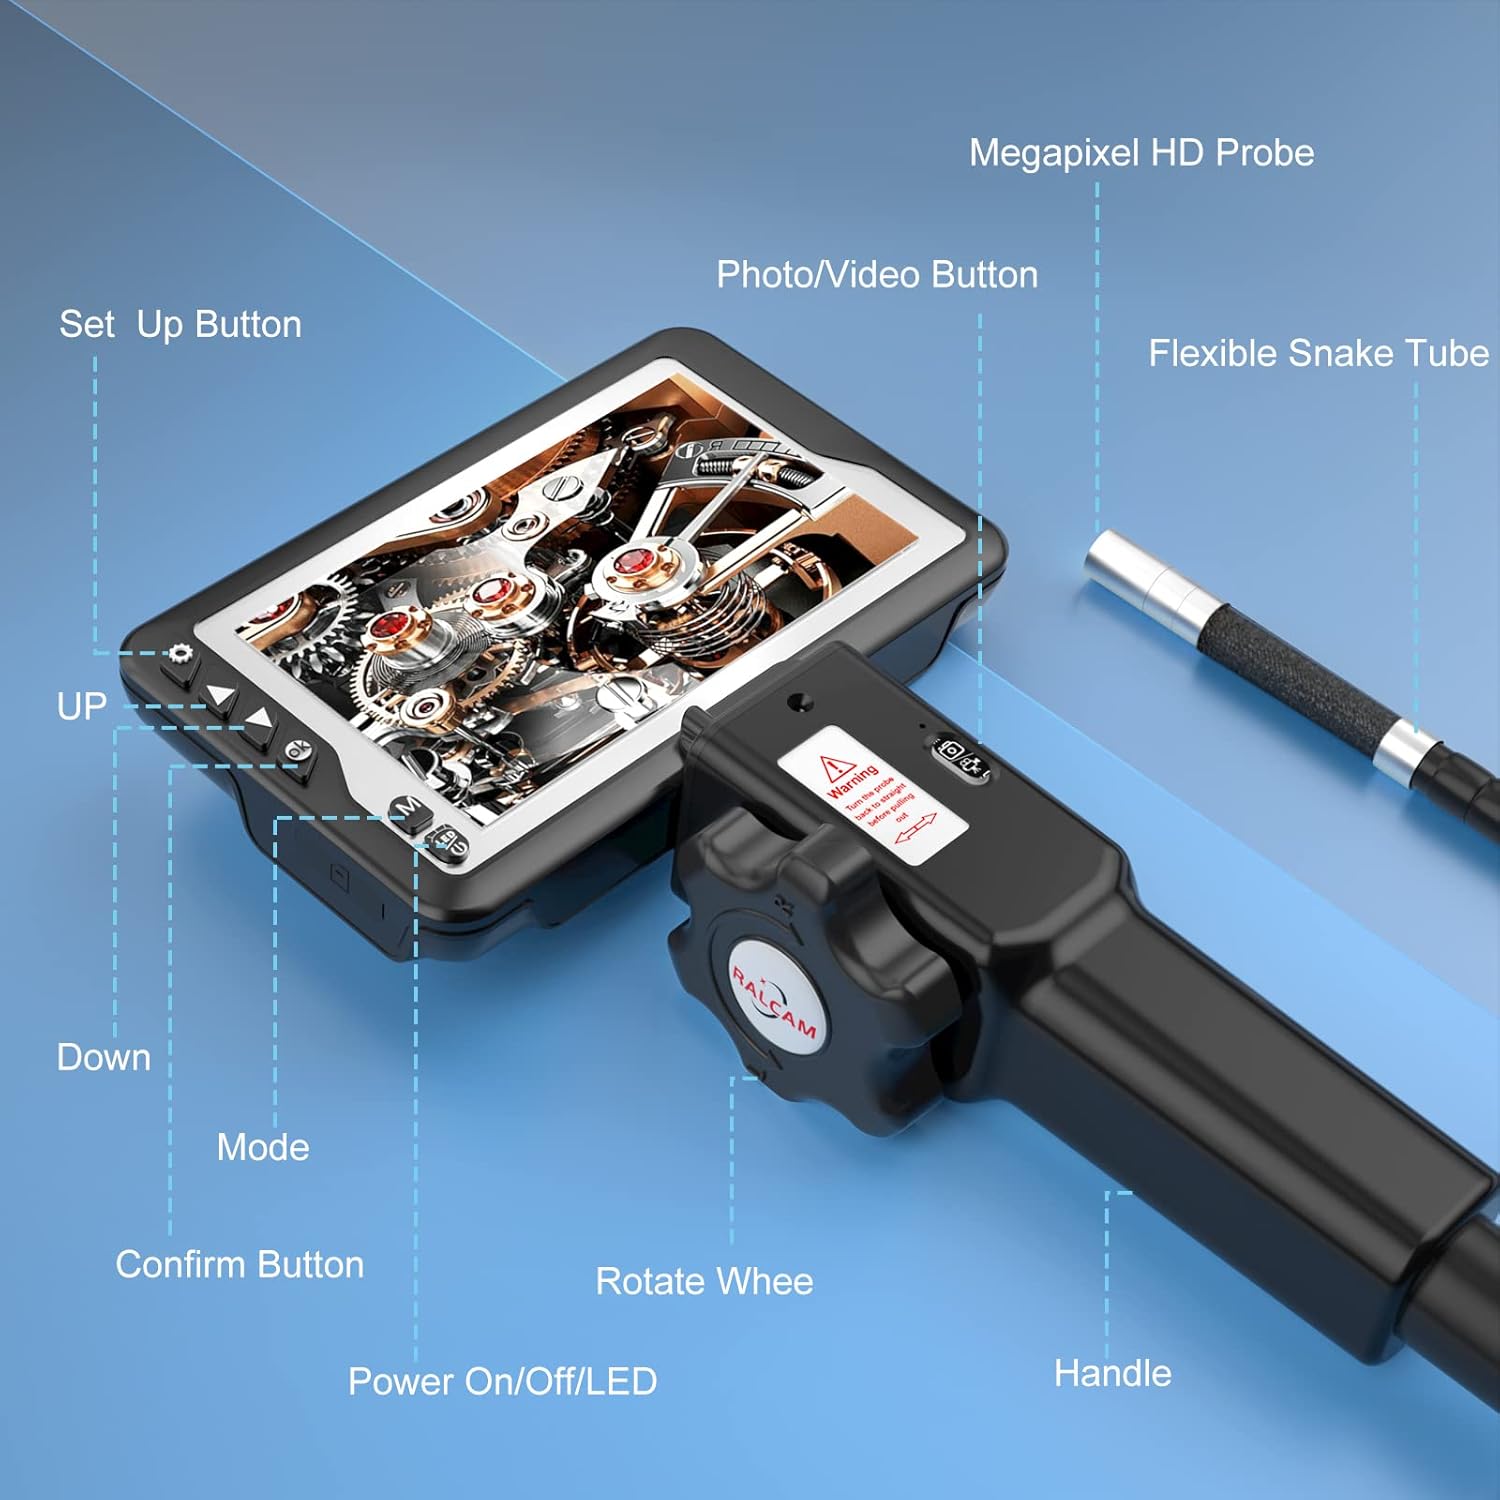
Figure 2.9: A detailed diagram labeling the various controls and components of the borescope, including the Set Up button, UP/Down navigation, Mode button, Confirm button, Power On/Off/LED button, Rotate Wheel for articulation, Photo/Video button, Flexible Snake Tube, Megapixel HD Probe, and Handle.
3. Setup
3.1 Unpacking
Carefully remove all components from the packaging. Verify that all items listed in the "Package Contents" section (Figure 2.8) are present and undamaged. Retain the packaging for future storage or transport.
3.2 Charging the Battery
Before first use, fully charge the integrated 6000mAh rechargeable battery.
- Connect the provided USB charging cable to the charging port on the borescope unit.
- Connect the other end of the USB cable to a standard USB power adapter (not included) or a computer USB port.
- The charging indicator light (if present) will illuminate, typically red, and turn green when fully charged.
- Charging time may vary, but typically takes several hours for a full charge.
3.3 Attaching the Probe
Ensure the borescope unit is powered off before attaching or detaching the probe.
- Align the connector of the flexible snake tube probe with the port on the main unit's handle.
- Gently push the probe connector into the port until it clicks securely into place.
- To detach, press the release button (if present) or pull firmly but gently on the connector.
4. Operating Instructions
4.1 Powering On/Off
- To Power On: Press and hold the "Power On/Off/LED" button (refer to Figure 2.9) for a few seconds until the screen illuminates.
- To Power Off: Press and hold the "Power On/Off/LED" button again until the screen turns off.
4.2 Adjusting LED Brightness
While the device is powered on, short press the "Power On/Off/LED" button to cycle through different LED brightness levels. There are 8 adjustable LEDs to provide optimal illumination.
4.3 Articulating the Probe
The probe features two-way 180° articulation for precise control of the camera's viewing angle.
- Rotate the "Rotate Wheel" (refer to Figure 2.9) on the handle to articulate the probe tip left or right.
- Turn the wheel clockwise to bend the probe in one direction and counter-clockwise for the opposite direction.
- Important: Always ensure the probe is straightened before pulling it out of any confined space to prevent damage (as indicated by the warning sticker in Figure 2.1).
4.4 Capturing Images and Videos
- To Capture an Image: Short press the "Photo/Video Button" (refer to Figure 2.9) to take a still photograph. A capture icon or sound may confirm the action.
- To Record Video: Press and hold the "Photo/Video Button" for a few seconds to start video recording. A recording indicator (e.g., a red dot or timer) will appear on the screen. Press and hold again to stop recording.
- Captured media is saved to the internal memory or an inserted SD card (if applicable).
4.5 Menu Navigation and Settings
Use the "Set Up Button", "UP", "Down", "Mode", and "Confirm Button" (refer to Figure 2.9) to navigate the device's menu and adjust settings.
- Press "Set Up" to enter the main menu.
- Use "UP" and "Down" to scroll through menu options.
- Press "Confirm Button" to select an option or enter a sub-menu.
- The "Mode" button may switch between photo, video, and playback modes.
4.6 High Temperature Protection
The device incorporates a high-temperature protection system to prevent damage (refer to Figure 2.7).
- Below 85°C: Normal operation.
- 85°C - 90°C: A warning will appear on the screen, indicating high temperature.
- Above 90°C: The device will automatically power off to protect internal components. Allow the device to cool down before resuming operation.
5. Maintenance
5.1 Cleaning the Probe and Lens
- After each use, especially in dirty or wet environments, gently wipe the probe and camera lens with a soft, damp cloth.
- For stubborn dirt, use a small amount of mild, non-abrasive cleaning solution on the cloth. Do not spray liquids directly onto the probe or main unit.
- Ensure the lens is free of smudges or debris for clear image quality.
5.2 Battery Care
- To prolong battery life, avoid fully discharging the battery frequently.
- If storing the device for an extended period, charge the battery to approximately 50-70% capacity.
- Recharge the battery every 3-6 months during storage to prevent deep discharge.
5.3 Storage
- Store the borescope in a cool, dry place, away from direct sunlight and extreme temperatures.
- Use the original carrying case (if provided) to protect the device from dust and physical damage.
- Ensure the probe is not sharply bent or kinked during storage.
6. Troubleshooting
Common Issues and Solutions
| Problem | Possible Cause | Solution |
|---|---|---|
| Device does not power on. | Battery is depleted. | Charge the battery fully. |
| No image on screen / Blurry image. | Lens is dirty or damaged; LED brightness too low/high; Probe not connected properly. | Clean the lens. Adjust LED brightness. Ensure probe is securely connected. Check focal length (40-70mm). |
| Probe articulation is stiff or unresponsive. | Mechanical obstruction; Internal damage. | Ensure no external obstruction. Do not force articulation. If issue persists, contact support. |
| Device shuts down unexpectedly. | Overheating; Low battery. | Allow device to cool down. Recharge battery. Avoid operating in environments above 90°C. |
| Cannot save photos/videos. | Memory full; No SD card (if required); File system error. | Delete old files. Insert a compatible SD card. Format SD card (backup data first). |
If the problem persists after attempting these solutions, please contact Ralcam customer support for further assistance.
7. Specifications
| Feature | Detail |
|---|---|
| Display | 4.5-inch IPS LCD |
| Display Resolution | 1920 x 1080 pixels (1080P HD) |
| Camera Resolution | 2 Megapixels |
| Probe Diameter | 8.5mm |
| Articulation Angle | Two-way 180° steering |
| LED Lights | 8 adjustable LEDs |
| Focal Length | 40mm - 70mm |
| Battery Capacity | 6000mAh Rechargeable Lithium Battery |
| Water Resistance | IP68 (Probe only) |
| Operating Temperature | Normal: <85°C; Warning: 85°C - 90°C; Auto-shutdown: >90°C |
| Connectivity Technology | Wi-Fi (as per product specifications, though not explicitly detailed in images for user interaction) |
| Audio Recording | Yes (as per product specifications) |
8. Warranty and Support
Ralcam products are manufactured to high-quality standards. For information regarding warranty coverage, technical support, or service, please refer to the warranty card included with your product or visit the official Ralcam website.
When contacting support, please have your product model (ASIN: B0CMC6J8T5) and purchase details ready.
Ask a question about this manual
Ask about setup, troubleshooting, compatibility, parts, safety, or missing instructions. Manuals+ will review the question and use this page’s manual context to help answer it.