Introduction
This manual provides detailed instructions for the setup, operation, and maintenance of your Seismic Audio Slider10 10-Channel Mixer Console. Designed for versatility, this mixer integrates essential features for various audio applications, from live sound to studio recording and content creation.
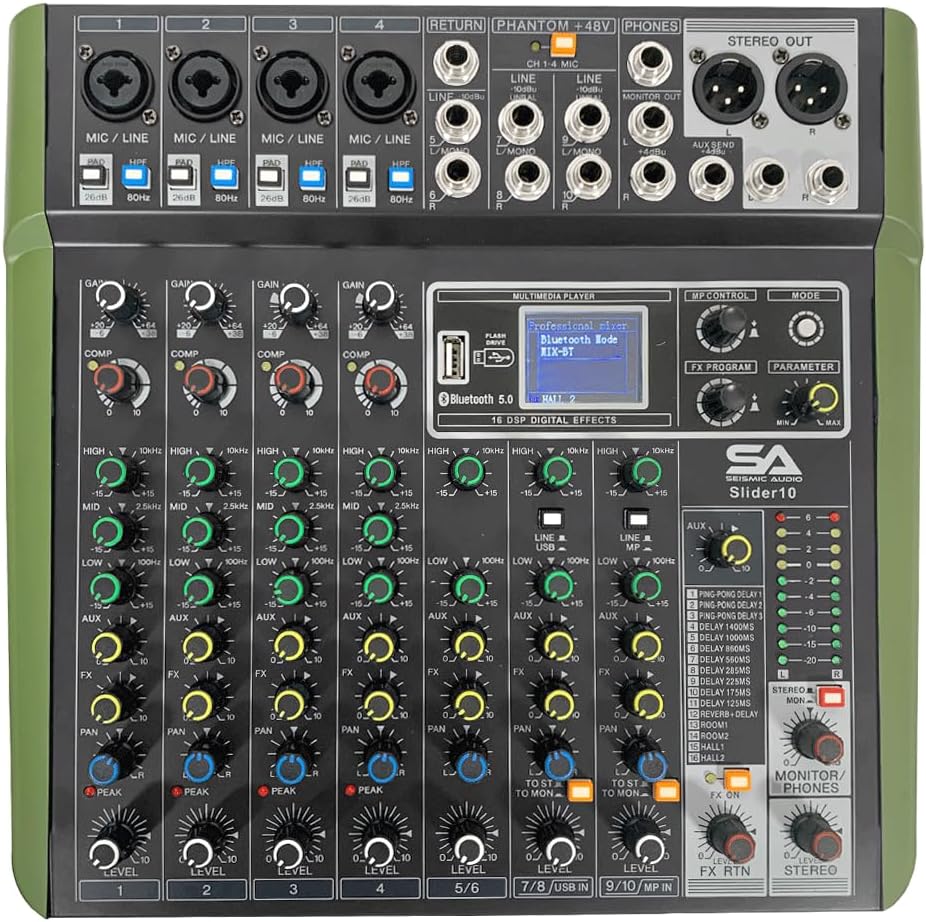
Figure 1: Top view of the Seismic Audio Slider10 mixer, showcasing its control layout.
Setup
1. Unpacking and Inspection
Carefully remove the mixer from its packaging. Inspect the unit for any signs of damage that may have occurred during transit. Ensure all included accessories, such as the AC adaptor and owner's manual, are present.
2. Power Connection
Connect the provided AC adaptor to the DC INPUT port on the rear of the mixer. Plug the adaptor into a suitable power outlet. Ensure the POWER switch is in the OFF position before connecting to power.

Figure 2: Rear panel of the Slider10, highlighting the power input and USB 2.0 port.
3. Initial Connections
Before powering on, connect your microphones, instruments, and other audio sources to the appropriate input channels. For microphones, use the XLR balanced inputs. For line-level sources, use the 6.35mm (1/4 inch) inputs.
- Microphone Inputs: Use XLR cables for condenser or dynamic microphones. The mixer provides +48V phantom power for condenser microphones.
- Line Inputs: Use 6.35mm (1/4 inch) cables for instruments or other line-level devices.
- Main Outputs: Connect your main speakers or recording interface to the XLR or 6.35mm STEREO OUT ports.
- Headphones: Connect headphones to the PHONES output for monitoring.
Operating Instructions
1. Channel Layout and Controls
The Slider10 features 10 input channels: 4 mono Mic/Line inputs and 3 stereo Line inputs. Each channel is equipped with controls for gain, equalization, effects send, and level. The layout is designed for intuitive operation.

Figure 3: Angled view of the Slider10, illustrating the faders and various control knobs for each channel.
- GAIN/TRIM: Adjusts the input sensitivity for each channel.
- PAD Switch: Reduces input signal by 26dB for high-level sources (mono channels only).
- HPF (High-Pass Filter): Cuts frequencies below 80Hz to reduce unwanted low-end noise (mono channels only).
- COMPRESSOR: A single-knob compressor on all channels to reduce the dynamic range and prevent clipping.
- 3-Band EQ: High (12 kHz shelving), Mid (2.5 kHz shelving), and Low (80 Hz shelving) controls for tone shaping.
- FX Send: Controls the amount of signal sent to the internal DSP effects processor.
- PAN: Adjusts the stereo position of the channel signal.
- LEVEL Fader: Controls the output level of each channel to the main mix.
- PFL (Pre-Fader Listen): Allows monitoring of the channel signal before the fader.
- ON/OFF Switch: Mutes or unmutes the channel.
2. Bluetooth Connectivity
The Slider10 features built-in Bluetooth 5.0 for wireless audio streaming. This allows you to play background music or backing tracks directly from a Bluetooth-enabled device like a smartphone or tablet without additional cables.
- Press the MODE button on the multimedia player section until "bt" appears on the display.
- On your Bluetooth device, search for "DEJASOUND FX-8" and pair.
- Once connected, audio from your device will stream through the mixer. Adjust the TAPE/USB fader to control the volume.

Figure 4: The multimedia player section, showing the digital display and Bluetooth indicator.
3. USB Interface and MP3 Playback
The mixer includes a USB 2.0 interface for direct connection to a PC, enabling 24-bit/192kHz audio recording and playback. Additionally, you can play MP3 files directly from a USB flash drive.
- USB Audio Interface: Connect the mixer to your computer using a USB cable. The mixer will be recognized as an audio device, allowing you to record your mix or play audio from your computer through the mixer.
- MP3 Playback: Insert a USB flash drive containing MP3 files into the USB port. Use the multimedia player controls (REP, NEX, PLAY, MODE) to navigate and play tracks. Adjust the TAPE/USB fader for volume control.
4. DSP Effects
The Slider10 features 16 built-in high-quality DSP effects, offering a range of options including reverb, delay, chorus, and more. These effects can be applied to individual channels or the main mix.
- Turn the PROGRAM (PUSH) knob to select an effect number (1-16). The selected effect number will be displayed.
- Push the PROGRAM knob to confirm the selection.
- Adjust the FX send knob on each channel to control how much of that channel's signal is sent to the effects processor.
- Use the FX RETURN fader to control the overall level of the effects in the main mix.

Figure 5: Detail of the DSP effects section, showing the program selection knob and display.
5. Monitoring
The mixer provides clear level displays and a dedicated headphone output for accurate monitoring of your audio.
- LED Level Meters: Monitor the main output levels using the LED meters located near the main faders. Aim for levels that are strong but do not consistently peak into the red, which indicates clipping.
- Headphone Output: Use the PHONES output with headphones to listen to the main mix or individual channels (via PFL). Adjust the PHONES level knob for comfortable listening.
Specifications
| Feature | Specification |
|---|---|
| Model | Slider10 |
| Input Channels | 4 Mono Mic/Line, 3 Stereo Line, 1 Mono Return |
| Output Channels | 2 Stereo Out (XLR & 6.35mm), 1 Monitor Out, 1 Phones, 1 Aux Send |
| DSP Effects | 16 Built-In High Quality Effects |
| EQ | 3-Band (High: 12 kHz, Mid: 2.5 kHz, Low: 80 Hz) |
| Phantom Power | +48V |
| USB Audio Interface | 24-bit / 192kHz, USB 2.0 Compliant |
| Bluetooth | Bluetooth 5.0 for Wireless Streaming |
| Dimensions | 11.25" x 11.75" x 2.5" |
| Weight | 4.7 lbs |
| Power Requirements | AC 100-240 V, 50/60Hz |
Troubleshooting
- No Sound Output:
- Ensure the mixer is powered on and connected correctly to speakers or headphones.
- Check all channel LEVEL faders and the MAIN L/R faders are raised.
- Verify input sources are connected properly and their gain/level controls are set appropriately.
- If using phantom power, ensure it is activated for condenser microphones.
- Distorted Sound:
- Reduce the GAIN/TRIM on the input channel.
- Check the LED level meters; if they are consistently in the red, reduce input or output levels.
- Ensure the PAD switch is engaged for very loud input sources.
- Check for damaged cables or faulty connections.
- Bluetooth Connection Issues:
- Ensure the mixer's multimedia player is in Bluetooth mode ("bt" displayed).
- Verify Bluetooth is enabled on your streaming device and it is within range.
- Try unpairing and re-pairing the device.
- USB Recording/Playback Problems:
- Ensure the USB cable is securely connected to both the mixer and your computer.
- Verify the mixer is selected as the audio input/output device in your computer's sound settings and recording software.
- For MP3 playback, ensure the USB flash drive is formatted correctly and contains compatible audio files.
Maintenance
To ensure the longevity and optimal performance of your Slider10 mixer, follow these simple maintenance guidelines:
- Cleaning: Use a soft, dry cloth to clean the exterior of the mixer. Avoid using abrasive cleaners, solvents, or waxes.
- Storage: Store the mixer in a cool, dry place away from direct sunlight and extreme temperatures.
- Handling: Always handle the mixer with care. Avoid dropping or subjecting it to strong impacts.
- Ventilation: Ensure proper ventilation around the unit to prevent overheating. Do not block any ventilation openings.
Warranty and Support
For warranty information, technical support, or service inquiries, please refer to the official Seismic Audio website or contact their customer service department. Keep your purchase receipt as proof of purchase for warranty claims.
This product is designed to provide reliable performance. Should you encounter any issues not covered in this manual, professional assistance is recommended.