Introduction
This manual provides comprehensive instructions for the JIARUIXIN JR1839 2.4G Bluetooth Remote Control, designed for use with children's electric ride-on cars. Please read this manual carefully before use to ensure proper operation and safety.
Setup
1. Battery Installation
The remote control requires two AAA (1.5V) batteries. To install, locate the battery compartment on the back of the remote, loosen the screw, and insert the batteries according to the polarity markings. Secure the cover by tightening the screw.
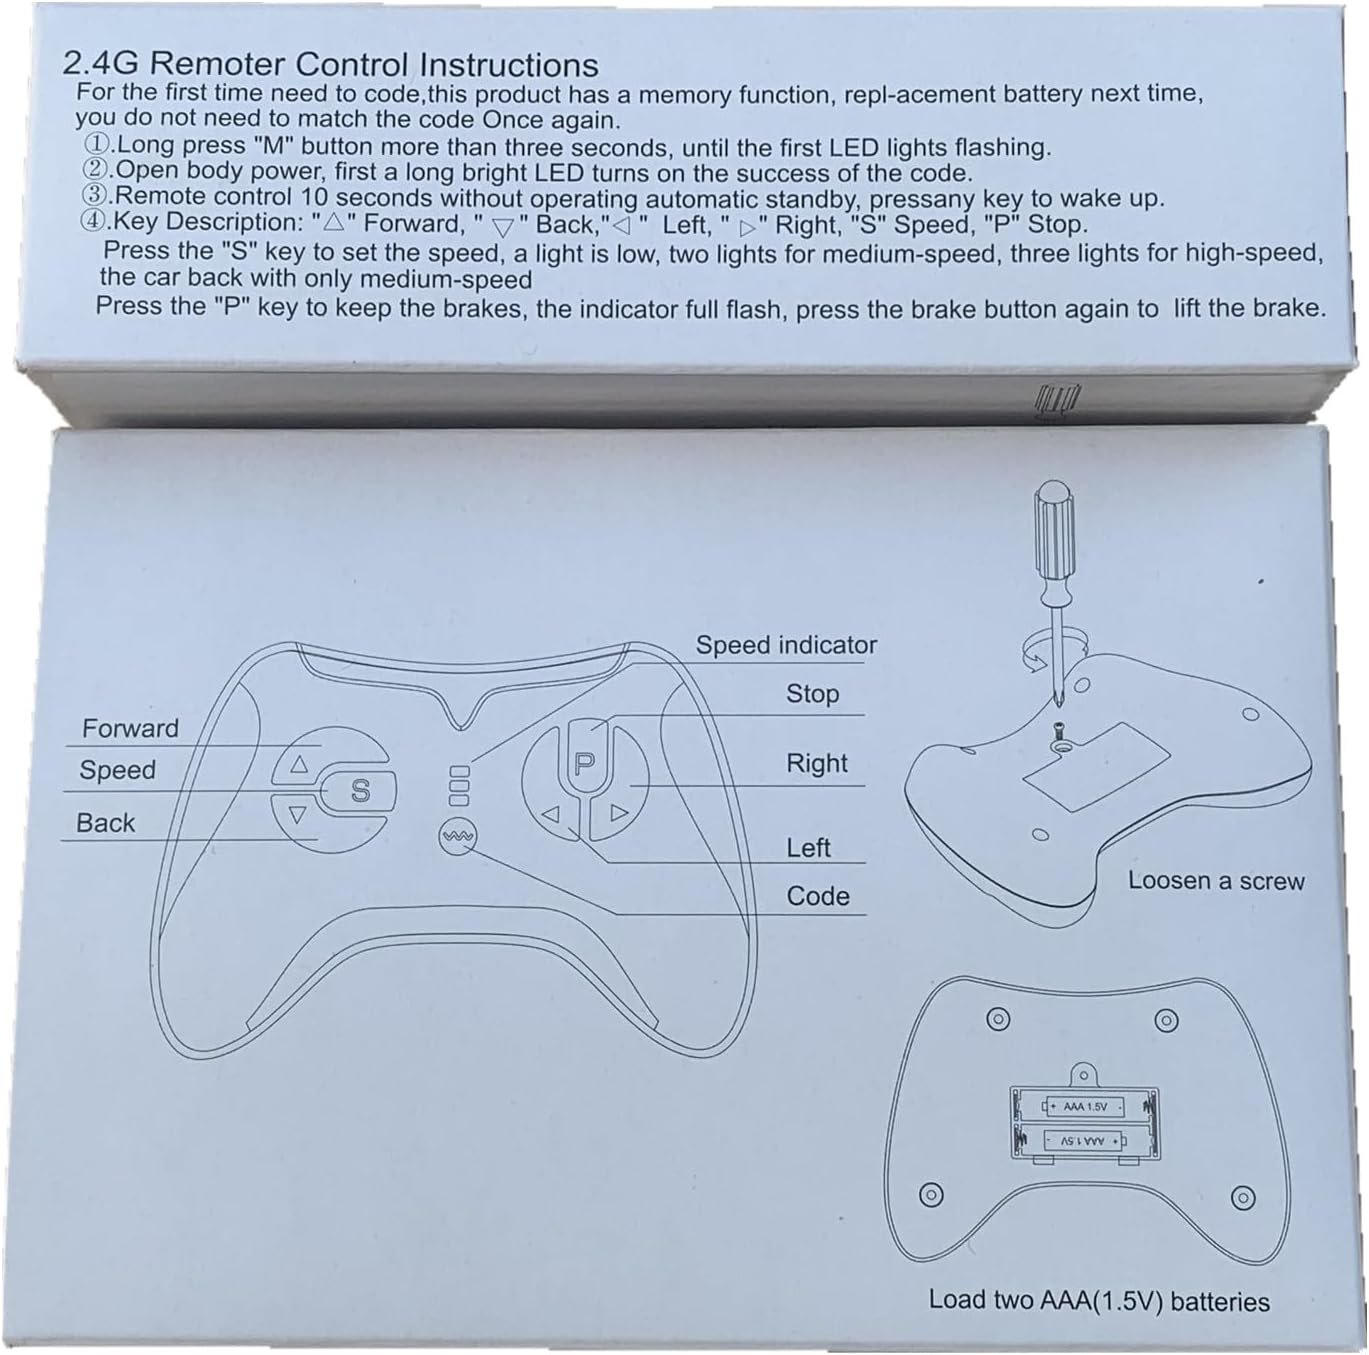
Figure 1: Remote control diagram illustrating battery compartment and button functions.

Figure 2: Rear view of the remote control, highlighting the battery cover.
2. Pairing (Match Code) Instructions
Follow these steps to pair the remote control with your electric ride-on car:
- Ensure the remote control has fresh batteries installed.
- Turn off the power switch on the electric ride-on vehicle.
- On the remote control, press and hold the "▲" (Forward) and "▼" (Back) keys simultaneously for 3 seconds. The first LED indicator on the remote will begin to flicker, indicating it is in pairing mode.
- While the remote's LED is flickering, turn on the power switch of the electric ride-on vehicle.
- The red indicator light on the remote should stop flashing and remain solid, indicating successful pairing.
- If pairing is unsuccessful, turn off both devices and repeat the steps. The remote control has a memory function, so re-pairing is generally not required after battery replacement.

Figure 3: Detailed pairing instructions and remote control layout.
Operating Instructions
Familiarize yourself with the remote control buttons and their functions:

Figure 4: Front view of the JR1839 remote control.
- ▲ (Forward): Moves the vehicle forward.
- ▼ (Back): Moves the vehicle backward.
- ◀ (Left): Turns the vehicle left.
- ▶ (Right): Turns the vehicle right.
- S (Speed): Press this button to cycle through speed settings.
- 1 LED lit: Low speed
- 2 LEDs lit: Medium speed
- 3 LEDs lit: High speed
- P (Brake/Stop): Press and hold this key to engage the brake. All LED indicators will flicker while the brake is active. Release the key to disengage the brake.
The remote control is intended for use by adults to supervise and control the ride-on vehicle for children.
Maintenance
- Keep the remote control dry and away from moisture.
- Clean the remote control with a soft, dry cloth. Do not use harsh chemicals or abrasive cleaners.
- Replace batteries promptly when the remote's performance degrades. Always use new AAA (1.5V) batteries.
- Store the remote control in a safe place when not in use, away from extreme temperatures.
Troubleshooting
- Remote not responding:
- Check if the batteries are correctly installed and have sufficient charge. Replace if necessary.
- Ensure the remote is properly paired with the ride-on car by following the "Pairing Instructions" section.
- Verify that the ride-on car's power switch is on and its battery is charged.
- Interference issues:
- This device complies with Part 15 of the FCC Rules. Operation is subject to the following two conditions: (1) This device may not cause harmful interference, and (2) This device must accept any interference received, including interference that may cause undesired operation.
- If interference occurs, try reorienting or relocating the receiving antenna.
- Increase the separation between the equipment and receiver.
- Connect the equipment into an outlet on a circuit different from that to which the receiver is connected.
- Consult the dealer or an experienced radio/TV technician for help.
- Remote control not pairing:
- Ensure the ride-on car is turned off before initiating the pairing sequence.
- Hold the "▲" and "▼" keys for the full 3 seconds until the LED flickers.
- Turn on the car's power switch immediately after the remote enters pairing mode.
Important: Changes or modifications to this unit not expressly approved by the party responsible for compliance could void the user's authority to operate the equipment.
Specifications
| Model | JR1839 |
| Brand | JIARUIXIN |
| Connectivity Technology | 2.4G Bluetooth |
| Controller Type | Gamepad |
| Color | Black |
| Power Supply | DC 3.0V (2 x 1.5V AAA batteries, not included) |
| Frequency | 2.407GHz-2.473GHz (Peak output power: 5dBm) |
| Product Dimensions | 4.9 x 3.8 x 2 inches |
| Item Weight | 2.88 ounces |
Warranty and Support
For warranty information or technical support, please contact the manufacturer or your retailer. Ensure you have your product model number (JR1839) and purchase details available when seeking assistance.
The remote controller is only to be used with adult's guidance.
FCC Compliance Statement
This device complies with part 15 of the FCC Rules. Operation is subject to the following two conditions:
- This device may not cause harmful interference.
- This device must accept any interference received, including interference that may cause undesired operation.
Note: This equipment has been tested and found to comply with the limits for a Class B digital device, pursuant to Part 15 of the FCC Rules. These limits are designed to provide reasonable protection against harmful interference in a residential installation. This equipment generates, uses and can radiate radio frequency energy and, if not installed and used in accordance with the instructions, may cause harmful interference to radio communications. However, there is no guarantee that interference will not occur in a particular installation. If this equipment does cause harmful interference to radio or television reception, which can be determined by turning the equipment off and on, the user is encouraged to try to correct the interference by one or more of the following measures:
- Reorient or relocate the receiving antenna.
- Increase the separation between the equipment and receiver.
- Connect the equipment into an outlet on a circuit different from that to which the receiver is connected.
- Consult the dealer or an experienced radio/TV technician for help.
The device has been evaluated to meet general RF exposure requirement. The device can be used in portable exposure condition without restriction.

