
IPC672LR-AX4DUPKC
Uniview IPC672LR-AX4DUPKC 2MP IR WDR 2D/3D DNR LightHunter Active Deterrence Outdoor Network Ultra 265 PoE PTZ Dome Camera User Manual
Model: IPC672LR-AX4DUPKC | Brand: Generic (Manufactured by Uniview)
1. Introduction
This manual provides comprehensive instructions for the installation, operation, and maintenance of the Uniview IPC672LR-AX4DUPKC 2MP IR WDR 2D/3D DNR LightHunter Active Deterrence Outdoor Network Ultra 265 PoE PTZ Dome Camera. This advanced surveillance camera is designed for outdoor security applications, offering high-resolution imaging, robust night vision capabilities, and intelligent deterrence features.
Key features include LightHunter illumination for superior low-light performance, Wide Dynamic Range (WDR) for clear images in varying light conditions, and advanced noise reduction (2D/3D DNR). It supports Ultra 265 video compression for efficient storage and bandwidth usage, and features a built-in microphone and speaker for two-way audio, along with an alarm light for active deterrence. The camera's motorized zoom lens allows for flexible field of view adjustments.
2. Safety Information
Please read all safety instructions carefully before installation and operation to prevent damage and ensure proper functioning.
- Power Supply: Use only the specified Power over Ethernet (PoE) or external power supply. Ensure the power source meets the camera's voltage requirements.
- Installation Environment: Install the camera in a stable location that can support its weight. Avoid direct exposure to extreme temperatures, humidity, or corrosive environments. Ensure proper ventilation.
- Water and Moisture: The camera is rated IP66 for outdoor use, providing protection against dust and powerful water jets. However, do not immerse the camera in water.
- Cleaning: Disconnect power before cleaning. Use a soft, dry cloth. Do not use strong detergents or abrasive cleaners.
- Servicing: Do not attempt to disassemble or modify the camera. Refer all servicing to qualified personnel.
3. Package Contents
Verify that all items are present and in good condition upon unpacking:
- Uniview IPC672LR-AX4DUPKC PTZ Dome Camera
- Mounting Bracket and Screws
- Waterproof Connector Kit
- Drilling Template
- Quick Start Guide
- Warranty Card (if applicable)
4. Product Overview
The IPC672LR-AX4DUPKC camera integrates advanced features for reliable surveillance.
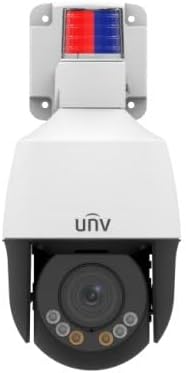
Figure 4.1: Front view of the IPC672LR-AX4DUPKC camera, showing the dome lens, IR illuminators, and the active deterrence alarm light at the top.
- Motorized Zoom Lens: 2.8-12mm AF automatic focusing lens for flexible field of view.
- IR Illuminators: Provides infrared light for night vision up to 50m (164 ft).
- Warm Light: Additional illumination for color night vision up to 10m (33 ft).
- Alarm Light: Integrated red and blue alarm light for active deterrence.
- Built-in Microphone & Speaker: Enables two-way audio communication.
- Ethernet Port (PoE): For network connection and power supply.

Figure 4.2: Feature icons highlighting LightHunter technology, WDR, Ultra H.265 compression, Edge Storage, Built-in Microphone, and Power over Ethernet (PoE).
Advanced Features:
- LightHunter Illumination: Enhances low-light performance for clear images in challenging conditions.
- Optical WDR (Wide Dynamic Range): Up to 120 dB for balanced exposure in scenes with both bright and dark areas.
- 2D/3D DNR (Digital Noise Reduction): Reduces image noise for cleaner video streams.
- Ultra 265 Compression: Efficient video compression standard, also supporting H.265, H.264, and MJPEG.
- Triple Streams: Allows for multiple video streams at different resolutions and bitrates.
- ROI (Region of Interest): Focuses encoding resources on specific areas for higher quality.
5. Setup and Installation
Follow these steps for proper installation of your camera.
5.1 Mounting the Camera
- Choose a Location: Select an outdoor location that provides the desired viewing angle and is within range of your network infrastructure. Consider the camera's IP66 rating for weather resistance.
- Prepare the Surface: Use the provided drilling template to mark the screw holes on the mounting surface.
- Drill Holes: Drill pilot holes according to the template. Insert wall anchors if mounting on masonry or drywall.
- Attach Mounting Bracket: Secure the mounting bracket to the surface using the supplied screws.
- Attach Camera: Mount the camera onto the bracket, ensuring it is securely fastened.
5.2 Network and Power Connection
The camera supports Power over Ethernet (PoE) for simplified installation, requiring only a single Ethernet cable for both power and data.

Figure 5.1: An Ethernet cable, used for both power and data with PoE-enabled cameras.
- Connect Ethernet Cable: Connect one end of an Ethernet cable to the camera's Ethernet port. Use the waterproof connector kit to ensure a sealed connection for outdoor use.
- Connect to PoE Switch/NVR: Connect the other end of the Ethernet cable to a PoE-enabled network switch or a Network Video Recorder (NVR) with PoE ports.
- Alternative Power (if not using PoE): If PoE is not available, connect a compatible 12V DC power adapter (not included) to the camera's power input.
- Network Configuration: Refer to the camera's Quick Start Guide or the full user manual (available online) for initial network configuration, including setting up IP addresses and accessing the camera's web interface.
6. Operating the Camera
Once installed and configured, you can begin operating your Uniview PTZ Dome Camera.
6.1 Accessing Live View
- Via NVR/DVR: If connected to an NVR, access the live view directly through the NVR's interface or connected monitor.
- Via Web Browser: Enter the camera's IP address into a web browser on a computer connected to the same network. Log in using your credentials.
- Via Mobile App: Download the official Uniview mobile application (if available) and add your camera for remote viewing.

Figure 6.1: Example of a multi-camera surveillance feed displayed on a monitor.
6.2 PTZ Control and Zoom
The camera features Pan, Tilt, and Zoom (PTZ) capabilities with a 2.8-12mm motorized zoom lens.
- Pan/Tilt: Use the PTZ controls in your NVR interface, web browser, or mobile app to remotely adjust the camera's horizontal (pan) and vertical (tilt) viewing angles.
- Zoom: Utilize the zoom controls to optically zoom in or out, adjusting the focal length from 2.8mm (wide) to 12mm (telephoto). The automatic focusing (AF) ensures clear images at all zoom levels.

Figure 6.2: Remote monitoring of camera feeds via a tablet device.
6.3 Night Vision and Active Deterrence
- IR Night Vision: The camera automatically switches to IR mode in low light, providing clear black and white images up to 50m (164 ft).
- Warm Light: For enhanced color night vision, the camera can utilize its warm light illuminator up to 10m (33 ft).
- Active Deterrence: Configure motion detection or other events to trigger the built-in alarm light and audible warnings via the speaker, deterring intruders.
7. Maintenance
Regular maintenance ensures optimal performance and longevity of your camera.
- Lens Cleaning: Gently wipe the lens with a soft, lint-free cloth. For stubborn dirt, use a lens cleaning solution designed for optical surfaces. Do not use abrasive materials.
- Housing Cleaning: Clean the camera housing with a damp cloth. Avoid harsh chemicals.
- Firmware Updates: Periodically check the manufacturer's website (Uniview) for firmware updates. Updating firmware can improve performance, add new features, and enhance security.
- Cable Inspection: Regularly inspect all cables and connections for signs of wear or damage, especially for outdoor installations.
8. Troubleshooting
Refer to this section for common issues and their solutions.
| Problem | Possible Cause | Solution |
|---|---|---|
| No Power | No PoE power; faulty power adapter; loose connection. | Verify PoE switch/NVR is supplying power; check power adapter and connections. |
| No Video Feed | Network issue; incorrect IP address; camera offline; firewall blocking. | Check network cable; verify camera's IP address; restart camera/NVR/router; check firewall settings. |
| Poor Image Quality | Dirty lens; improper focus; low bandwidth; insufficient lighting. | Clean lens; adjust focus/zoom; check network bandwidth; ensure adequate lighting or IR/warm light is active. |
| PTZ Control Not Working | Software issue; camera malfunction; network latency. | Restart camera; update firmware; check network connection stability. |
9. Specifications
Detailed technical specifications for the IPC672LR-AX4DUPKC camera.
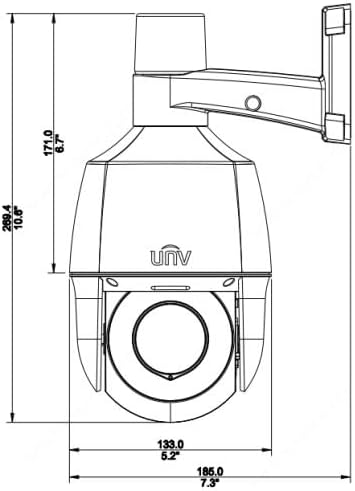
Figure 9.1: Dimensional drawing of the camera, indicating its physical size.
| Feature | Detail |
|---|---|
| Model Number | IPC672LR-AX4DUPKC |
| Video Capture Resolution | 2MP |
| Lens | 2.8-12mm AF Automatic Focusing and Motorized Zoom Lens |
| Night Vision Range | Up to 50 m (164 ft) IR, 10m (33 ft) warm light |
| Connectivity Technology | Wired (PoE) |
| Connectivity Protocol | Wi-Fi (for certain functions/setup, primarily wired for operation) |
| Video Compression | Ultra 265, H.265, H.264, MJPEG |
| Audio | Built-in microphone & speaker |
| Dynamic Range | Up to 120 dB Optical WDR |
| Noise Reduction | 2D/3D DNR |
| Ingress Protection Rating | IP66 |
| Form Factor | Dome |
| Dimensions (L x W x H) | 5.2 x 5.2 x 10.6 inches |
| Manufacturer | Uniview |
| Recommended Uses | Outdoor Security |
| Alert Type | Motion Only |
| Photo Sensor Technology | CMOS |
10. Warranty and Support
For warranty information, please refer to the warranty card included with your product or contact the seller/manufacturer directly. Technical support may be available through the manufacturer's official website or customer service channels.
Manufacturer: Uniview
Related documentsIPC672LR-AX4DUPKC


Ask a question about this manual
Ask about setup, troubleshooting, compatibility, parts, safety, or missing instructions. Manuals+ will review the question and use this page’s manual context to help answer it.