1. Introduction
Thank you for choosing the Belaco 18L/Day Dehumidifier. This appliance is designed to efficiently remove excess moisture from your home, helping to prevent dampness, mold, and musty odors. It features a digital display, 24-hour timer, and a large 3-liter water tank, making it ideal for various living spaces including bedrooms, offices, kitchens, and basements. Please read this manual thoroughly before operation to ensure safe and effective use of your dehumidifier.

Figure 1: Front view of the Belaco 18L/Day Dehumidifier.
2. Safety Information
To reduce the risk of fire, electric shock, or injury, always follow these basic safety precautions:
- Read all instructions before using the appliance.
- Do not operate the dehumidifier with a damaged cord or plug.
- Ensure the appliance is placed on a stable, level surface.
- Do not block air inlets or outlets. Maintain at least 20 cm clearance around the unit.
- Do not immerse the unit, power cord, or plug in water or other liquids.
- Unplug the dehumidifier before cleaning or performing any maintenance.
- Keep out of reach of children and pets.
- This appliance is for indoor residential use only.
3. Product Overview
3.1 Components
Familiarize yourself with the main components of your dehumidifier:
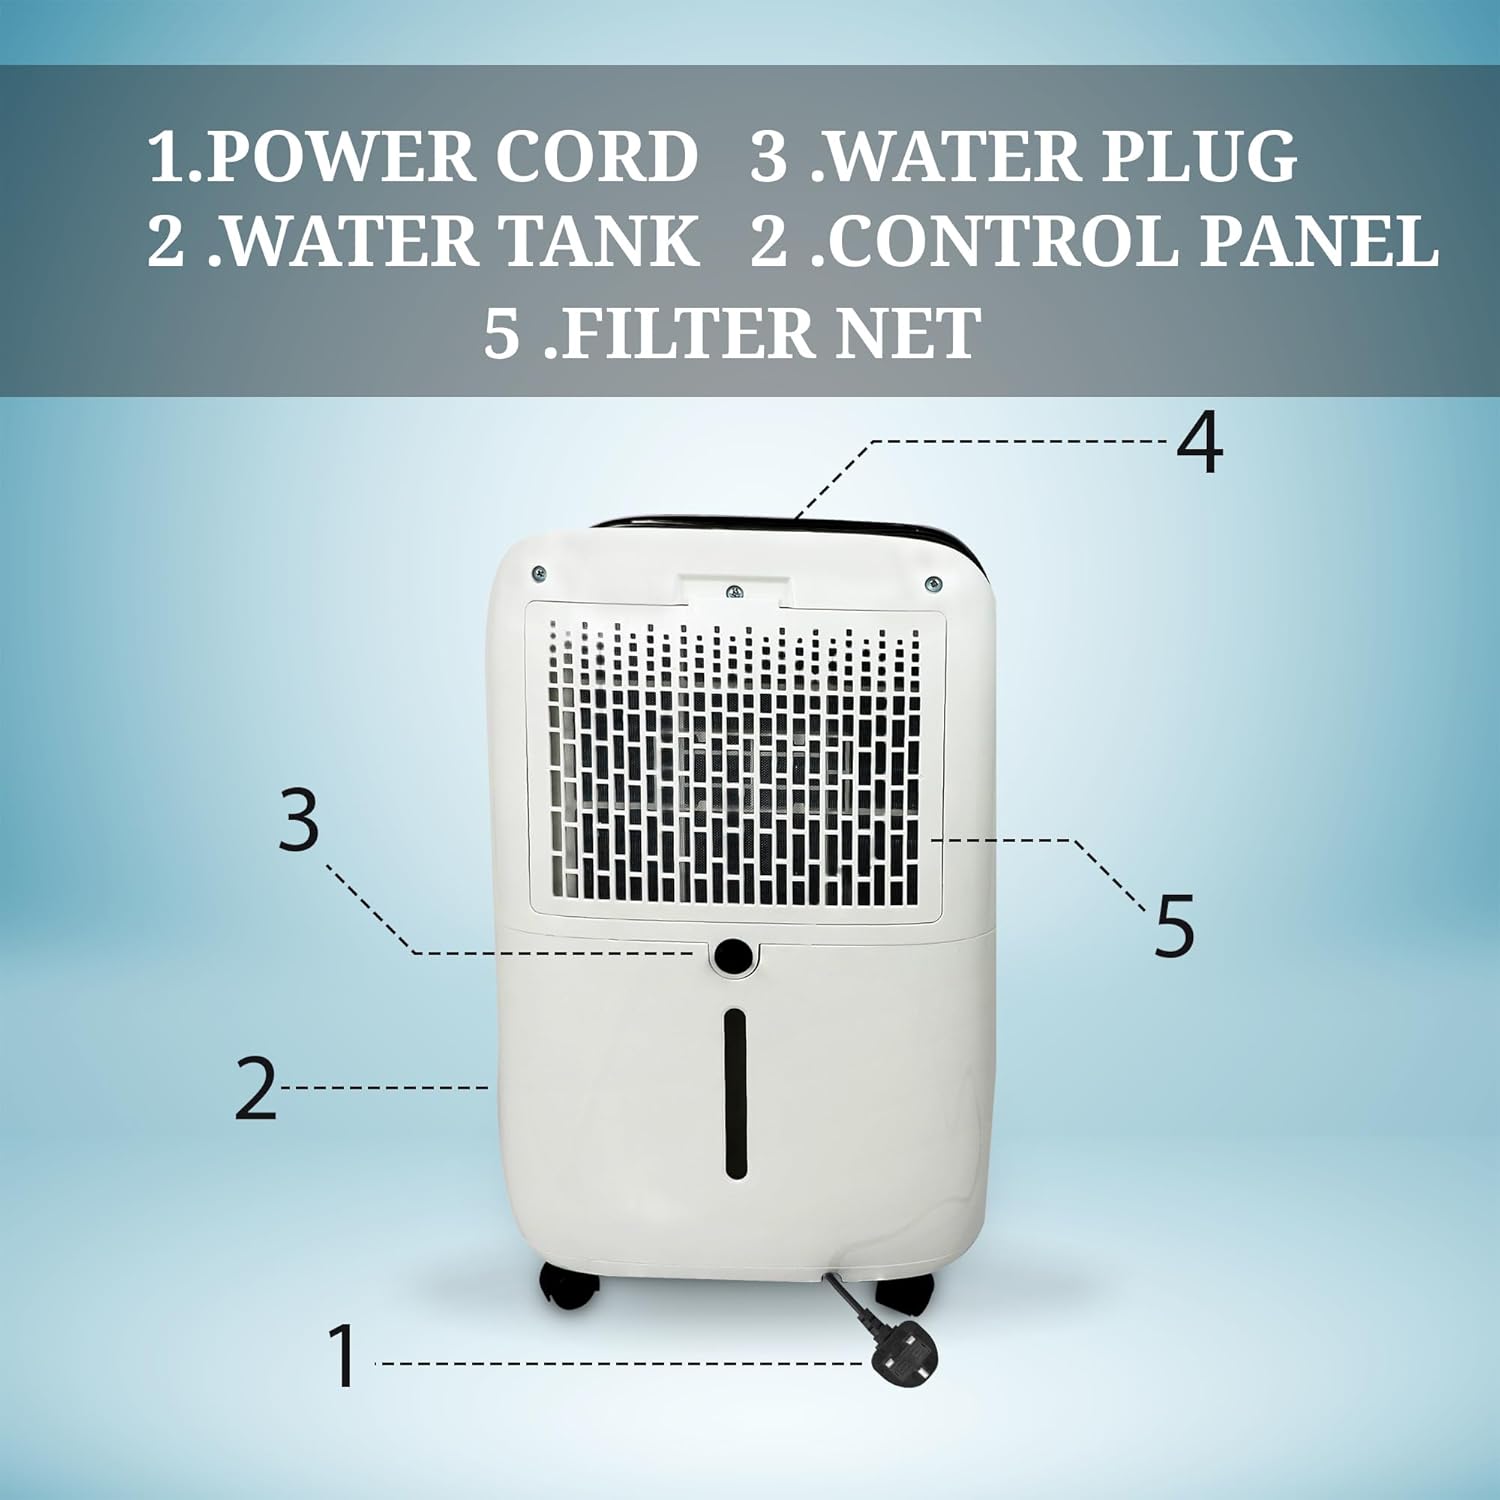
Figure 2: Rear view with labeled components. 1. Power Cord, 2. Water Tank, 3. Water Plug, 4. Control Panel, 5. Filter Net.
3.2 Control Panel and Display
The digital control panel allows you to manage all functions of the dehumidifier. The display shows current humidity levels and settings.

Figure 3: Control Panel layout with display lamps and controller buttons.
- Display Lamps: Standard Dehumidifier, Water Full Lamp, Drying Clothes Dehumidifier, Sleep Dehumidifier, Low Wind Speed Lamp, Timing Lamp, Humidity Lamp, On-Off Switch, Wet Day Dehumidifier, Frost Lamp, High Wind Lamp.
- Controller Buttons: Mode Button, On-Off Button, Timing Button, +/- Button, Child Lock Button, Wind Speed Button.
3.3 Ambient Humidity Indicator
The dehumidifier features a 3-colored LED display that indicates the ambient humidity level:
- Green: Humidity < 50%
- Blue: Humidity 50% ~ 70%
- Red: Humidity > 70%

Figure 4: 3-colored LED display for ambient humidity indication.
4. Setup
4.1 Unpacking and Placement
Carefully remove the dehumidifier from its packaging. Place the unit upright on a firm, level surface in the desired location. Ensure there is adequate space around the unit for proper airflow (at least 20 cm from walls or furniture).
4.2 Caster Wheel Installation
The dehumidifier comes with castor wheels for easy mobility. Gently tilt the unit and insert the castor wheels into the designated slots at the bottom of the unit until they click into place. Ensure all four wheels are securely installed before moving the unit.
4.3 Drainage Methods
Your dehumidifier offers two drainage options:
- Manual Drainage (Water Tank): The unit will collect water in the internal 3-liter water tank. When the tank is full, the unit will automatically shut off and the 'Water Full Lamp' will illuminate. Empty the tank manually by pulling it out from the rear of the unit and discarding the collected water.
- Continuous Drainage (Drain Hose): For continuous operation without needing to empty the tank, attach the included drain hose to the drainage outlet at the rear of the unit. Ensure the hose is sloped downwards to allow gravity drainage into a suitable drain or container.

Figure 5: Two-way draining method: Manual (left) and Auto (right) with drain hose.
5. Operation
5.1 Power On/Off
Plug the power cord into a grounded electrical outlet. Press the On-Off Button on the control panel to turn the unit on or off.
5.2 Setting Desired Humidity
When the unit is on, the digital display will show the current room humidity. Use the +/- Buttons to set your desired humidity level. The unit will operate until the set humidity is reached, then cycle on and off to maintain it.
5.3 Operating Modes
Press the Mode Button to cycle through the available operating modes:
- Standard Dehumidifier: Normal operation for general humidity control.
- Drying Clothes Dehumidifier: Optimized setting for drying laundry indoors.
- Sleep Dehumidifier: Operates at a lower fan speed for quieter performance during sleep.
- Wet Day Dehumidifier: Enhanced dehumidification for very humid conditions.
5.4 Timer Function
The 24-hour timer allows you to set a specific time for the unit to turn on or off. Press the Timing Button and use the +/- Buttons to set the desired hours (1-24). The 'Timing Lamp' will illuminate when the timer is active.
5.5 Child Lock
To prevent accidental changes to settings, press and hold the Child Lock Button (if available on your model) for a few seconds to activate or deactivate the child lock function.
5.6 Automatic Defrost
The dehumidifier is equipped with an automatic defrost feature. If frost builds up on the evaporator coils, the unit will temporarily stop dehumidifying and run the fan to melt the frost. The 'Frost Lamp' will illuminate during this process. This is normal operation and ensures efficient performance.

Figure 6: The dehumidifier operates at low noise levels (42-44dBA) for a peaceful environment.
6. Maintenance
Regular maintenance ensures optimal performance and extends the lifespan of your dehumidifier.
6.1 Emptying the Water Tank
When the water tank is full, the unit will stop operating and indicate that the tank needs emptying. Carefully pull out the water tank from the rear of the unit, empty the collected water, and then reinsert the tank firmly until it clicks into place. Ensure the tank is properly seated for the unit to resume operation.
6.2 Cleaning the Filter Net
The filter net should be cleaned regularly (e.g., every two weeks or as needed) to maintain air quality and dehumidifier efficiency. Locate the filter net at the rear of the unit (refer to Figure 2). Remove the filter, gently clean it with a soft brush or vacuum cleaner to remove dust and debris. If heavily soiled, wash it with warm, soapy water, rinse thoroughly, and allow it to air dry completely before reinserting.
6.3 General Care
Wipe the exterior of the unit with a soft, damp cloth. Do not use harsh chemicals, abrasive cleaners, or solvents. Always unplug the unit before cleaning.
7. Troubleshooting
If you encounter issues with your dehumidifier, please refer to the following common problems and solutions:
| Problem | Possible Cause | Solution |
|---|---|---|
| Dehumidifier does not turn on. | No power; Power cord not plugged in; Water tank full or not properly seated. | Check power connection; Empty and re-seat water tank. |
| No water collected or low collection. | Humidity level too low; Air filter clogged; Room temperature too low; Unit too small for space. | Increase desired humidity setting; Clean air filter; Ensure room temperature is above 5°C; Consider a larger unit for the space. |
| Unit is noisy. | Unit not on a level surface; Air filter clogged; Internal components vibrating. | Place on a flat, stable surface; Clean air filter; Contact customer support if noise persists. |
| Frost on coils. | Room temperature too low. | This is normal during defrost cycle. Unit will automatically defrost. If persistent, ensure room temperature is adequate. |
If the problem persists after attempting these solutions, please contact Belaco customer support for assistance.
8. Specifications
Key technical specifications for the Belaco 18L/Day Dehumidifier:
| Feature | Detail |
|---|---|
| Model Number | BDD018L |
| Dehumidification Capacity | 18 Litres/Day |
| Water Tank Volume | 3 Litres |
| Product Dimensions (D x W x H) | 21.5 x 30.5 x 48 cm |
| Weight | 11.82 kg |
| Floor Area Coverage | Up to 50 Square Meters |
| Noise Level | 42dBA / 44dBA |
| Special Features | Automatic Defrost, Child Lock, 24H Timer, Castor Wheels |
| Included Components | Castor Wheels, Manual Book, Drain Hose |
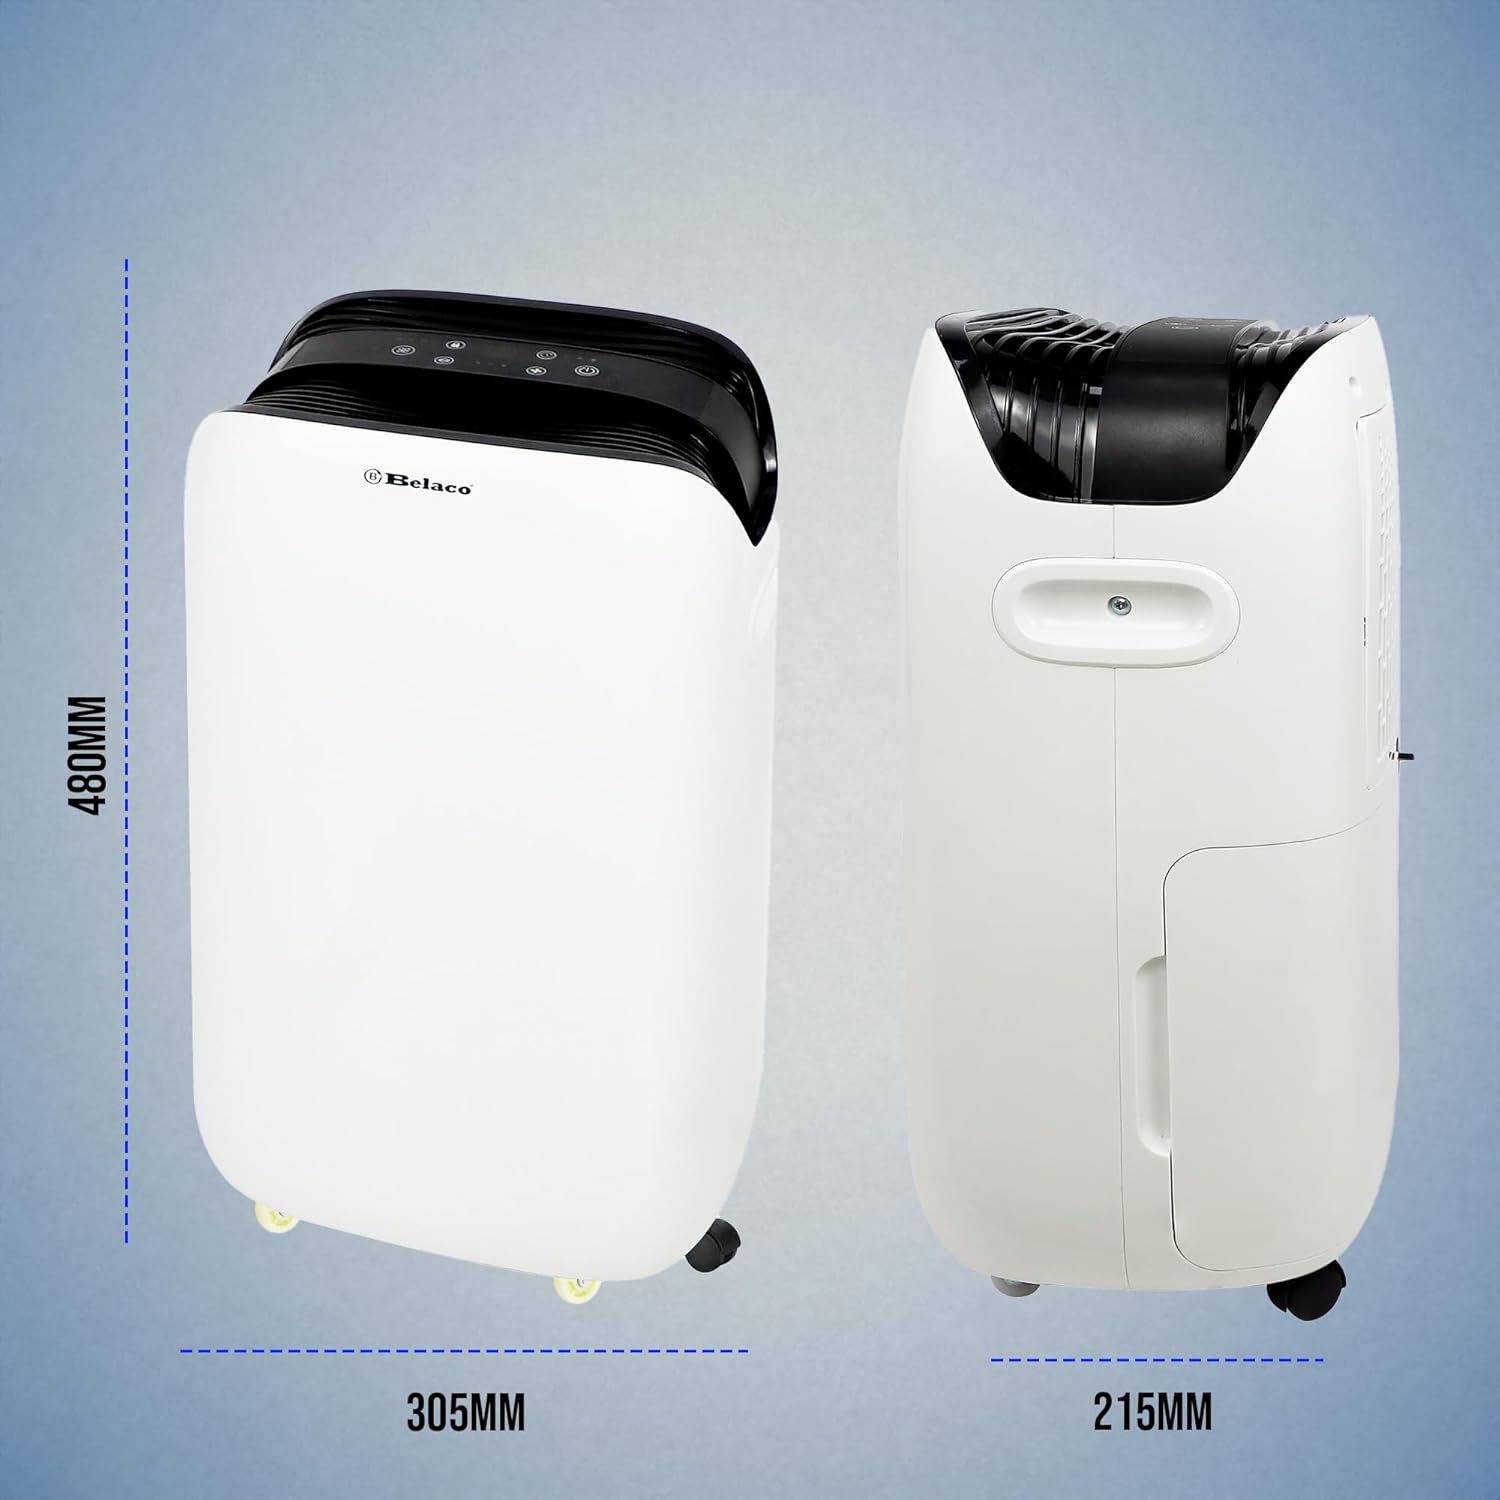
Figure 7: Product dimensions (Height: 480mm, Width: 305mm, Depth: 215mm).

Figure 8: The dehumidifier helps maintain optimal air humidity, reducing musty smells, wet walls, moisture, and black mold, and can assist in drying clothes.
9. Warranty and Support
For warranty information or technical support, please refer to the contact details provided with your purchase documentation or visit the official Belaco website. Keep your proof of purchase for any warranty claims.