
1. Introduction
This manual provides instructions for the safe and efficient installation, operation, and maintenance of your INTBUYING 39-Inch Electric Projector Lifter. This device is designed to discreetly store a projector within a ceiling, lowering it for use and retracting it when not needed. It features adjustable wireless control and a scissor bracket mechanism for stable and precise positioning.
Key features include:
- Hidden Installation: Designed to conceal the projector within the ceiling for a clean aesthetic and protection.
- Adjustable Wireless Control: Allows for precise height adjustment and operation via remote control.
- Stable Operation: Utilizes a mechanical positioning cross-shear design for flexible adjustment, stable movement, and low noise.
- Wide Application: Suitable for various environments including conference rooms, academic halls, classrooms, hotels, and home theaters.
2. Safety Information
Please read all safety instructions carefully before installation and operation. Failure to follow these instructions may result in injury or damage to the product.
- Electrical Safety: Ensure the power supply matches the specifications of the projector lifter. Disconnect power before any installation, maintenance, or repair. All electrical connections should be performed by a qualified electrician.
- Mounting Safety: The lifter must be mounted on a structurally sound ceiling capable of supporting the combined weight of the lifter, projector, and any associated cables. Use appropriate fasteners, such as explosion-proof screws, especially when mounting to concrete or masonry.
- Load Capacity: Do not exceed the maximum load capacity of 10 kg (22 lb). Overloading can cause damage to the unit and potential hazards.
- Clearance: Ensure there is sufficient clearance around the lifter and projector during operation to prevent obstructions or collisions.
- Children and Pets: Keep children and pets away from the operating area of the projector lifter.
- Batteries: Remote control batteries are not included. Use the specified battery type and dispose of old batteries responsibly.
3. Package Contents
Verify that all components are present and undamaged before proceeding with installation.

Image: All components included with the projector lifter.
- Electric Projector Lifter Main Unit
- Ceiling Decoration Board/Fixing Plate (20" x 20")
- Mounting Rods and Brackets
- Wireless Remote Control
- Wired Control Box and Power Cable
- Installation Hardware (screws, anchors, washers)
- User Manual (this document)
4. Specifications
| Feature | Specification |
|---|---|
| Brand | INTBUYING |
| Compatible Devices | Projectors |
| Mounting Type | Ceiling Mount |
| Special Feature | Adjustable |
| Material | Aluminum |
| Max Load Capacity | 10 kg (22 lb) |
| Fixing Plate Dimensions | 20" x 20" (50 cm x 50 cm) |
| Maximum Drop Length | 39 inches (approximate, based on product title) |
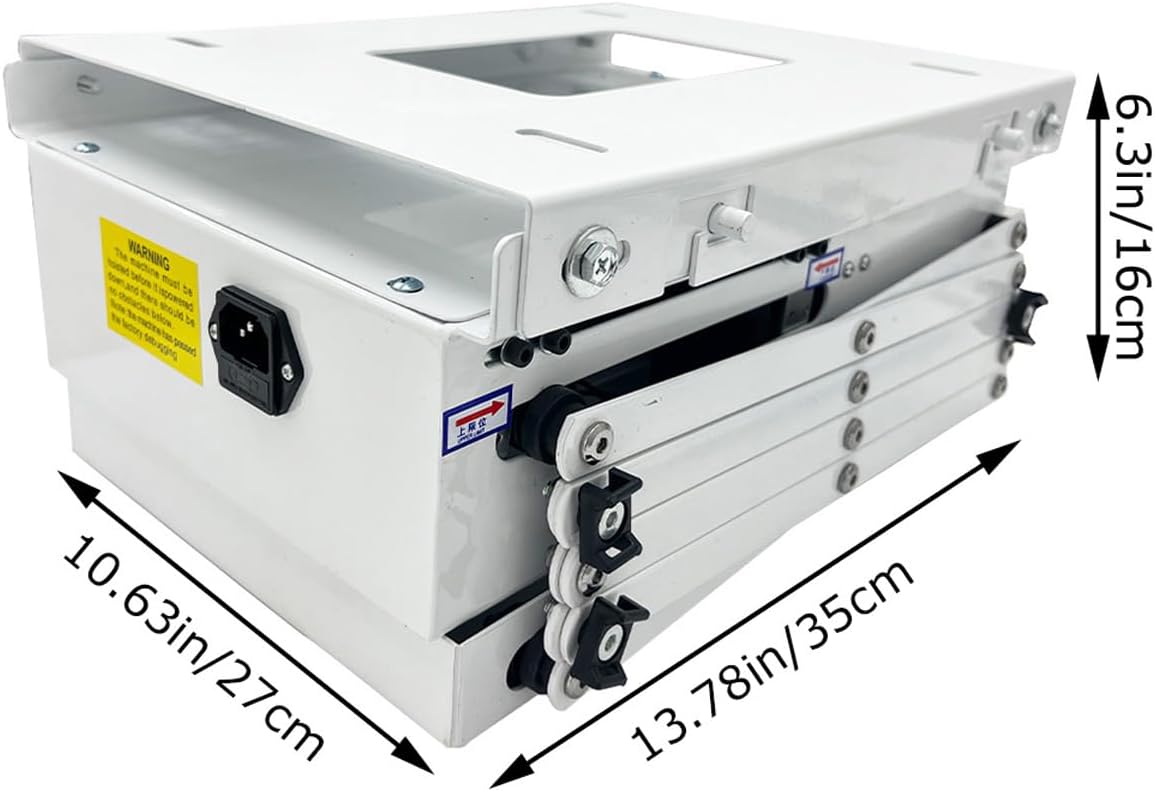
Image: Product dimensions for planning installation space.
5. Setup and Installation
Proper installation is crucial for the safety and performance of the projector lifter. It is recommended that installation be performed by two people.
5.1 Site Selection and Preparation
- Choose a location on the ceiling that is structurally sound and can support the total weight of the lifter and projector (up to 10 kg / 22 lb).
- Ensure the ceiling material is suitable for mounting, such as concrete, masonry, or other strong structural elements.
- Verify that the projector to be installed has dimensions less than 20" x 20" (50 cm x 50 cm) to fit the fixing plate.
- Consider the required space above the ceiling: Mainframe thickness (9 Inch) + Projector angle adjust (9 Inch) + Your projector thickness & Angle adjust space.
5.2 Mounting the Lifter
- Mark the drilling points on the ceiling according to the lifter's mounting holes.
- Drill holes and insert appropriate anchors. For concrete or masonry, use explosion-proof screws for secure fastening.
- Attach the main lifter unit to the ceiling using the provided mounting hardware. Ensure it is level and securely fastened.
- Install the four vertical mounting rods to the lifter unit. These rods will support the projector and the ceiling decoration board.

Image: Projector lifter with mounting rods extended.
5.3 Projector Installation
- Attach your projector to the projector mounting plate at the bottom of the lifter. Ensure the projector is centered and securely fastened.
- Connect all necessary cables (power, video, etc.) to the projector, ensuring they have enough slack for the full range of motion.
- Install the ceiling decoration board onto the bottom of the mounting rods. This board will conceal the projector when the lifter is retracted.

Image: Projector mounted and lifter extended.
5.4 Electrical Connection
- Connect the power cable from the lifter to a suitable power outlet.
- Ensure all connections are secure and properly insulated.
6. Operating Instructions
The projector lifter can be operated using the included wireless remote control.
6.1 Remote Control Operation
- Insert batteries into the wireless remote control (batteries not included).
- UP Button: Press to raise the projector lifter, retracting the projector into the ceiling.
- DOWN Button: Press to lower the projector lifter, extending the projector from the ceiling.
- STOP Button: Press to halt the lifter at any desired position.

Image: Detail of the scissor mechanism, highlighting smooth hoisting.
6.2 Adjusting Projection Height
Use the UP and DOWN buttons on the remote control to precisely adjust the projector to your desired projection height. The mechanical positioning system ensures stable and accurate stopping.
7. Maintenance
Regular maintenance helps ensure the longevity and reliable operation of your projector lifter.
- Cleaning: Periodically wipe the exterior surfaces of the lifter and the ceiling decoration board with a soft, dry cloth. Do not use abrasive cleaners or solvents.
- Inspection: Annually inspect all mounting hardware, cables, and moving parts for any signs of wear, damage, or looseness. Tighten any loose screws.
- Lubrication: The scissor mechanism is designed for low maintenance. If any squeaking or stiffness occurs, consult a qualified technician for appropriate lubrication.
- Power Disconnection: Always disconnect power to the unit before performing any cleaning or inspection.
8. Troubleshooting
If you encounter issues with your projector lifter, refer to the following common problems and solutions.
| Problem | Possible Cause | Solution |
|---|---|---|
| Lifter does not move | No power supply Remote control batteries are dead Remote control not paired | Check power connection and outlet Replace remote control batteries Refer to remote control pairing instructions (if applicable, not detailed in product info) |
| Lifter moves erratically or makes unusual noise | Obstruction in mechanism Loose mounting hardware Overload | Inspect for obstructions and remove Check and tighten all mounting screws Ensure projector weight is within 10 kg (22 lb) limit |
| Lifter stops mid-operation | Power interruption Overheating protection activated | Check power supply Allow unit to cool down before attempting operation again |
If the problem persists after attempting these solutions, please contact customer support.
9. Warranty and Support
Specific warranty information for the INTBUYING 39-Inch Electric Projector Lifter is not provided in the product data. For warranty details, technical support, or service inquiries, please contact the manufacturer directly or refer to the documentation included with your purchase.
Please retain your proof of purchase for any warranty claims.