
Introduction
This manual provides detailed instructions for the installation and use of the Jayubien 16Pin Android Radio Wiring Harness Adapter. This product is designed to simplify the connection of an aftermarket 16-pin Android car stereo to your vehicle's existing wiring system, ensuring proper power and speaker functionality, along with support for steering wheel controls and reverse camera input.
Product Overview and Components
The Jayubien 16Pin Android Radio Wiring Harness Adapter is a comprehensive solution for integrating your new car stereo. It includes a 16-pin ISO connector and 16 butt connectors for secure, solder-free connections.

Figure 1: The Jayubien 16Pin Android Radio Wiring Harness Adapter, showing the main harness and the included butt connectors.

Figure 2: Close-up of the 16-pin connector plug and a pure copper wire, highlighting the quality of the cable.
Package Contents:
- 1 x 16Pin ISO Car Stereo Wiring Harness
- 16 x Butt Connectors
Setup and Installation Guide
This wiring harness is designed for direct installation to an aftermarket 16-pin Android car stereo. It is compatible with universal 16-pin ISO Android car radios and is intended for vehicles with a 4-speaker system. It is not suitable for 20-pin connectors or premium amplifier systems.
Connecting the Harness:
- Prepare Wires: Identify the corresponding wires from your vehicle's wiring and the new Android head unit. The Jayubien harness wires are fully labeled for easy identification.
- Use Butt Connectors: The included butt connectors allow for a secure connection without soldering or additional tape.

Figure 3: Step-by-step guide for crimping wires with butt connectors. 1. Tear the PVC jacket. 2. Insert the butt connector (fit for 18AWG-22AWG cables). 3. Use a plier tool to crimp one side of the butt connector.
Ensure the wires are properly stripped to the correct length before inserting them into the butt connectors. Use a crimping tool to secure the connection firmly.
- Connect to Head Unit: Once all necessary connections are made using the butt connectors, plug the 16-pin ISO connector of the Jayubien harness directly into the corresponding port on your aftermarket Android car stereo.
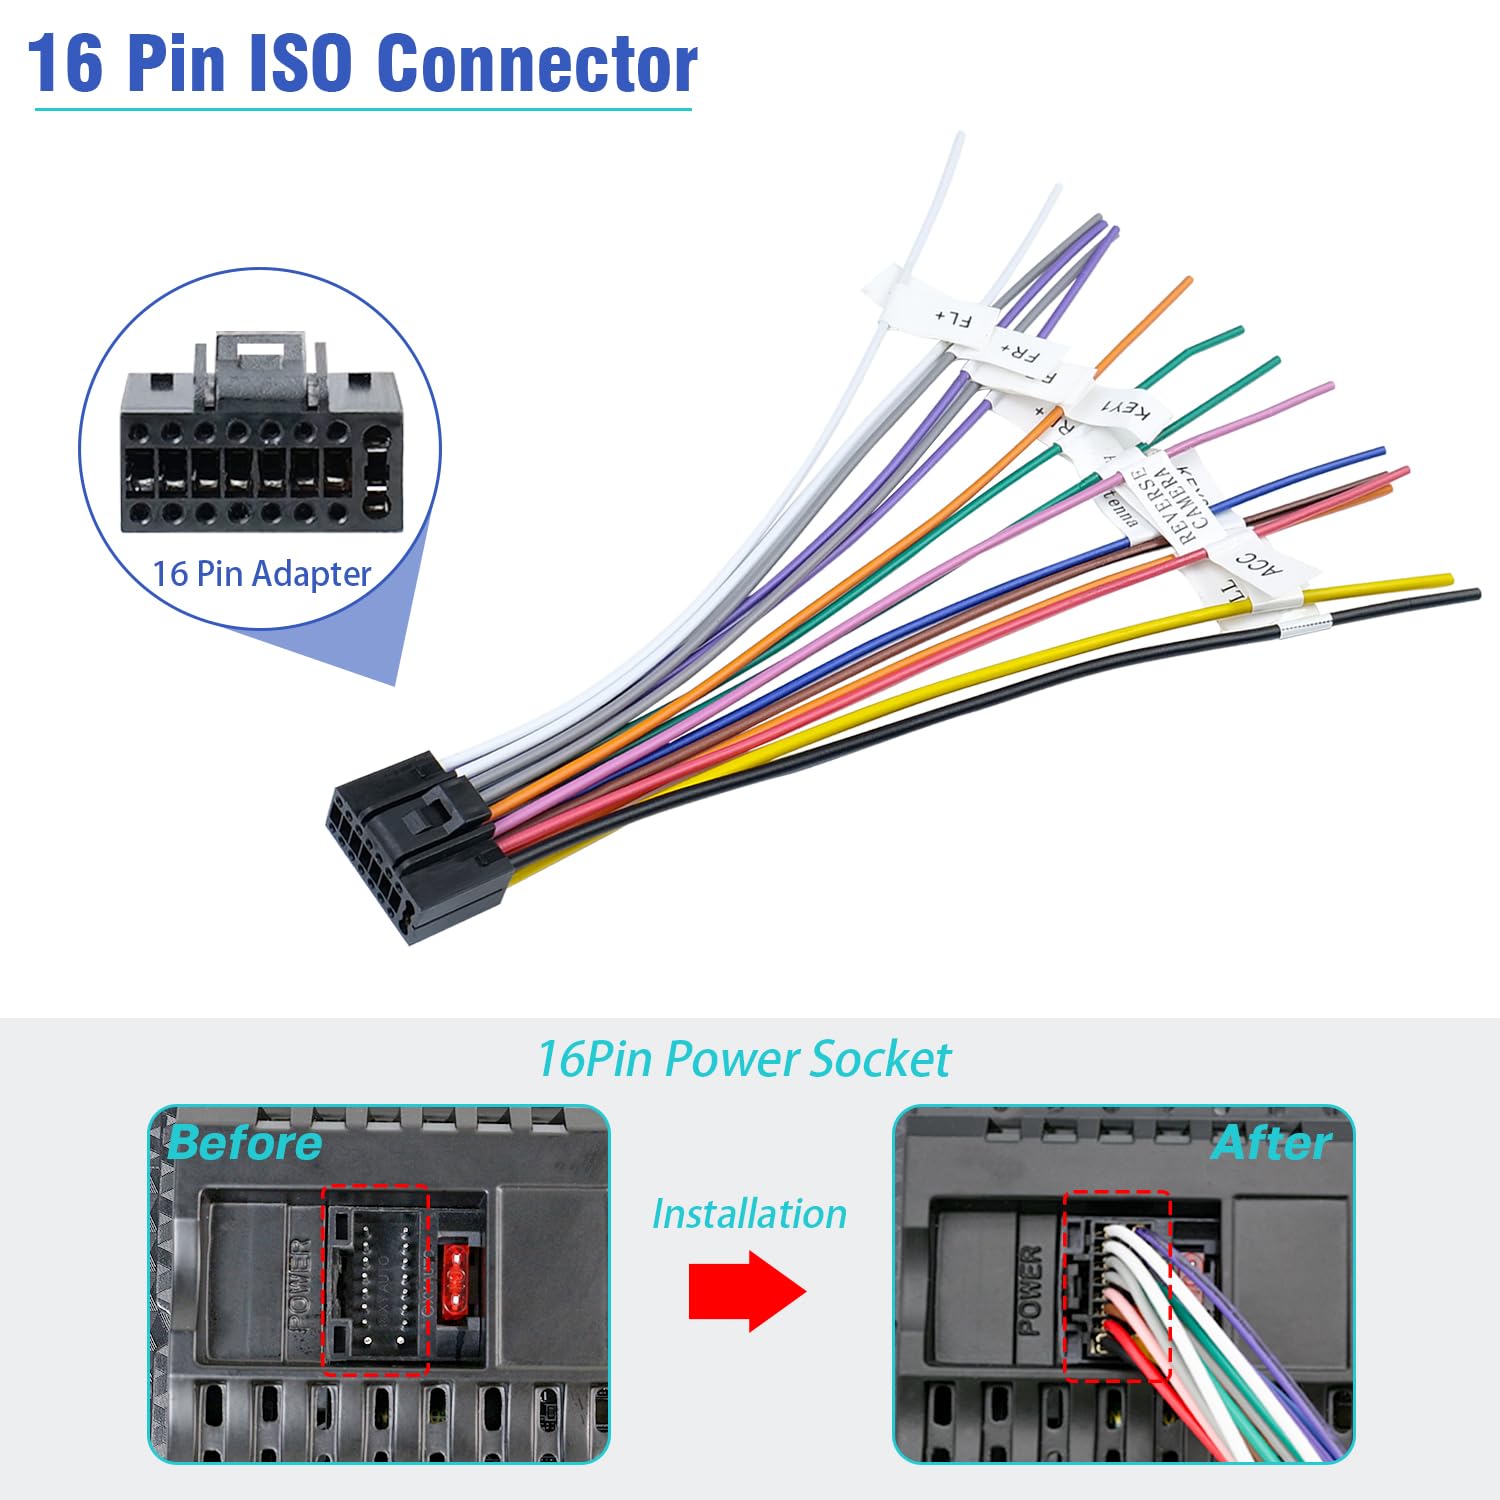
Figure 4: Illustration of the 16-pin ISO connector and its installation into the car stereo's power socket, showing before and after views.
Wiring Diagram and Connection Details
The Jayubien wiring harness features clearly labeled wires to facilitate correct connections. Refer to the diagram and descriptions below for proper wiring.

Figure 5: Detailed wiring diagram for the Jayubien harness, showing all labeled wires and their corresponding functions.
Wire Functions:
| Wire Label | Function |
|---|---|
| ACC | Connect to ignition switch (switched 12V power) |
| B+ | Connect to battery +12V (constant 12V power) |
| GND | Connect to battery negative B- (ground) |
| +ILL | To illuminate backlight B+ (illumination wire) |
| REVERSE CAMERA | To backup camera detection cable (out of the RCA cord) |
| SWC KEY1 | To steering wheel control line 1 |
| SWC KEY2 | To steering wheel control line 2 |
| ANT | To auto antenna (power antenna trigger) |
| RR+ | To rear right speaker + |
| RR- | To rear right speaker - |
| RL+ | To rear left speaker + |
| RL- | To rear left speaker - |
| FR+ | To front right speaker + |
| FR- | To front right speaker - |
| FL+ | To front left speaker + |
| FL- | To front left speaker - |

Figure 6: Dedicated wires for Steering Wheel Control (KEY1, KEY2) and the Reversing Trigger Cable (REVERSE CAMERA) for back camera detection.
Maintenance
The Jayubien wiring harness is designed for durability and requires minimal maintenance. To ensure continued optimal performance:
- Inspect Connections: Periodically check all crimped connections to ensure they remain secure and free from corrosion.
- Cable Routing: Ensure the harness cables are routed away from sharp edges, heat sources, and moving parts to prevent damage.
- Cleanliness: Keep the connections clean and free from dust or debris.
Troubleshooting
If you encounter issues after installation, consider the following troubleshooting steps:
- No Power to Head Unit:
- Verify that the B+ (constant 12V) and ACC (switched 12V) wires are correctly connected and receiving power.
- Check the vehicle's fuses related to the stereo system.
- Ensure the GND (ground) wire has a secure connection to a good chassis ground point.
- No Sound from Speakers:
- Confirm that all speaker wires (FL+, FL-, FR+, FR-, RL+, RL-, RR+, RR-) are correctly matched and connected to the corresponding speaker terminals.
- Ensure the head unit's volume is not muted or set to zero.
- Verify that your head unit is compatible with a 4-speaker system and not requiring a separate amplifier connection if you are not using one.
- Steering Wheel Controls Not Working:
- Ensure SWC KEY1 and SWC KEY2 wires are correctly connected to your vehicle's steering wheel control module (if applicable and not requiring a CANBUS adapter).
- Check the settings within your Android head unit for steering wheel control configuration.
- Reverse Camera Not Activating:
- Confirm the REVERSE CAMERA wire is connected to the reverse trigger wire from your vehicle or the camera's detection cable.
- Ensure the camera itself is properly powered and connected to the head unit's video input.
- Intermittent Connections:
- Re-inspect all butt connector crimps to ensure they are tight and secure. Loose connections can cause intermittent power or signal loss.
Specifications
| Attribute | Detail |
|---|---|
| Model Number | USJY34 |
| Brand | JAYUBIEN |
| Material | Copper |
| Cable Type | 16-pin |
| Connector Type | 16-pin ISO |
| Item Weight | 30 Grams |
| Parcel Dimensions | 22.3 x 11.61 x 1.3 cm |
| Recommended Use | For Android Car Radio Stereo Head Unit |
Warranty and Support
For information regarding product warranty, please refer to the terms and conditions provided at the time of purchase or contact the seller directly. For technical support or further assistance, please reach out to the manufacturer, JAYUBIEN, through their official support channels.