
Black+Decker BXGNI4000E
BLACK+DECKER BXGNI4000E 4000W Inverter Gasoline Generator User Manual
Model: BXGNI4000E
1. Introduction
This manual provides essential information for the safe and efficient operation, maintenance, and troubleshooting of your BLACK+DECKER BXGNI4000E 4000W Inverter Gasoline Generator. Please read this manual thoroughly before operating the generator to ensure proper use and to prevent injury or damage.
The BLACK+DECKER BXGNI4000E is a portable inverter generator designed to provide reliable electrical power for various applications, including residential backup, outdoor activities, and light-duty professional use. Its inverter technology ensures stable and clean power, suitable for sensitive electronics.

Image 1.1: Front view of the BLACK+DECKER BXGNI4000E Inverter Generator.
2. Safety Information
WARNING: Failure to follow these safety instructions could result in serious injury or death.
- Carbon Monoxide Hazard: Generators produce carbon monoxide, a colorless, odorless, poisonous gas. Operate the generator outdoors in a well-ventilated area, far away from windows, doors, and vents. Never operate indoors, in a garage, or in any enclosed space.
- Fire Hazard: Gasoline is highly flammable. Store fuel in an approved container in a well-ventilated area. Do not refuel while the engine is running or hot. Ensure no open flames or sparks are near the generator or fuel.
- Electrical Shock Hazard: Do not operate the generator in wet conditions. Ensure all electrical connections are dry and properly insulated. Never touch live electrical parts. Use a ground fault circuit interrupter (GFCI) when operating in damp or wet locations.
- Hot Surfaces: The generator's engine and muffler become very hot during operation and remain hot for some time after shutdown. Avoid touching hot surfaces to prevent burns.
- Proper Grounding: Always properly ground the generator before operation to prevent electrical shock. Refer to the grounding instructions in the setup section.
- Children and Pets: Keep children and pets away from the generator at all times.
3. Component Identification
Familiarize yourself with the key components of your generator before operation. Refer to the diagram below for a visual guide to the control panel and other important parts.
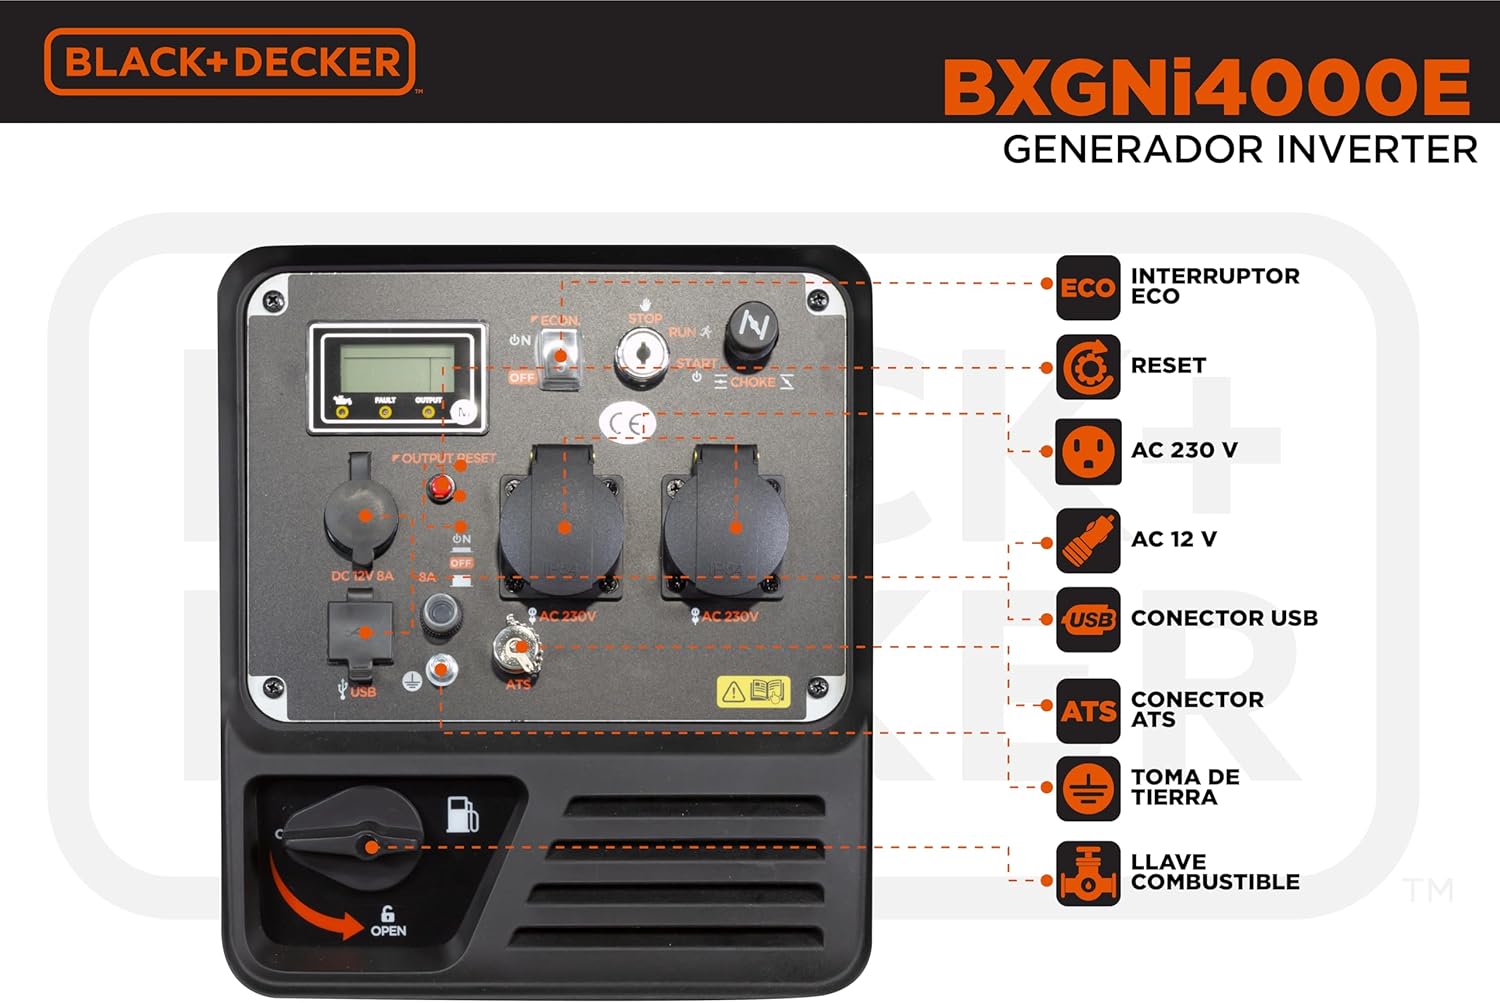
Image 3.1: Detailed view of the control panel with labeled components.
- ECO Switch: Engages or disengages Eco Mode for fuel efficiency.
- Reset Button: Resets the output circuit breaker.
- AC 230V Outlets: Two standard 230V AC power outlets.
- DC 12V Outlet: 12V DC 8A output for charging batteries.
- USB Connector: USB port for charging small electronic devices.
- ATS Connector: Automatic Transfer Switch connection point (if applicable).
- Ground Terminal: Point for connecting the generator to an earth ground.
- Fuel Valve: Controls the flow of fuel to the engine.
- Engine Switch: Controls engine operation (OFF/RUN/START).
- Choke Lever: Used for starting a cold engine.
- Digital Display: Shows output voltage, frequency, and runtime.
- Fuel Cap: For adding gasoline to the fuel tank.
- Oil Fill Cap/Dipstick: For checking and adding engine oil.
- Spark Plug Access: Location of the spark plug for maintenance.

Image 3.2: Close-up of the generator's front control panel.
4. Initial Setup
Before starting your generator for the first time, perform the following steps:
4.1 Unpacking and Placement
- Remove the generator from its packaging and inspect for any shipping damage.
- Place the generator on a firm, level surface outdoors, in a well-ventilated area, at least 1 meter (3 feet) away from buildings or other equipment.
- Ensure the exhaust is directed away from people and buildings.
4.2 Adding Engine Oil
CAUTION: The engine is shipped without oil. Operating without oil will cause severe engine damage.
- Locate the oil fill cap/dipstick (refer to Image 3.1).
- Unscrew and remove the oil fill cap/dipstick.
- Using a funnel, slowly add the recommended engine oil (SAE 10W-30 or 15W-40, depending on ambient temperature) until it reaches the upper mark on the dipstick. Do not overfill.
- Securely replace the oil fill cap/dipstick.
4.3 Adding Fuel
WARNING: Gasoline is highly flammable. Do not smoke or allow open flames near the generator. Do not overfill the fuel tank.
- Ensure the engine is off and cool.
- Unscrew the fuel cap.
- Carefully pour fresh, unleaded gasoline (minimum 87 octane) into the fuel tank. The tank capacity is 8.8 liters.
- Do not fill above the red indicator inside the tank. Leave space for fuel expansion.
- Securely replace the fuel cap. Wipe up any spilled fuel immediately.
4.4 Grounding the Generator
To prevent electrical shock, the generator must be properly grounded.
- Locate the ground terminal on the control panel (refer to Image 3.1).
- Connect a heavy-gauge copper wire from the ground terminal to a suitable earth ground, such as a metal ground rod driven into the earth.
5. Operating Instructions
5.1 Pre-Start Checks
- Check engine oil level.
- Check fuel level.
- Ensure the generator is properly grounded.
- Ensure all electrical loads are disconnected from the generator outlets.
5.2 Starting the Engine
- Turn the fuel valve to the "OPEN" position.
- Move the engine switch to the "START" position.
- If the engine is cold, pull the choke lever to the "CHOKE" position.
- Firmly pull the recoil starter handle until the engine starts. Do not let the rope snap back.
- Once the engine starts, slowly push the choke lever back to the "RUN" position.
- Allow the engine to warm up for a few minutes before connecting electrical loads.
5.3 Connecting Electrical Loads
CAUTION: Do not overload the generator. Ensure the total wattage of connected devices does not exceed the generator's rated output.
- Once the engine is running smoothly, plug in your electrical devices to the appropriate AC 230V or DC 12V outlets.
- For optimal fuel efficiency and reduced noise, engage the "ECO" switch. The engine speed will adjust automatically based on the load.
- Monitor the digital display for output voltage and frequency.
5.4 Stopping the Engine
- Disconnect all electrical loads from the generator outlets.
- If Eco Mode is engaged, disengage it.
- Turn the engine switch to the "OFF" position.
- Turn the fuel valve to the "CLOSED" position.
6. Maintenance
Regular maintenance is crucial for the longevity and reliable operation of your generator. Always ensure the engine is off and cool before performing any maintenance.
6.1 Maintenance Schedule
| Item | Every Use | Every 25 Hrs / Monthly | Every 100 Hrs / 6 Months | Every 300 Hrs / Annually |
|---|---|---|---|---|
| Engine Oil | Check Level | Change | ||
| Air Filter | Clean | Replace | ||
| Spark Plug | Inspect/Clean | Replace | ||
| Fuel Filter | Inspect/Replace |
6.2 Engine Oil Change
- Run the engine for a few minutes to warm the oil, then shut it off.
- Place a drain pan under the oil drain plug.
- Remove the oil fill cap/dipstick and the oil drain plug.
- Allow all old oil to drain completely.
- Replace the oil drain plug and tighten securely.
- Refill with the recommended amount and type of new engine oil (refer to Section 4.2).
- Replace the oil fill cap/dipstick.
6.3 Air Filter Maintenance
- Locate and remove the air filter cover.
- Remove the foam air filter element.
- Wash the foam element in warm, soapy water, rinse thoroughly, and allow to air dry completely.
- Lightly oil the foam element with engine oil, then squeeze out excess oil.
- Reinstall the air filter element and cover.
6.4 Spark Plug Inspection and Replacement
- Remove the spark plug cap.
- Use a spark plug wrench to remove the spark plug.
- Inspect the spark plug for carbon buildup or wear. Clean with a wire brush if necessary.
- Check the spark plug gap and adjust if needed (refer to specifications for correct gap).
- If the spark plug is heavily worn or damaged, replace it with a new one of the recommended type.
- Reinstall the spark plug and spark plug cap.
6.5 Storage
For long-term storage (more than 30 days):
- Drain the fuel tank and carburetor, or add a fuel stabilizer.
- Change the engine oil.
- Remove the spark plug and pour a small amount of engine oil into the cylinder. Pull the recoil starter a few times to distribute the oil, then reinstall the spark plug.
- Clean the exterior of the generator.
- Store in a clean, dry, well-ventilated area.
7. Troubleshooting
This section provides solutions to common operational issues. If you encounter a problem not listed here, or if the suggested solutions do not resolve the issue, contact customer support.
| Problem | Possible Cause | Solution |
|---|---|---|
| Engine will not start | No fuel Low oil level Choke not set correctly Spark plug issue Fuel valve closed | Add fresh fuel Add engine oil Adjust choke lever Inspect/clean/replace spark plug Open fuel valve |
| No power output | Overload Circuit breaker tripped Loose connections | Reduce load Press reset button Check and secure connections |
| Engine runs, then stops | Low fuel Low oil level Clogged fuel filter Dirty air filter | Add fuel Add engine oil Clean/replace fuel filter Clean air filter |
| Engine runs rough | Stale fuel Dirty spark plug Dirty air filter | Drain and refill with fresh fuel Clean/replace spark plug Clean air filter |
8. Specifications
Technical data for the BLACK+DECKER BXGNI4000E Inverter Gasoline Generator:
- Model: BXGNI4000E
- Engine Type: 4-stroke, 223cc
- Rated Power: 3500W
- Maximum Power: 3900W (3.9 kW)
- Voltage: 230V AC
- Fuel Type: Unleaded Gasoline
- Fuel Tank Capacity: 8.8 Liters
- Oil Type: SAE 10W-30 or 15W-40 (refer to manual for specific temperature ranges)
- Noise Level (at 7m): 72 dBA
- Run Time (50% load): 8 hours
- Dimensions (L x W x H): 67 x 47 x 54 cm
- Weight: 42 kg
- Included Components: Inverter Generator

Image 8.1: Dimensions of the BLACK+DECKER BXGNI4000E Inverter Generator.
9. Warranty Information
BLACK+DECKER products are manufactured to high-quality standards and are guaranteed against manufacturing defects. The specific warranty period and terms may vary by region and retailer. Please retain your proof of purchase for warranty claims.
For detailed warranty information, refer to the warranty card included with your product or visit the official BLACK+DECKER website.
10. Customer Support
If you have any questions, require technical assistance, or need to order replacement parts, please contact BLACK+DECKER customer support or an authorized service center.
- Online Support: Visit the official BLACK+DECKER website for FAQs, product registration, and service center locators.
- Service Centers: For professional service and repairs, locate an authorized BLACK+DECKER service center in your area.
Ask a question about this manual
Ask about setup, troubleshooting, compatibility, parts, safety, or missing instructions. Manuals+ will review the question and use this page’s manual context to help answer it.