1. Introduction
This manual provides instructions for the assembly, installation, operation, and maintenance of your vidaXL Sliding Door and Hardware Kit. Please read these instructions carefully before beginning installation to ensure correct assembly and safe operation. Keep this manual for future reference.
The sliding door system is designed to provide a space-saving and functional door solution for various indoor applications. It features a solid pine wood door and a robust powder-coated steel hardware kit for smooth and quiet operation.
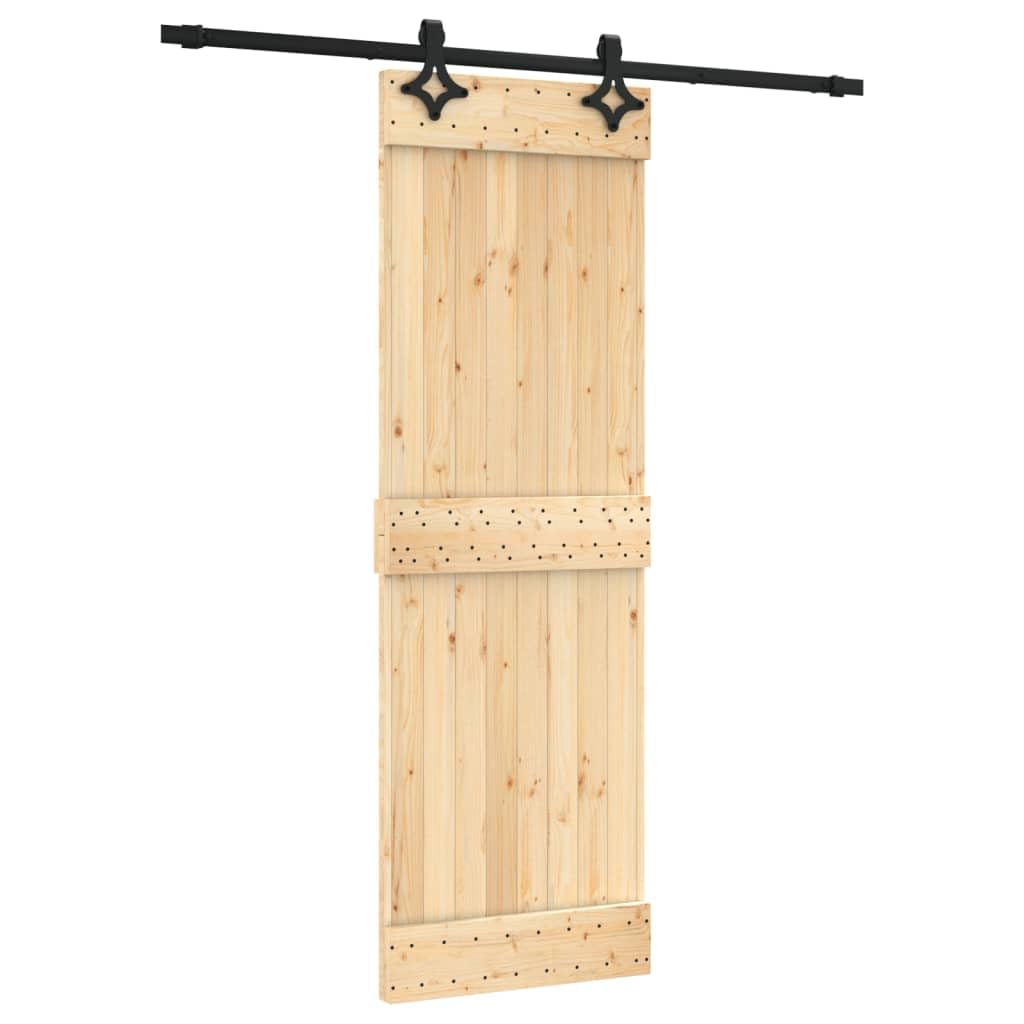
Image 1.1: Overview of the installed vidaXL sliding door.
2. Safety Information
- Always wear appropriate personal protective equipment (e.g., safety glasses, gloves) during installation.
- Ensure the wall structure is capable of supporting the weight of the door and hardware. Consult a professional if unsure.
- Keep children and pets away from the installation area.
- Do not modify the product components. Use only original parts.
- Ensure all fasteners are securely tightened before operating the door.
- Regularly inspect the door and hardware for any signs of wear or damage.
3. Package Contents
Verify that all components listed below are present and undamaged before beginning assembly.
- 1 x Sliding Door (Solid Pine Wood)
- 2 x Sliding Rails (Powder-coated steel)
- 2 x Rollers
- 2 x Door Stops
- 1 x Floor Guide
- 2 x Anti-jump Blocks
- 5 x Fixing Clamps
- Other necessary hardware (screws, anchors, etc.)

Image 3.1: All hardware components included in the kit.
4. Setup and Installation
4.1 Tools Required
- Drill
- Measuring Tape
- Level
- Pencil
- Screwdriver (Phillips head)
- Wrench
4.2 Installation Steps
- Prepare the Door: The solid pine wood door may require light sanding or finishing (e.g., painting, varnishing) before installation, as it is untreated.
- Mark Rail Position: Determine the desired height for the sliding rail. Ensure there is sufficient clearance above the door opening. Use a level and pencil to mark the mounting points for the rail on the wall. The total length of the sliding rail is 200 cm.
- Install Sliding Rails: Drill pilot holes at the marked positions. Secure the sliding rails to the wall using the provided fixing clamps and appropriate screws/anchors for your wall type (wood or concrete). Ensure the rail is perfectly level and securely fastened.
- Attach Rollers to Door: Position the rollers on the top edge of the door panel. Mark and drill pilot holes, then securely fasten the rollers using the provided bolts. Ensure the rollers are aligned correctly for smooth movement.
- Install Door Stops: Slide the door stops onto the rail, one at each end. These prevent the door from sliding off the rail. Adjust their position to control the door's travel distance.
- Install Floor Guide: Position the floor guide on the floor directly below the rail, ensuring it aligns with the bottom edge of the door. Mark and drill holes, then secure the floor guide. This prevents the bottom of the door from swinging out.
- Hang the Door: Carefully lift the door and hook the rollers onto the installed sliding rail. Ensure the door is properly seated on the rail and moves freely.
- Install Anti-Jump Blocks: Attach the anti-jump blocks to the top edge of the door, above the rollers. These prevent the door from lifting off the rail during operation.
- Final Adjustments: Test the door's movement. Adjust the door stops and floor guide as needed to ensure smooth, quiet, and safe operation.
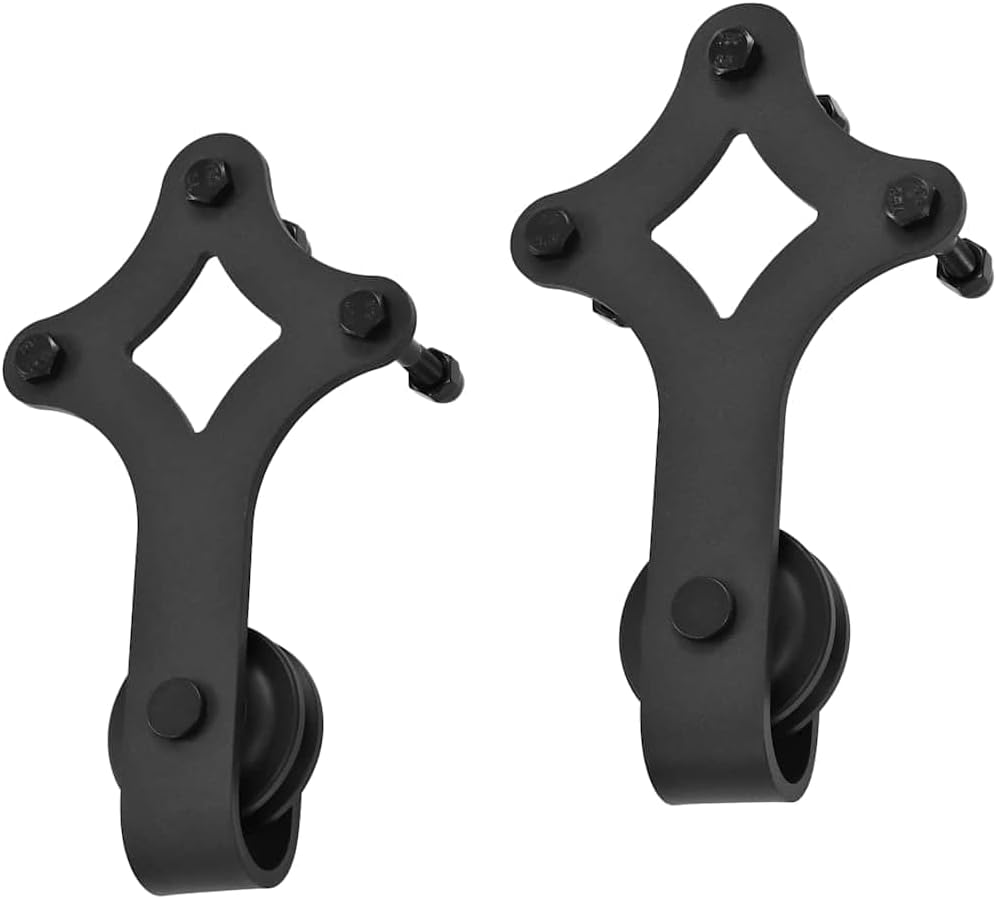
Image 4.1: Detail of the sliding door rollers.
5. Operating Instructions
To open or close the sliding door, gently push or pull the door panel along the installed rail. The internal bearings in the rollers ensure smooth and silent gliding. Avoid forcing the door if it encounters resistance. Ensure the path of the door is clear of obstructions.
6. Maintenance
- Cleaning: Clean the door and hardware regularly with a soft, damp cloth. Avoid abrasive cleaners or solvents that could damage the wood finish or powder coating.
- Hardware Inspection: Periodically check all screws and fasteners to ensure they remain tight. Re-tighten if necessary.
- Rail and Rollers: Keep the sliding rail free of dust and debris. If the door's movement becomes stiff, clean the rail and rollers. Lubrication is generally not required for the internal bearings but can be applied sparingly to the rail if needed.
- Wood Care: If the door is untreated, consider applying a wood sealant, paint, or varnish to protect it from moisture and wear.
7. Troubleshooting
| Problem | Possible Cause | Solution |
|---|---|---|
| Door does not slide smoothly | Debris on rail, loose rollers, misaligned rail. | Clean the rail. Check and tighten roller bolts. Verify rail is level and securely mounted. |
| Door makes noise during operation | Dry rollers, loose hardware, debris. | Clean rail and rollers. Check all fasteners. Rubber seals on door stops help reduce noise. |
| Door swings at the bottom | Floor guide not installed or improperly adjusted. | Ensure the floor guide is installed and correctly positioned to engage the bottom of the door. |
| Door comes off the rail | Anti-jump blocks not installed or loose. | Install or tighten the anti-jump blocks on the top edge of the door. |
8. Specifications
8.1 Door Specifications
- Material: Solid Pine Wood (untreated)
- Dimensions (W x D x H): 70 x 3.6 x 210 cm (27.6 x 1.4 x 82.7 inches)
- Color: Natural Wood (untreated)
- Weight: Approximately 25.26 kg (55.7 lbs)
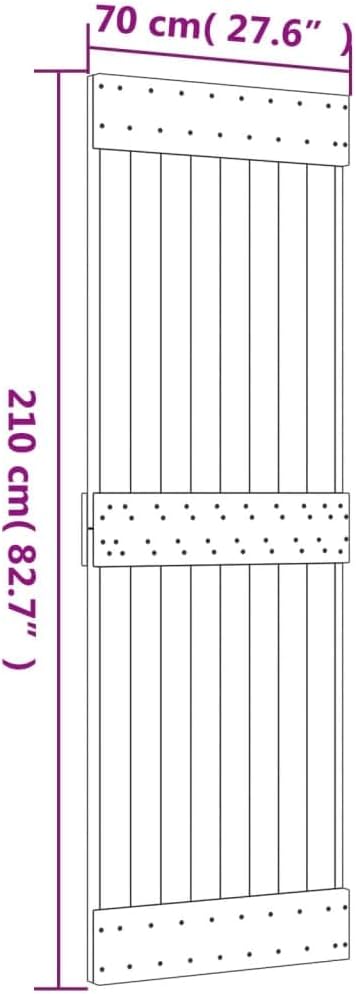
Image 8.1: Door dimensions.
8.2 Hardware Kit Specifications
- Color: Black
- Material: Powder-coated Steel
- Total Sliding Rail Length: 200 cm (78.7 inches)
- Maximum Load Capacity: 80 kg (176 lbs)
- Suitable Door Width: 70-100 cm (27.6-39.4 inches)
- Suitable Door Thickness: 35-45 mm (1.4-1.8 inches)

Image 8.2: Sliding rail length.
9. Warranty Information
Specific warranty details for this product may vary by region and retailer. Please refer to your purchase documentation or contact your point of sale for comprehensive warranty information.
10. Customer Support
For further assistance, technical support, or to inquire about replacement parts, please contact vidaXL customer service. Refer to the contact information provided with your purchase or visit the official vidaXL website.
Manufacturer: vidaXL
Model Number: 3203139