PARWIN PRO BEAUTY HT0295
PARWIN PRO BEAUTY 5-in-1 Curling Iron Set
Model: HT0295
1. Important Safety Information
Please read all instructions carefully before use and retain for future reference.
- Burn Hazard: Surfaces get extremely hot during use. Avoid direct contact with skin.
- Electric Shock Risk: Keep away from water. Do not use near bathtubs, sinks, or other water sources.
- Fire Risk: Unplug when not in use. Do not leave unattended when plugged in.
- Keep out of reach of children.
2. Product Overview
The PARWIN PRO BEAUTY 5-in-1 Curling Iron Set offers versatile styling options with its interchangeable barrels and advanced heating technology.

Image: The complete 5-in-1 curling iron set including the main handle, five interchangeable barrels, heat protective glove, and two hair clips.
What's Included:
- 1 x Curling Iron Handle with LED Display
- 5 x Interchangeable Tourmaline Ceramic Barrels:
- Original Square Iron (for fine hair and medium-length curly hair)
- 9" Extra Long Spiral Wand (for long waves and large curls)
- 0.5in Wand (for small wool curly hair)
- 3/4-1 1/4in Conical Wand (for bouncy & textured curls)
- 1in Wand with Clip (for lazy, voluminous & loose curls)
- 1 x Heat Protective Glove
- 2 x Hair Clips
- 1 x Storage Bag
Video: An overview of the items included in the PARWIN PRO BEAUTY 5-in-1 Curling Iron Set.
3. Setup
Before first use, ensure all packaging materials are removed.
Attaching and Detaching Barrels:
- Ensure the curling iron handle is unplugged and cool.
- Align the desired barrel with the handle's interface.
- Insert the barrel firmly into the handle.
- Rotate the handle's locking mechanism to the 'Lock' position (indicated by a closed padlock icon) to secure the barrel.
- To detach, rotate the locking mechanism to the 'Unlock' position (open padlock icon) and gently pull the barrel out.
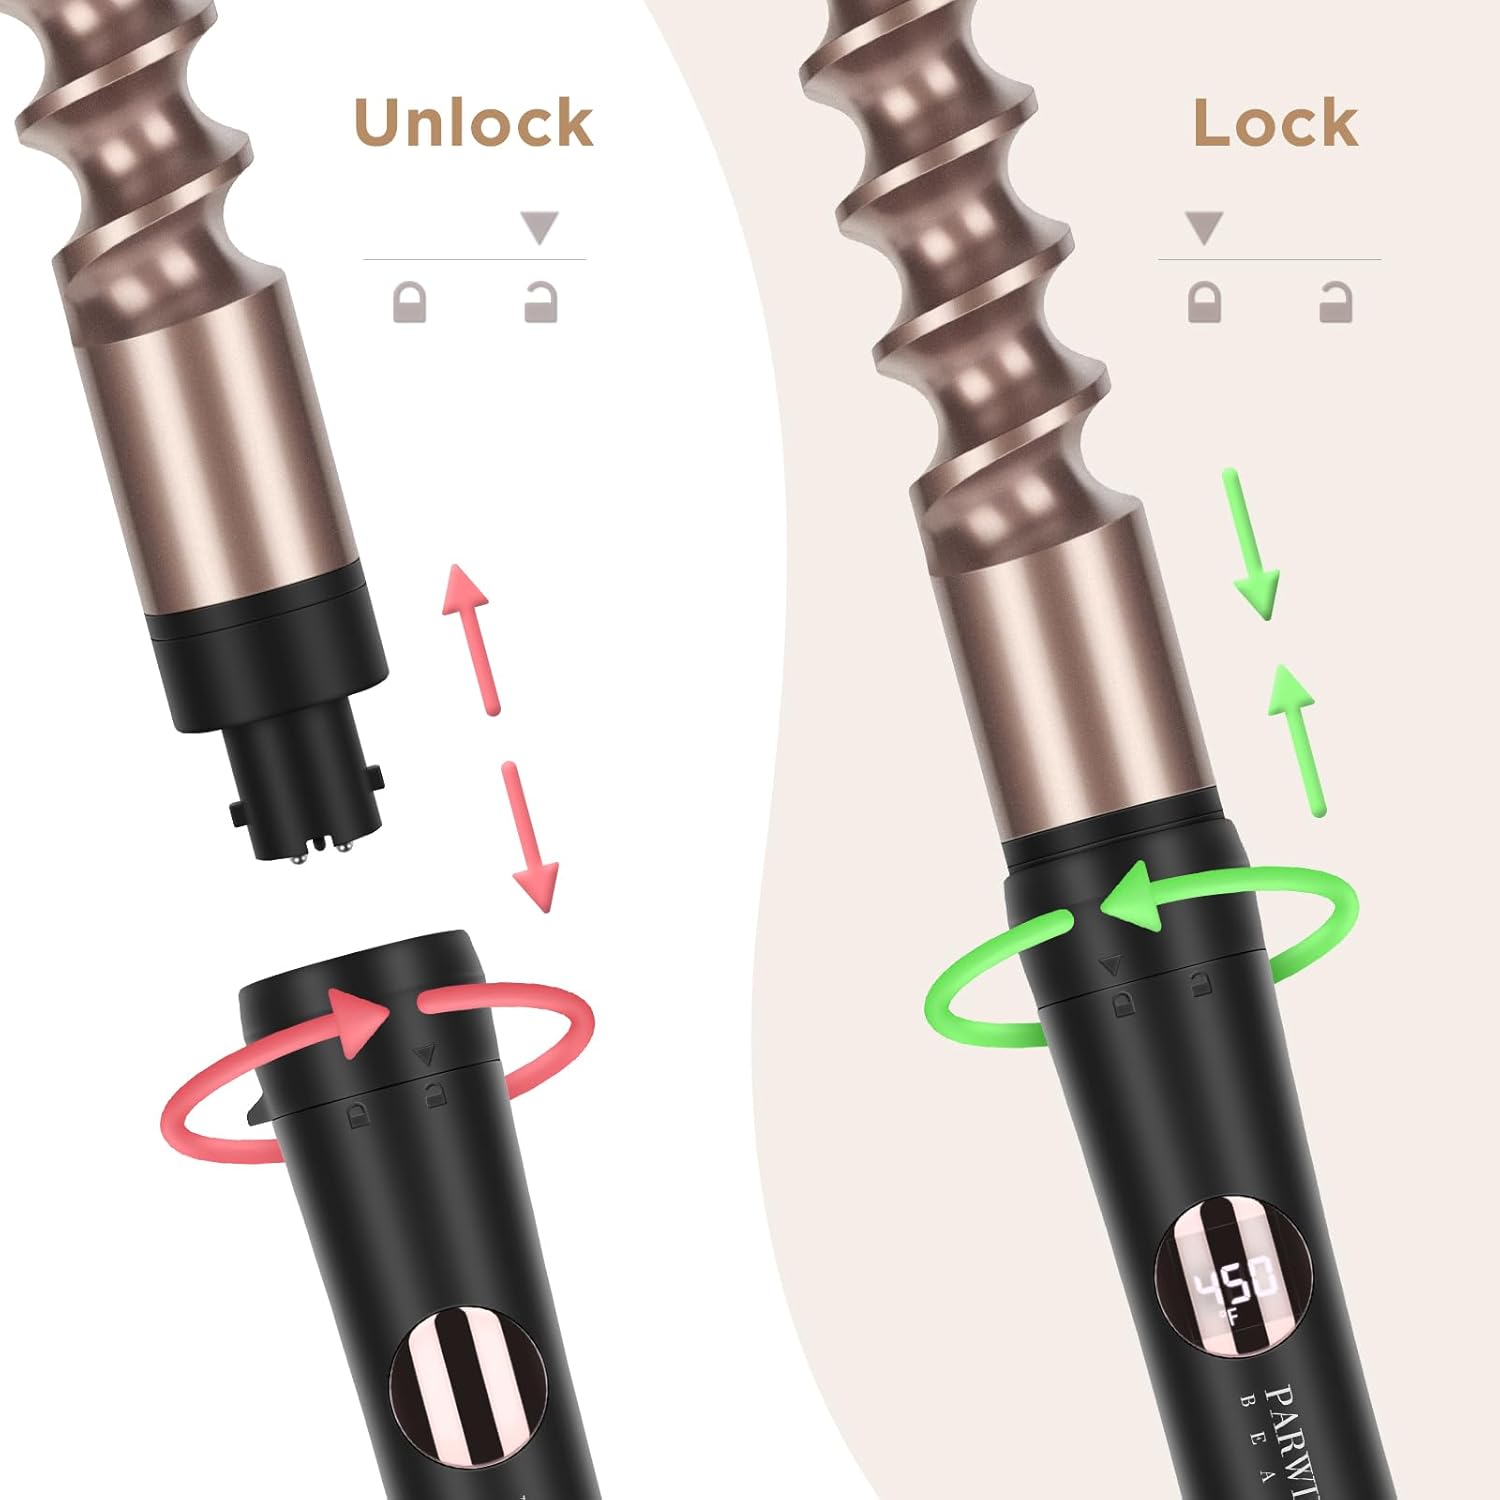
Image: Visual guide on the lock/unlock mechanism for attaching and detaching barrels.
Video: Demonstration of how to install and remove the barrel from the curling iron handle.
4. Operating Instructions
Power On/Off & Temperature Control:
- Plug the curling iron into a suitable power outlet (110-240V compatible).
- Press and hold the ON/OFF button for 2-3 seconds to power on.
- The LED display will show the current temperature. The iron heats up in approximately 30 seconds.
- Press the ON/OFF button repeatedly to cycle through the 4 adjustable temperature settings (330°F, 370°F, 410°F, 450°F).
- It is recommended to start with a lower temperature and adjust as needed for your hair type.
- The temperature display will blink until the desired temperature is reached.
- The curling iron features a 60-minute automatic shut-off for safety.

Image: Details of the curling iron handle, including the LED temperature display, ON/OFF/temperature setting button, and 360° rotatable cable.

Image: Illustration of PTC heating technology, showing 30-second fast heating, 4 adjustable temperatures (330°F-450°F), and 60-minute auto shut-off.
Curling Techniques:
Always use the heat protective glove provided, especially when using wand-style barrels without a clamp.
- For Loose Waves (1in Wand with Clip): Clamp a section of hair near the root, wrap the hair around the barrel, and hold for a few seconds before releasing.
- For Textured & Spiraled Curls (Square Iron): Wrap a section of hair around the square barrel, ensuring even contact with the flat edges. Hold briefly and release for a crimped effect.
- For Bouncy & Textured Curls (Conical Wand): Wrap hair around the tapered barrel, starting from the wider base for looser curls and moving towards the narrower tip for tighter curls.
- For Small Wool Curly Hair (0.5in Wand): Wrap small sections of hair tightly around the thin barrel for very defined, tight curls.
- For Long Waves & Large Curls (9" Extra Long Spiral Wand): Use this unique spiral barrel to create distinct, textured spiral curls by wrapping hair along its grooves.

Image: Visual examples of curls created by the Spiral (1.25in), Square, 1 inch Wand with clip, Conical (3/4-1 1/4in), and 0.5in Wand barrels.
Video: A short demonstration on how to use the curling iron for different styles.
Video: A visual guide to the different styling possibilities with the 5-in-1 curling iron set.
5. Maintenance
Proper maintenance ensures the longevity and performance of your curling iron set.
- Cleaning: Always unplug the device and allow it to cool completely before cleaning. Wipe the barrels and handle with a soft, damp cloth. Do not use harsh chemicals or abrasive cleaners.
- Storage: Store the curling iron and all its accessories in the provided storage bag in a cool, dry place. Ensure the cord is not wrapped tightly around the handle to prevent damage.
6. Troubleshooting
If you encounter any issues with your curling iron set, please refer to the following common solutions:
- Device not heating: Ensure the device is properly plugged into a working outlet and the ON/OFF button is pressed and held until the display lights up. Check for any visible damage to the cord or plug.
- Barrel not staying in place: Ensure the barrel is fully inserted and the locking mechanism is rotated to the 'Lock' position.
- Hair getting tangled: Ensure hair is clean, dry, and free of tangles before curling. Use smaller sections of hair. The smooth tourmaline ceramic coating is designed to prevent tangling.
For further assistance, please contact customer support.
7. Specifications
| Product Dimensions | 11.5 x 1.25 x 1.25 inches; 2.2 Pounds |
| Item Model Number | HT0295 |
| Manufacturer | PARWIN PRO BEAUTY |
| Material | Titanium (Tourmaline Ceramic Coating) |
| Hair Type | Normal |
| Temperature Range | 330°F - 450°F (4 settings) |
| Auto Shut-off | 60 minutes |
| Voltage | 110-240V (Dual Voltage) |
8. Warranty & Support
The PARWIN PRO BEAUTY 5-in-1 Curling Iron Set comes with a one-year guarantee, ensuring safe use and product reliability.
Lifelong technical support and 7/24-hour customer service are guaranteed. For any inquiries or assistance, please contact our support team.
Ask a question about this manual
Ask about setup, troubleshooting, compatibility, parts, safety, or missing instructions. Manuals+ will review the question and use this page’s manual context to help answer it.