eppfun AK3046G
eppfun AK3046G Pro Bluetooth 5.3 Audio Adapter User Manual
Model: AK3046G Pro
1. Introduction
The eppfun AK3046G Pro is a versatile Bluetooth 5.3 audio adapter designed to add wireless audio capabilities to various devices. It functions as both a Bluetooth transmitter (TX mode) and a Bluetooth receiver (RX mode), allowing you to stream audio wirelessly to or from non-Bluetooth devices. This manual provides detailed instructions for setup, operation, and maintenance.
Package Contents
- eppfun AK3046G Pro Bluetooth 5.3 Audio Adapter
- 3.5mm AUX Audio Cable
- USB-C Charging Cable
- Optical Audio Cable (TOSLINK)
- Coaxial Audio Cable
- User Manual (this document)
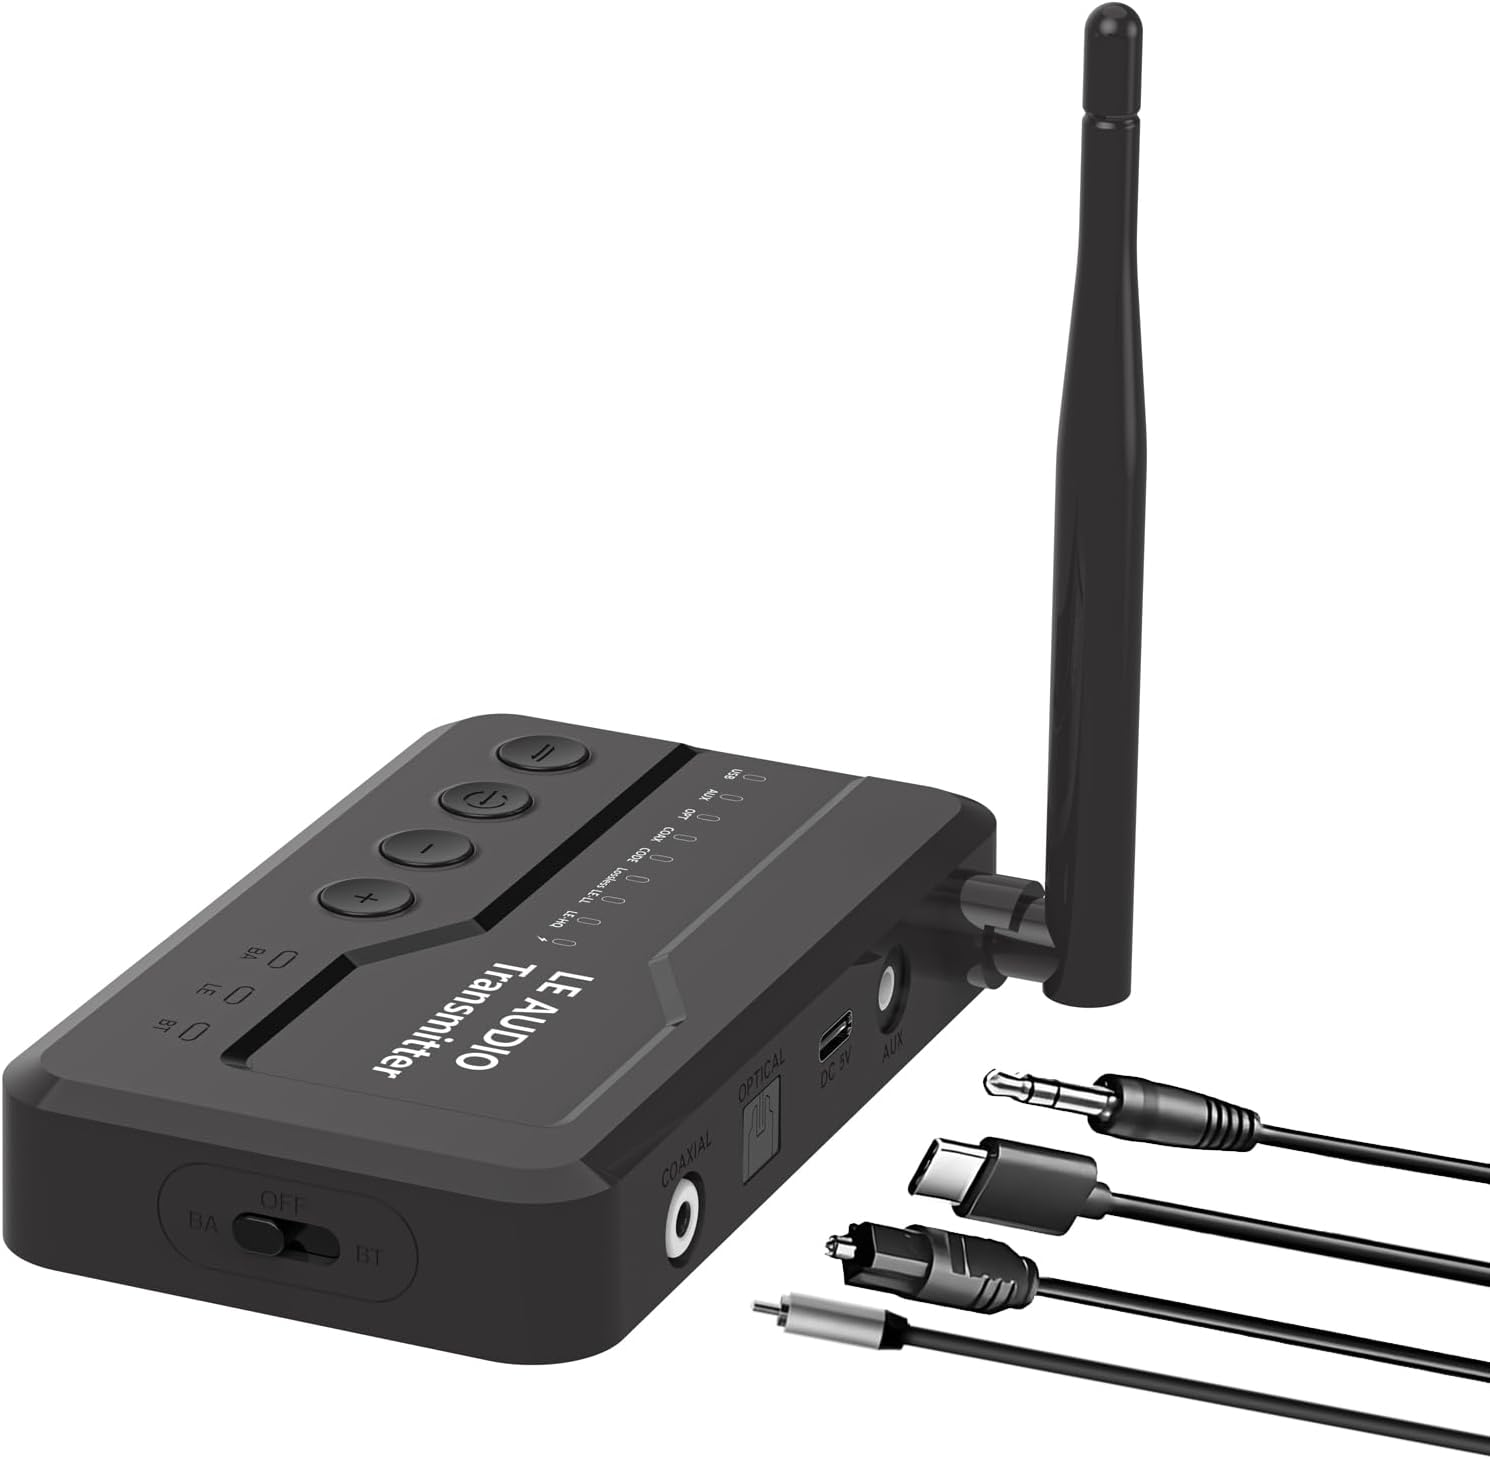
Image 1.1: The eppfun AK3046G Pro Bluetooth 5.3 Audio Adapter shown with its detachable antenna and various included cables: 3.5mm AUX, USB-C charging, optical, and coaxial. The adapter features control buttons on top and input/output ports on the side.
2. Key Features
- Bluetooth 5.3 Technology: Ensures stable connection and fast transmission.
- 2-in-1 Functionality: Operates as both a Bluetooth Transmitter (TX) and Receiver (RX).
- LED Display Screen: Shows Bluetooth connection status, volume, battery level, and working mode.
- CVC8.0 Noise Cancellation & DSP: Reduces background noise for clear call quality.
- Built-in Microphone: Enables hands-free calling in RX mode.
- Multiple Audio Inputs/Outputs: Supports 3.5mm AUX, Optical, and Coaxial connections.
- Convenient Control Buttons: Easy management of music playback, calls, and volume.
- Micro USB Charging: Efficient charging with included cable.
3. Setup and Connection
3.1 Device Overview
Familiarize yourself with the device's ports and controls:
- Top Panel: Power button, Play/Pause, Volume Up (+), Volume Down (-).
- Front Panel: LED Display.
- Side Panel: OFF/BA/BT switch (Power/Bypass/Bluetooth mode), Optical IN/OUT, Coaxial IN/OUT, DC 5V (Micro USB charging), AUX IN/OUT.
- Antenna: Detachable for improved signal.
Image 3.1: A detailed view of the eppfun AK3046G Pro, highlighting the control buttons (Power, Play/Pause, Volume Up, Volume Down) on the top surface, the LED display, and the various ports on the side including Optical, Coaxial, DC 5V (Micro USB), and AUX. The OFF/BA/BT switch is also visible.
3.2 Charging the Device
- Connect the Micro USB charging cable to the DC 5V port on the adapter.
- Connect the other end of the USB cable to a 5V USB power source (e.g., car charger, wall adapter, computer USB port).
- The LED display will indicate charging status. A full charge takes approximately 35 minutes.
3.3 Receiver Mode (RX) Setup
Use RX mode to receive audio from a Bluetooth-enabled device (e.g., smartphone) and output it to a non-Bluetooth audio system (e.g., car stereo, wired headphones, home stereo).
- Switch to RX Mode: Slide the switch on the side of the adapter to the "BT" position.
- Connect to Audio System:
- For 3.5mm AUX: Connect one end of the 3.5mm AUX cable to the adapter's AUX port and the other end to your audio system's AUX input.
- For Optical: Connect the optical cable to the adapter's OPTICAL port and your audio system's optical input.
- For Coaxial: Connect the coaxial cable to the adapter's COAXIAL port and your audio system's coaxial input.
- Power On: Press and hold the power button on the top panel until the LED display illuminates.
- Pairing: The adapter will automatically enter pairing mode (indicated on the LED display). On your Bluetooth-enabled device (e.g., smartphone), search for "eppfun AK3046G Pro" in the Bluetooth settings and select it to pair.
- Audio Playback: Once paired, play audio on your Bluetooth device, and it will stream wirelessly to your connected audio system.
3.4 Transmitter Mode (TX) Setup
Use TX mode to transmit audio from a non-Bluetooth audio source (e.g., TV, PC, MP3 player) to a Bluetooth-enabled audio device (e.g., Bluetooth headphones, Bluetooth speaker).
- Switch to TX Mode: Slide the switch on the side of the adapter to the "BT" position.
- Connect to Audio Source:
- For 3.5mm AUX: Connect one end of the 3.5mm AUX cable to the adapter's AUX port and the other end to your audio source's audio output (e.g., headphone jack).
- For Optical: Connect the optical cable to the adapter's OPTICAL port and your audio source's optical output.
- For Coaxial: Connect the coaxial cable to the adapter's COAXIAL port and your audio source's coaxial output.
- Power On: Press and hold the power button on the top panel until the LED display illuminates.
- Pairing: Ensure your Bluetooth headphones or speaker are in pairing mode. The adapter will automatically search for and connect to nearby Bluetooth audio devices. The LED display will show the connection status.
- Audio Playback: Once connected, play audio from your non-Bluetooth source, and it will transmit wirelessly to your Bluetooth audio device.
4. Operation
4.1 Power On/Off
- Power On: Press and hold the power button for approximately 3 seconds.
- Power Off: Press and hold the power button for approximately 3 seconds.
4.2 Music Control (RX Mode)
- Play/Pause: Press the Play/Pause button once.
- Volume Up: Press the "+" button.
- Volume Down: Press the "-" button.
- Next Track: Press and hold the "+" button.
- Previous Track: Press and hold the "-" button.
4.3 Call Control (RX Mode)
When connected to a smartphone in RX mode:
- Answer Call: Press the Play/Pause button once.
- End Call: Press the Play/Pause button once during a call.
- Reject Call: Press and hold the Play/Pause button for 2 seconds.
- Redial Last Number: Double-press the Play/Pause button.
4.4 LED Display Indicators
The LED display provides real-time information:
- Bluetooth Connection Status: Indicates if a device is connected or in pairing mode.
- Volume Level: Shows the current audio volume.
- Battery Level: Displays the remaining battery charge.
- Working Mode: Indicates whether the device is in RX (Receiver) or TX (Transmitter) mode.
- Audio Codec: May display the active audio codec (e.g., SBC, aptX).
5. Maintenance and Care
- Charging: Charge the device fully before first use. Recharge when the battery indicator is low. Avoid overcharging for extended periods.
- Cleaning: Use a soft, dry cloth to clean the device. Do not use liquid cleaners or solvents.
- Storage: Store the device in a cool, dry place away from direct sunlight and extreme temperatures.
- Water Exposure: This device is not waterproof. Avoid exposure to water or moisture.
6. Troubleshooting
6.1 Device Does Not Power On
- Ensure the device is fully charged. Connect it to a power source using the Micro USB cable and try again.
6.2 Cannot Pair with Bluetooth Device
- Ensure the adapter is in the correct mode (RX for receiving, TX for transmitting) and the side switch is set to "BT".
- Make sure the adapter is in pairing mode (LED display will indicate).
- Place the adapter and the target Bluetooth device close to each other.
- Turn off and on the Bluetooth function on your pairing device.
- Clear the Bluetooth pairing list on your device and try pairing again.
6.3 No Sound or Low Volume
- Check all cable connections (AUX, Optical, Coaxial) are secure and correctly inserted.
- Ensure the volume on both the adapter and the connected audio device/source is turned up.
- Verify that the correct input/output source is selected on your audio system (e.g., AUX input on car stereo).
- Confirm the adapter is successfully paired and connected.
6.4 Poor Audio Quality or Disconnections
- Reduce the distance between the adapter and the connected Bluetooth device.
- Remove any obstacles (walls, large objects) that may interfere with the Bluetooth signal.
- Avoid strong electromagnetic interference from other electronic devices.
- Ensure the adapter is fully charged.
7. Specifications
| Model Name | AK3046G Pro |
| Bluetooth Version | 5.3 |
| Hardware Interface | Bluetooth, USB |
| Compatible Devices | Car Stereo System, Headphone, Home Stereo System, Smartphone, Speaker |
| Special Features | Built-In Microphone, LED Display |
| Audio Input | 3.5mm AUX, Optical, Coaxial |
| Audio Output | 3.5mm AUX, Optical, Coaxial, Bluetooth |
| Power Source | Battery Powered (Lithium-Polymer) |
| Charging Port | Micro USB (DC 5V) |
| RX Mode Working Time | Approximately 7.5 hours |
| TX Mode Working Time | Approximately 5 hours |
| Charging Time | Approximately 35 minutes |
| Weight | 0.1 Kilograms |
| Dimensions | 12 x 9 x 1 cm (Package dimensions) |
8. Warranty and Support
eppfun products are designed and manufactured to the highest quality standards. For information regarding warranty coverage, technical support, or customer service, please refer to the official eppfun website or contact your local distributor. Please retain your proof of purchase for warranty claims.
For further assistance, visit: www.eppfun.com
Related Documents - AK3046G
 |
eppfun 3040C Pro Bluetooth 5.4 Transmitter and Receiver Specifications Technical specifications and packaging list for the eppfun 3040C Pro 3-in-1 Bluetooth 5.4 transmitter and receiver. |
 |
eppfun Cutemeet 818 Bluetooth Speaker User Manual and Specifications Comprehensive guide for the eppfun Cutemeet 818 Bluetooth speaker, covering product specifications, detailed user interface operations, packaging contents, and essential regulatory compliance information. |
 |
EPPFUN Cute meet 600 Wireless Earbuds User Manual and Guide Comprehensive user manual for the EPPFUN Cute meet 600 wireless earbuds, covering product overview, specifications, setup, usage, troubleshooting, warranty, and safety information. |
 |
eppfun cute meet 150 LS002 Wireless Earbuds User Manual User manual for the eppfun cute meet 150 LS002 wireless earbuds. Provides instructions on charging, pairing, fitting, basic operations, warranty information, and safety guidelines. |
 |
eppfun AK3040R PRO User Manual: Bluetooth Audio Receiver Setup & Operation Comprehensive user manual for the eppfun AK3040R PRO Bluetooth audio receiver. Learn how to connect, operate, charge, and troubleshoot this high-fidelity audio adapter. |
 |
eppfun AV100C Audio Ground Loop Noise Isolator Overview Overview of the eppfun AV100C audio ground loop noise isolator, featuring plug-and-play design, HiFi performance, and multi-device compatibility for car and home audio systems. |
Ask a question about this manual
Ask about setup, troubleshooting, compatibility, parts, safety, or missing instructions. Manuals+ will review the question and use this page’s manual context to help answer it.