
Introduction
The Epiphone Sonic Sidekick is a 15-watt guitar amplifier designed for electric guitars. It features a range of digital amp tones, modulation effects, delay, reverb, and an integrated electronic rhythm module. This manual provides instructions for the proper setup, operation, and maintenance of your amplifier to ensure optimal performance and longevity.
Safety Information
Please read and understand all safety instructions before operating the amplifier. Retain this manual for future reference.
- Risk of Electric Shock: Do not open the amplifier casing. There are no user-serviceable parts inside. Refer all servicing to qualified service personnel.
- Hot Area: The rear panel of the amplifier may become hot during extended use. Avoid prolonged contact.
- Fuse Replacement: For continued protection against the risk of fire, replace the fuse only with the same type and rating as specified on the rear panel.
- Power Supply: Ensure the amplifier is connected to a power outlet matching the voltage specified on the rear panel (100-120V~60Hz or 220-240V~50Hz).
- Do not expose the amplifier to rain or moisture.
- Do not block ventilation openings.
Product Overview
Front View

This image displays the front of the Epiphone Sonic Sidekick amplifier, featuring a black speaker grille and the Epiphone brand logo prominently displayed at the bottom.
Control Panel
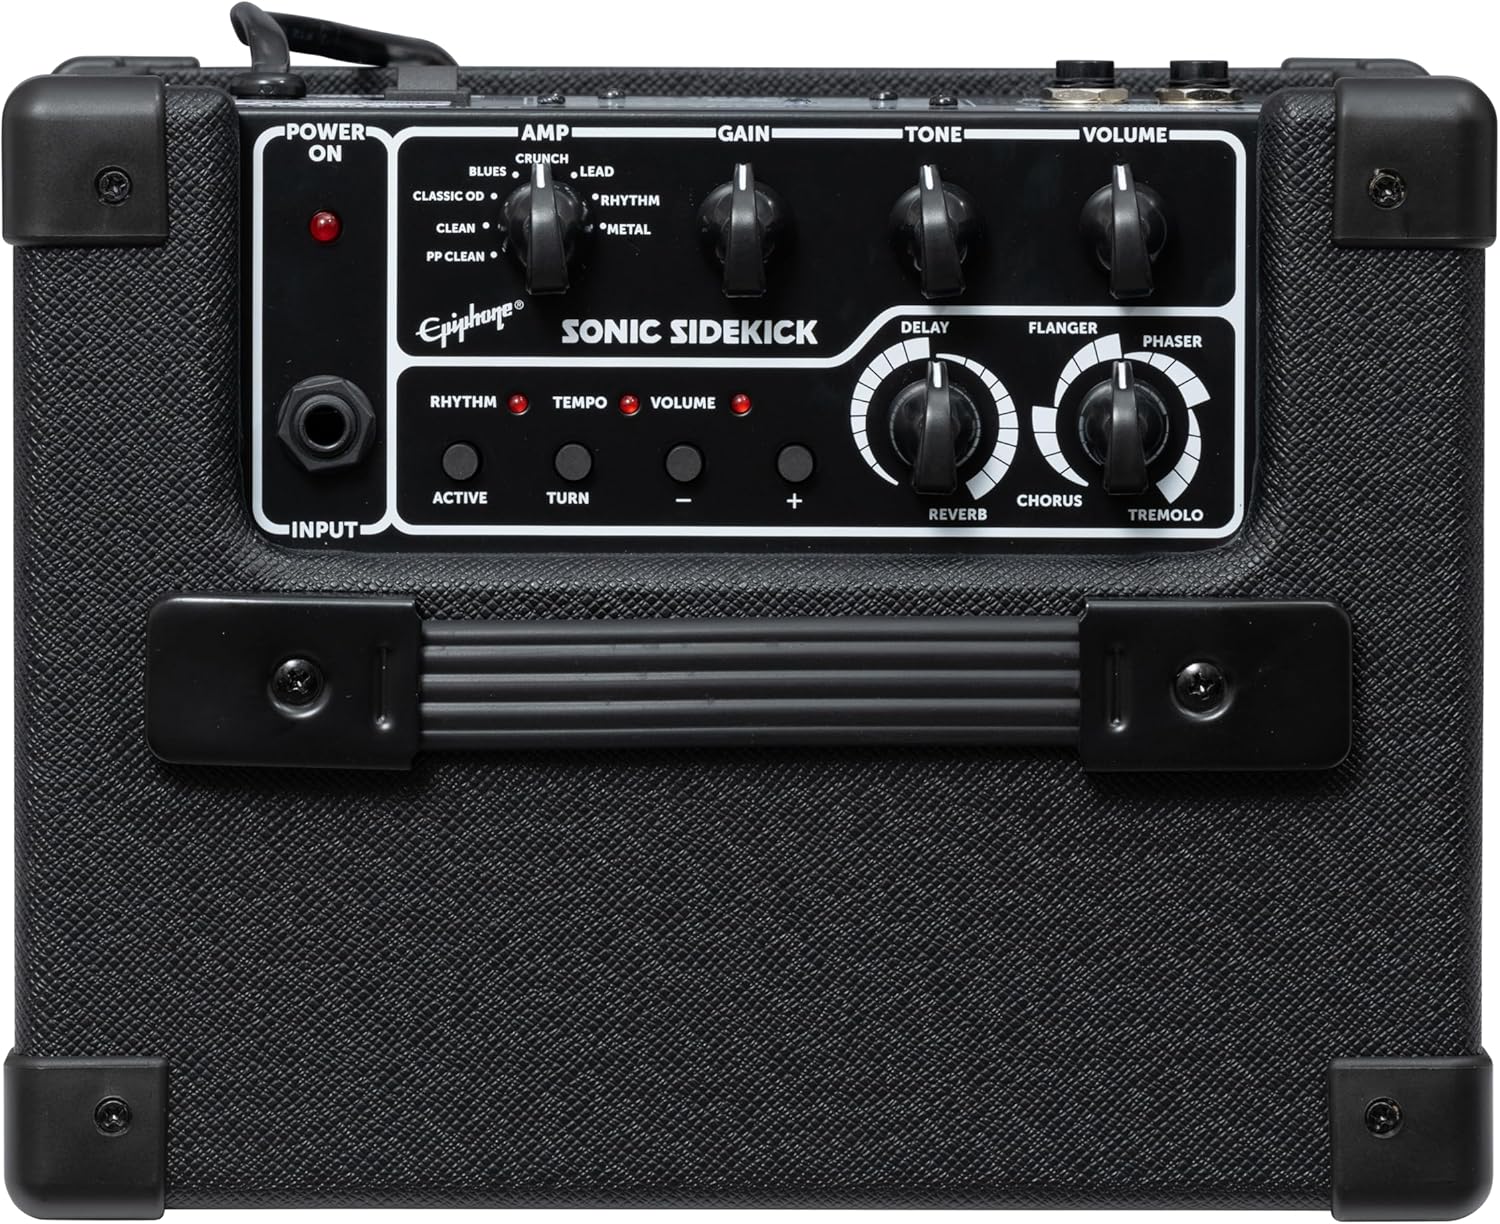
This image provides a clear view of the amplifier's top control panel, including the Power On switch, Input jack, Amp selector, Gain, Tone, Volume, Rhythm module controls (Active, Turn, Tempo, Volume), and Effects section (Delay, Reverb, Chorus, Flanger, Phaser, Tremolo).
- POWER ON: Indicator light and switch for amplifier power.
- INPUT: 0.25-inch jack for connecting your electric guitar.
- AMP Selector: Rotary switch to select one of eight amplifier models: PP Clean, Clean, Classic OD, Blues, Crunch, Lead, Rhythm, Metal.
- GAIN: Controls the amount of input signal overdrive or distortion.
- TONE: Adjusts the overall tonal character, from darker to brighter.
- VOLUME: Controls the overall output level of the amplifier.
- RHYTHM Section:
- ACTIVE: Button to engage or disengage the rhythm module.
- TURN: Selects one of 36 rhythm patterns.
- TEMPO: Adjusts the speed of the rhythm pattern. Can be tapped or rotated.
- VOLUME: Controls the output level of the rhythm module.
- EFFECTS Section:
- DELAY: Controls the level of the delay effect.
- REVERB: Controls the level of the reverb effect.
- CHORUS/FLANGER/PHASER/TREMOLO: Rotary switch to select and adjust the intensity of these modulation effects.
Rear Panel
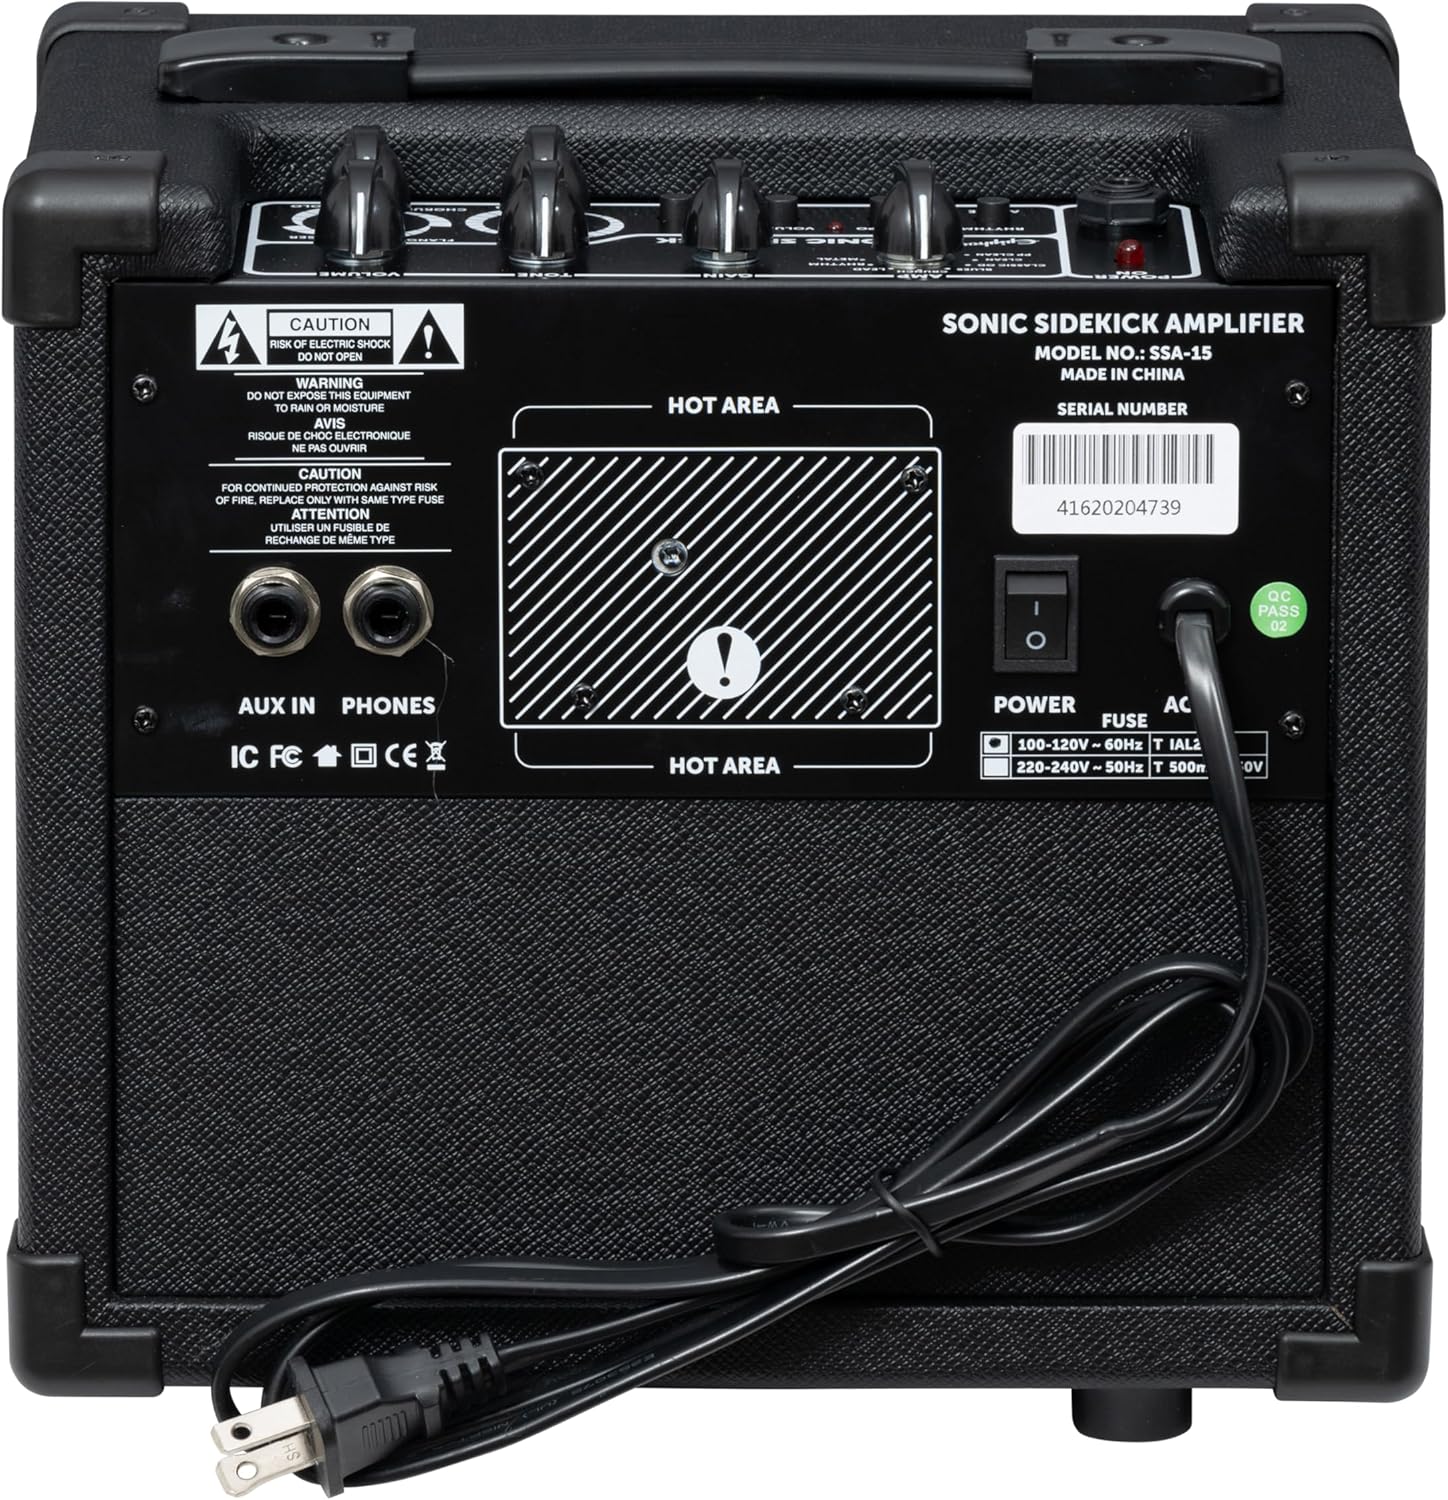
This image shows the back panel of the Epiphone Sonic Sidekick amplifier, highlighting the AC power input, fuse compartment, Aux In jack, Phones jack, and important safety warnings regarding electric shock and fuse replacement.
- AUX IN: 3.5mm stereo input jack for connecting external audio devices (e.g., smartphone, MP3 player).
- PHONES: 3.5mm stereo output jack for connecting headphones. Connecting headphones mutes the internal speaker.
- POWER: Main power switch for the amplifier.
- FUSE: Fuse compartment. Refer to safety information for replacement details.
- AC: Power cable input.
Setup
- Placement: Place the amplifier on a stable, level surface. Ensure adequate ventilation around the unit.
- Power Connection: Ensure the amplifier's POWER switch is in the OFF position. Connect the supplied power cable to the AC input on the rear panel, then plug the other end into a suitable wall outlet. Verify the outlet voltage matches the amplifier's requirements.
- Guitar Connection: Connect your electric guitar to the INPUT jack on the front panel using a standard 0.25-inch instrument cable.
- Auxiliary Device (Optional): To play along with external audio, connect your smartphone or other audio device to the AUX IN jack on the rear panel using a 3.5mm stereo cable.
- Headphones (Optional): For private practice, connect headphones to the PHONES jack on the rear panel. This will mute the internal speaker.
Operating Instructions
- Power On: Turn the POWER switch on the rear panel to the ON position. The POWER ON indicator on the front panel will illuminate.
- Initial Settings: Before playing, set the GAIN, TONE, and VOLUME knobs to their minimum positions to avoid sudden loud sounds.
- Select Amp Model: Rotate the AMP selector to choose your desired amplifier tone. Experiment with different models like Clean, Crunch, or Metal to find your preferred sound.
- Adjust Sound:
- Use the GAIN knob to control the amount of overdrive or distortion. Higher settings produce more aggressive tones.
- Adjust the TONE knob to shape the frequency response, making your sound brighter or warmer.
- Gradually increase the main VOLUME knob to achieve your desired listening level.
- Apply Effects:
- Rotate the DELAY knob to add echo effects.
- Rotate the REVERB knob to add spatial ambiance.
- Select a modulation effect (CHORUS, FLANGER, PHASER, TREMOLO) by rotating the corresponding knob. The intensity of these effects is controlled by the knob's position.
- Using the Rhythm Module:
- Press the ACTIVE button to turn the rhythm module on or off.
- Rotate the TURN knob to cycle through the 36 available rhythm patterns.
- Press the TEMPO button repeatedly to tap in your desired tempo, or rotate the TEMPO knob for fine adjustments.
- Use the RHYTHM VOLUME knob to adjust the rhythm module's output level independently of your guitar volume.
- Playing with Auxiliary Input: If an external audio device is connected to the AUX IN jack, its audio will be mixed with your guitar signal. Adjust the volume on your external device.
- Using Headphones: When headphones are connected to the PHONES jack, the internal speaker is muted. Adjust the main VOLUME knob to control the headphone output level.
- Power Off: When finished, turn the POWER switch on the rear panel to the OFF position.
Maintenance
- Cleaning: Wipe the amplifier's exterior with a soft, dry cloth. Do not use abrasive cleaners, solvents, or waxes, as these can damage the finish.
- Storage: Store the amplifier in a dry, cool environment, away from direct sunlight, extreme temperatures, and high humidity.
- Fuse Replacement: If the amplifier fails to power on, the fuse may need replacement. Always disconnect the power cable from the wall outlet before attempting to replace the fuse.
- Locate the FUSE compartment on the rear panel.
- Carefully pry open or unscrew the fuse holder.
- Remove the old fuse and replace it with a new fuse of the exact same type and rating (e.g., T 1AL250V for 100-120V regions, T 500mAL250V for 220-240V regions). Using an incorrect fuse can cause damage or fire.
- Securely reinsert the fuse holder. If the new fuse blows immediately, consult a qualified service technician.
Troubleshooting
If you encounter issues with your amplifier, refer to the following common troubleshooting steps:
- No Sound:
- Ensure the amplifier is powered on and the POWER ON indicator is lit.
- Check that all cables (power, guitar) are securely connected.
- Verify that the VOLUME knobs on both the amplifier and your guitar are turned up.
- If headphones are connected, disconnect them to check the main speaker.
- Test with a different guitar cable or guitar to rule out faulty equipment.
- Check the fuse (refer to Maintenance section).
- Distorted or Unwanted Noise:
- Reduce the GAIN or VOLUME settings on the amplifier.
- Ensure all cables are in good condition and properly shielded.
- Move the amplifier away from other electronic devices that may cause interference.
- Rhythm Module Not Working:
- Ensure the ACTIVE button for the rhythm module is engaged.
- Check the RHYTHM VOLUME knob is turned up.
- Effects Not Functioning:
- Ensure the respective effect knobs (DELAY, REVERB, CHORUS, etc.) are turned up from their minimum positions.
Specifications
| Feature | Specification |
|---|---|
| Brand | Epiphone |
| Model Name | Sonic Sidekick |
| Model Number | ES1PPAMP |
| Output Wattage | 15 Watts |
| Speaker Size | 6 Inches |
| Item Weight | 4.7 Kilograms |
| Power Source | Corded Electric |
| Amplifier Type | Digital Modeling |
| Input Connector Type | 0.25 inch Jack (Guitar) |
| Auxiliary Input | 3.5mm Jack |
| Headphone Output | 3.5mm Jack |
| Input Voltage (US) | 100-120V~60Hz |
| Input Voltage (EU/UK) | 220-240V~50Hz |
| Fuse (100-120V) | T 1AL250V |
| Fuse (220-240V) | T 500mAL250V |
Warranty and Support
For warranty information or technical support, please refer to the official Epiphone website or contact your authorized Epiphone dealer. Keep your purchase receipt as proof of purchase.