1. Important Safety Instructions
WARNING: Read all safety warnings and instructions before using this product. Failure to follow the warnings and instructions may result in electric shock, fire, and/or serious injury.
- This charger is designed for Bosch 12V and 10.8V Li-ion batteries only. Do not attempt to charge other types of batteries.
- Do not expose the charger to rain or wet conditions. Water entering a battery charger will increase the risk of electric shock.
- Use only the charger specified by the manufacturer. Using any other charger may create a risk of injury and fire.
- Do not abuse the cord. Never use the cord for carrying, pulling, or unplugging the charger. Keep cord away from heat, oil, sharp edges, or moving parts.
- Do not operate the charger if it has received a sharp blow, been dropped, or otherwise damaged. Take it to a qualified service person.
- Do not disassemble the charger. Take it to a qualified service person when service or repair is required. Incorrect reassembly may result in a risk of electric shock or fire.
- Unplug the charger from the power outlet before attempting any maintenance or cleaning.
- Do not charge batteries in damp or wet locations.
- Ensure proper ventilation during charging. Do not cover the charger.
2. Product Overview
The TAURUSKING CA-BOS-CH03 is a reliable battery charger designed for use with Bosch 12V and 10.8V Li-ion batteries. It provides efficient charging for various Bosch battery models, including BAT411, BAT412, BAT413, and BAT414. This charger operates on a wide input voltage range, making it versatile for different power environments.

Image 1: Front view of the TAURUSKING CA-BOS-CH03 battery charger, showing the battery slot and European power plug.

Image 2: Top view of the charger, highlighting the ventilation grilles and battery interface.
3. Specifications
| Brand | TAURUSKING |
| Model Number | CA-BOS-CH03 |
| Input Voltage | 110V-220V (AC) |
| Output Voltage | 12V (DC) |
| Current Rating | 1.5 Amps |
| Compatible Battery Types | Bosch 12V / 10.8V Li-ion (e.g., BAT411, BAT412, BAT413, BAT414) |
| Product Dimensions (D x W x H) | 7.09" x 5.91" x 3.94" |
| Item Weight | 0.5 Kilograms |
| UPC | 618758916728 |
4. Setup
- Unpack the Charger: Carefully remove the charger from its packaging. Inspect for any signs of damage.
- Choose a Location: Place the charger on a stable, flat, non-flammable surface in a well-ventilated area. Ensure it is away from direct sunlight, heat sources, and moisture.
- Connect to Power: Plug the charger's power cord into a suitable 110V-220V AC electrical outlet. The charger's LED indicator should illuminate green (sustained light), indicating it is powered on and ready.
5. Operating Instructions
Follow these steps to charge your compatible Bosch Li-ion battery:
- Insert Battery: Align your Bosch 12V or 10.8V Li-ion battery with the charging slot on the charger. Slide the battery firmly into place until it clicks.
- Monitor Charging: The LED indicator on the charger will change to a green flashing light, indicating that the battery is actively charging (0-100% charging).
- Charging Complete: Once the battery is fully charged, the LED indicator will change to a green sustained light.
- Remove Battery: Disconnect the charger from the power outlet. Press the battery release button (if present on your battery) and slide the fully charged battery out of the charger.
LED Indicator Functions:
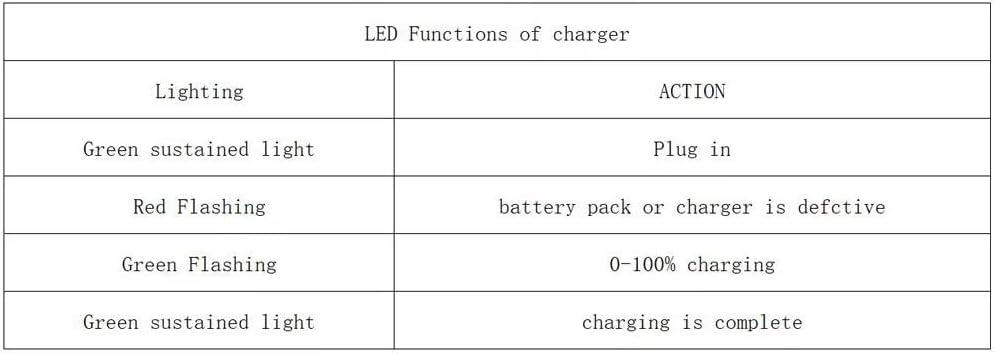
Image 3: Detailed table explaining the meaning of different LED light patterns on the charger.
| Lighting | Action |
|---|---|
| Green sustained light | Plug in (Ready) / Charging is complete |
| Red Flashing | Battery pack or charger is defective |
| Green Flashing | 0-100% charging |
6. Maintenance
- Cleaning: Always unplug the charger before cleaning. Use a soft, dry cloth to wipe the exterior of the charger. Do not use abrasive cleaners or solvents.
- Storage: When not in use, store the charger in a dry, cool place, away from direct sunlight and moisture.
- Cord Inspection: Regularly inspect the power cord for any damage, cuts, or fraying. If damaged, do not use the charger and have it repaired by a qualified professional.
7. Troubleshooting
Refer to the LED indicator functions for common issues:
- Charger not powering on (No LED light):
- Ensure the charger is securely plugged into a working power outlet.
- Check the power outlet with another device to confirm it has power.
- Inspect the power cord for damage.
- Red Flashing LED:
- This indicates a potential issue with either the battery pack or the charger itself.
- Try charging a different, known-good compatible battery to determine if the issue is with the battery or the charger.
- If multiple batteries cause a red flashing light, the charger may be defective.
- If only one battery causes it, that specific battery may be defective.
- Battery not charging (Green sustained light after inserting battery):
- Ensure the battery is correctly seated in the charging slot.
- The battery might already be fully charged.
- The battery might be too hot or too cold. Allow it to reach room temperature before attempting to charge.
8. Warranty and Support
For warranty information or technical support, please refer to the documentation included with your purchase or contact the manufacturer directly. Keep your purchase receipt as proof of purchase.
Manufacturer: Nuclear power source commerce
Brand: TAURUSKING