Introduction
This manual provides detailed instructions for the installation, operation, and maintenance of your LEDIARY 42 Inch Chandelier Ceiling Fan. Please read this manual thoroughly before installation and use to ensure proper function and safety. Keep this manual for future reference.
Safety Information
Always follow basic safety precautions when installing and operating electrical appliances to reduce the risk of fire, electric shock, and personal injury.
- Ensure the power is turned off at the circuit breaker before installation or maintenance.
- All electrical wiring must be performed by a qualified electrician and conform to local codes and regulations.
- The mounting structure must be capable of supporting the weight of the fan (approximately 22.9 pounds).
- Do not bend the blade holders during installation, balancing, or cleaning.
- Keep hands clear of the fan blades when the fan is operating.
- Do not use the fan with a dimmer switch not specifically designed for ceiling fans.
Package Contents
Verify that all components are present before beginning installation.

Image Description: A visual representation of all parts included in the package. This includes the canopy cover, two downrod options (4 and 8 inches), a coupling cover, a crystal stand, a lamp shade, the main motor host, an LED light panel, a remote control, a receiver, and 40 individual crystal strings.
- 1 x Canopy Cover
- 2 x Downrod (4"/8")
- 1 x Coupling Cover
- 1 x Crystal Stand
- 1 x Lamp Shade
- 1 x Motor Host
- 1 x LED Light Panel
- 1 x Remote Control (batteries included)
- 1 x Receiver
- 40 x Crystal String
Setup and Installation
Follow these steps for proper installation of your ceiling fan. Professional installation is recommended.
- Prepare the LED Light Board: Connect the LED light board to the motor host.
- Secure the Lampshade: Fix the lampshade to the fan assembly using screws.
- Install the Downrod: Insert the chosen downrod into the mounting bracket.
- Insert the Receiver: Place the receiver into the mounting bracket.
- Attach Crystal Strings: Hook the longest crystal bead string into the middle of the frame, then attach the remaining crystal strings.

Image Description: A sequential diagram illustrating the five main steps for assembling the ceiling fan. It shows connecting the LED light board, securing the lampshade, installing the downrod, inserting the receiver, and finally, attaching the crystal strings.
Mounting Considerations
- The fan is designed for flush mount installation.
- Two downrod options (4" and 8") are provided for adjustable height.
- Adaptable for sloped ceilings up to 15 degrees.
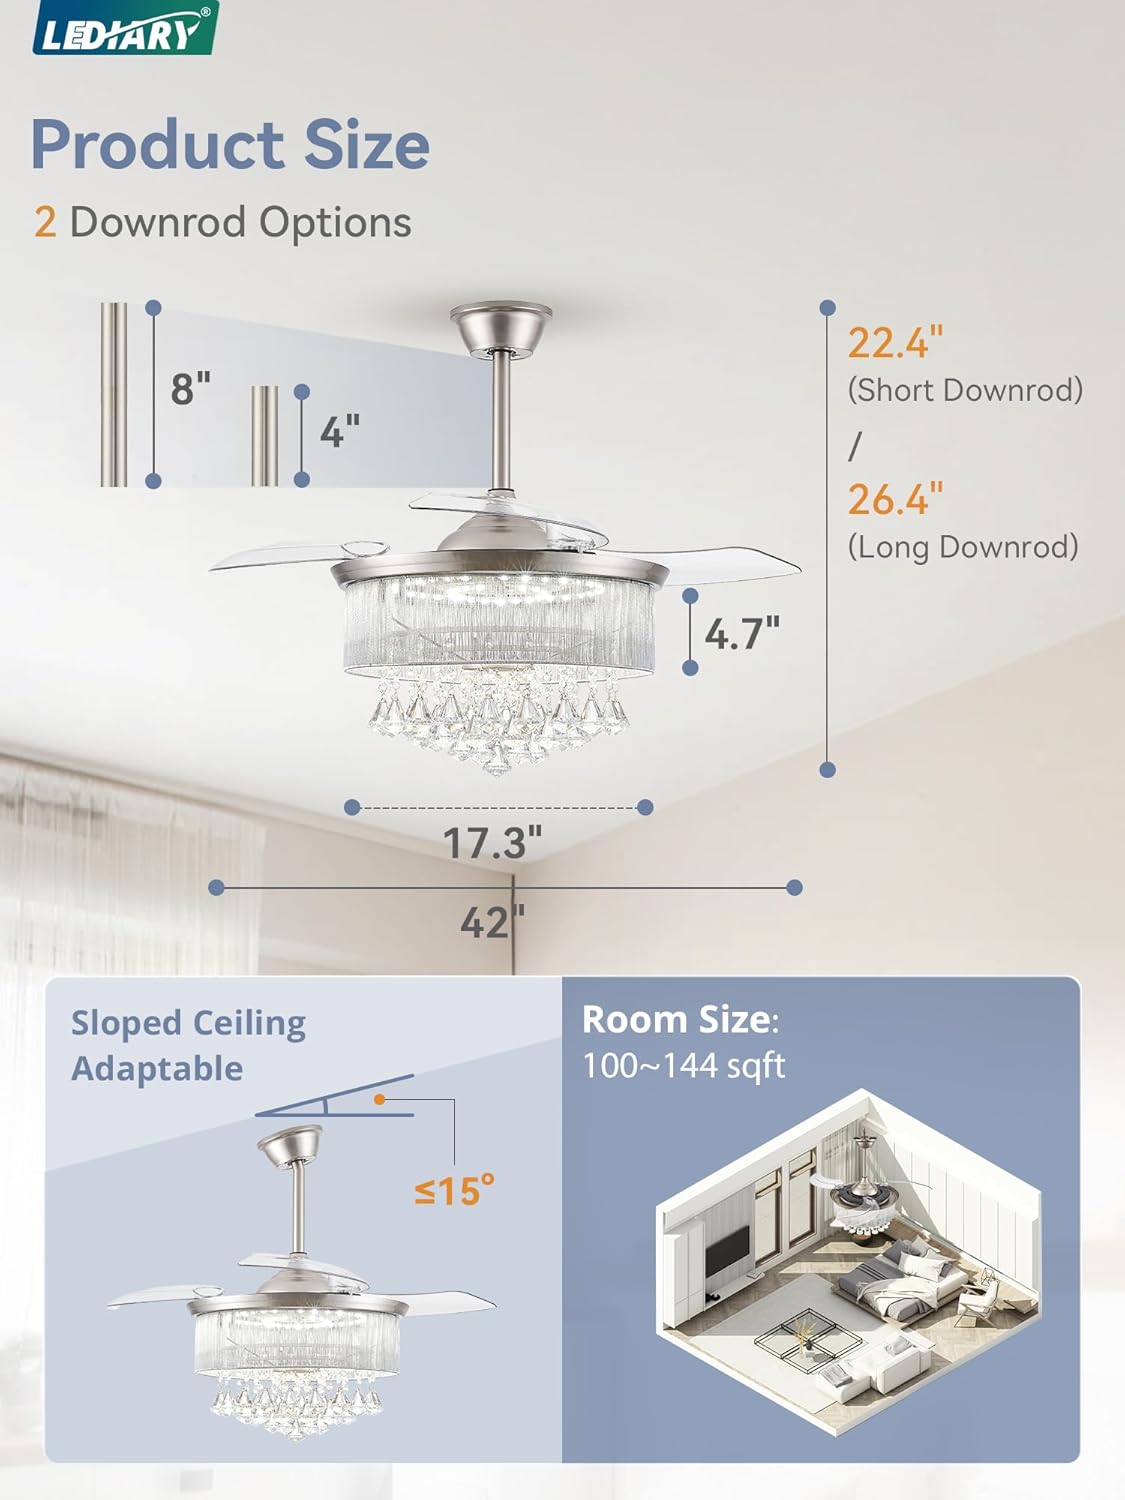
Image Description: This image displays the fan's dimensions, including its 42-inch diameter and height with both 4-inch and 8-inch downrod options. It also illustrates how the fan can be installed on sloped ceilings (up to 15 degrees) and suggests a suitable room size of 100-144 square feet.
Operating Instructions
Your LEDIARY ceiling fan can be controlled via the included remote control or a compatible smartphone application.
Remote Control and App Functions

Image Description: This image illustrates both the physical remote control and a smartphone application interface used to operate the fan. Key functions highlighted include 6 fan speeds, adjustable brightness, timer settings, color temperature control, and a reverse function.
- Fan Speeds: Select from 6 available fan speeds for optimal airflow.
- Brightness Adjustment: Adjust the LED lighting brightness from 10% to 100%.
- Color Temperature Control: Change the light color temperature between Warm White (3000K), Cool White (4500K), and Clear White (6000K).
- Timer Setting: Set the fan to turn off automatically after a specified duration (e.g., 1H, 2H, 4H).
- Reverse Function: Utilize the reversible DC motor for seasonal comfort.
- Night Light: Activate a low-level light setting for nighttime use.

Image Description: This visual shows the fan's lighting capabilities, displaying three distinct color temperatures: 3000K (Warm White), 4500K (Cool White), and 6000K (Clear White). Below these examples, a slider indicates the adjustable brightness range from 10% to 100%.
Reversible Motor Function
The fan features a reversible DC motor to optimize air circulation for different seasons.
- Summer Mode (Downdraft): Blades rotate counter-clockwise to create a cooling downdraft.
- Winter Mode (Updraft): Blades rotate clockwise to create an updraft, circulating warm air near the ceiling.

Image Description: This image visually explains the reversible motor function. On the left, 'Summer Mode' shows the fan creating a downward airflow for cooling. On the right, 'Winter Mode' depicts the fan generating an upward airflow to circulate warm air.
Retractable Blades
The fan's transparent blades automatically retract and become invisible when the fan is turned off, and extend when the fan is in operation.
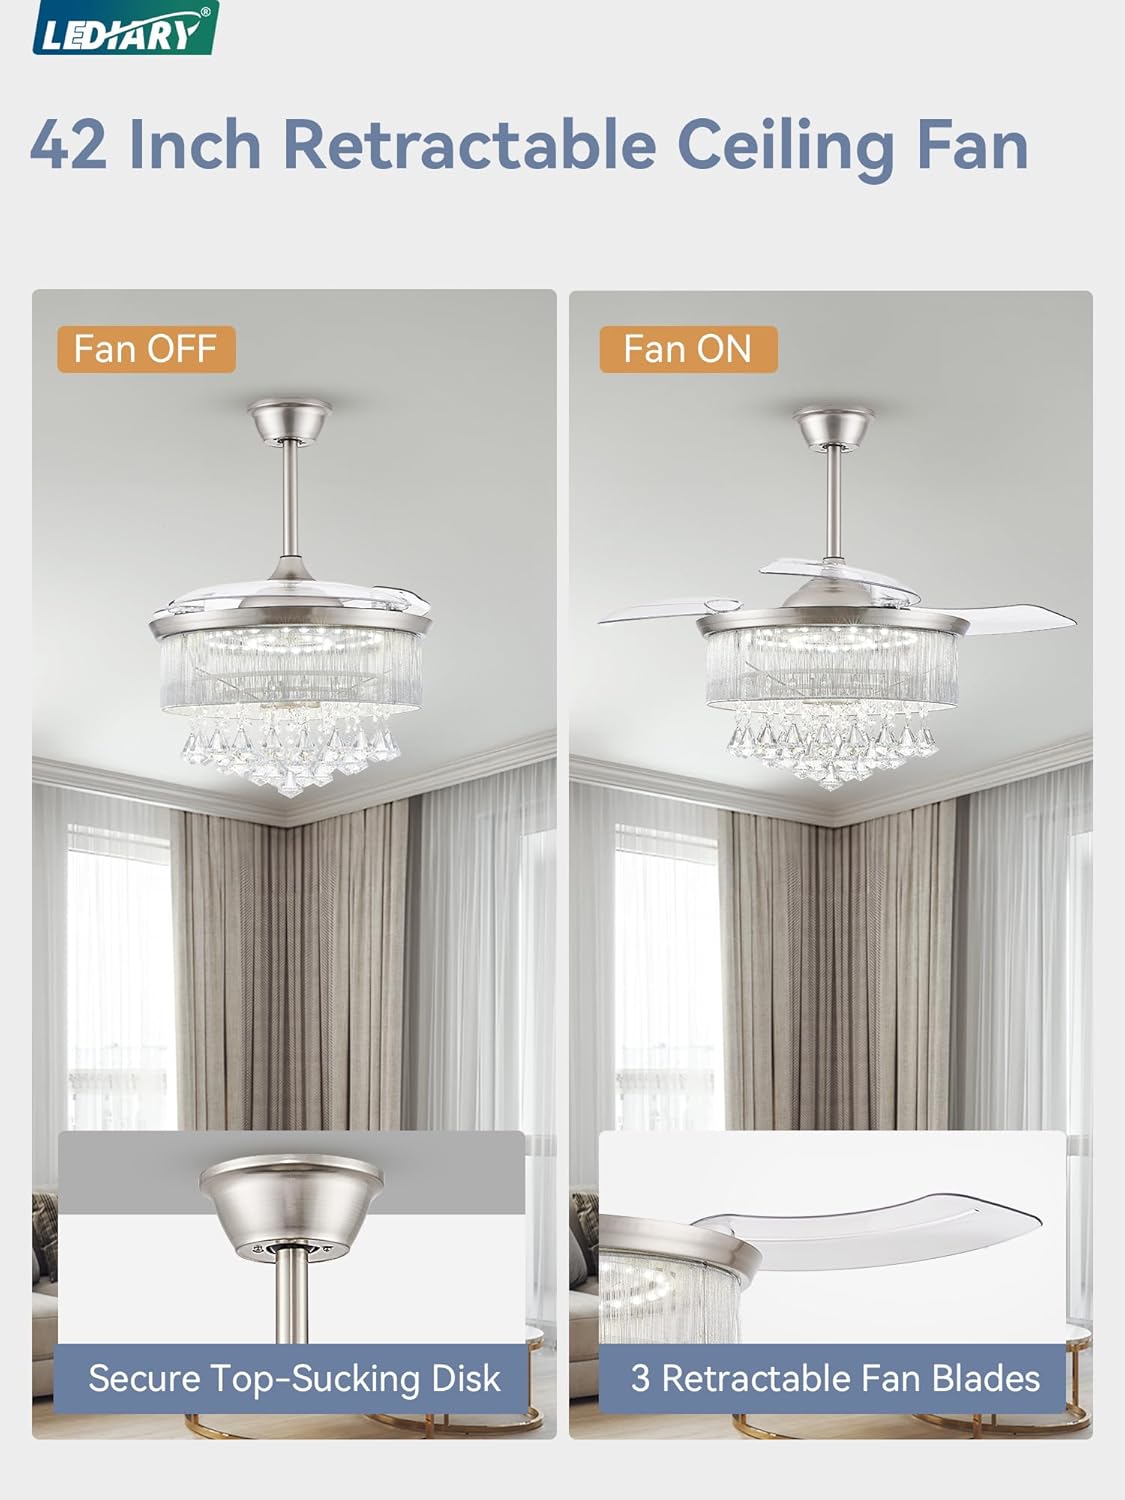
Image Description: A comparison image showing the fan in two states: 'Fan OFF' where the transparent blades are retracted and concealed, and 'Fan ON' where the blades are extended for operation.
Maintenance
Regular maintenance ensures the longevity and optimal performance of your ceiling fan.
- Cleaning: Turn off the power before cleaning. Use a soft, damp cloth to wipe down the fan housing and blades. Do not use abrasive cleaners or solvents.
- Crystal Care: Gently wipe crystals with a soft, lint-free cloth.
- Tighten Fasteners: Periodically check and tighten all screws and fasteners to ensure secure operation.
Troubleshooting
If you encounter issues with your fan, refer to the following common problems and solutions.
| Problem | Possible Cause | Solution |
|---|---|---|
| Fan does not start | No power to the fan; Loose wire connections; Remote control battery low. | Check circuit breaker; Verify all wire connections are secure; Replace remote control batteries. |
| Fan makes noise | Loose screws; Unbalanced blades; Motor hum. | Tighten all screws; Ensure blades are balanced; Motor hum is normal for DC motors, but should be minimal (under 30dB). |
| Light does not work | Loose wire connection; LED panel issue. | Check light wiring connections; Contact customer support if LED panel is faulty. |
| Remote control not working | Low battery; Remote not paired. | Replace batteries (Zinc Carbon); Refer to remote pairing instructions (if applicable). |
If problems persist after attempting these solutions, please contact LEDIARY customer support.
Specifications
| Feature | Detail |
|---|---|
| Brand | LEDIARY |
| Model Number | f384470f-a39d-45ac-bc7a-928e6ff337a5 |
| Product Dimensions | 42"L x 42"W x 26.4"H |
| Item Weight | 22.9 pounds |
| Material | Acrylonitrile Butadiene Styrene, Crystal, Iron |
| Color | Brush Nickel |
| Installation Type | Flush Mount |
| Power Source | DC |
| Motor Efficiency | 30W |
| Light Source Type | LED |
| LED Wattage | 40W |
| Light Color Temperature | 3000K (Warm), 4500K (Cool), 6000K (Clear) |
| Brightness | Adjustable (10%-100%) |
| Control Method | Remote Control, APP Control |
| Fan Speeds | 6 |
| Noise Level | Under 30dB |
| Special Features | Adjustable Height, Color Changing, Crystal, Dimmable, Timer, Retractable Blades, Reversible Motor |
| Assembly Required | Yes |
| Batteries for Remote | Zinc Carbon (Included) |
Warranty and Support
LEDIARY offers a 2-year warranty for this product. If you encounter any issues or require technical assistance, please contact LEDIARY customer support.
Your satisfaction is our priority. For support, please refer to the contact information provided with your purchase or visit the official LEDIARY website.