
1. Introduction
This manual provides essential instructions for the proper installation, use, and maintenance of the Dayton Parts 334-548 Bolt Assembly. Adhering to these guidelines will ensure optimal performance and longevity of the product. Please read this manual thoroughly before proceeding with any installation or maintenance.
2. Product Overview
The Dayton Parts 334-548 Bolt Assembly is designed for securing components in various industrial and automotive applications, specifically as a wheel bolt. It consists of multiple components engineered for durability and reliable fastening.
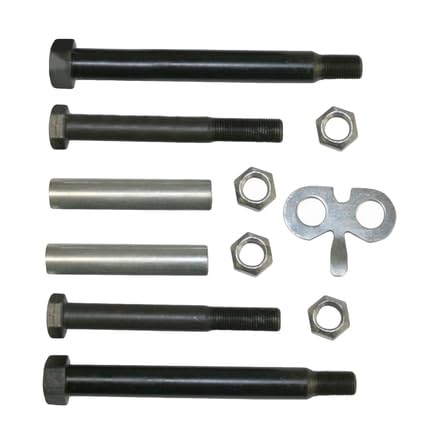
Figure 1: Components of the Dayton Parts 334-548 Bolt Assembly. The image displays several dark-colored bolts with hexagonal heads and threaded ends, silver cylindrical spacers, hexagonal nuts, and a flat, silver, key-like component with two circular openings.
3. Components List
The 334-548 Bolt Assembly typically includes the following components:
- Bolts: Hexagonal head bolts with threaded shafts.
- Nuts: Hexagonal nuts designed to match the bolt threads.
- Spacers/Bushings: Cylindrical components for proper spacing or alignment.
- Key/Retainer: A specialized flat metal component, possibly for alignment or securing.
4. Setup and Installation
Proper installation is critical for the safety and performance of the bolt assembly. Always refer to the specific equipment manufacturer's service manual for detailed torque specifications and procedures.
- Preparation: Ensure all mating surfaces are clean, free of debris, and corrosion. Inspect all components of the bolt assembly for any signs of damage or wear.
- Component Placement: Position the bolt, spacers, and any other specific components according to the equipment manufacturer's instructions.
- Initial Fastening: Hand-tighten the nuts onto the bolts to ensure proper thread engagement.
- Torquing: Using a calibrated torque wrench, tighten the nuts to the manufacturer's specified torque values. Follow the recommended tightening sequence (e.g., star pattern for wheel bolts) to ensure even pressure and prevent distortion.
- Final Check: After torquing, visually inspect the assembly to confirm all components are seated correctly and securely.
5. Operating
Once properly installed, the Dayton Parts 334-548 Bolt Assembly functions as a critical fastener, securing the intended components. No specific 'operating' steps are required beyond ensuring the assembly remains securely fastened during the operation of the equipment it is installed on.
6. Maintenance
Regular maintenance checks are essential to ensure the continued integrity and safety of the bolt assembly.
- Periodic Inspection: Regularly inspect the bolts, nuts, and surrounding components for signs of loosening, corrosion, cracks, or other damage.
- Re-torquing: After initial installation and during routine maintenance, re-torque the fasteners to the manufacturer's specifications, especially after the first few hours or miles of operation.
- Cleaning: Keep the assembly clean from dirt, grime, and corrosive substances.
- Replacement: Replace any damaged, corroded, or worn components immediately. Do not reuse bolts or nuts that show signs of stretching, stripped threads, or significant corrosion.
7. Troubleshooting
If issues arise with the bolt assembly, consider the following:
- Loosening: If bolts or nuts become loose, re-torque them to specification. Persistent loosening may indicate improper installation, incorrect torque, or component wear.
- Corrosion: Excessive corrosion can weaken fasteners. Ensure proper protective coatings are maintained and replace severely corroded parts.
- Damage: Any visible damage such as bent bolts, stripped threads, or cracked nuts requires immediate replacement of the affected components.
Always consult a qualified technician if you are unsure about the cause or solution to a problem.
8. Specifications
Key specifications for the Dayton Parts 334-548 Bolt Assembly are provided below:
| Attribute | Value |
|---|---|
| Brand | Dayton Parts |
| Model Number | 334-548 |
| Item Weight | 2 Pounds |
| Manufacturer | DAYTON PARTS |
| UPC | 601602108073 |
9. Safety Information
Always observe the following safety precautions when handling and installing the bolt assembly:
- Wear appropriate personal protective equipment (PPE), including safety glasses and gloves.
- Ensure the equipment is properly supported and secured before working on it.
- Use only the correct tools for installation and removal.
- Never exceed specified torque values, as this can lead to fastener failure.
- Keep children and unauthorized personnel away from the work area.
10. Warranty and Support
For specific warranty information regarding the Dayton Parts 334-548 Bolt Assembly, please refer to the documentation provided at the time of purchase or contact Dayton Parts directly. For technical support or inquiries, please reach out to your authorized Dayton Parts distributor or the manufacturer's customer service.