RLXLOKY B0CLR41YHY
RLXLOKY Cold Therapy Unit Instruction Manual
Model: B0CLR41YHY
1. Important Safety Information
Please read all instructions carefully before using the RLXLOKY Cold Therapy Unit. Failure to follow these instructions may result in injury or damage to the device.
- Consult a Healthcare Professional: Always consult with your doctor or a qualified healthcare professional before using this device, especially if you have pre-existing medical conditions, circulatory issues, nerve damage, or are pregnant.
- Skin Monitoring: Regularly inspect the skin under the cold therapy pad for any signs of redness, blistering, or discomfort. Discontinue use immediately if any adverse reactions occur.
- Temperature Control: Do not apply cold therapy directly to the skin for prolonged periods without a barrier. Use a cloth or bandage between the pad and skin to prevent frostbite.
- Electrical Safety: Ensure the unit is placed on a stable, dry surface. Keep the power adapter and electrical connections away from water to prevent electric shock. The unit is designed with separate water and pump compartments to enhance safety.
- Water Levels: Always ensure the water level in the bucket is between the 'Water line min' and 'Water line max' marks to ensure proper pump operation and prevent damage.
- Children and Pets: Keep the device out of reach of children and pets.
- Intended Use: This device is intended for temporary pain relief and post-trauma/post-exercise recovery. Do not use for any other purpose.
2. Package Contents
Verify that all items are present in your package:
- RLXLOKY Cold Therapy Unit (Main Unit with Digital Control Panel)
- Universal Ice Pad (12.2" x 13.9")
- Detachable Insulated Tube (1.5m / 5.2ft long)
- Elastic Velcro Straps (3" x 39.3")
- Power and Control Adapter (6.2ft)

Figure 2.1: Complete RLXLOKY Cold Therapy Unit package contents.
3. Product Overview
The RLXLOKY Cold Therapy Unit is designed for targeted cold therapy. It features a main unit with a digital control panel, a universal ice pad, and insulated tubing for efficient circulation of cold water.
3.1 Main Unit
The main unit houses the water reservoir, pump, and control panel. It has a 6L capacity for extended therapy sessions.

Figure 3.1: Dimensions of the Cold Therapy Unit and accessories.
3.2 Control Panel
The digital control panel allows you to set therapy duration and water flow speed.
- ON/OFF Button: Powers the unit on and off.
- Time Setting: Select from 20, 40, 60 minutes, or continuous mode.
- Flow Setting: Adjust water flow speed (F1, F2, F3, F4) to control intensity.
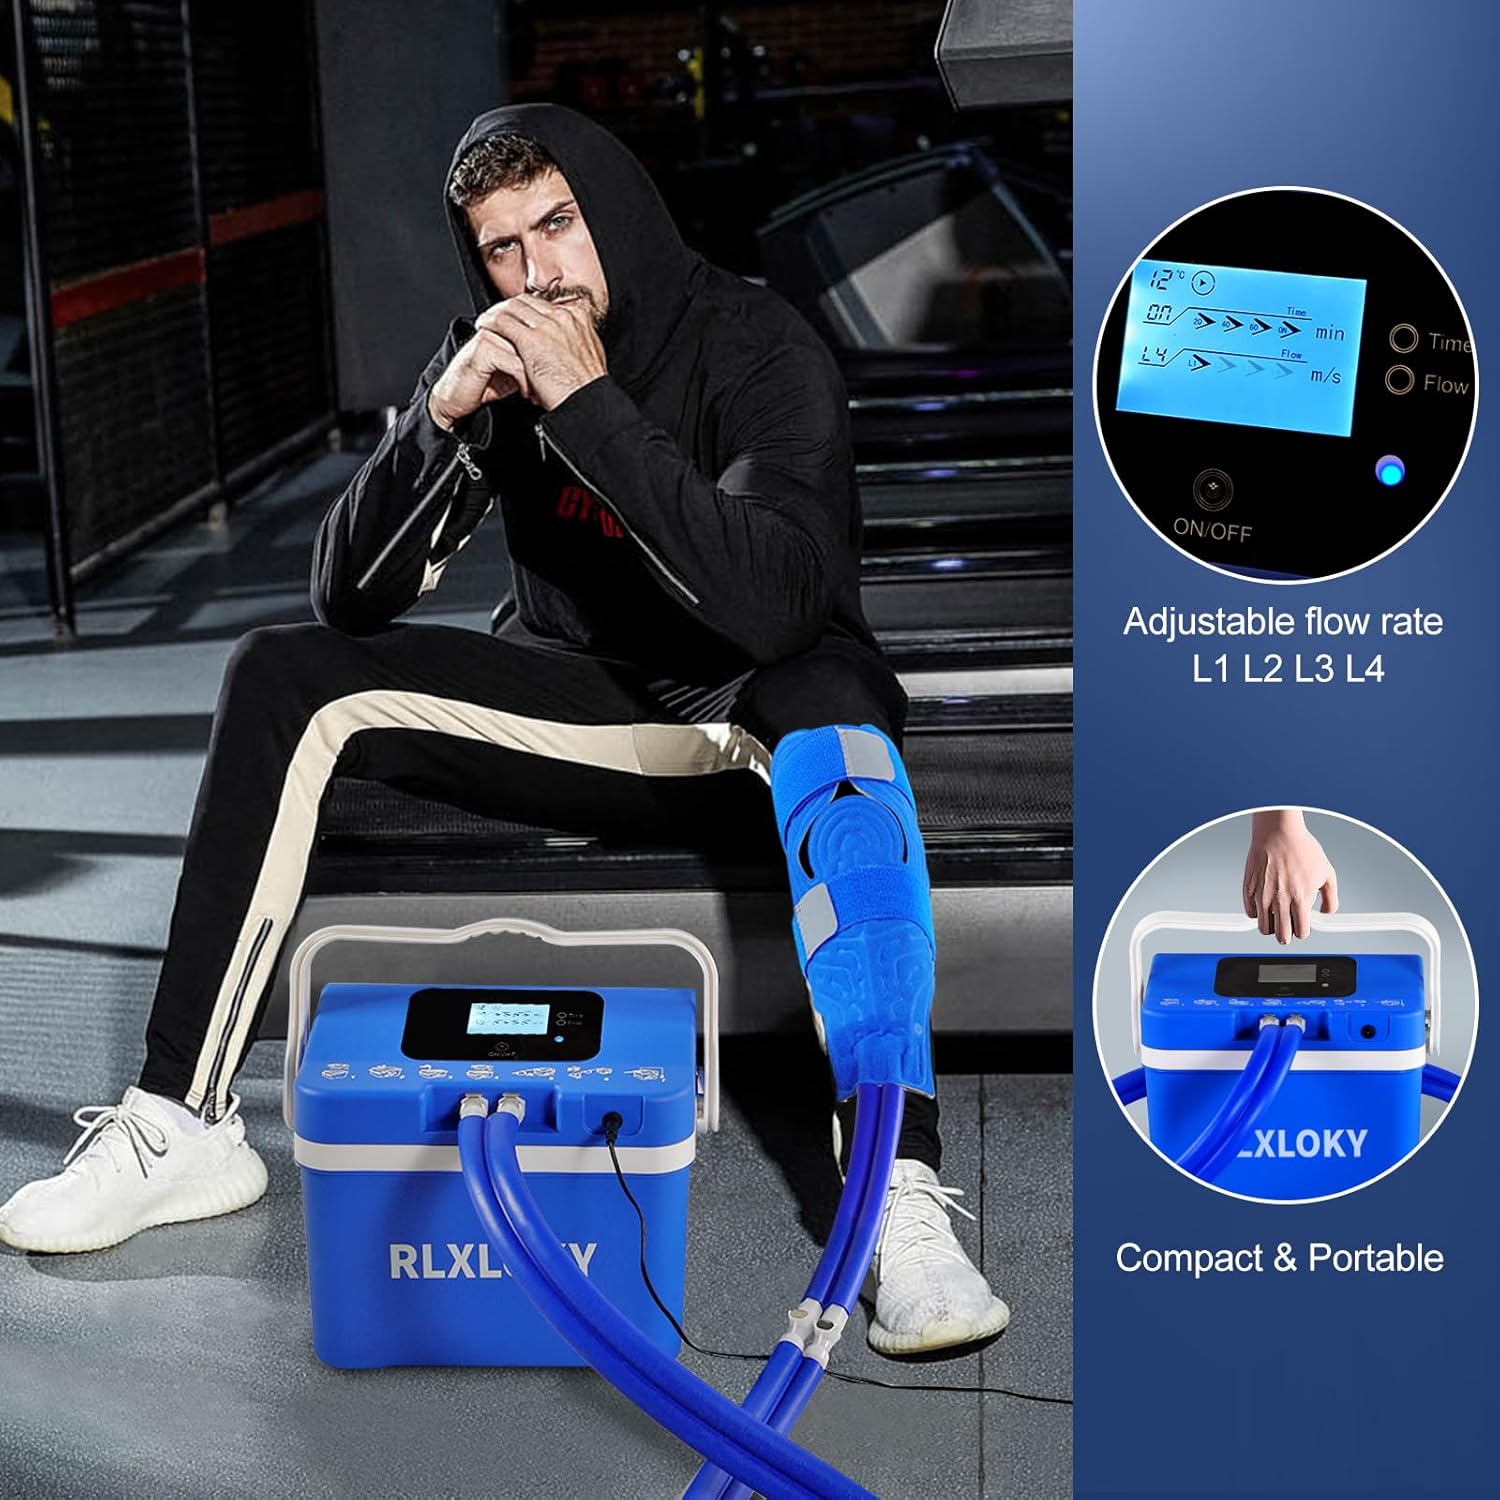
Figure 3.2: Digital control panel for time and flow adjustments.
3.3 Universal Ice Pad
The flexible ice pad is designed for various body parts, including the knee, ankle, shoulder, and back, providing targeted relief.
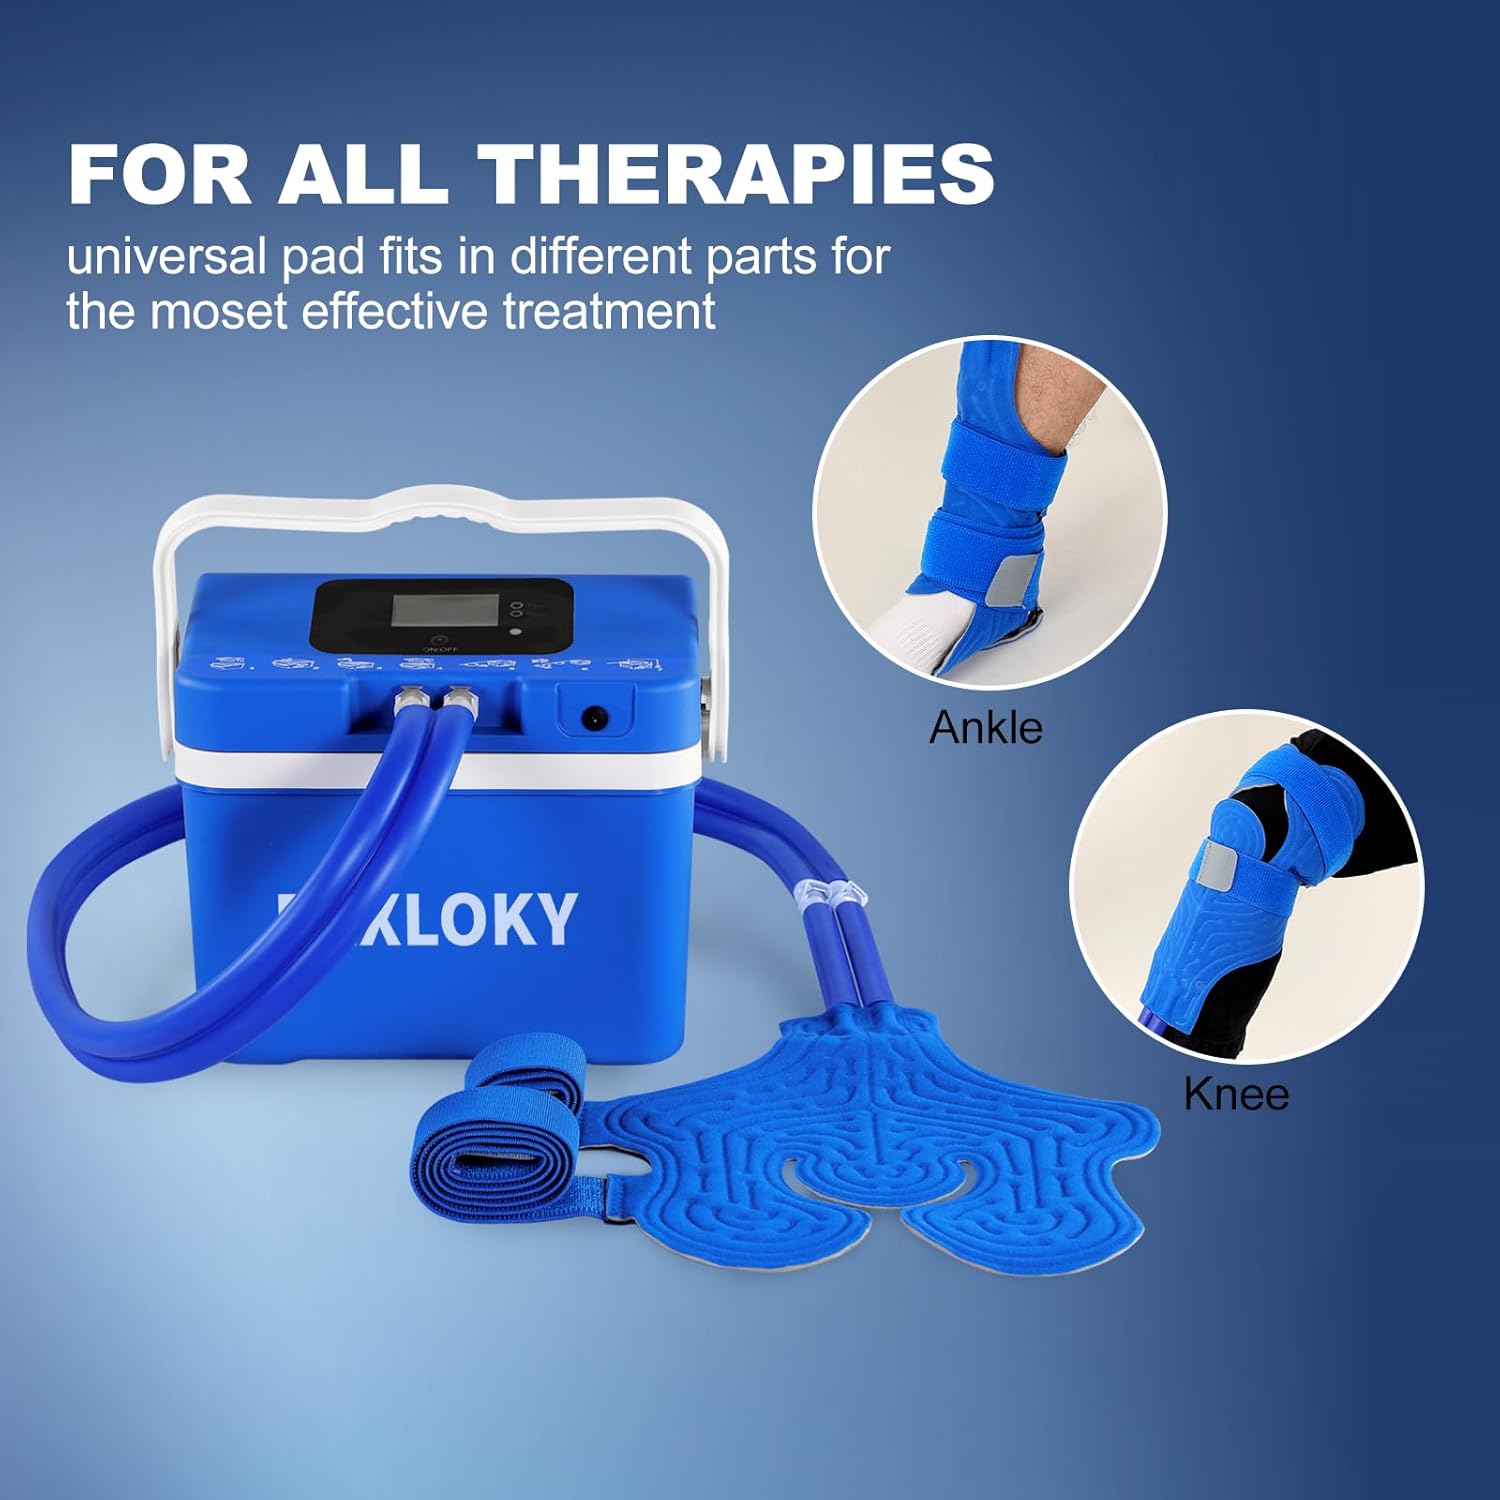
Figure 3.3: Universal ice pad application on ankle and knee.
4. Setup Instructions
Follow these steps to set up your cold therapy unit:
- Unlock and Open: Unlock the bucket handle by rotating it forward to the 'Unlock' position, then lift the lid of the main unit.
- Add Ice: Pour an appropriate amount of ice cubes into the inner bucket. More ice will result in colder water.
- Add Water: Fill the bucket with cold water, ensuring the water level is above the 'Water line min' mark and below the 'Water line max' mark. This ensures the sensor tube on the lid is covered.
- Close and Lock: Place the lid back onto the main unit and rotate the handle backward to the 'Lock' position to secure it and prevent water leakage.
- Connect Tubing: Connect the insulated tubes from the ice pad to the corresponding ports on the main unit. Ensure the metal locks on the female connectors are pressed down before connecting to make attachment easier. You will hear a click when correctly connected.
- Attach Pad: Secure the universal ice pad to the desired body area (e.g., knee, ankle, shoulder, back) using the elastic velcro straps. Ensure a snug but comfortable fit.
- Plug In: Plug the power adapter into the main unit's power port, then plug the adapter into a power outlet.

Figure 4.1: Visual guide for unit setup.
Setup Video Guide
Video 4.1: Detailed instructions on how to set up and use the RLXLOKY Cold Therapy Unit.
5. Operating Instructions
Once the unit is set up, you can begin your cold therapy session:
- Power On: Press and hold the ON/OFF button on the control panel to turn on the unit. The display will light up.
- Set Time: Press the 'Time' button to cycle through the available therapy durations: 20 minutes, 40 minutes, 60 minutes, or continuous mode.
- Set Flow: Press the 'Flow' button to select your desired water flow speed: F1 (lowest), F2, F3, or F4 (highest). Higher flow rates provide more intense cooling.
- Begin Therapy: The unit will automatically start circulating cold water through the pad once settings are selected.
- Monitor Progress: The display will show the remaining time and current flow setting.
- Power Off: To end the session, press and hold the ON/OFF button. The unit will stop circulating water.
Operation Video Guide
Video 5.1: Demonstration of the RLXLOKY Cold Therapy Machine with Universal Ice Pack in operation.
Quick Start Video
Video 5.2: A quick guide to getting started with the Cold Therapy Unit.
6. Maintenance and Care
Proper maintenance ensures the longevity and hygiene of your unit:
- Empty Water: After each use, disconnect the power and tubing. Unlock the lid and carefully empty any remaining water and melted ice from the bucket.
- Clean Unit: Wipe down the interior and exterior of the unit with a clean, damp cloth. For thorough cleaning, use a mild soap solution and rinse well. Ensure all components are dry before storage.
- Clean Pad and Tubing: Rinse the ice pad and tubing with clean water. Allow them to air dry completely.
- Storage: Store the unit in a cool, dry place away from direct sunlight. All items can be stored within the main unit for convenience.

Figure 6.1: Leak-proof couplings ensure secure connections and minimize spills during use and maintenance.
7. Troubleshooting
If you encounter any issues with your RLXLOKY Cold Therapy Unit, refer to the following common problems and solutions:
| Problem | Possible Cause | Solution |
|---|---|---|
| Unit does not power on | Power adapter not connected or faulty outlet. | Ensure power adapter is securely plugged into the unit and a working electrical outlet. Try a different outlet. |
| Water is not circulating | Insufficient water level; tubing kinked or disconnected; pump malfunction. | Check water level and add water if below 'min' line. Ensure tubing is not kinked and is securely connected to both the unit and the pad. |
| Unit is leaking water | Lid not properly locked; loose tubing connections; damaged seal. | Ensure the lid is securely locked. Check all tubing connections for tightness. Inspect the seal around the lid for any damage. |
| Not cold enough | Insufficient ice; low flow setting. | Add more ice to the bucket. Increase the flow setting on the control panel. |
If the problem persists after trying these solutions, please contact customer support.
8. Specifications
| Feature | Detail |
|---|---|
| Brand | RLXLOKY |
| Model | B0CLR41YHY |
| Package Dimensions | 13 x 10.9 x 9.9 inches |
| Weight | 6.1 Pounds (2.75kg) |
| Water Reservoir Capacity | 6 Liters |
| Timer Settings | 20min, 40min, 60min, Continuous |
| Flow Rates | F1, F2, F3, F4 |
| Ice Pad Dimensions | 12.2" x 13.9" |
| Elastic Strap Dimensions | 3" x 39.3" |
| Insulated Tube Length | 1.5m (5.2ft) |
| Power Adapter Length | 6.2ft |
| Special Features | Portable, Leak Proof, Reusable, Wearable, Adjustable |
9. Warranty and Support
RLXLOKY stands behind the quality of its products.
- Manufacturer's Warranty: This RLXLOKY Cold Therapy Unit comes with a one-year manufacturer's warranty.
- Customer Support: For any questions, concerns, or warranty claims, please contact RLXLOKY customer support through the retailer's platform or the official brand website.