1. Introduction
This manual provides detailed instructions for the assembly, operation, and maintenance of your Higeego H5 Extra Large Wire Garment Rack. Please read all instructions carefully before assembly and use to ensure proper function and safety.
The Higeego H5 Garment Rack is designed as a heavy-duty, freestanding storage solution for clothing and accessories. It features adjustable shelves and a customizable configuration to suit various storage needs.
2. Safety Information
- Ensure all components are present and undamaged before beginning assembly.
- Assemble the unit on a soft, clean surface to prevent scratches.
- Do not exceed the maximum load capacity of 1400 lbs for the entire unit, 88 lbs per shelf, and 75 lbs per hanger rod.
- Distribute weight evenly across shelves and hanging rods to maintain stability.
- Always use the included anti-tip device to secure the rack to a wall, especially in households with children or pets.
- Keep small parts away from children during assembly.
3. Package Contents
Verify that all the following components are included in your package:
- Wire Shelves (8 units)
- Vertical Poles (various lengths)
- Detachable Hanger Rods (5 units)
- Expandable Hanger Rods
- Adjustable Leveling Feet
- Plastic Clips (for shelf attachment)
- Anti-tip Device (wall anchor and strap)
- Assembly Instructions
4. Setup and Assembly
Before assembly, measure your intended space to ensure the rack fits. A rubber mallet (not included) is recommended for easier assembly.
4.1. Preparation
- Unpack all components and lay them out on a clean, flat surface.
- Identify each part by comparing it with the parts list.
4.2. Assembling the Poles
- Screw the adjustable leveling feet into the bottom of the lower pole sections.
- Connect the upper and lower pole sections by screwing them together. Ensure they are securely tightened.
4.3. Attaching Shelves
- Snap the plastic clips onto the poles at your desired shelf height. Ensure the clips are oriented correctly and all four clips for a single shelf are at the same height.
- Slide a wire shelf down over the poles until it rests firmly on the plastic clips. Gently tap the shelf corners with a rubber mallet to secure it.
- Repeat for all shelves. Note that certain shelves may need to be installed in a particular order based on your desired configuration.
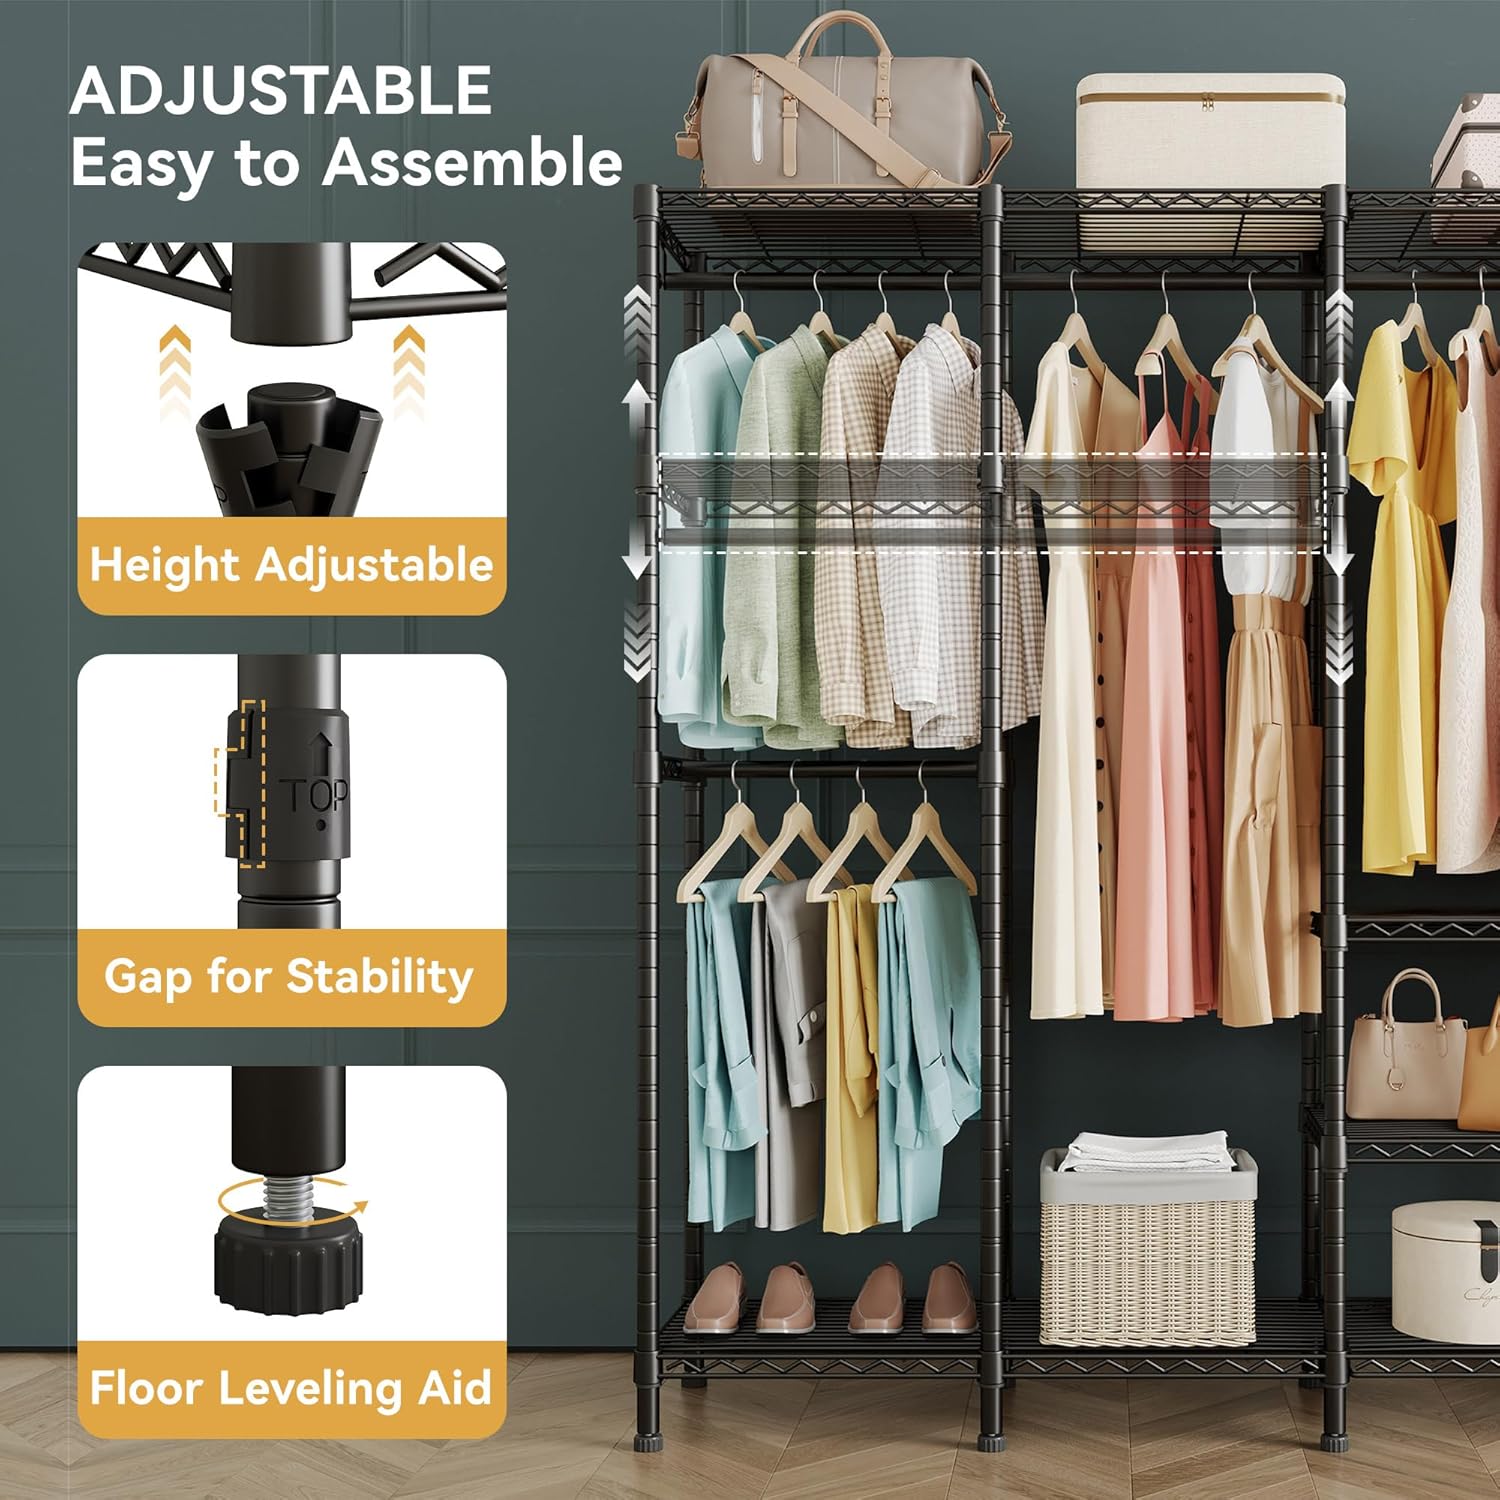
Figure 1: Adjustable features including height adjustment and leveling feet.

Figure 2: Detail of the height adjustment mechanism for shelves.
4.4. Installing Hanger Rods
- Attach the detachable hanger rods between two poles at your desired height. Ensure they are securely hooked into the shelf wires or designated slots.
- If using expandable hanger rods, adjust their length to fit the space between poles and secure them.

Figure 3: Detail of a detachable hanger rod attachment.
4.5. Securing the Rack
- Once fully assembled, adjust the leveling feet to ensure the rack is stable and does not wobble on uneven floors.
- Attach the anti-tip device to the top of the rack and secure it to a wall stud using appropriate hardware.

Figure 4: Adjustable leveling foot for stability.

Figure 5: Anti-tip device for wall attachment.
5. Operating and Usage
The Higeego H5 Garment Rack offers versatile storage options:
- Adjustable Shelves: Customize the height of the wire shelves to accommodate different items such as folded clothing, handbags, shoes, or storage boxes.
- Hanging Rods: Utilize the multiple hanging rods for short and long garments like shirts, dresses, coats, and trousers.
- Configuration Options: The rack can be assembled in a straight-lined configuration for walk-in closets or a large room, or an L-shape for corner spaces.

Figure 6: Example of organized storage areas for various clothing types.

Figure 7: Customizable configurations, including straight and L-shaped setups.

Figure 8: Example of two units combined to create a larger walk-in closet system.
6. Maintenance
- Cleaning: Wipe down the wire shelves and poles with a soft, damp cloth. Avoid abrasive cleaners or harsh chemicals that could damage the powder-coated finish.
- Rust Prevention: The carbon steel construction features a high-quality coating designed to protect against humidity, rust, and corrosion. To maintain this protection, avoid prolonged exposure to excessive moisture.
- Stability Check: Periodically check all connections and leveling feet to ensure the rack remains stable and secure. Re-tighten any loose components as needed.
7. Troubleshooting
- Rack is Unstable/Wobbles:
- Ensure all poles are fully connected and tightened.
- Verify that all plastic clips are securely snapped into place at the same height for each shelf.
- Adjust the leveling feet on the bottom of the poles to compensate for uneven flooring.
- Confirm that the anti-tip device is properly installed and secured to a wall stud.
- Difficulty Assembling:
- Refer to the assembly instructions carefully, paying attention to the order of shelf installation.
- Ensure plastic clips are oriented correctly and fully closed around the poles.
- A rubber mallet can assist in seating shelves firmly onto clips.
- Parts Missing or Damaged:
- Contact Higeego customer support for assistance with replacement parts.
8. Specifications
| Feature | Detail |
|---|---|
| Model | H5 |
| Brand | Higeego |
| Product Dimensions (Straight) | 93.3" W x 15.7" D x 75.4" H |
| Product Dimensions (L-Shape) | 71.4" W x 38" D x 75.4" H (approximate, based on image) |
| Material | Carbon Steel, Metal |
| Color | Black |
| Total Load Capacity | 1400 lbs |
| Load Capacity per Shelf | 88 lbs |
| Load Capacity per Hanger Rod | 75 lbs |
| Number of Shelves | 8 |
| Installation Type | Free Standing |
| Special Features | Easy to Install, Portable, Removable, With Adjustable Shelves, Anti-tip Device, Leveling Feet |

Figure 9: Product dimensions and load capacity.
9. Warranty and Support
Specific manufacturer warranty details are not provided in the product information. For warranty inquiries, product support, or to purchase additional protection plans, please contact Higeego customer service directly or visit their official website.
Protection plans may be available for purchase separately through your retailer.