1. Introduction
Thank you for choosing the Charmingwater Touchless Bathroom Faucet. This manual provides essential information for the safe and efficient installation, operation, and maintenance of your new faucet. Please read these instructions thoroughly before installation and keep them for future reference.

Image: Charmingwater Touchless Bathroom Faucet in Matte Black finish.
2. Product Overview
Key Features:
- Touchless Automatic Sensor: For hygienic and water-saving operation.
- Battery-Powered: Operates on 4 AA alkaline batteries (not included), providing 6-8 months of stable operation.
- Adjustable Water Temperature: Dual handles allow independent adjustment of hot and cold water.
- 360° Swivel Spout: Offers enhanced clearance and flexibility.
- Honeycomb Aerator: Delivers a soft, splash-free water stream.
- Durable Construction: Crafted from premium stainless steel and brass with a matte black finish.
Package Contents:
- Widespread Touchless Bathroom Faucet (1)
- Hot Hoses (2)
- Cold Hoses (2)
- Water Outlet Hose (1)
- White Control Box (1)
- Mounting Hardware

Image: Exploded view of faucet components and connections.
3. Specifications
| Feature | Detail |
|---|---|
| Model Name | CW-2188 |
| Material | Stainless Steel, Brass |
| Finish Type | Matte Black |
| Mounting Type | Deck Mount (Widespread) |
| Hole Count | 3 |
| Installation Hole Size | 1.12 - 1.37 inches |
| Max Counter Thickness | 1.88 inches |
| Widespread Centers | 8 - 16 inches |
| Number of Handles | 2 |
| Spout Height | 6.3 inches |
| Spout Reach | 5.31 inches |
| Maximum Flow Rate | 1.2 Gallons Per Minute |
| Power Source | 4 AA Alkaline Batteries (not included) |
| Item Weight | 5.13 pounds (2.33 kg) |
| Product Dimensions | 8.58 x 5.12 x 2.65 inches |
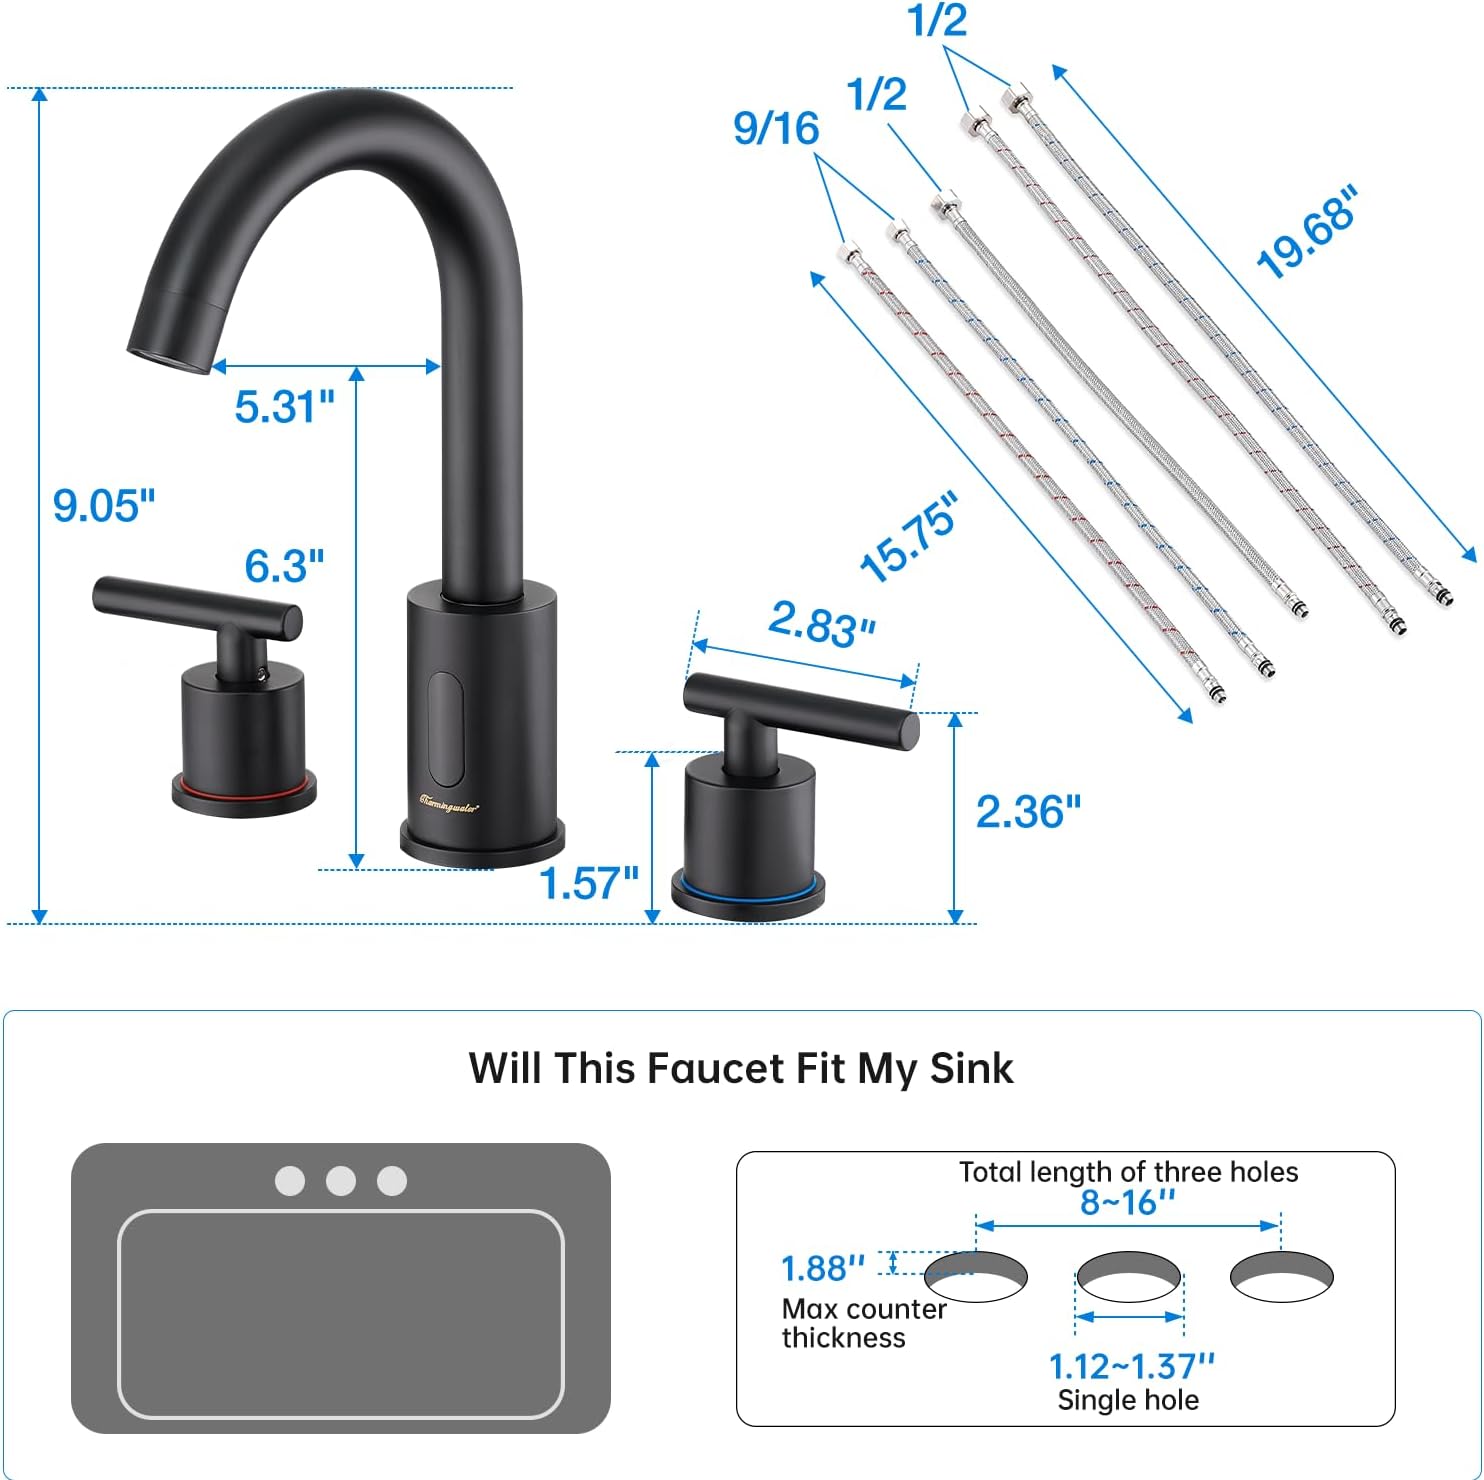
Image: Detailed dimensions of the faucet and compatibility requirements for 3-hole sinks.
4. Safety Information
- Always turn off the main water supply before beginning any installation or maintenance.
- Wear appropriate personal protective equipment (PPE) such as safety glasses and gloves during installation.
- Ensure all connections are tight to prevent leaks. Do not overtighten.
- Use only 4 AA alkaline batteries. Do not mix old and new batteries or different types of batteries.
- Dispose of used batteries responsibly according to local regulations.
- Keep the battery box dry and away from direct water exposure.
5. Setup and Installation
This faucet is designed for a 3-hole widespread installation with 8-16 inch centers. The recommended hole size is 1.12-1.37 inches, and the maximum counter thickness is 1.88 inches.
Installation Steps:
- Prepare the Sink: Ensure the sink holes are clean and meet the specified dimensions. Turn off the water supply.
- Assemble Faucet Components: Pass the water outlet hose and power cord through the central faucet body. Connect the hot and cold hoses to their respective handles.
- Mount Faucet and Handles: Insert the faucet body and handles into the sink holes. Secure them from underneath the counter using the provided mounting hardware. Ensure the hot and cold handles are correctly positioned (red for hot, blue for cold).
- Install Battery Box: Find a suitable location under the sink to mount the control box. Mark and drill pilot holes, then secure the box with screws. Ensure the 'UP' arrow on the box faces upwards.
- Connect Hoses to Control Box:
- Connect the water outlet hose from the faucet to the 'Water Out' port on the control box.
- Connect the short cold hose from the cold handle to the mixing valve on the control box.
- Connect the short hot hose from the hot handle to the mixing valve on the control box.
Note: All hose connections do not require additional white tape, as the hose itself has sufficient sealing properties.
- Connect Water Supply: Connect the long cold hose from the mixing valve to your cold water angle valve. Connect the long hot hose from the mixing valve to your hot water angle valve.
- Connect Power Cord: Connect the power cord from the faucet body to the power cord interface on the control box.
- Install Batteries: Open the lid of the battery box and insert 4 AA alkaline batteries. Ensure correct polarity. Rotate the batteries several times to ensure proper contact with the springs. Close and tighten the lid.
- Test Faucet: Turn on the main water supply. Check for leaks. Wave your hand near the sensor to activate water flow. Adjust temperature using the handles.
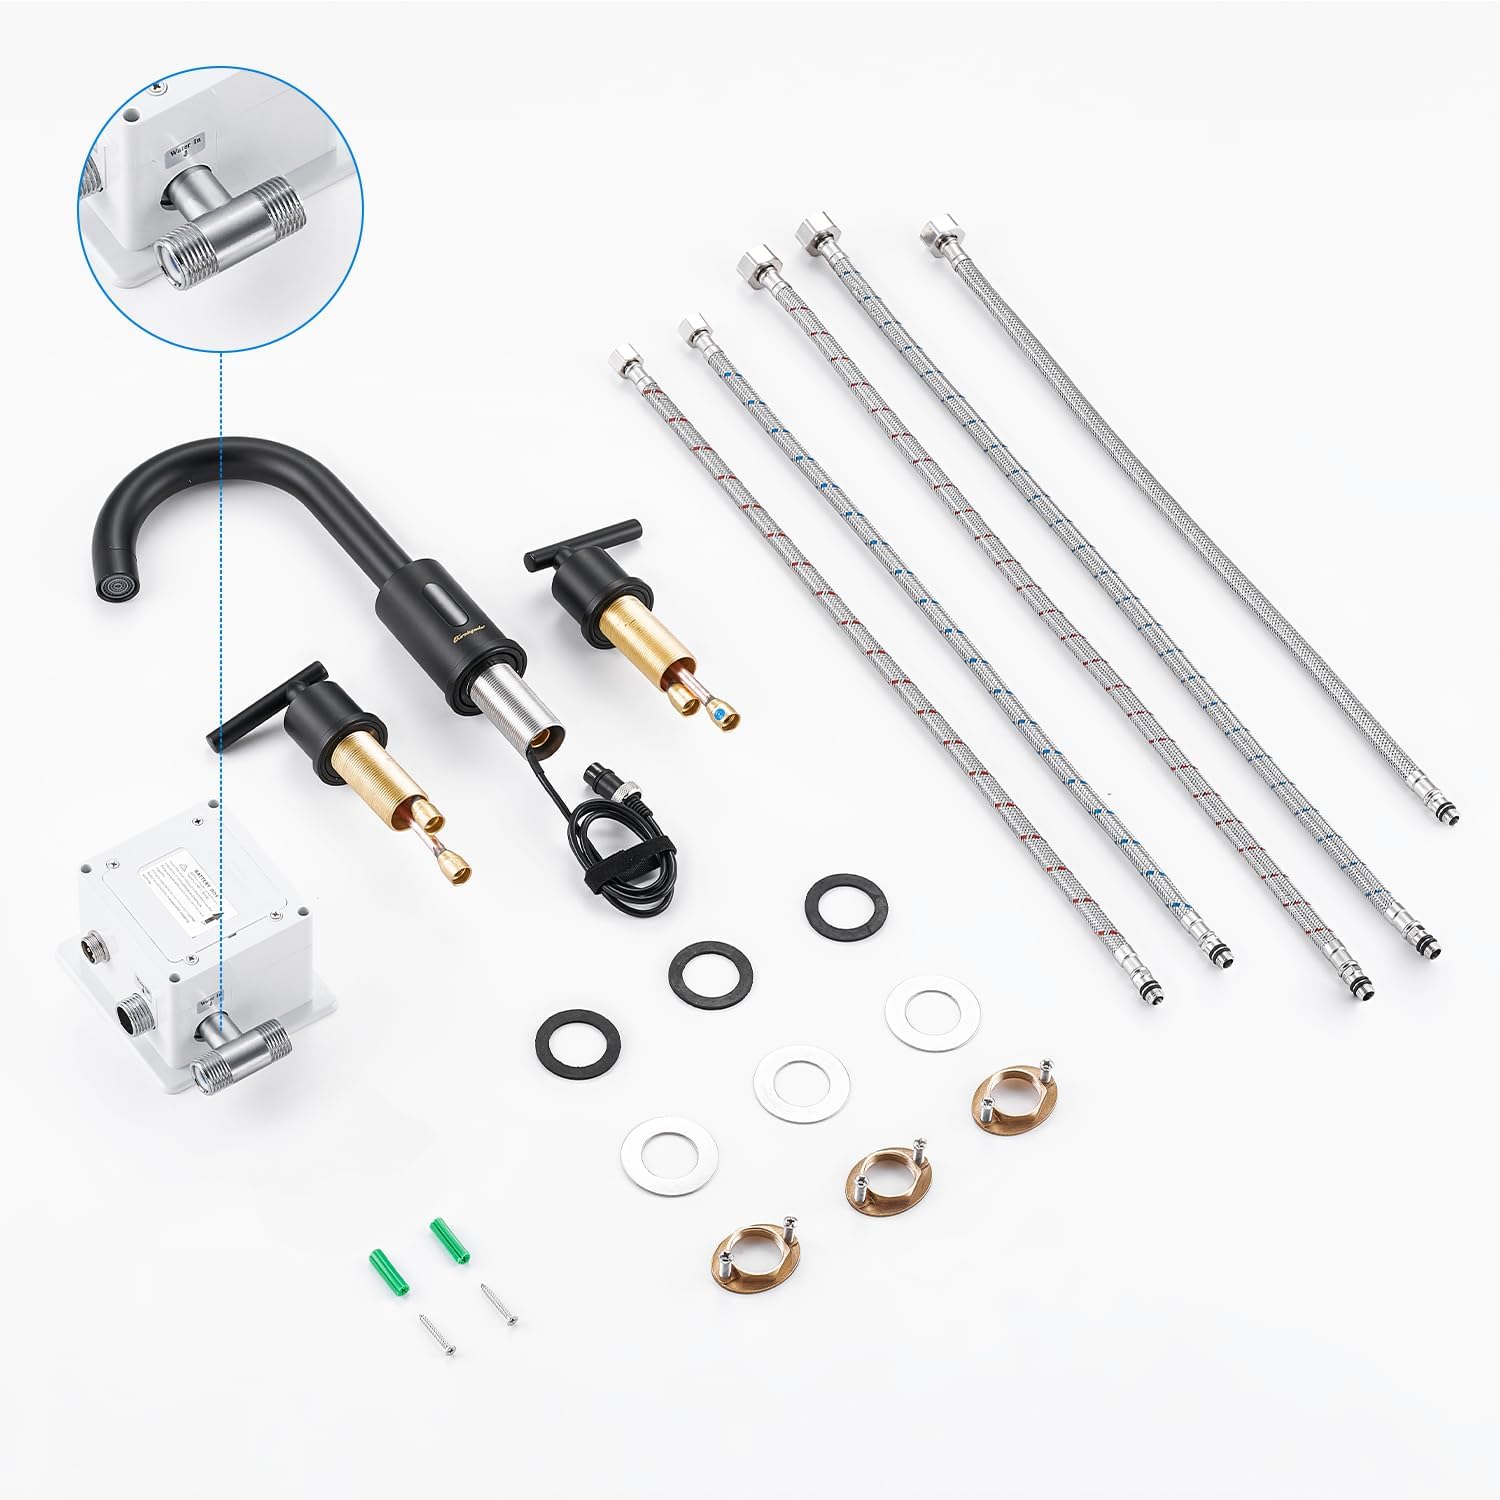
Image: All faucet components, including the main spout, handles, battery box, and hoses, ready for installation.

Image: The battery box with a notice about battery type (AA x 4 alkaline) and a low battery warning.
Installation Video:
Video: A detailed installation guide for the Charmingwater Touchless Bathroom Faucet.
6. Operating Instructions
Touchless Operation:
The faucet features an automatic sensor for hands-free operation. Simply wave your hand within the sensor range (approximately 3.93-4.72 inches) at the bottom of the faucet spout to initiate water flow. Water will automatically stop flowing when your hand is removed or after 0.5 seconds if no object is detected, conserving water.

Image: Demonstrating the touchless activation of the faucet by placing a hand near the sensor.
Temperature Adjustment:
Use the dual handles to adjust the water temperature. The left handle controls hot water, and the right handle controls cold water. Rotate both handles to achieve your desired warm water temperature. Note that the handles control temperature, not water flow, which is managed by the sensor.
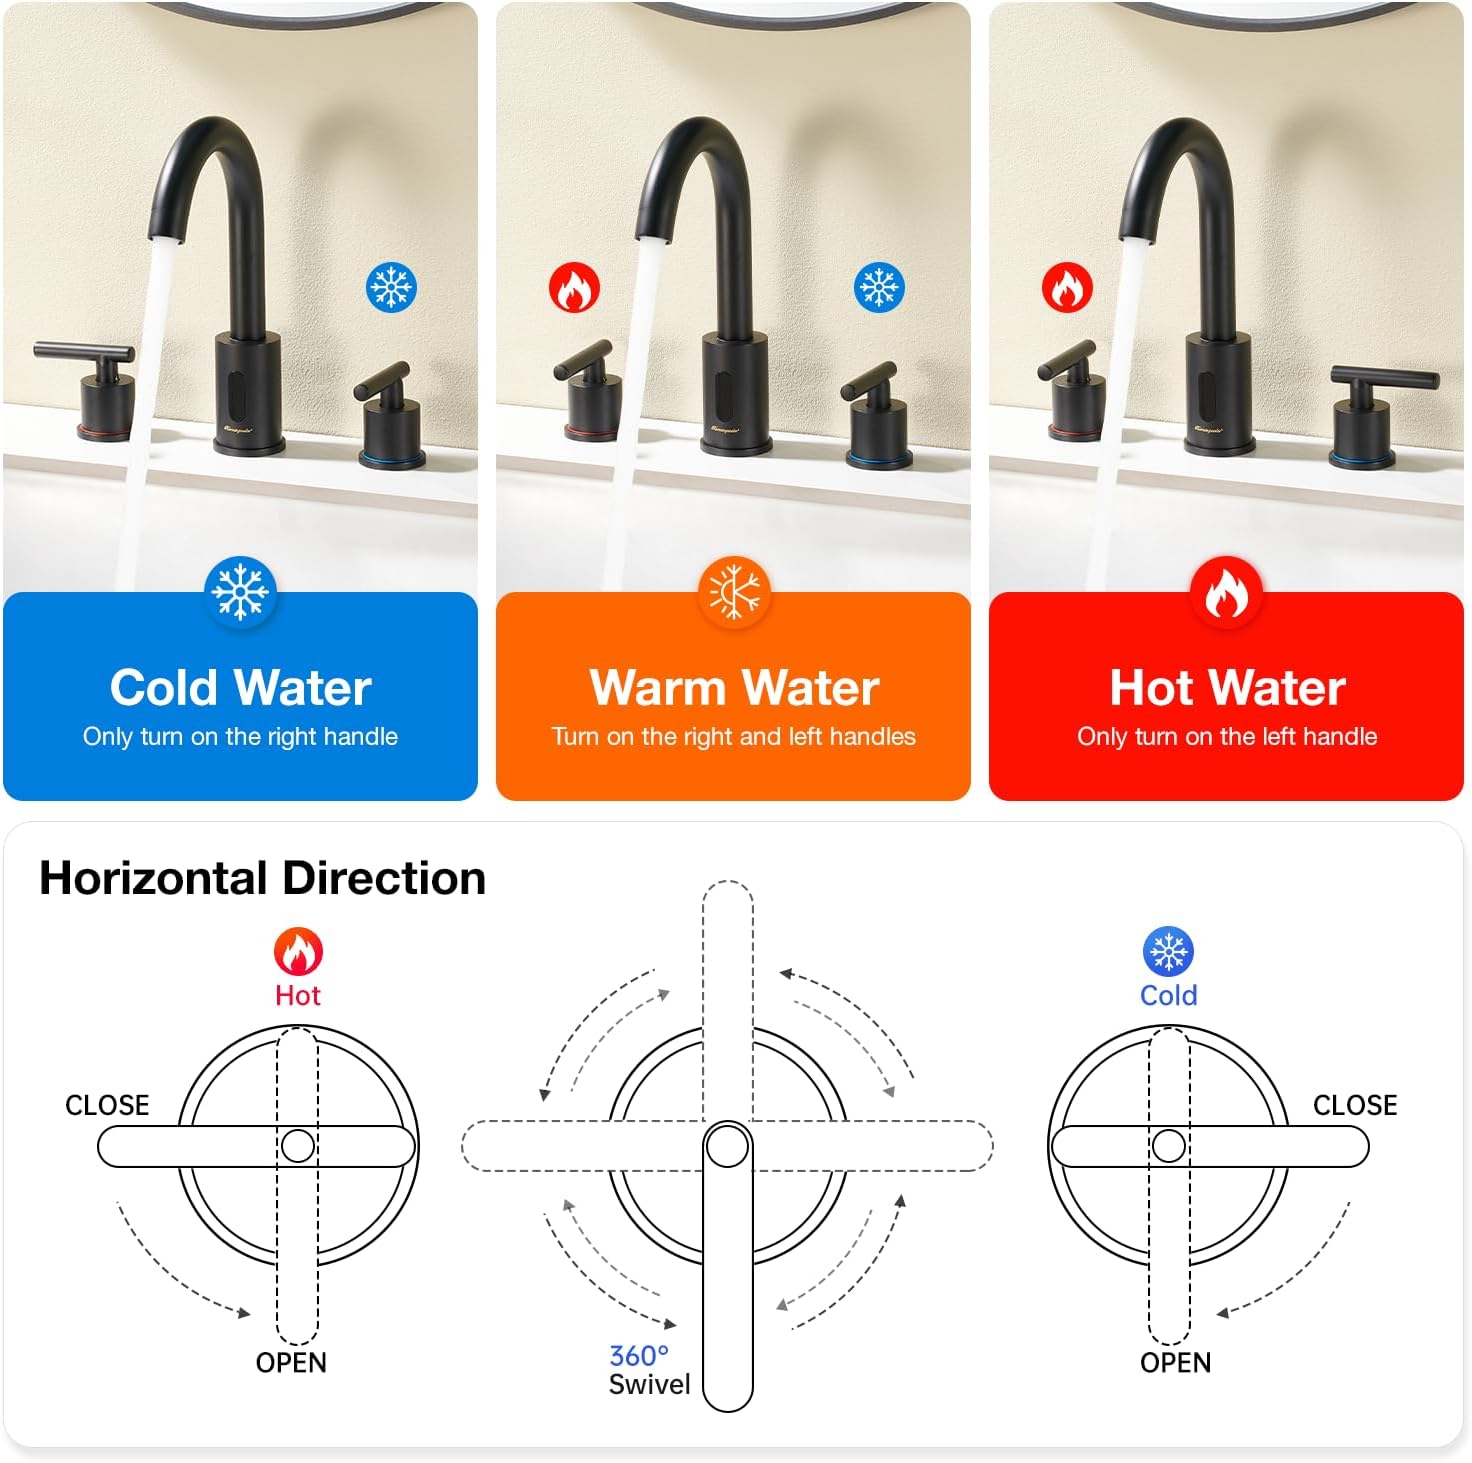
Image: Visual guide for adjusting water temperature using the hot and cold handles.
360° Swivel Spout:
The faucet's high-arc spout can swivel 360 degrees, providing flexibility and convenience for various tasks and sink sizes.

Image: The 360-degree swivel feature of the faucet spout.
Operation Video:
Video: Demonstration of the touchless operation and temperature adjustment of the Charmingwater Bathroom Faucet.
7. Maintenance
Cleaning:
To maintain the finish of your faucet, clean it regularly with a soft, damp cloth. Avoid using abrasive cleaners, harsh chemicals, or scouring pads, as these can damage the finish.

Image: Close-up of the honeycomb aerator, designed for a softer water flow.
Battery Replacement:
The faucet is powered by 4 AA alkaline batteries located in the control box. When the batteries are low, the sensor light on the faucet will remain on continuously. Replace all four batteries with new, identical brand batteries, ensuring correct polarity. Rotate the batteries slightly after insertion to ensure proper contact.
8. Troubleshooting
| Problem | Possible Cause | Solution |
|---|---|---|
| No water flow when sensor is activated. | Water supply is off; batteries are dead or incorrectly installed; sensor is blocked. | Check main water supply valves; replace batteries; ensure sensor is clean and unobstructed. |
| Water flow is weak. | Low water pressure; aerator is clogged. | Check water pressure in your home; clean or replace the aerator. |
| Sensor light stays on. | Low battery. | Replace all 4 AA alkaline batteries. |
| Water does not stop flowing. | Sensor is continuously detecting an object; sensor malfunction. | Ensure no objects are within the sensor range; clean the sensor. If problem persists, contact customer support. |
9. Warranty and Support
Charmingwater offers a 2-year guarantee on this product. We also provide lifetime technical consultation to assist you with any questions or concerns. If you encounter any issues or require support, please do not hesitate to contact us.
Contact: charmingwater@qq.com