1. Introduction
Thank you for choosing the Generic 2D Wired Barcode Scanner. This device is designed for efficient and accurate scanning of both 1D and 2D barcodes, including those displayed on screens. Its plug-and-play USB connectivity ensures easy integration with various systems. This manual provides essential information for setting up, operating, and maintaining your barcode scanner.
2. Safety Information
- Do not expose the scanner to extreme temperatures, moisture, or direct sunlight.
- Avoid dropping the scanner or subjecting it to strong impacts.
- Do not attempt to disassemble or repair the scanner yourself. Refer to qualified personnel for service.
- Keep the scan window clean to ensure optimal performance.
- Avoid direct eye exposure to the scanner's light source.
3. Product Overview
Familiarize yourself with the components of your barcode scanner:
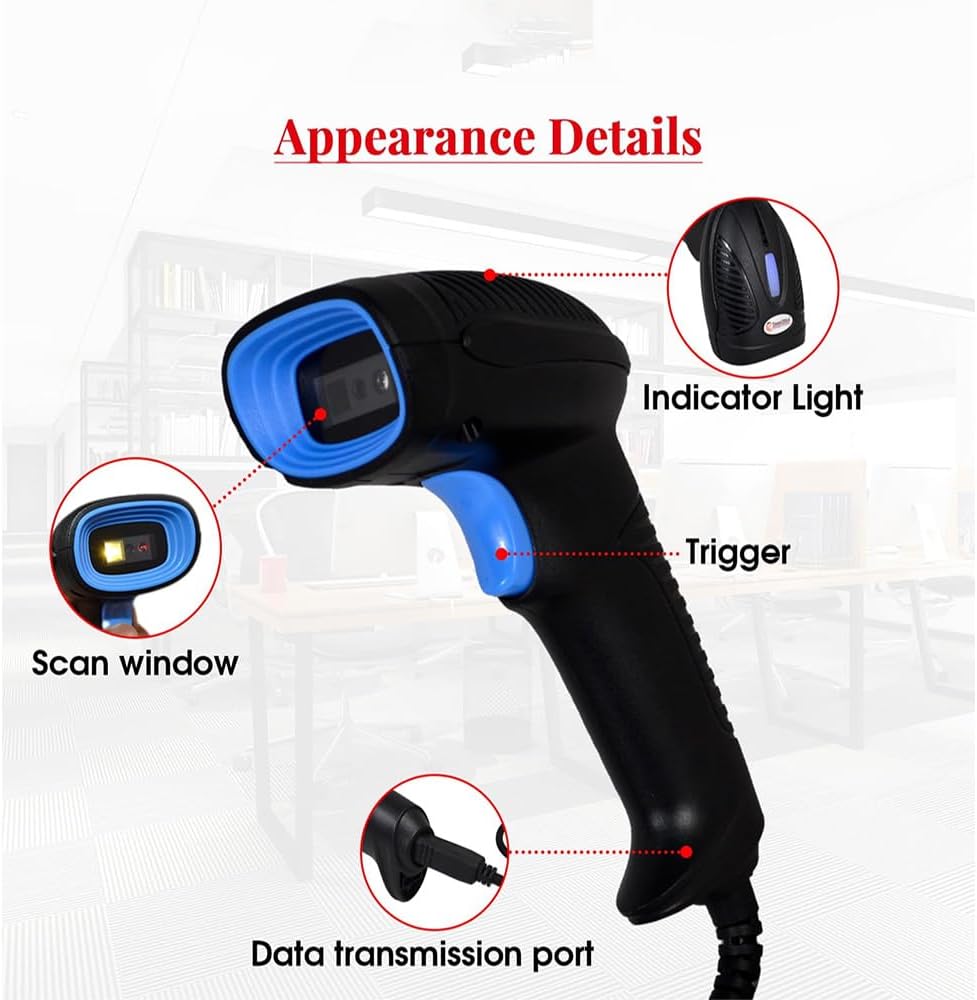
Image 3.1: Scanner Components
This image illustrates the key parts of the barcode scanner. The Indicator Light provides status feedback. The Trigger activates the scanning function. The Scan window is where barcodes are read. The Data transmission port connects the USB cable to the scanner.
- Scan Window: The area through which barcodes are read.
- Trigger: Activates the scanning beam.
- Indicator Light: Provides visual feedback on scanning status (e.g., successful scan).
- Data Transmission Port: Connects the USB cable to the scanner.

Image 3.2: Barcode Scanner with USB Cable
This image displays the complete barcode scanner unit, highlighting its wired USB connection for direct plug-and-play functionality.
4. Setup
The Generic 2D Wired Barcode Scanner is designed for simple plug-and-play installation.
- Connect the USB cable from the scanner's data transmission port to an available USB port on your computer (Laptop or PC).
- The operating system (Windows XP/7/8/10, Mac OS, Linux) will automatically detect and install the necessary drivers. No additional software installation is required.
- Once the installation is complete, the scanner is ready for use.

Image 4.1: Scanner Connected to a Computer
This image shows the barcode scanner in operation, connected via its USB cable to a computer, demonstrating its compatibility with multiple devices and direct data transmission.
5. Operating Instructions
5.1 Scanning Barcodes
The scanner supports both 1D and 2D barcodes, including those on physical labels and digital screens.
- Point the scan window towards the barcode you wish to read.
- Press the trigger button to activate the scanning beam.
- A successful scan is typically indicated by an audible beep and/or a change in the indicator light.
- The scanned data will appear in the active application on your connected computer.

Image 5.1: Scanning 1D and 2D Barcodes
This image demonstrates the scanner's capability to read various barcode types, including those on mobile screens, anti-white barcodes, metal QR codes, material QR codes, and color barcodes. It shows a user scanning a barcode on a package.
5.2 Automatic Sensor Mode
The scanner features an automatic sensor mode, allowing for hands-free operation. When placed on a desk or table, it can detect and scan barcodes presented within its field of view without requiring the trigger to be pressed.
5.3 Upload Modes
The scanner supports two primary data upload modes:

Image 5.2: Instant and Storage Upload Modes
This diagram explains the two operational modes. In Instant Upload Mode, scanned barcodes are immediately transmitted to the connected computer. In Storage Mode, barcodes are saved internally within the scanner, allowing for batch upload at a later time.
- Instant Upload Mode: Barcodes are transmitted to the connected computer immediately after scanning. This is the default mode for real-time data entry.
- Storage Mode: The scanner can store up to 100,000 barcodes internally. This mode is useful when working away from a computer. Data can be uploaded to the computer when reconnected. Refer to the included quick setup guide for instructions on switching between modes and uploading stored data.
6. Maintenance
- Cleaning: Use a soft, dry cloth to clean the scanner's exterior. For the scan window, use a soft, lint-free cloth lightly dampened with a mild glass cleaner. Do not spray cleaner directly onto the scanner.
- Storage: When not in use, store the scanner in a clean, dry environment, away from direct sunlight and extreme temperatures.
7. Troubleshooting
| Problem | Possible Cause | Solution |
|---|---|---|
| Scanner not recognized by computer | Loose USB connection, faulty USB port, driver issue. | Ensure USB cable is securely connected. Try a different USB port. Restart computer. |
| Cannot scan barcodes | Dirty scan window, barcode damaged, incorrect barcode type, scanner not in correct mode. | Clean scan window. Ensure barcode is clear and undamaged. Verify scanner supports the barcode type. Check scanner mode (e.g., not in storage mode if instant scan is desired). |
| Scanned data is incorrect | Partial scan, incorrect settings. | Ensure the entire barcode is within the scan beam. Refer to the quick setup guide for advanced configuration options. |
8. Specifications
| Feature | Detail |
|---|---|
| Model Number | CX30 / CQH20 |
| Connectivity Technology | USB Cable |
| Compatible Devices | Laptop, PC (Windows XP/7/8/10, Mac OS, Linux) |
| Power Source | Corded Electric (via USB) |
| Barcode Types Supported | 1D and 2D barcodes (e.g., QR Code, Data Matrix, UPC/EAN, Code 39) |
| Processor | 32-Bit Processor |
| Storage Capacity (Storage Mode) | Up to 100,000 barcodes |
| Product Dimensions | 20 x 5 x 10 cm |
| Weight | 220 g |
9. Warranty and Support
For warranty information or technical support, please refer to the documentation provided at the time of purchase or contact your retailer. Keep your purchase receipt as proof of purchase.