1. Introduction
Thank you for choosing the Asyko 52-inch Crystal Ceiling Fan Fandelier. This product combines the elegance of a crystal chandelier with the functionality of a ceiling fan, designed to enhance the comfort and aesthetic of your indoor living spaces. Featuring a silent motor, reversible blades, and convenient remote control, this fandelier provides both illumination and air circulation.
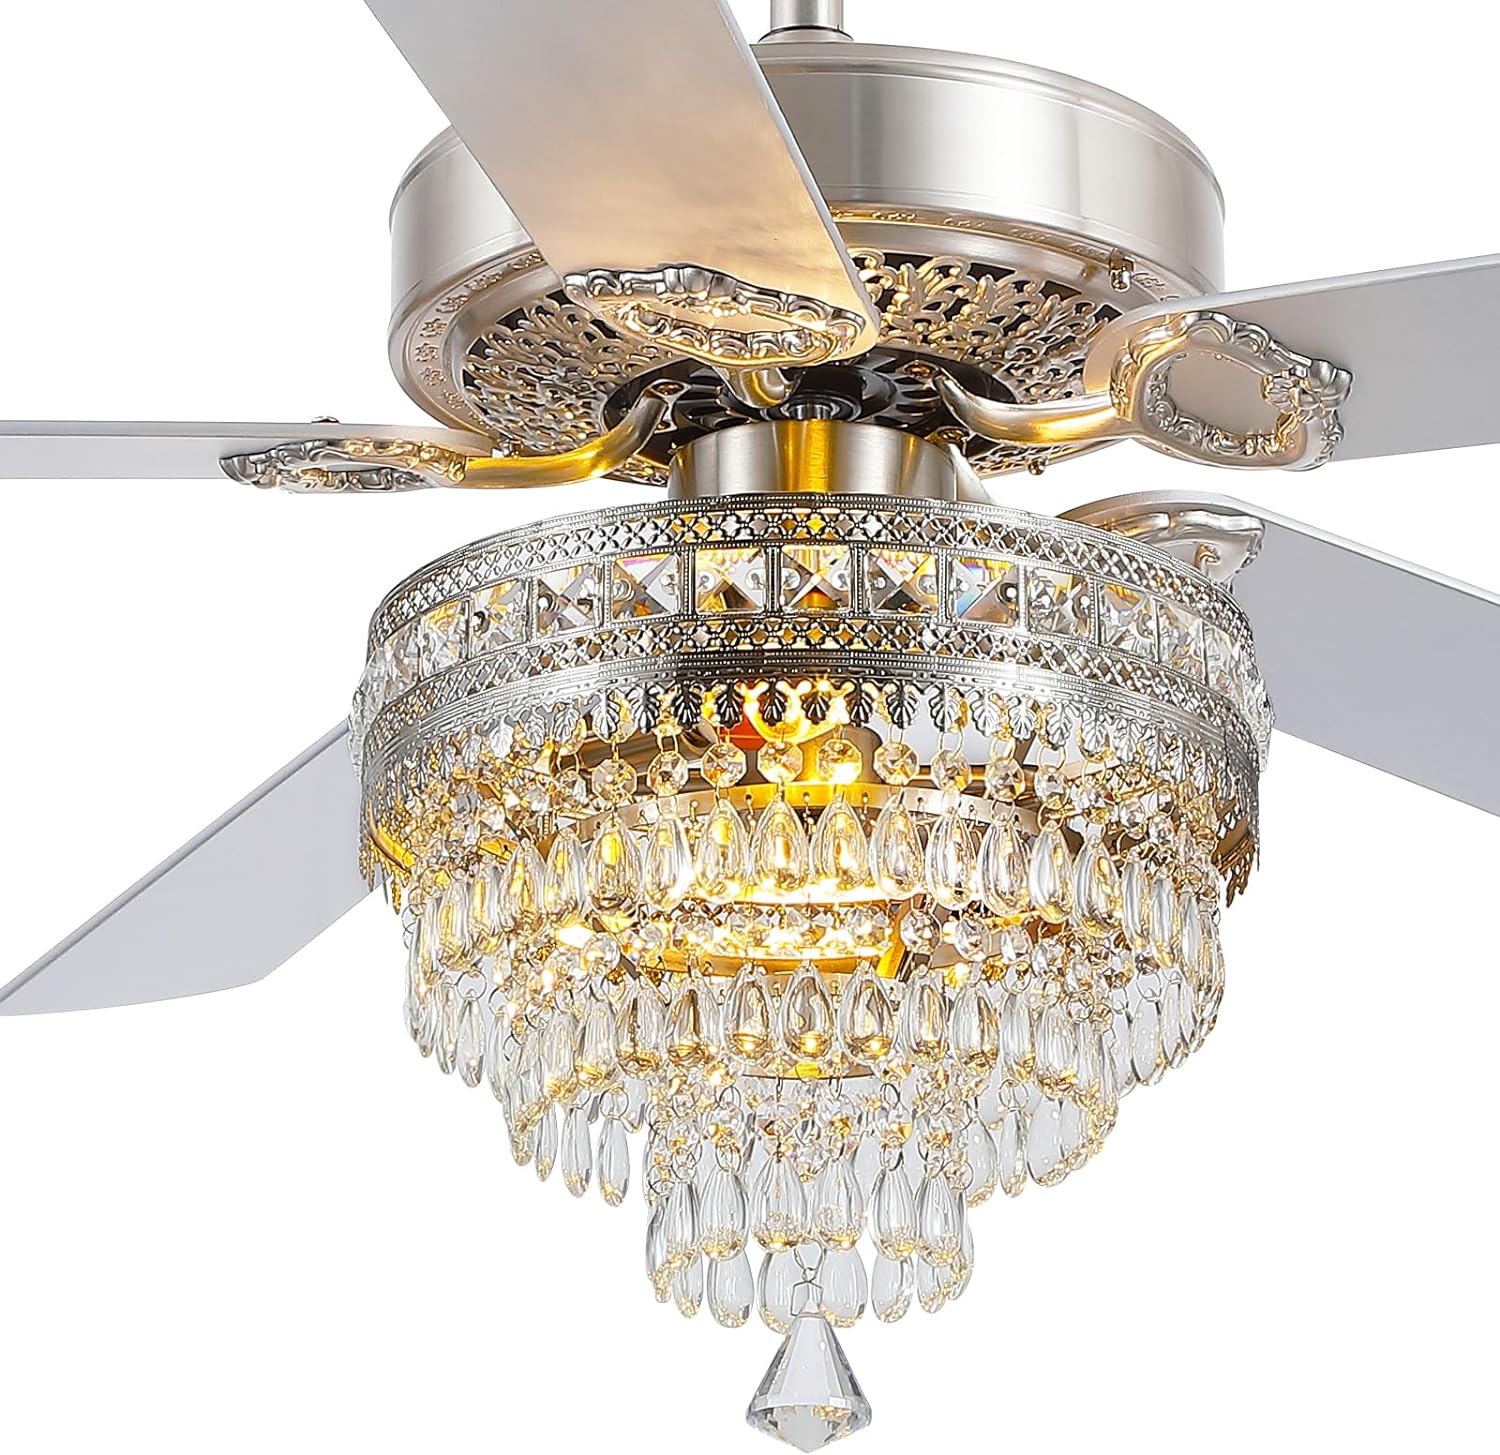
Image 1.1: Asyko 52-inch Crystal Ceiling Fan Fandelier with chrome finish and clear K9 crystals. This image provides an overview of the product's design and appearance.
2. Safety Information
Please read all instructions carefully before installation and use. Retain this manual for future reference.
- Ensure the power supply is disconnected at the circuit breaker before installation or maintenance.
- All electrical wiring must be performed by a qualified electrician and comply with local codes and regulations.
- The mounting structure must be capable of supporting the weight of the fan (approximately 22 pounds).
- Maintain a minimum clearance of 7 feet from the floor to the bottom of the fan blades.
- Do not insert objects into the path of the fan blades.
- This product is designed for indoor use only and is not water resistant.
3. Package Contents
Verify that all components are present and undamaged before beginning installation. If any parts are missing or damaged, contact customer support.
- Fan Motor Housing
- Ceiling Canopy
- Downrods (5-inch and 10-inch)
- Mounting Bracket
- Fan Blades (5)
- Blade Holders
- Crystal Chandelier Assembly
- Remote Control with Wall Mount Holder
- E12 Light Bulbs (2)
- Hardware Pack (screws, washers, wire nuts, balance kit)
- Instruction Manual
4. Setup and Installation
Installation requires basic electrical knowledge and tools. If you are unsure, consult a professional electrician.
4.1 Pre-Installation
- Turn off power at the main circuit breaker.
- Ensure the ceiling junction box is securely mounted and capable of supporting the fan's weight.
- Unpack all components and lay them out on a clean, soft surface to prevent scratches.
4.2 Mounting the Bracket and Downrod
- Attach the mounting bracket to the ceiling junction box using the provided screws and washers. Ensure it is firmly secured.
- Select the appropriate downrod (5-inch or 10-inch) based on your ceiling height. The fan supports standard downrod mounting and angled mounting up to 15 degrees.
- Feed the electrical wires from the fan motor through the chosen downrod.
- Secure the downrod to the fan motor housing.
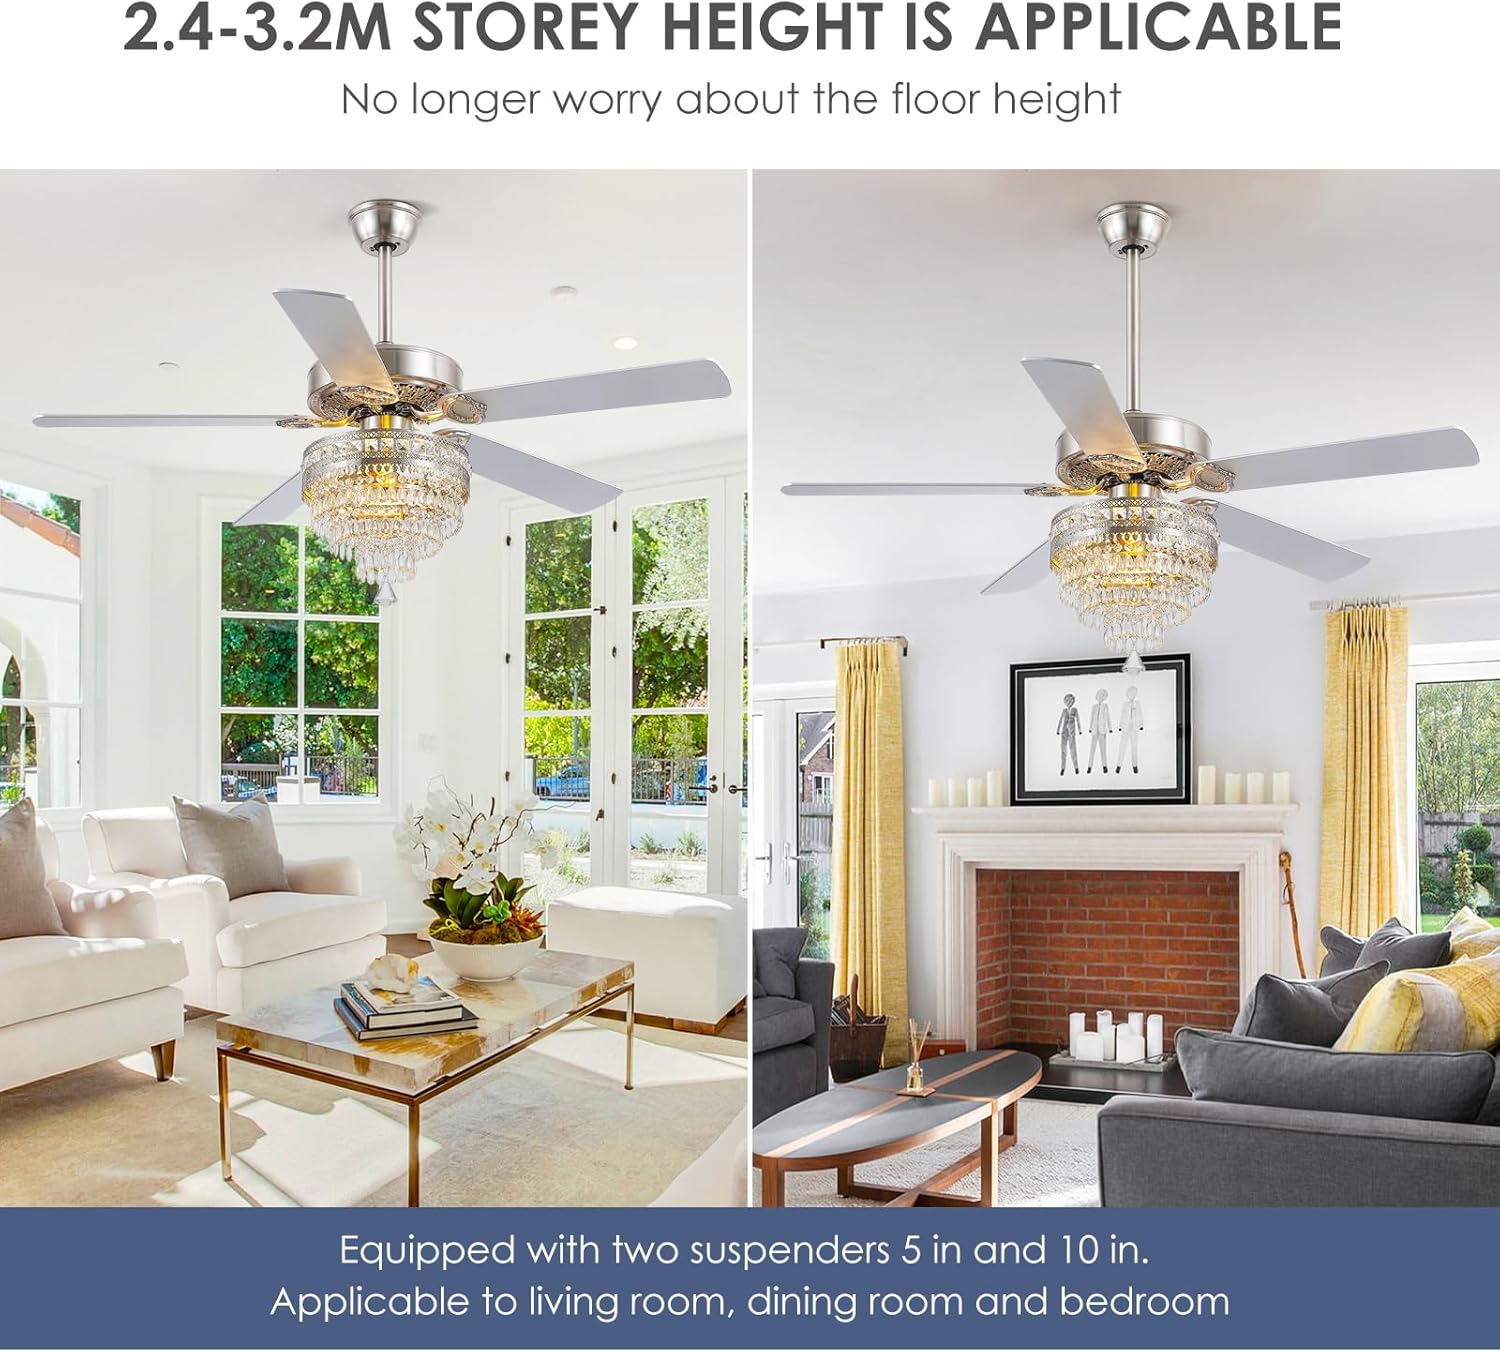
Image 4.1: This image illustrates the applicability of the Asyko ceiling fan for various ceiling heights (2.4-3.2m) using the included 5-inch and 10-inch downrods.
4.3 Wiring Connections
- Carefully lift the fan assembly and hang it on the mounting bracket hook.
- Connect the electrical wires from the fan to the house wiring using the provided wire nuts. Match colors: Black to Black (Live), White to White (Neutral), Green/Bare Copper to Green/Bare Copper (Ground). Pre-installed wire clips are included for easier connection.
- Tuck all wires neatly into the junction box.
4.4 Attaching the Fan Body and Blades
- Secure the fan motor housing to the mounting bracket.
- Attach the blade holders to the fan motor housing.
- Mount each fan blade to its respective blade holder using the provided screws. Ensure all screws are tightened securely.
4.5 Assembling and Attaching Crystal Components
The crystal assembly is a detailed process. Handle crystals with care to avoid damage.
- Carefully attach each K9 crystal piece to the chandelier frame according to the specific design. It is recommended to perform this step on a stable surface before attaching the entire light fixture to the fan.
- Once the crystal assembly is complete, attach the entire light fixture to the bottom of the fan motor housing.

Image 4.2: A detailed view of the polished metal lamp body and the K9 crystal decor, highlighting the quality of materials.
4.6 Installing Light Bulbs
Install the two E12 base bulbs (included) into the sockets within the crystal light fixture. Ensure bulbs are securely screwed in but not overtightened.
5. Operating Instructions
The Asyko Crystal Ceiling Fan Fandelier is operated via the included remote control.
5.1 Remote Control Functions
The remote control allows for convenient adjustment of fan speed, light operation, and timing functions.
- LIGHT ON/OFF: Turns the light on or off.
- LOW: Sets the fan to low speed.
- MED: Sets the fan to medium speed.
- HIGH: Sets the fan to high speed.
- STOP: Turns the fan off.
- 1H/2H/4H: Activates the fan timer for 1, 2, or 4 hours, after which the fan will automatically turn off.
- Reverse Function: A dedicated button on the remote allows you to reverse the blade direction.

Image 5.1: This image displays the remote control and icons for key features such as 3 wind speeds, silent operation, and timer.
5.2 Reversible Blades for Seasonal Use
The fan features reversible blades to optimize air circulation for different seasons.
- Summer Mode (Counter-clockwise rotation): Creates a downward airflow, producing a cooling effect.
- Winter Mode (Clockwise rotation): Creates an upward airflow, circulating warm air near the ceiling throughout the room.
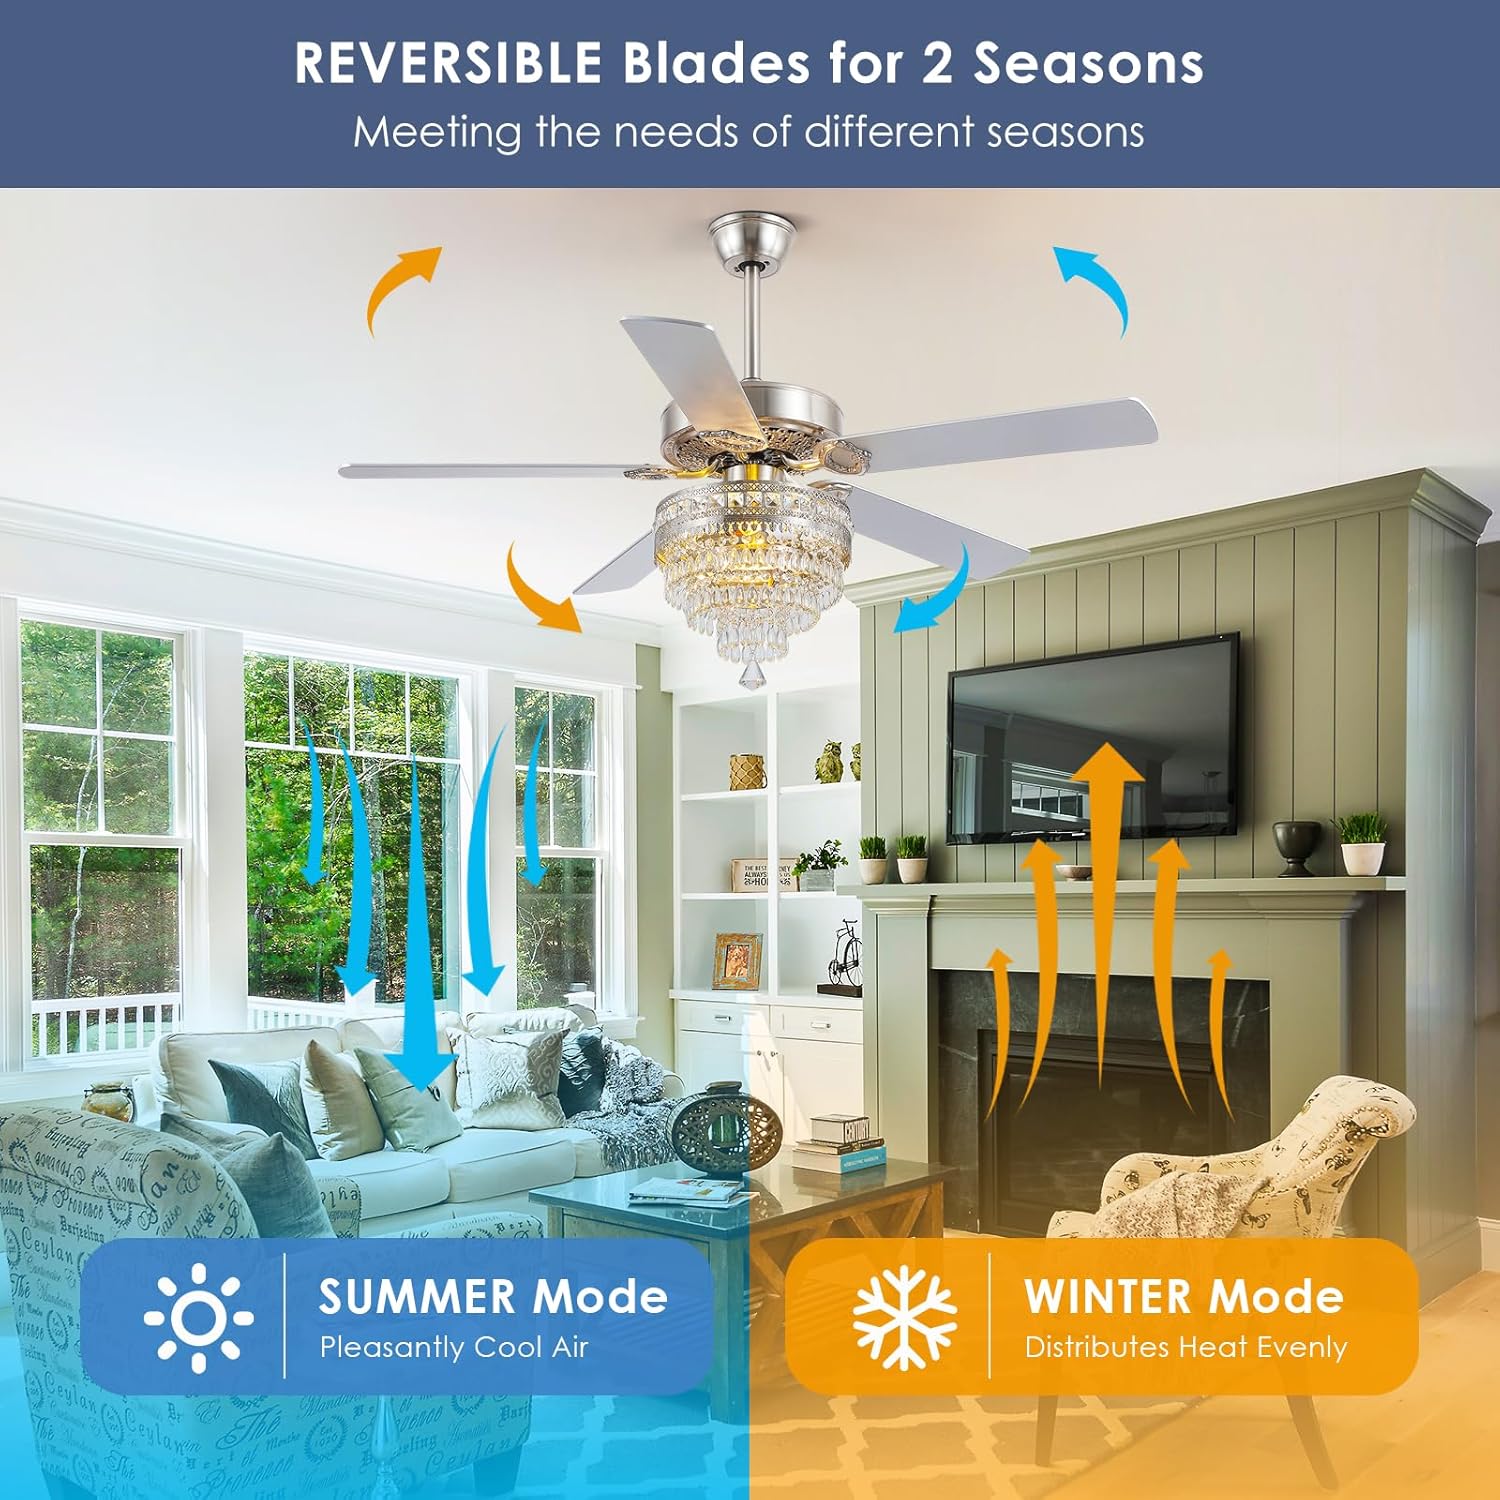
Image 5.2: This diagram visually explains the summer and winter modes of the fan, showing airflow direction.
5.3 Light Operation
The fandelier uses two E12 base bulbs. The included bulbs provide white light with 850 lumens brightness. The fixture is compatible with various E12 bulbs, including LED and incandescent types, allowing for customization of light output and color temperature.
6. Maintenance
Regular maintenance ensures the longevity and optimal performance of your fandelier.
6.1 Cleaning
- Always turn off the power at the circuit breaker before cleaning.
- Use a soft, damp cloth to wipe down the fan blades and metal components. Avoid abrasive cleaners that may damage the finish.
- For the crystal components, use a soft, lint-free cloth, possibly dampened with a mild glass cleaner, and gently wipe each crystal. Do not spray cleaner directly onto the fixture.
6.2 Bulb Replacement
- Ensure the light is off and bulbs have cooled before attempting to replace them.
- Unscrew the old E12 bulb and replace it with a new E12 base bulb.
7. Troubleshooting
If you encounter issues, refer to the following troubleshooting guide. If the problem persists, contact customer support.
| Problem | Possible Cause | Solution |
|---|---|---|
| Fan does not start | No power to the fan; Loose wire connections; Remote control battery low or not paired. | Check circuit breaker; Verify all wire connections are secure; Replace remote battery or re-pair remote. |
| Light does not turn on | Loose bulb; Faulty bulb; Loose wire connection to light kit. | Tighten or replace bulb; Check light kit wiring. |
| Fan wobbles | Loose blades or blade holders; Unbalanced blades; Loose mounting bracket. | Ensure all blade screws are tight; Use the included balance kit to balance blades; Verify mounting bracket is secure. |
| Remote control not working | Battery depleted; Remote not paired; Obstruction between remote and receiver. | Replace battery; Re-pair remote (refer to remote instructions); Ensure clear line of sight. |
| Excessive noise | Loose screws; Motor issue; Blades hitting an obstruction. | Check and tighten all screws; Ensure blades are not hitting anything; Contact support if motor noise persists. |
8. Specifications
| Feature | Detail |
|---|---|
| Model | 5003 Silver |
| Brand | Asyko |
| Size | 52 inches (diameter) |
| Motor | Silent AC Motor (under 35dB) |
| Blades | 5 Reversible Wood Blades |
| Light Source | E12 x 2 (bulbs included, compatible with LED/Incandescent) |
| Brightness | 850 lumens (with included bulbs) |
| Control Method | Remote Control (3 speeds, timer, reverse) |
| Mounting Type | Downrod (5in and 10in included), Angled (max 15°) |
| Material | Iron, K9 Crystal, Wood |
| Finish | Polished Chrome |
| Recommended Room Size | 225 sq ft to 400 sq ft |
| Usage | Indoor |
| Product Dimensions (approx.) | 52" (W) x 24.6"-27.7" (H, with downrod) |
| Item Weight | 22 pounds |
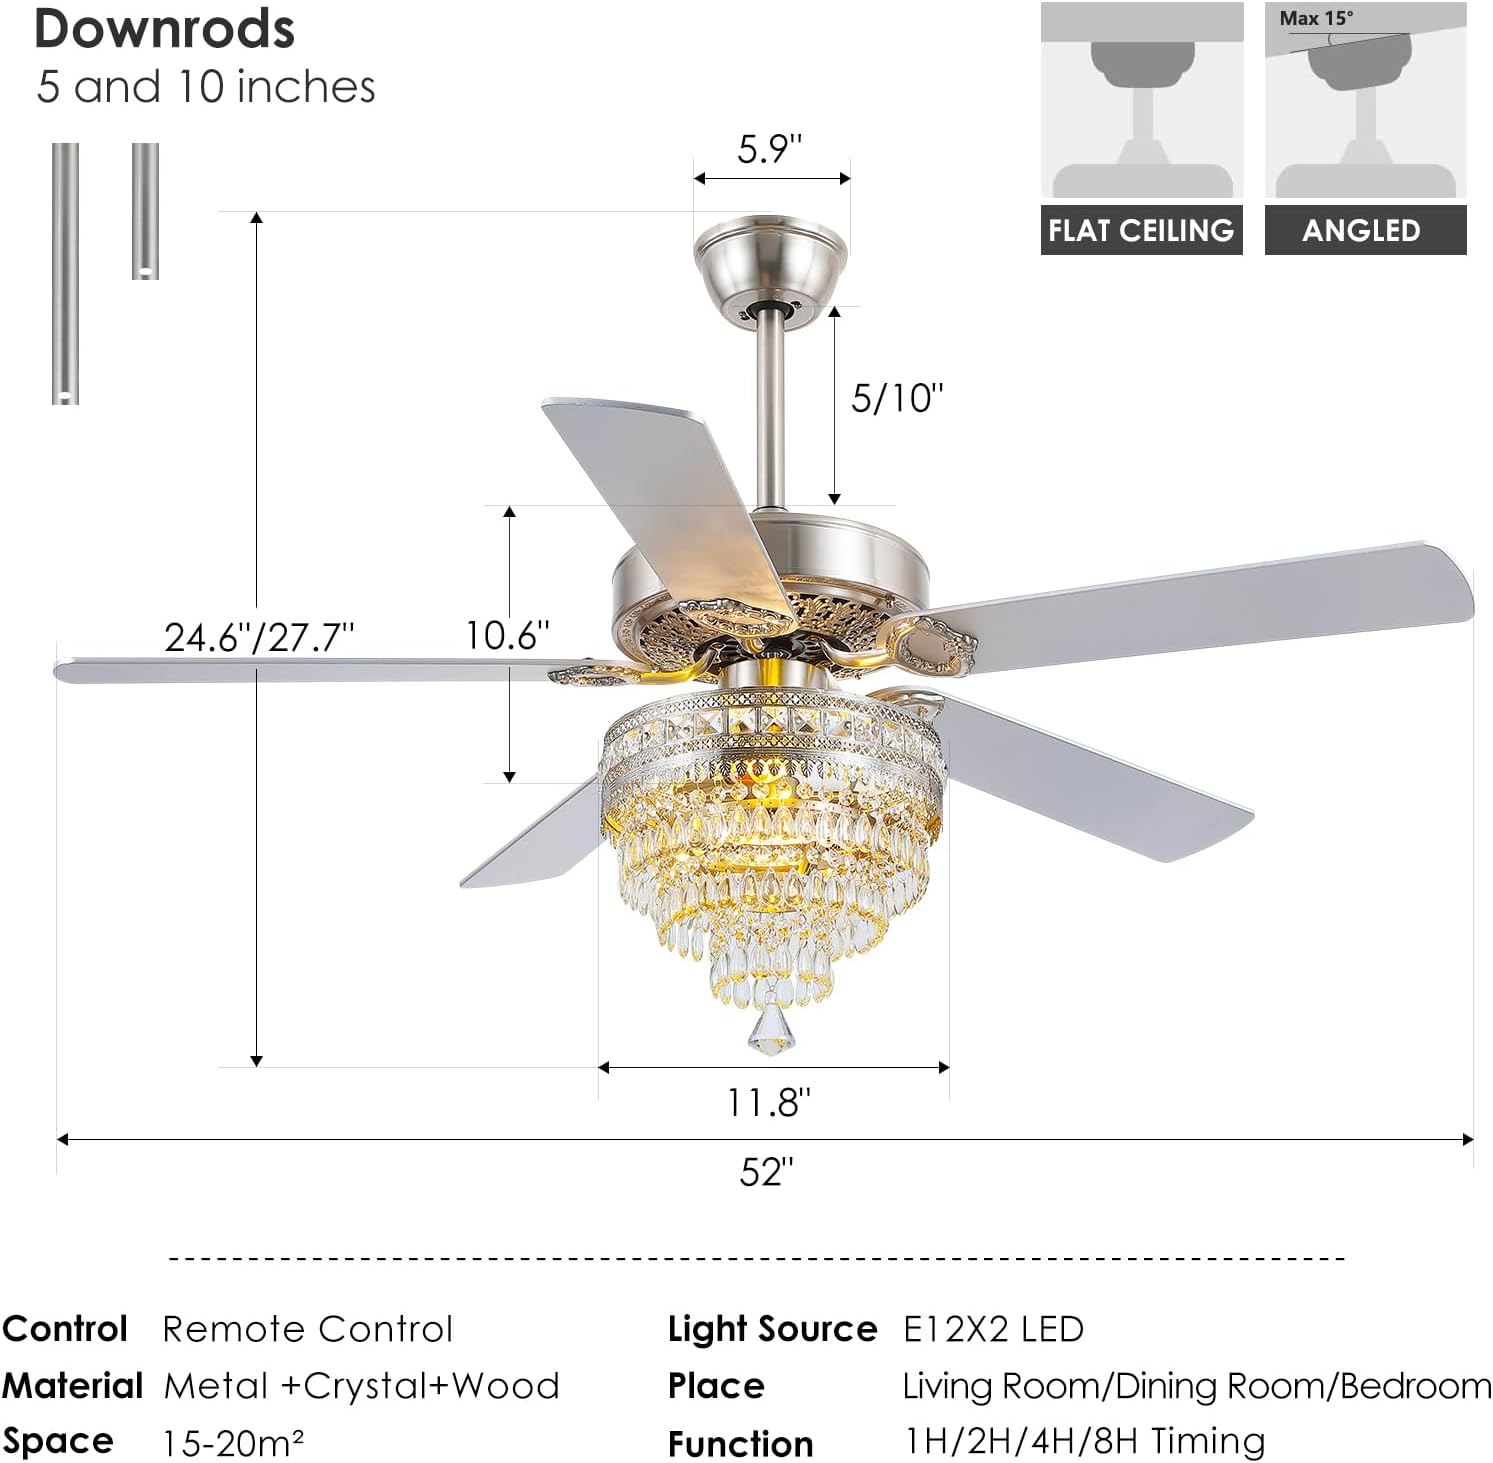
Image 8.1: This diagram provides detailed dimensions of the Asyko 52-inch ceiling fan fandelier, including height with different downrods and maximum angle for sloped ceilings.
9. Warranty and Support
Asyko is committed to providing quality products and customer satisfaction.
- Free Replacement Service: We offer a free replacement service for damaged parts.
- Professional Customer Service: Our dedicated team is available to assist you with product installation or quality issues. We aim to provide a satisfactory response within 24 hours.
For assistance, please refer to the contact information provided with your purchase or visit the official Asyko website.


