Product Overview
The YF-7 Dual Channel Delay Relay is a versatile module designed for various timing and control applications. It features 32 commonly-used functions, allowing for precise control of AC/DC loads within 5A. With an input voltage range of DC 7-30V and an adjustable delay time from 0.01 seconds to 999 minutes, this relay module is suitable for a wide array of industrial and scientific uses. It also includes a memory function to retain settings in case of power-off.

Figure 1: Top view of the YF-7 Dual Channel Delay Relay module, showing the digital display, control buttons, and relay components.
Setup and Connections
Proper connection of the YF-7 module is essential for safe and effective operation. Refer to the diagram below for detailed wiring instructions.
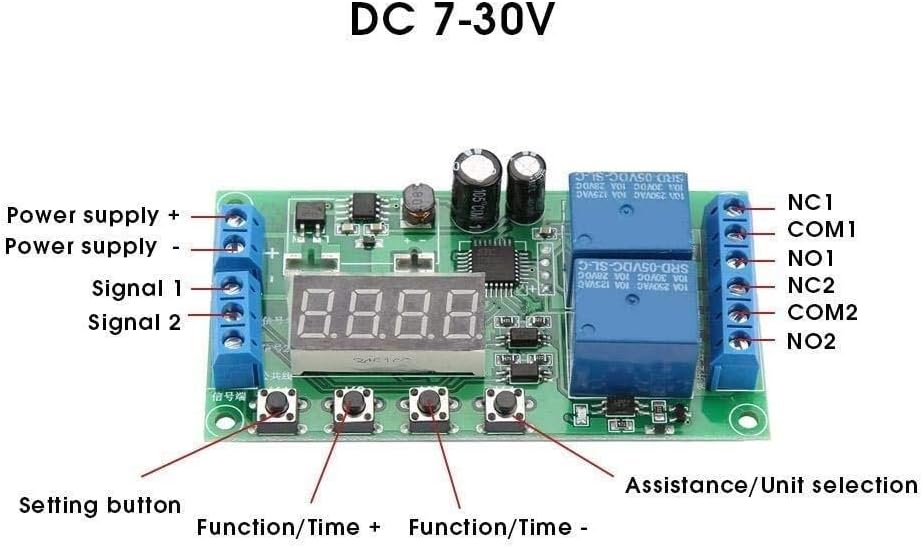
Figure 2: Detailed connection diagram of the YF-7 Delay Relay, indicating power supply terminals, signal inputs, relay outputs, and control buttons.
Wiring Instructions:
- Power Supply: Connect DC 7-30V to the "Power supply +" and "Power supply -" terminals on the left side of the module. Ensure correct polarity.
- Signal Inputs: "Signal 1" and "Signal 2" terminals are for trigger signals. These signals activate the corresponding relays.
- Relay Outputs: The right side of the module provides output terminals for two independent relays:
- Relay 1: COM1 (Common), NO1 (Normally Open), NC1 (Normally Closed)
- Relay 2: COM2 (Common), NO2 (Normally Open), NC2 (Normally Closed)
Operating Instructions
The YF-7 module offers 32 distinct functions (P-11 to P-44) for various timing and triggering scenarios. The module is controlled via four buttons located below the digital display.
Control Buttons:
- Setting button: Used to enter and exit setting modes, and to confirm selections.
- Function/Time +: Increases numerical values or cycles through functions.
- Function/Time -: Decreases numerical values or cycles through functions.
- Assistance/Unit selection: Used for selecting time units (seconds, minutes) or accessing auxiliary settings.
Function Selection and Parameter Setting:
To select a function (P-XX) and set its parameters (delay times, trigger modes), follow these general steps:
- Press the "Setting button" to enter the function selection mode. The display will show the current function code (e.g., P-11).
- Use "Function/Time +" or "Function/Time -" to navigate through the 32 available functions (P-11 to P-44).
- Once the desired function is displayed, press the "Setting button" again to enter parameter setting mode for that function.
- The display will show the first parameter. Use "Function/Time +" or "Function/Time -" to adjust its value.
- Press the "Setting button" to move to the next parameter. Repeat adjustment as needed.
- Use the "Assistance/Unit selection" button to change time units (e.g., from seconds to minutes) if applicable for the current parameter.
- After setting all parameters, press and hold the "Setting button" to save the settings and exit the configuration mode. The module will then operate according to the selected function and parameters.
Note: Signal 1 corresponds to Relay 1, and Signal 2 corresponds to Relay 2. The two relays can be triggered simultaneously and operate independently.
Specifications
| Feature | Detail |
|---|---|
| Input Voltage | DC 7-30V |
| Delay Time Range | 0.01 seconds to 999 minutes (adjustable) |
| Output Load Capacity | AC/DC load within 5A |
| Contact Type | Normally Open |
| Current Rating | 5 Amps |
| Mounting Type | DIN Rail Mount |
| Coil Voltage | 30 Volts |
| Memory Function | Yes (in case of power-off) |
| Number of Functions | 32 (P-11 to P-44) |
| Item Weight | 1.76 ounces |
| Package Dimensions | 1.18 x 0.79 x 0.39 inches |
| Model Number | INENDAQCE |
Maintenance
To ensure the longevity and reliable operation of your YF-7 Delay Relay module, follow these maintenance guidelines:
- Keep Dry: Protect the module from moisture, humidity, and liquids. Water can cause short circuits and damage electronic components.
- Cleanliness: Regularly inspect the module for dust and debris. Use a soft, dry brush or compressed air to gently clean the circuit board. Avoid using harsh chemicals or abrasive materials.
- Temperature: Operate the module within its specified temperature range. Avoid exposing it to extreme heat or cold, which can affect performance and component lifespan.
- Secure Connections: Periodically check all wiring connections to ensure they are secure and free from corrosion. Loose connections can lead to intermittent operation or component damage.
- Avoid Physical Stress: Handle the module with care. Avoid dropping it or subjecting it to excessive vibration or mechanical shock.
Troubleshooting
If you encounter issues with your YF-7 Delay Relay module, consider the following troubleshooting steps:
- No Power/Display Off:
- Verify that the DC 7-30V power supply is correctly connected to the "Power supply +" and "Power supply -" terminals and is providing the correct voltage.
- Check for any loose wires or incorrect polarity.
- Ensure the power supply itself is functional.
- Relay Not Triggering:
- Confirm that the trigger signal (Signal 1 or Signal 2) is being applied correctly and meets the module's input requirements.
- Check the selected function (P-XX) and its parameters to ensure they are configured as expected for your application.
- Verify that the load connected to the relay output is within the 5A limit and is correctly wired to the COM and NO/NC terminals.
- Inspect the relay itself for any visible damage.
- Incorrect Timing/Functionality:
- Re-enter the parameter setting mode and carefully review all settings for the chosen function.
- Ensure the correct time unit (seconds, minutes) is selected using the "Assistance/Unit selection" button.
- If the issue persists, try resetting the module by disconnecting and reconnecting power, then reconfigure the desired function.
- Display Issues:
- If the digital display is dim or flickering, check the input voltage stability.
- Ensure there is no physical damage to the display itself.
If these steps do not resolve the issue, contact the seller or a qualified technician for further assistance.
Warranty and Support
According to product information, this item is sold with No Warranty. For any operational questions, technical assistance, or issues not covered in this manual, please contact the seller directly through the platform where the product was purchased. Provide your order details and a clear description of the problem to facilitate a prompt resolution.