Garosa Garosav4dcyh3kwx
Garosa Barcode Scanner User Manual
Model: A60Z
1. Introduction
Thank you for choosing the Garosa A60Z Barcode Scanner. This handheld barcode reader is designed for efficient and reliable 1D barcode scanning in various environments such as stores, supermarkets, and warehouses. It features 2.4G wireless connectivity, a long-lasting battery, and a comfortable design for extended use. This manual provides detailed instructions for setup, operation, maintenance, and troubleshooting to ensure optimal performance of your device.
2. Product Overview
The Garosa A60Z Barcode Scanner consists of the handheld scanner unit and a charging base. Key features include:
- 2.4G Wireless Mode: Enables a communication distance of up to 100 meters.
- Large Battery Capacity: Built-in 2200mAh lithium-ion battery provides 3-10 days of working time on a full charge.
- Scanning Modes: Supports both trigger-press scanning and continuous automatic scanning.
- Broad Compatibility: Suitable for scanning 1D barcodes on labels, paper, and digital screens.
- Durable Design: Short circuit proof design and 1.8m drop test resistance.
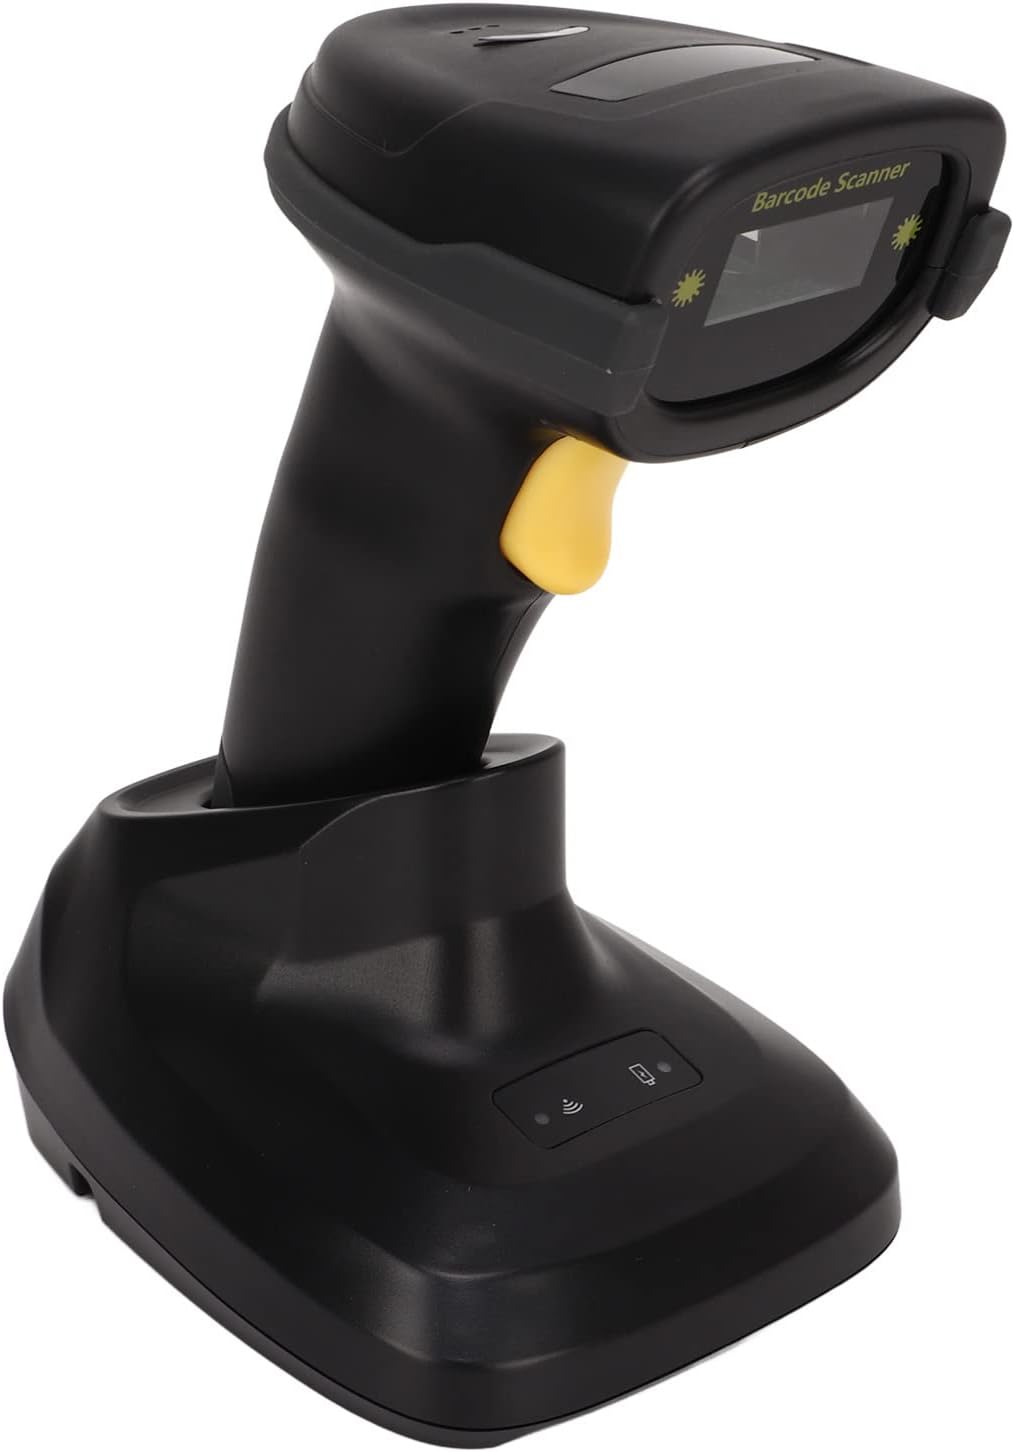
Figure 2.1: Garosa A60Z Barcode Scanner with its charging base. The scanner is black with a yellow trigger button, resting securely in its black charging base.

Figure 2.2: Top-down view of the Garosa A60Z Barcode Scanner, highlighting its ergonomic shape and the scanning window.
3. Specifications
| Feature | Description |
|---|---|
| Model | A60Z |
| Material | ABS, TPU |
| Communication Distance | Approx. 100m / 328.08ft (2.4G mode) |
| Storage | 16M (8192 characters or barcode ≤ 128) |
| Working Time | 3~10 Days |
| Charging Power | 5V, 400mA |
| Light Source | 650 ± 20nm VLD |
| Scan Type | Bidirectional Scan |
| Decoding Accuracy | ≥ 3mil AT PCS90% Code39 |
| Scanning Width | Approx. 300mm / 11.81in |
| Decoding Speed | 300/s |
| Print Contract | ≥ 20% |
| Scanning Angle | Rotation ± 30°, Inclination ± 45°, Declination ± 60° |
| Anti Interference | Unaffected by strong light and sunlight |
| Decoding Capability | UPC EAN, ISBN, ISSN, Code39, Code39 all ASCII, Code32, Code128, Code11, Code93, Coda bar, industrial 2/5, Interleaved 2/5, MSI, GS1 data bars. |
| Indicator Light | Buzzer and LED |
| Trigger Mode | Press key, continuous scanning |
| Key Life | 100,000 Times |
| Laser Life | 10,000 Hours |
| Drop Test | 1.8m |
| Basic Interface | USB, USB COM, RS232 |
| Operating Temperature | -20℃ to 50℃ |
| Storage Temperature | -30℃ to 60℃ |
| Humidity | 5% - 95% non-condensing |
| Power Supply Mode | Built-in lithium-ion battery 2200mAh |

Figure 3.1: Physical dimensions of the Garosa A60Z Barcode Scanner and its charging base. The scanner measures approximately 175mm (6.89in) in height, 83mm (3.27in) in depth, and 70mm (2.76in) in width. The base measures approximately 90mm (3.54in) in width, 120mm (4.72in) in depth, and 85mm (3.35in) in height.
4. Setup
Follow these steps to set up your Garosa A60Z Barcode Scanner for first use:
- Unpack: Carefully open the package and remove all components: the barcode scanner, the charging base, and the connecting cable.
- Connect Base: Connect the barcode scanner to the charging base using the provided connecting cable. Ensure the connection is secure.
- Power On: Connect the charging base to a power source (e.g., a computer USB port or a USB wall adapter) using the USB cable. The scanner will begin charging.
- Initial Charge: For optimal battery life, it is recommended to fully charge the scanner before its first use.

Figure 4.1: The USB connecting cable used to link the scanner to its charging base or a host device.
5. Operating Instructions
The Garosa A60Z Barcode Scanner offers flexible scanning modes for various applications.
5.1. Basic Scanning Operation
- Activate Scanner: Press the trigger button on the scanner to activate the laser.
- Position Scanner: Aim the laser beam at the barcode you wish to scan. Ensure the entire barcode is covered by the laser line.
- Scan: Hold the scanner steady until you hear a beep and see the LED indicator light up, confirming a successful scan. The decoded data will be transmitted to your connected device.

Figure 5.1: The barcode scanner in operation, demonstrating the red laser line used for scanning. The inset shows a close-up of the active laser.
5.2. Scanning Modes
The scanner supports two primary modes:
- Trigger Mode: Default mode where a scan is initiated each time the trigger button is pressed.
- Continuous Scanning Mode: The scanner continuously emits the laser for automatic scanning without needing to press the trigger for each scan. Refer to the programming guide (not included in this manual) for instructions on switching to this mode.
5.3. Decoding Capability
The Garosa A60Z can decode a wide range of 1D barcode symbologies, including but not limited to:
- UPC EAN
- ISBN, ISSN
- Code39, Code39 all ASCII, Code32
- Code128, Code11, Code93
- Coda bar
- Industrial 2/5, Interleaved 2/5
- MSI, GS1 data bars

Figure 5.2: A hand holding the barcode scanner, with a computer screen in the background displaying successfully decoded barcode data. This illustrates the scanner's decoding capability.

Figure 5.3: The Garosa A60Z Barcode Scanner shown in diverse operational environments, including retail checkout, warehouse inventory, and office settings, demonstrating its broad utility.
6. Maintenance
Proper maintenance ensures the longevity and optimal performance of your barcode scanner.
- Cleaning: Use a soft, dry cloth to clean the scanner's exterior. For the scanning window, use a lint-free cloth lightly dampened with a mild, non-abrasive cleaner. Avoid harsh chemicals or abrasive materials.
- Storage: Store the scanner in a cool, dry place away from direct sunlight and extreme temperatures when not in use.
- Battery Care: To preserve battery life, avoid fully discharging the battery frequently. Recharge the scanner regularly, especially if it will be stored for an extended period.
- Handle with Care: Although designed to be durable (1.8m drop test), avoid unnecessary drops or impacts to prevent damage.
7. Troubleshooting
This section addresses common issues you might encounter with your Garosa A60Z Barcode Scanner.
| Problem | Possible Cause | Solution |
|---|---|---|
| Scanner not turning on/no laser | Low battery; Loose connection; Device malfunction. | Charge the scanner fully. Ensure the cable is securely connected to the base and power source. If problem persists, contact support. |
| Cannot scan barcodes | Barcode damaged/unreadable; Incorrect scanning angle; Scanner not paired; Unsupported barcode type. | Ensure barcode is clear and flat. Adjust scanning angle. Confirm scanner is properly connected/paired to host device. Verify barcode type is supported (see Section 5.3). |
| Data not transmitting to computer | Loose USB connection; Driver issue; Software not ready to receive input. | Check USB cable connection. Ensure necessary drivers are installed on your computer. Open a text editor or application ready to receive input. |
| Short battery life | Battery not fully charged; Aging battery; Continuous scanning mode enabled unnecessarily. | Ensure full charge cycles. If battery life significantly degrades, it may need replacement (contact support). Switch to trigger mode if continuous scanning is not required. |
8. Package Contents
The Garosa A60Z Barcode Scanner package includes the following items:
- 1 x Barcode Scanner (A60Z)
- 1 x Charging Base
- 1 x Connecting Cable (USB)
9. Warranty and Support
For warranty information and technical support, please refer to the warranty card included with your product or visit the official Garosa website. You can also contact Garosa customer service through the retailer where you purchased the product.
Garosa Store: Visit the Garosa Store on Amazon