warmiplanet WICF06-3
warmiplanet Flush Mount Ceiling Fan User Manual
Model: WICF06-3
Brand: warmiplanet
1. Introduction
This manual provides detailed instructions for the installation, operation, and maintenance of your warmiplanet 52-Inch Flush Mount Ceiling Fan with Lights and Remote Control. Designed for indoor use, this fan features a quiet DC motor, dimmable LED lighting with adjustable color temperature, and a multi-function remote for convenient control. Please read this manual thoroughly before installation and use to ensure safe and efficient operation.
2. Important Safety Information
Always disconnect power at the main circuit breaker before installing, cleaning, or servicing the fan. Ensure all electrical connections comply with local codes and ordinances. If you are unfamiliar with electrical wiring, consult a qualified electrician. The fan must be mounted to a ceiling joist or support structure capable of supporting the fan's weight (15.84 lbs). Do not bend the blade holders during installation or cleaning. Ensure all screws are tightened securely. Do not operate the fan if any part is damaged.
3. Package Contents
Verify that all components are present and undamaged before beginning installation.
- Ceiling Fan Motor Assembly
- Fan Blades (3)
- LED Light Kit
- Remote Control
- Mounting Bracket
- Hardware Bag (screws, washers, wire nuts)
- User Manual

4. Product Specifications
| Feature | Specification |
|---|---|
| Brand | warmiplanet |
| Model Name | WICF06-3 |
| Color | Antique Nickel |
| Material | Metal, Glass |
| Style | 3 Blades |
| Light Fixture Form | Close to Ceiling |
| Room Type | Indoor |
| Product Dimensions | 52"L x 52"W x 11.3"H |
| Power Source | DC |
| Installation Type | Flush Mount |
| Special Feature | Dimmable |
| Control Method | Remote |
| Light Source Type | LED |
| Wattage | 28 watts (LED Light: 22 watts) |
| Voltage | 120 Volts |
| Item Weight | 15.84 Pounds |
| Number of Blades | 3 |
| Air Flow Capacity | 2268 Cubic Feet Per Minute |
| Batteries Required | 2 AAA batteries (included) |

5. Installation Guide
Follow these steps for proper installation. It is recommended to have assistance during certain steps, especially when handling the fan motor.
5.1. Pre-Installation
- Turn off power at the circuit breaker.
- Ensure the mounting location can support the fan's weight.
- Unpack all components and verify against the package contents list.
5.2. Install the Mounting Bracket
Secure the mounting bracket to the ceiling junction box using the provided machine screws. If installing on a wooden ceiling, use wood screws. Ensure the bracket is firmly attached.

5.3. Hang the Motor and Wire Connections
Carefully hang the fan motor assembly onto the J-hook of the mounting bracket. Connect the power live wire (black), neutral wire (white), and ground wire (green) from the ceiling to the corresponding wires on the fan using wire nuts. Ensure all connections are secure.

5.4. Install the Fan Blades
Attach each fan blade to the motor assembly using the provided screws and washers. Tighten all screws firmly to prevent shaking during operation.
5.5. Install the Light Source
Connect the wires of the LED light source to the corresponding wires on the fan motor. Secure the light source to the fan using the designated screws. Ensure the light plate is aligned and tightened.
5.6. Final Assembly
Rotate the light shade until it is securely fastened to the fan. Once all components are installed, restore power at the circuit breaker.
5.7. Installation Video
For a visual guide, please refer to the official installation video:
6. Operating Instructions
Your warmiplanet ceiling fan is controlled by a multi-function remote control. Ensure the remote has 2 AAA batteries installed.
6.1. Remote Control Functions

- Power On/Off: Press the power button to turn the fan and light on or off.
- Fan Speed: Select from 6 available speeds (1-6) to adjust airflow.
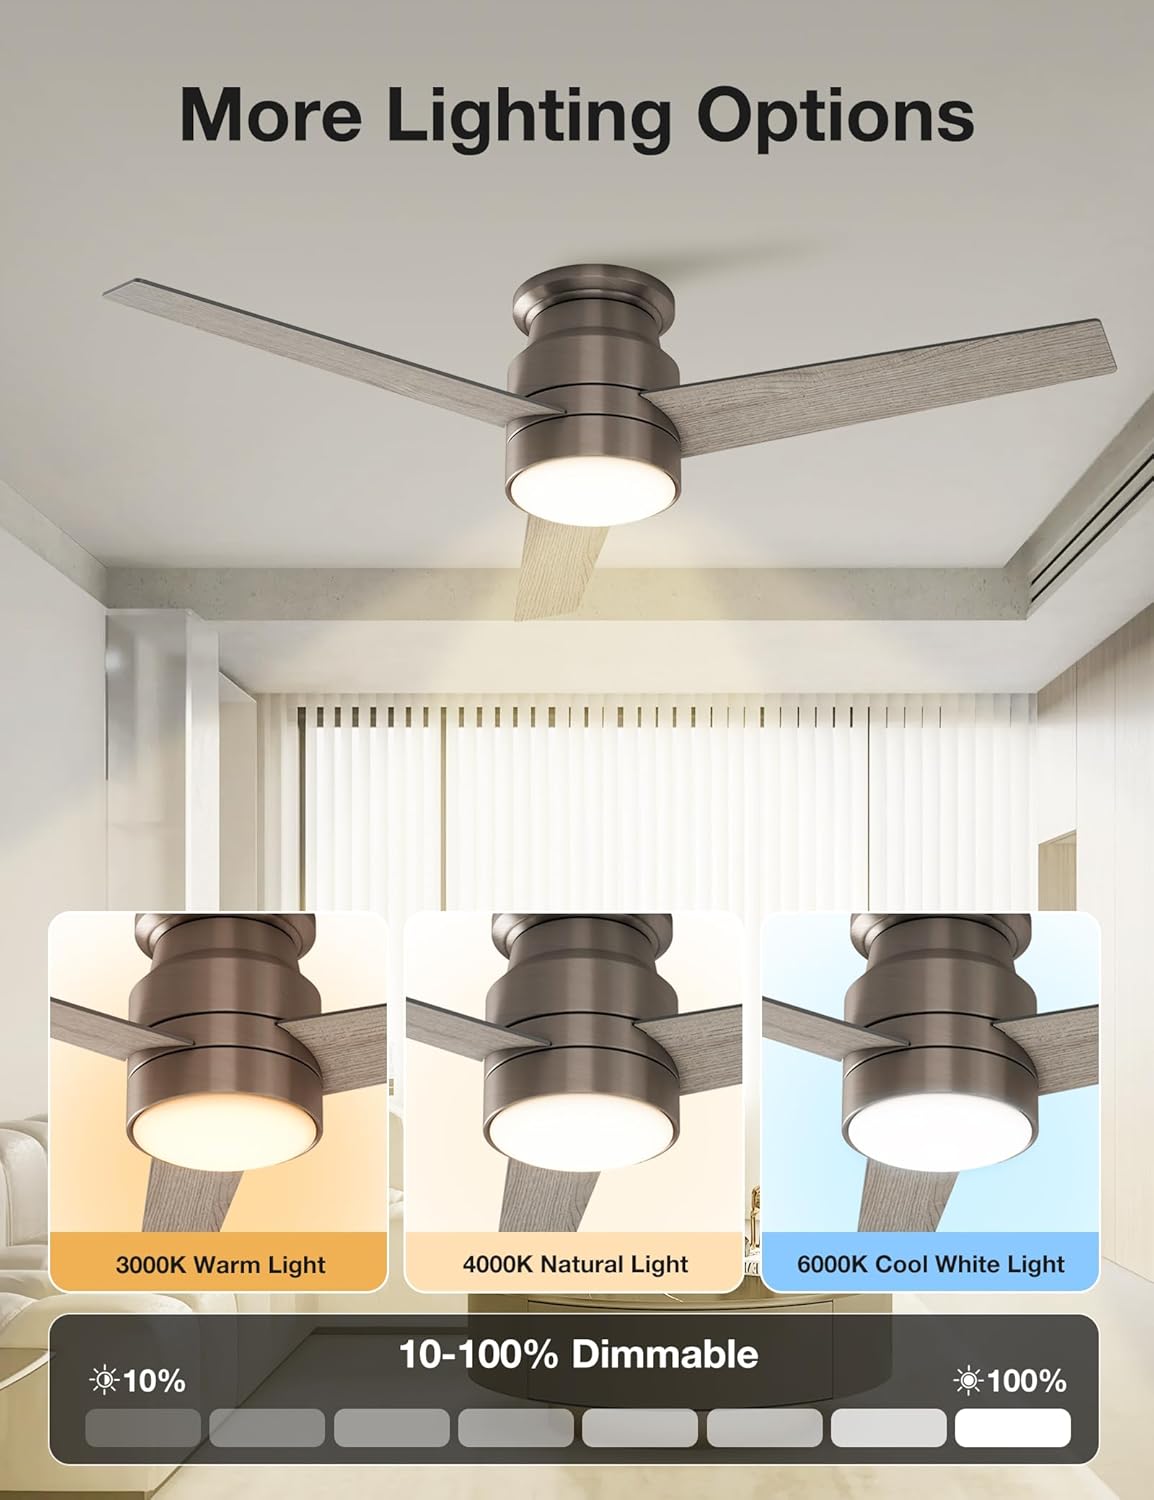
- Light Control:
- Press the light button to cycle through 3 color temperatures: Cool White (6000K), Natural Light (4000K), and Warm White (3000K).
- Hold the light button to dim the light from 10% to 100%. The light has a memory function and will retain the last setting.
- Timer Function: Set the fan to turn off automatically after 1 hour or 4 hours.
- Natural Breeze Mode: Activates a fluctuating fan speed to simulate a natural breeze.
6.2. Reversible Function (Seasonal Use)
The fan features a reversible DC motor for year-round comfort. A small switch on the motor housing allows you to change the blade direction.
- Summer Mode (Counter-Clockwise Updraft): Blades rotate counter-clockwise, pushing air downwards to create a cooling breeze.
- Winter Mode (Clockwise Downdraft): Blades rotate clockwise, drawing air upwards to circulate warm air trapped near the ceiling.

6.3. Product Demonstration Videos
View these videos for a demonstration of the fan's features and operation:
7. Maintenance
Regular maintenance helps prolong the life and performance of your ceiling fan.
- Cleaning: Use a soft, damp cloth to clean the fan blades and motor housing. Do not use abrasive cleaners or solvents.
- Blade Balance: Check fan blades periodically for any wobbling. If wobbling occurs, ensure all blade screws are tight. A balancing kit (not included) may be used if necessary.
- Light Source: The LED light source is designed for long life and is replaceable. Contact customer support for replacement parts if needed.
8. Troubleshooting
If you experience issues with your fan, refer to the following common problems and solutions:
| Problem | Possible Cause & Solution |
|---|---|
| Fan does not start |
|
| Light does not work |
|
| Fan wobbles |
|
| Humming noise from fan |
|
| Remote control not responding |
|
9. Warranty and Customer Support
warmiplanet stands behind the quality of its products.
- Motor Warranty: 10-year warranty for the DC motor.
- Other Parts Warranty: 2-year warranty for all other fan components.
- Customer Support: We offer 24-hour customer support. If you have any questions, concerns, or require assistance with installation or troubleshooting, please feel free to contact us. We aim to reply within 24 hours and provide the best possible service.
Contact information can typically be found on the product packaging or the official warmiplanet website.
Ask a question about this manual
Ask about setup, troubleshooting, compatibility, parts, safety, or missing instructions. Manuals+ will review the question and use this page’s manual context to help answer it.