Phenyx Pro PDP-2-1H1B
Phenyx Pro Dual Digital Wireless Microphone System User Manual
Model: PDP-2-1H1B
Product Overview
The Phenyx Pro PDP-2-1H1B is a versatile dual digital UHF wireless microphone system designed for clear and reliable audio transmission. It features a handheld dynamic microphone and a bodypack transmitter with options for a headset or lapel microphone, making it suitable for various applications from home karaoke to professional performances.
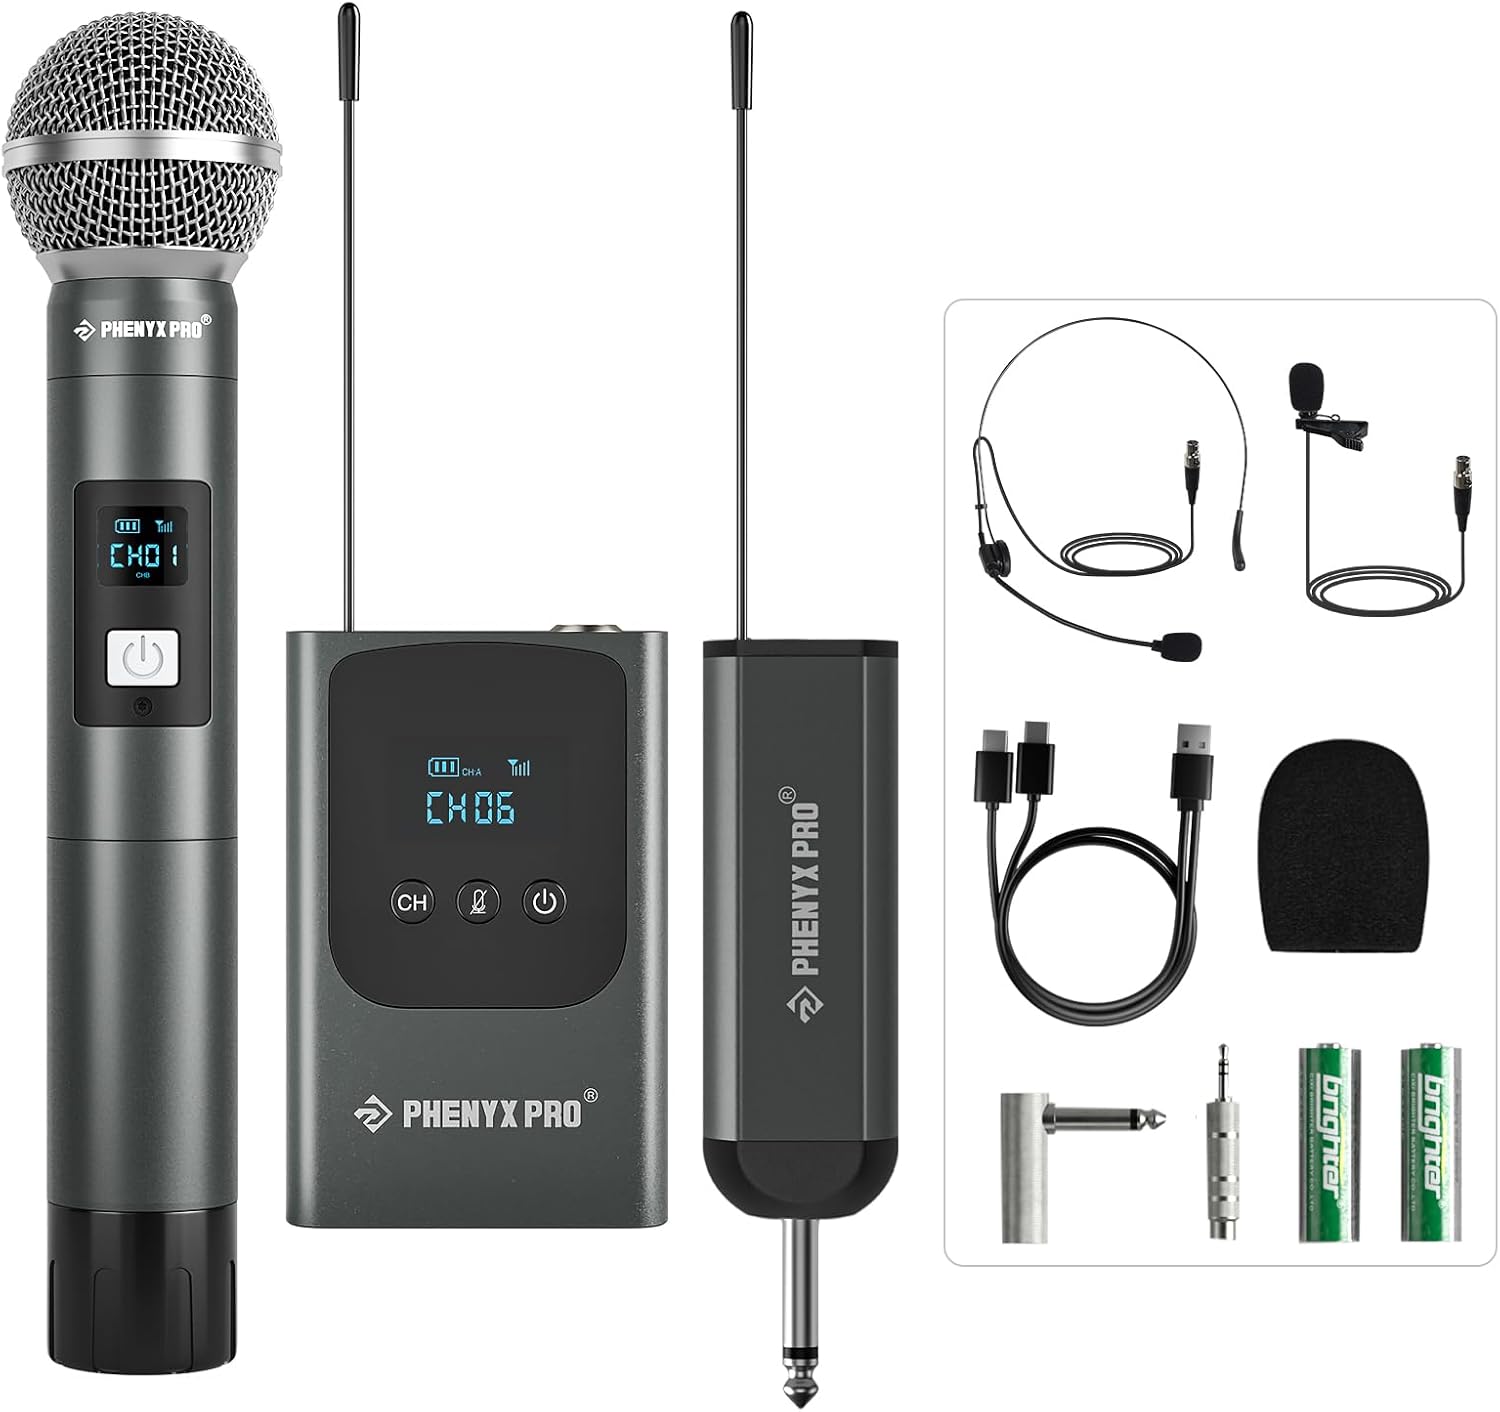
Figure 1: Complete Phenyx Pro PDP-2-1H1B Wireless Microphone System.
What's Included
Your Phenyx Pro PDP-2-1H1B system package contains the following items:
- 1 x Receiver with a 6.35mm plug
- 1 x Portable Wireless Handheld Microphone
- 1 x Rechargeable Bodypack Transmitter
- 1 x Headset Microphone
- 1 x Lapel/Lavalier Microphone
- 1 x Handheld Foam Cover
- 2 x AA Batteries (for handheld mic)
- 1 x USB-C Dual Charging Cable
- 1 x 6.35mm to 3.5mm Adapter
- 1 x Angle TS Male to 1/4'' TS Female Adapter (to keep receiver antenna upward)
- 1 x User's Manual

Figure 2: Contents of the product package.
Setup Guide
- Charge the Receiver and Bodypack: Use the provided USB-C dual charging cable to fully charge the mini receiver (1500mAh battery) and the bodypack transmitter (550mAh battery). The receiver is rechargeable and offers up to 5.5 hours of working time with approximately 3 hours of fast charging.
- Install Batteries in Handheld Microphone: Open the battery compartment of the handheld microphone and insert the 2 AA batteries provided.
- Connect Receiver to Audio System: Plug the 1/4" TS connector of the mini receiver into the microphone input of your karaoke machine, partybox, mixer, or audio interface. If needed, use the included angle TS male to 1/4" TS female adapter to ensure the receiver's antenna points upward for optimal signal reception.
- Connect Headset or Lapel Mic to Bodypack (Optional): If using the headset or lapel microphone, plug its 3-pin mini XLR jack into the bodypack transmitter.
- Power On: Turn on the receiver, handheld microphone, and bodypack transmitter. The system should automatically pair.

Figure 3: Charging the mini receiver.

Figure 4: Connecting the receiver to an audio system.

Figure 5: Bodypack transmitter with headset and lapel mic options.

Figure 6: Hassle-free Hookup process.
Operating Instructions
Handheld Microphone Operation
- Power On/Off: Long press the power button on the microphone to turn it on or off.
- Mute Function: Short press the power button to mute or unmute the microphone.
- Frequency Selection: The handheld microphone features a digital display showing channel number, battery life, and signal strength. Use the frequency selection button to change channels if interference occurs. The system offers 2x15 UHF tunable frequencies (902-928MHz).

Figure 7: Handheld Microphone Controls and Display.
Bodypack Transmitter Operation
- Power On/Off: Long press the power button on the bodypack to turn it on or off.
- Mute Function: Short press the mute button for safe and reliable control during performances.
- Frequency Selection: Simply tap the CH button to select a desired frequency among the 2x15 tunable UHF frequencies. The receiver automatically switches to the new channel.

Figure 8: Bodypack Transmitter Controls.
General Usage Tips
- Line-of-Sight: For optimal performance and range (160-200ft), maintain a clear line-of-sight between the transmitters and the receiver. Avoid placing metal or glass objects directly in the signal path.
- Antenna Position: Keep the receiver antenna pointed upward. Use the included angle adapter if necessary to achieve this orientation when plugging into rear ports.
- Microphone Handling: When using the handheld microphone, avoid covering the bottom of the transmitter where the signal is sent with your hands to prevent signal blockage.
- Wearing Headset/Lapel Mic: Ensure the headset or lapel microphone is positioned correctly to capture your voice clearly.

Figure 9: Wireless Microphone Usage Tips.
Maintenance
- Cleaning: Use a soft, dry cloth to clean the exterior of the microphones, transmitter, and receiver. Do not use liquid cleaners or solvents.
- Battery Care: For the handheld microphone, remove AA batteries if the unit will not be used for an extended period to prevent leakage. Rechargeable components (receiver, bodypack) should be charged regularly to maintain battery health.
- Storage: Store the system in a cool, dry place away from direct sunlight and extreme temperatures.
- Handling: Handle all components with care to avoid physical damage, especially the antennas and microphone capsules.
Troubleshooting
| Problem | Possible Cause | Solution |
|---|---|---|
| No Sound / Weak Sound |
|
|
| Interference / Static Noise |
|
|
| Humming Noise |
|
|
Specifications
| Feature | Detail |
|---|---|
| Model Number | PDP-2-1H1B |
| Microphone Form Factor | Microphone System |
| Frequency Range | 902 - 928MHz |
| Number of Channels | 2 (2x15 UHF Frequencies) |
| Sampling Rate | 48kHz/24Bit |
| Signal-to-Noise Ratio | 96 dB |
| Handheld Mic Type | Dynamic, Cardioid |
| Headset/Lapel Mic Type | Condenser, Omni |
| Receiver Battery Capacity | 1500mAh |
| Bodypack Battery Capacity | 550mAh |
| Charging Interface | USB-C |
| Working Time | Up to 5.5 hours (approx.) |
| Material | Metal (microphones) |
| Connectivity Technology | Auxiliary (6.35mm Jack, XLR) |
| Compatible Devices | Party box, PA System, Audio Mixer, Camera, Amplifier |
Warranty and Support
Phenyx Pro products are crafted with premium components and precision engineering, ensuring trusted quality and lasting reliability. The manufacturer stands firmly behind every product they make.
For detailed warranty information, technical support, or further assistance, please refer to the official user manual provided with your product or visit the Phenyx Pro website.
You can also access the User Manual (PDF) online: Phenyx Pro User Manual PDF
Ask a question about this manual
Ask about setup, troubleshooting, compatibility, parts, safety, or missing instructions. Manuals+ will review the question and use this page’s manual context to help answer it.