1. Introduction
This manual provides essential information for the safe and efficient operation of your TuTu TUB32HN1N 32-inch HD Ready TV. Please read it thoroughly before using the television and retain it for future reference.

Front view of the TuTu TUB32HN1N 32-inch HD Ready TV, highlighting its borderless design and key features like HD Ready, Dolby Audio, USB, HDMI, Hotel Mode, CI+, and DVB-S2/T2/C tuners.
2. Safety Information
Always follow basic safety precautions when using this television to reduce the risk of fire, electric shock, and injury.
- Do not expose the TV to rain or moisture.
- Do not open the cabinet; refer all servicing to qualified personnel.
- Ensure proper ventilation around the TV.
- Unplug the TV during lightning storms or when unused for long periods.
- Keep the TV away from direct sunlight and heat sources.
3. Package Contents
Verify that all items are present in the box:
- 1x TuTu TUB32HN1N 32-inch HD Ready TV
- 1x User Manual
- 1x Remote Control
- 1x TV Stand (base)
Note: 2x AA batteries for the remote control are not included.
4. Product Overview
4.1. Dimensions
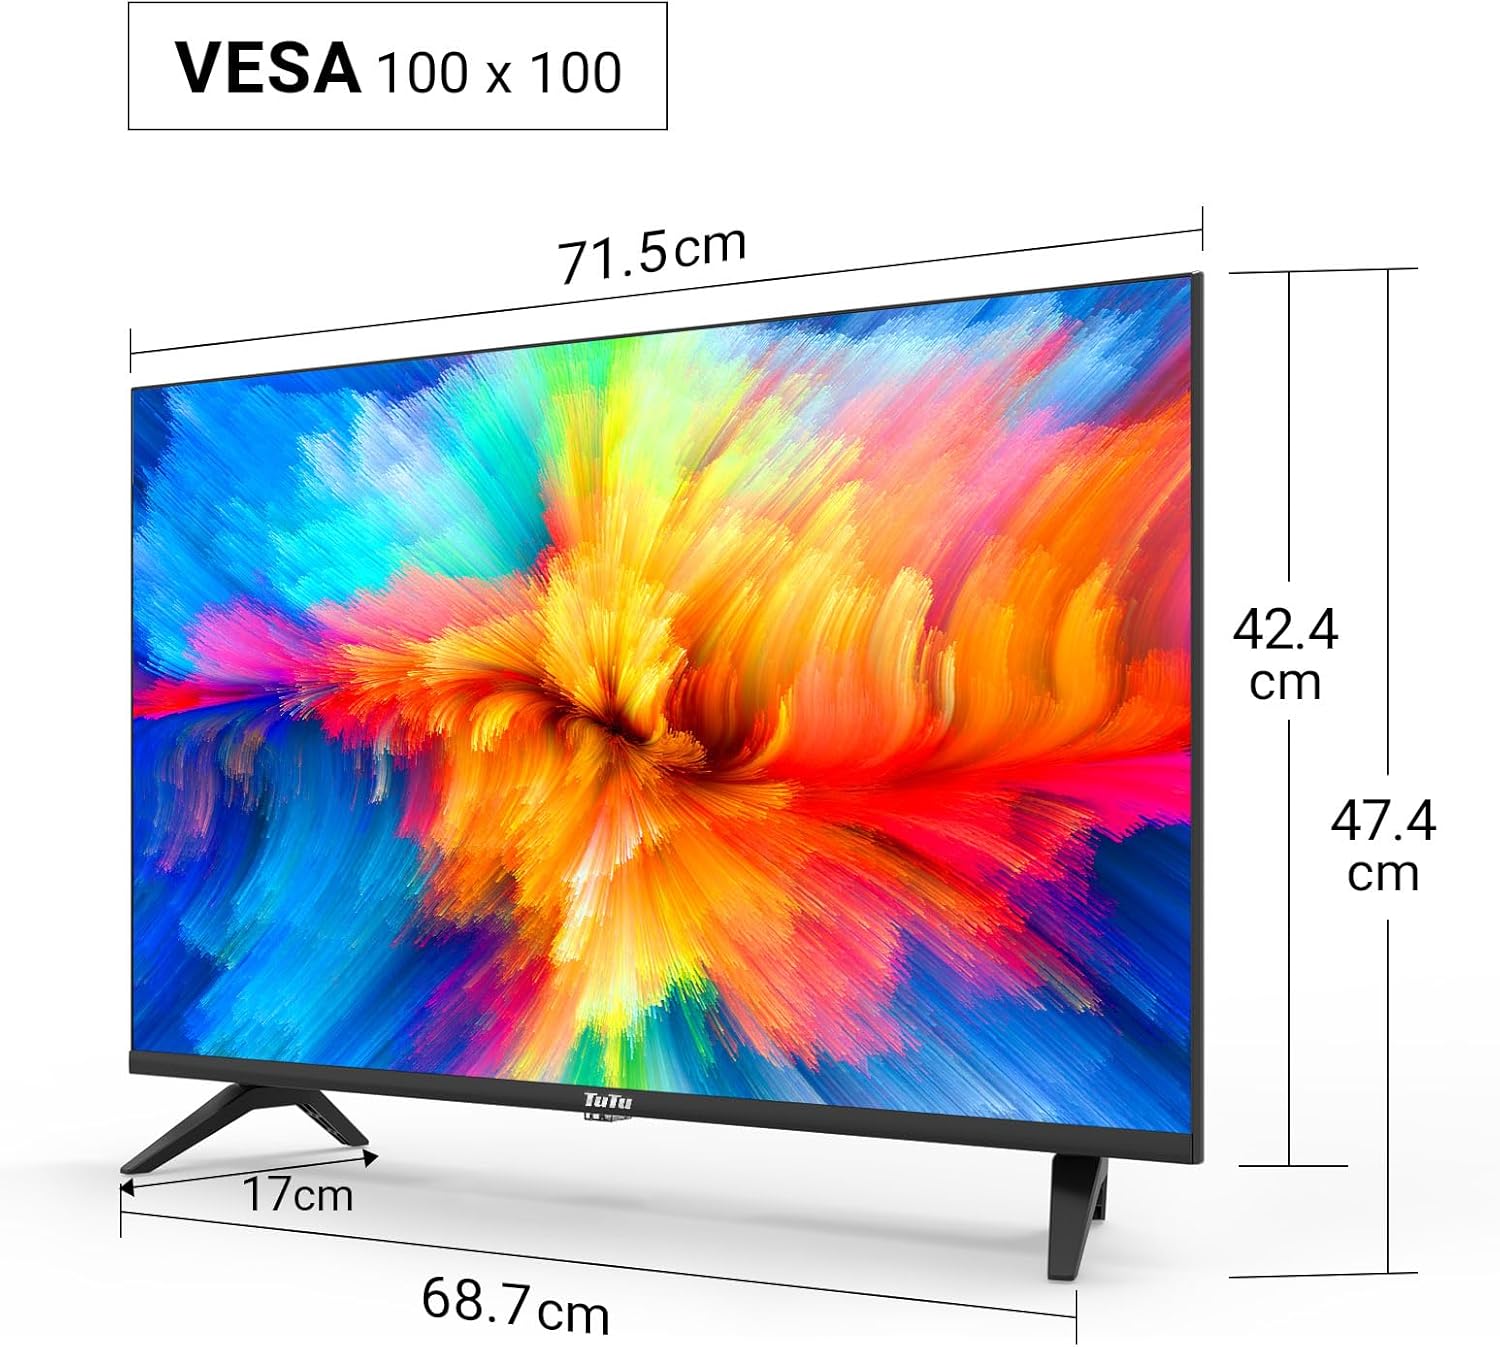
Technical drawing displaying the dimensions of the 32-inch TV, including screen width (71.5cm), height with stand (47.4cm), height without stand (42.4cm), and stand depth (17cm). VESA 100x100 compatibility is also indicated.
4.2. Connection Ports

Detailed view of the TV's input/output ports, including SCART, Coaxial Out, LNB In, RF (Antenna), 2x HDMI, USB, CI+ Common Interface, Mini AV, Mini YPbPr, and Earphone Out.
The TV features a variety of ports for connecting external devices:
- HDMI (x2): For connecting high-definition devices like Blu-ray players, game consoles, or external streaming devices.
- USB 2.0 (x1): For media playback and recording from USB storage devices.
- CI/CI+ Slot (x1): For inserting a Common Interface module to access encrypted digital channels.
- RF (Antenna): For connecting a terrestrial or cable antenna.
- LNB In: For connecting a satellite dish.
- SCART: For connecting older analog devices.
- Coaxial Out: For digital audio output.
- Mini AV / Mini YPbPr: For analog video and audio input (adapters may be required).
- Earphone Out: For connecting headphones.
5. Setup
5.1. Stand Assembly
To assemble the TV stand:
- Carefully place the TV face down on a soft, flat surface to prevent screen damage.
- Align the stand with the mounting holes on the bottom of the TV.
- Secure the stand using the provided screws.
5.2. Wall Mounting
The TV supports VESA 100x100 wall mounts. Wall mount brackets are sold separately. Follow the instructions provided with your wall mount kit for proper installation.
5.3. Connecting Peripherals
Connect your antenna, satellite dish, or cable to the appropriate RF or LNB IN port. Use HDMI cables for high-definition devices. Insert USB drives into the USB port for media access.

Illustration of the TV's triple tuner capabilities, showing connections for DVB-S/S2 (satellite), DVB-C (cable), and DVB-T/T2 (terrestrial) reception.
5.4. First-Time Power On & Channel Scan
After connecting the power cable and antenna/satellite, press the power button on the remote control or TV. The TV will guide you through the initial setup, including language selection and automatic channel scanning for DVB-T/T2, DVB-C, and DVB-S/S2 signals.
6. Operating Instructions
6.1. Remote Control Functions
Refer to the remote control diagram in your printed manual for specific button layouts. Common functions include Power, Volume Up/Down, Channel Up/Down, Input Source, Menu, and Navigation buttons.
6.2. Input Source Selection
Press the 'Source' button on your remote to switch between connected devices (e.g., HDMI 1, HDMI 2, USB, DVB-T, DVB-S).
6.3. USB Media Playback and Recording
Insert a USB storage device into the USB port. The TV's media player will allow you to browse and play video, image, and music files. The TV also supports recording digital broadcasts to a connected USB device.

Image demonstrating the USB media player and recorder function, allowing playback of video, images, and music from a USB drive or external hard disk. The 'REC' indicator shows recording capability.
6.4. CI/CI+ Module Installation
To access encrypted channels, insert your CI/CI+ module (with smart card) into the CI slot on the side or rear of the TV. Ensure the module is inserted correctly according to its instructions.
6.5. Hotel Mode Configuration
The Hotel Mode feature allows for customized settings ideal for hospitality environments. This includes limiting volume range, creating custom channel lists, locking sources, and batch processing TV settings via USB.

Screenshot of the Hotel Mode menu, illustrating features such as limited volume range, custom channel list creation, source locking, and batch processing of TV settings via USB.
7. Maintenance
To maintain your TV in optimal condition:
- Cleaning the Screen: Gently wipe the screen with a soft, lint-free cloth. For stubborn marks, use a screen cleaner specifically designed for TVs, applied to the cloth, not directly to the screen.
- Cleaning the Cabinet: Use a soft, dry cloth to wipe the TV cabinet. Do not use abrasive cleaners or solvents.
- Ventilation: Ensure the ventilation openings on the back of the TV are not blocked to prevent overheating.
8. Troubleshooting
If you encounter issues with your TV, refer to the following common problems and solutions:
| Problem | Possible Solution |
|---|---|
| No power | Check if the power cord is securely plugged into the TV and the wall outlet. Try a different outlet. |
| No picture, but sound is present | Ensure the correct input source is selected. Check cable connections to external devices. |
| No sound, but picture is present | Check the volume level and mute status. Verify audio cable connections. |
| Cannot find channels | Ensure the antenna/satellite cable is properly connected. Perform an automatic channel scan again. Check antenna signal strength. |
| Remote control not working | Replace the batteries. Ensure there are no obstructions between the remote and the TV's IR sensor. |
9. Specifications
Here are the technical specifications for the TuTu TUB32HN1N TV:
| Feature | Specification |
|---|---|
| Brand | TuTu |
| Model | TUB32HN1N |
| Screen Size | 32 Inches (80 cm) |
| Display Technology | LED (Direct LED Display) |
| Resolution | HD Ready (1366x768p) |
| Aspect Ratio | 16:9 |
| Refresh Rate | 60 Hz |
| Tuner Technology | DVB-T/T2 (Terrestrial), DVB-C (Cable), DVB-S/S2 (Satellite) |
| HDMI Ports | 2 |
| USB Ports | 1 (USB 2.0) |
| CI/CI+ Slot | 1 |
| Audio Output Mode | Stereo (Dolby Digital) |
| Power Consumption (SDR) | 27.0 W |
| Energy Efficiency Class | F |
| Product Dimensions (with stand) | 79.6 x 12.8 x 50.5 cm |
| Weight | 5.04 kg |
| VESA Compatibility | 100 x 100 mm |

The EU energy label for the TuTu TUB32HN1N TV, showing an energy efficiency class of F and energy consumption of 27 kWh/1000h.

A detailed product information sheet (PRODUCT INFORMATION SHEET) providing technical parameters and compliance details for the TuTu TUB32HN1N TV. For more details, visit the official EPREL database: https://eprel.ec.europa.eu/qr/1589506
10. Warranty and Support
TuTu offers a two-year warranty policy for this product. For warranty claims, technical support, or any inquiries, please refer to the contact information provided in your purchase documentation or visit the official TuTu website.