1. Introduction
This manual provides detailed instructions for the installation, operation, and maintenance of the ezqnirk 4mm Hole Mixer Equalizer Push Button Caps. These caps are designed for use with compatible potentiometers and faders found in audio mixers, equalizers, and other electronic equipment. Please read this manual thoroughly before installation to ensure proper use and longevity of the product.
2. Product Overview
2.1 Components
- 10 x Mixer Equalizer Push Button Caps (Black)
2.2 Features
- Designed for 4mm hole diameter potentiometer shafts.
- Durable plastic construction for long-lasting use.
- Black finish with a straight slip design for clear indication.
- Easy to install and replace.
2.3 Product Dimensions
The push button caps feature precise dimensions for a secure fit:
- Length: Approximately 12mm
- Height: Approximately 10mm
- Width: Approximately 6.5mm
- Hole Diameter: 4mm

Figure 1: Overview of the ezqnirk Mixer Equalizer Push Button Caps. The image displays several black caps, some with a white indicator line, from different perspectives, highlighting their design and form factor.

Figure 2: Measurement of the cap's height. A digital caliper is shown measuring one of the black push button caps, indicating a height of 10.2 mm, confirming the product's vertical dimension.
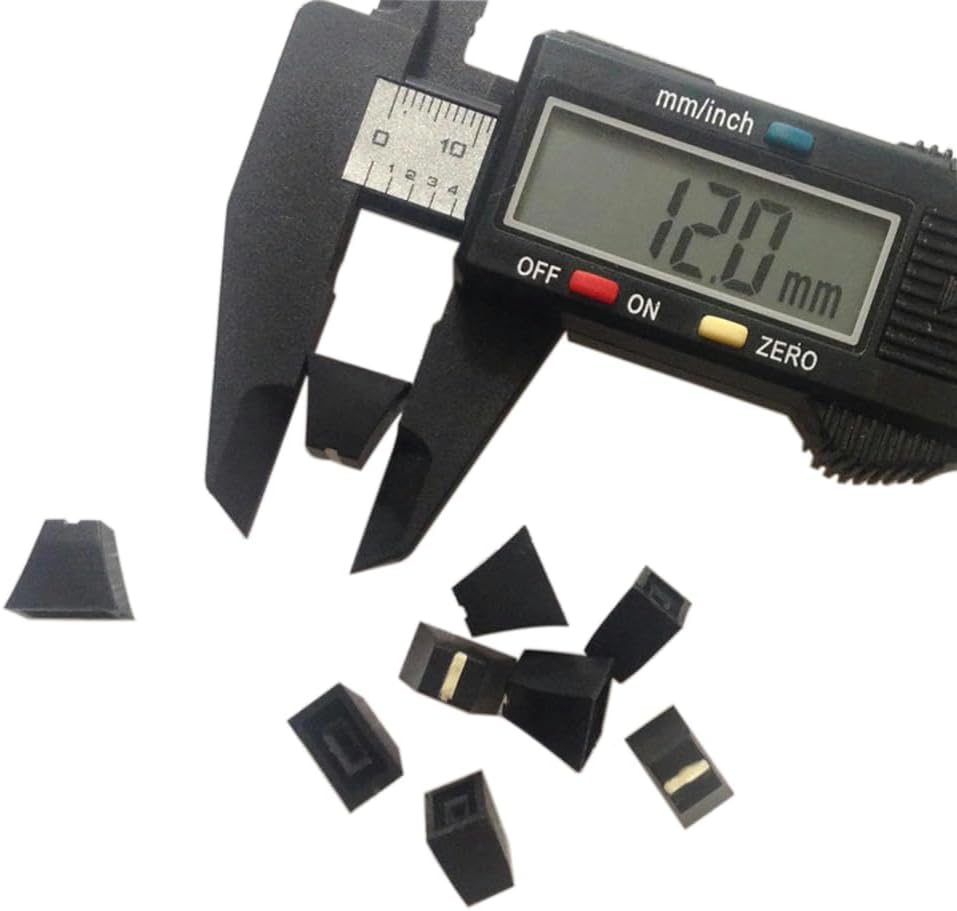
Figure 3: Measurement of the cap's length. This image displays a digital caliper measuring the longest dimension of a black push button cap, showing a reading of 12.0 mm.

Figure 4: Measurement of the cap's width. A digital caliper is used to measure the width of a black push button cap, displaying a measurement of 6.5 mm.
3. Installation Guide
Follow these steps to properly install the push button caps:
- Identify Compatible Potentiometer: Ensure the potentiometer or fader shaft has a 4mm diameter. These caps are designed for straight slip-type shafts, commonly found on mixer equalizers.
- Align the Cap: Carefully align the internal hole of the push button cap with the shaft of the potentiometer. Ensure the indicator line (if present) is oriented correctly for your application.
- Gently Push: Apply gentle, even pressure to push the cap onto the shaft. Avoid excessive force, which could damage the cap or the potentiometer. The cap should slide on smoothly and fit snugly.
- Verify Secure Fit: Once installed, gently pull on the cap to ensure it is securely seated and does not wobble. It should remain firmly in place during normal operation.
4. Operation
The ezqnirk push button caps are passive components designed to provide a tactile interface for potentiometers and faders. Once installed, they allow users to easily adjust the corresponding controls on audio equipment. Their operation is directly tied to the function of the potentiometer or fader they are attached to.
5. Maintenance and Care
To ensure the longevity and appearance of your push button caps, follow these simple maintenance guidelines:
- Cleaning: Use a soft, dry cloth to wipe the caps clean. For stubborn dirt, a slightly damp cloth with mild soap can be used, followed by immediate drying. Avoid abrasive cleaners or solvents, as they may damage the plastic finish.
- Storage: Store unused caps in a cool, dry place away from direct sunlight and extreme temperatures.
- Handling: Handle the caps with care to prevent scratches or damage to the plastic.
6. Troubleshooting
While these caps are simple components, here are some common issues and their solutions:
- Cap is Loose:
Possible Cause: The potentiometer shaft may not be exactly 4mm, or the cap was not pushed on firmly enough.
Solution: Ensure the shaft diameter matches. Re-install the cap, applying firm, even pressure until it clicks or feels secure. If the shaft is undersized, the cap may not fit securely. - Difficulty Installing Cap:
Possible Cause: Misalignment or an oversized potentiometer shaft.
Solution: Double-check the shaft diameter. Ensure the cap is perfectly aligned before pushing. Do not force the cap onto an oversized shaft, as this can cause damage. - Cap Appears Damaged:
Possible Cause: Physical impact or improper cleaning.
Solution: If the cap is cracked or severely scratched, it may need to be replaced. Refer to the maintenance section for proper cleaning methods.
7. Technical Specifications
| Specification | Detail |
|---|---|
| Product Name | Mixer Equalizer Push Button Cap |
| Brand | ezqnirk |
| Model Number | Esx-TCoe25DB0g |
| Material | Plastic |
| Color | Black |
| Length | 12mm |
| Height | 10mm |
| Width | 6.5mm |
| Hole Diameter | 4mm |
| Quantity | 10 pieces per pack |
8. Warranty and Support
This product is covered by the standard return and refund policies of the retailer from which it was purchased. For any questions regarding product defects, installation issues not covered in this manual, or general inquiries, please contact the seller or manufacturer directly through the platform where the purchase was made. Please retain your proof of purchase for any warranty claims or support requests.