
1. Introduction
The QPKING LM160 Smart Digital Manifold Kit is an advanced tool designed for professionals in HVAC and refrigeration. It integrates pressure and temperature measurement, vacuum status determination, and leak testing capabilities into a single, user-friendly device. Featuring a built-in database of 95 refrigerants, multilingual support, and a clear backlit display, the LM160 streamlines diagnostic and service procedures for various refrigeration systems.
2. What's in the Box
Upon unboxing your QPKING LM160 Smart Digital Manifold Kit, please verify that all the following components are present:
- 1x LM160 Smart Digital Manifold Main Unit
- 1x User Manual (in English)
- 2x Temperature Clips
- 3x Test Pipes (Hoses)
- 2x Hose Couplings
- 1x Carrying Suitcase
- 1x Giftbox

Image: All components included in the QPKING LM160 Smart Digital Manifold Kit, neatly arranged with the main unit, hoses, temperature probes, and the protective carrying case.
3. Product Overview and Components
The LM160 Smart Digital Manifold is designed for durability and ease of use. Familiarize yourself with its key components:
- Main Unit: Features a 2.8-inch backlit display and intuitive control buttons.
- High/Low Pressure Valves: Red and blue knobs for controlling refrigerant flow.
- Refrigerant Visible Window: A sight glass to observe refrigerant flow.
- Two-Side Handrails: Ergonomic handles for secure grip and portability.
- Foldable Hook: For convenient hanging during operation.
- Pressure Ports: Connections for high-pressure, low-pressure, and filling hoses.

Image: Close-up of the LM160's design details, highlighting the foldable hook for hanging, the red and blue high/low pressure control valves, the transparent refrigerant visible window, and the robust two-side handrails for easy handling.
4. Setup
Before initial use, ensure the device is fully charged or has sufficient battery life. Connect the appropriate hoses and temperature clips according to your application. Refer to the specific connection diagrams for your HVAC or refrigeration system.
- Unpack the LM160 unit and accessories from the carrying case.
- Attach the temperature clips to the desired measurement points on the refrigeration system.
- Connect the high-pressure (red) and low-pressure (blue) hoses to the corresponding ports on the manifold and the system.
- Connect the yellow service hose to the central port on the manifold for vacuum pump or refrigerant tank connection.
- Press the power button to turn on the device.
5. Operating Modes
The LM160 offers three primary operating modes to facilitate comprehensive system analysis:
5.1. Refrigeration Mode
This mode provides real-time measurement of pressure and temperature within the refrigeration system. It displays key parameters such as low pressure (LP), high pressure (HP), evaporation temperature (Ev), condensation temperature (Co), and superheat (SH) and subcooling (SC) values.
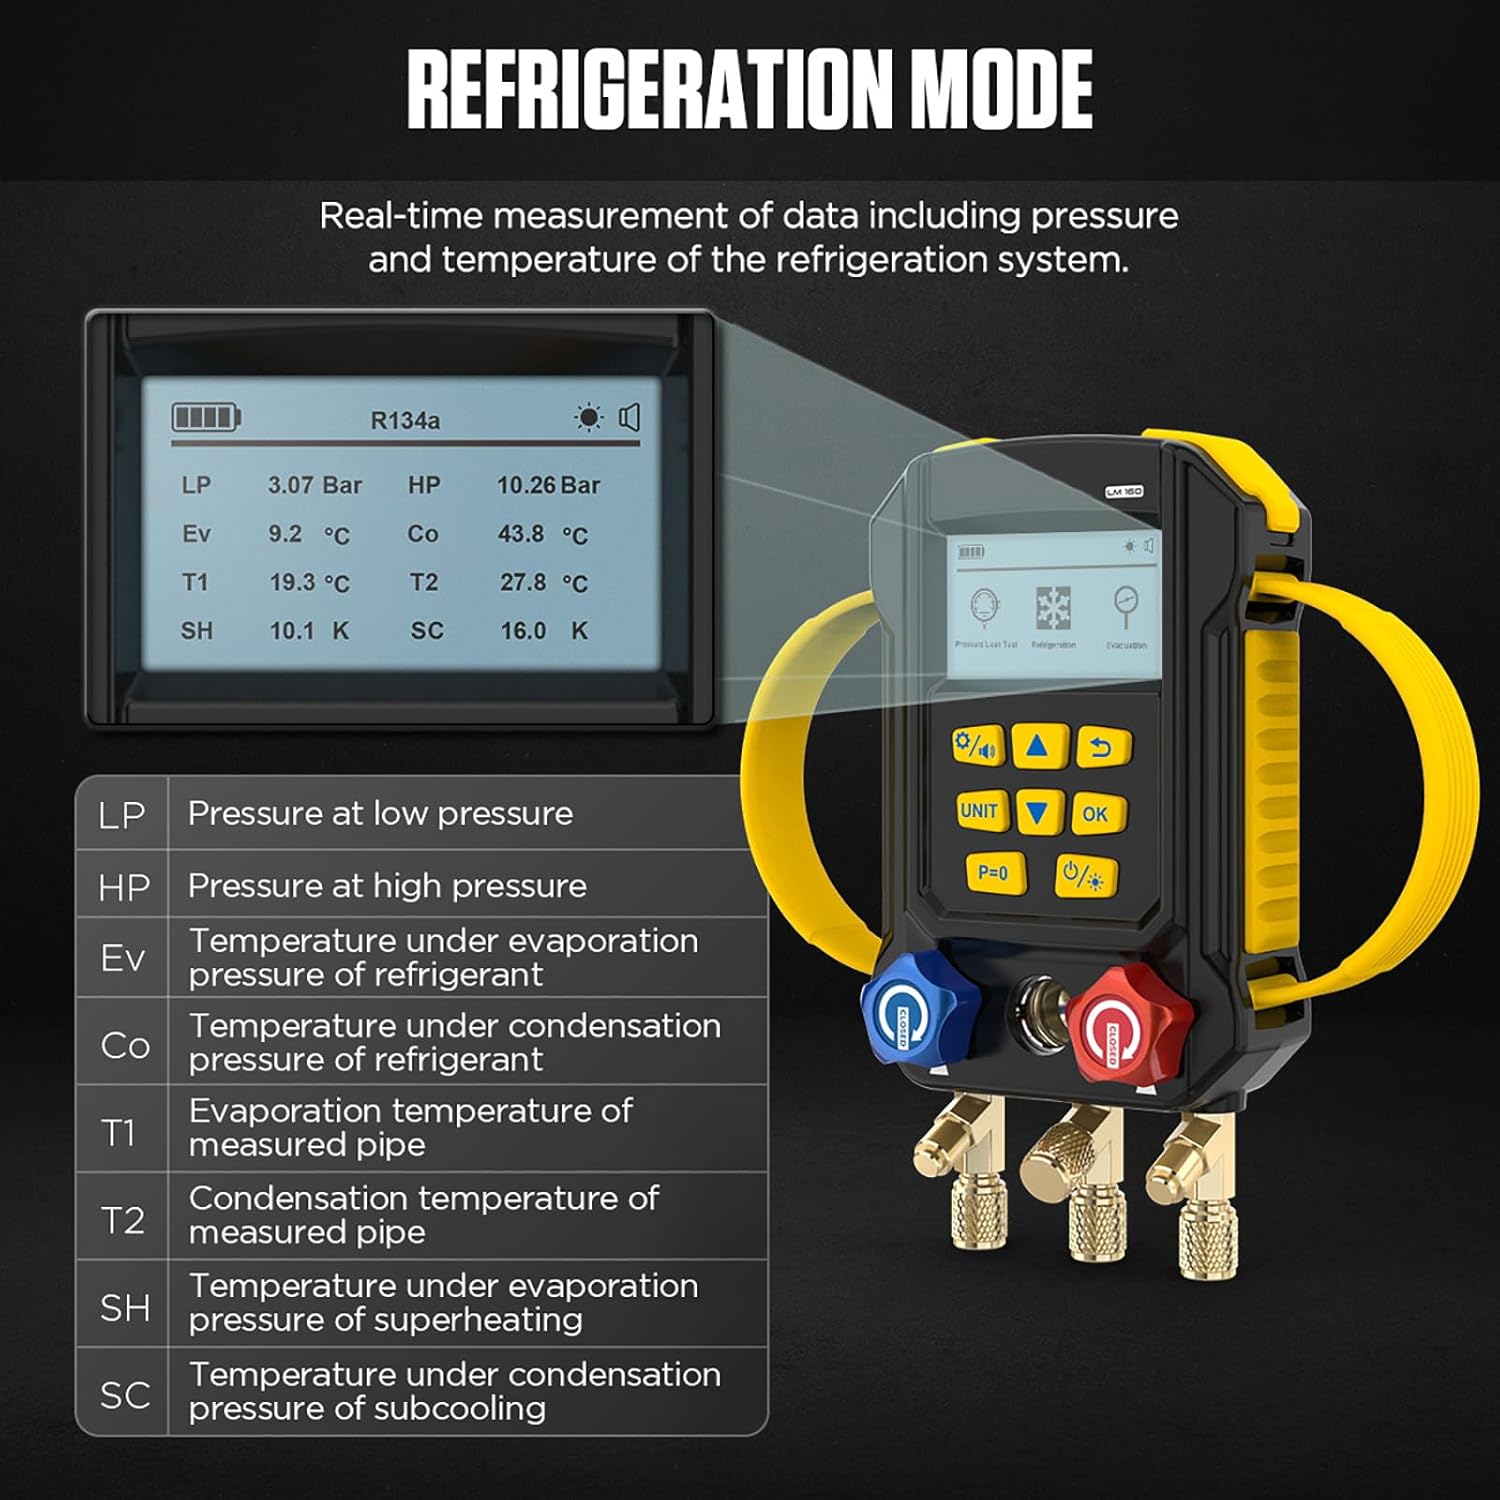
Image: The LM160 display in Refrigeration Mode, showing live data for R134a, including low and high pressures, evaporation and condensation temperatures, and calculated superheat and subcooling values.
5.2. Vacuuming Mode
Use this mode to measure the pressure of the refrigeration system during evacuation and to determine the current vacuum status. It displays hold time, current pressure, evaporation temperature of water (TH2O), ambient temperature (Tamb), and temperature difference (Delta T).

Image: The LM160 display in Vacuuming Mode, showing the duration of the vacuum process, the current vacuum pressure, the evaporation temperature of water, ambient temperature, and the temperature difference.
5.3. Pressure Leak Test
This mode is used to check the tightness of the refrigeration system. It records the starting pressure, current pressure, and calculates the pressure difference (Delta P) over time to identify potential leaks.

Image: The LM160 display in Pressure Leak Test mode, indicating the initial pressure, the current pressure, and the calculated pressure drop (Delta P) over the test duration, which helps in identifying leaks.
6. Key Features
6.1. Built-in 95 Standard Refrigerant Databases
The LM160 comes pre-loaded with a comprehensive database of 95 standard refrigerants, allowing for direct reading of operation process data without manual lookups.

Image: A detailed list of the 95 standard refrigerants integrated into the LM160's database, including common types like R134a, R22, R410A, and R1234yf.
6.2. Various Units Available
The manifold gauge supports automatic conversion between multiple pressure, vacuum, and temperature units, enhancing versatility for different regional standards and user preferences.
- Pressure Units: bar, kg/cm², psi, KPa, MPa
- Vacuum Degree Units: Micron, hPa, mbar, mTorr, Torr
- Temperature Units: Celsius (°C), Fahrenheit (°F)

Image: The LM160's display illustrating the range of selectable units for pressure (bar, kg/cm², psi, KPa, MPa), vacuum (Micron, hPa, mbar, mTorr, Torr), and temperature (°C, °F).
6.3. Multilingual Support
The LM160 Smart Digital Manifold Kit supports multiple language settings for user interface and display, including English, French, German, Italian, Spanish, Portuguese, Chinese, and Japanese.

Image: Visual representation of the LM160's multilingual capabilities, displaying flags and names of the eight supported languages: English, German, French, Portuguese, Italian, Chinese, Spanish, and Japanese.
6.4. 2.8-inch Backlit Display
The device features a clear 2.8-inch backlit screen, ensuring readability even in low-light or dark working environments.

Image: A visual demonstration of the LM160's 2.8-inch display, showing its clarity and the effect of the backlight for improved visibility in various lighting conditions.
6.5. Program Control System
The intuitive menu layout and intelligent program control simplify operation and provide detailed result displays, making complex tasks more manageable for technicians.

Image: A conceptual diagram demonstrating the LM160's intelligent program control system, which simplifies menu navigation and data display for efficient operation.
7. Maintenance
Proper maintenance ensures the longevity and accuracy of your LM160 Smart Digital Manifold Kit.
- Cleaning: Wipe the unit with a soft, damp cloth. Do not use abrasive cleaners or solvents.
- Storage: Store the unit and accessories in the provided carrying case in a dry, cool place when not in use.
- Battery: Ensure the battery is charged periodically, even during long periods of non-use, to maintain battery health.
- Hoses and Connections: Inspect hoses and fittings regularly for wear, cracks, or leaks. Replace damaged components immediately.
8. Troubleshooting
If you encounter issues with your LM160, consider the following common troubleshooting steps:
- Device Not Powering On: Check battery level. Ensure the power button is pressed firmly.
- Inaccurate Readings: Verify that hoses are securely connected and not leaking. Ensure temperature clips are properly attached. Calibrate the pressure if necessary (refer to the manual for calibration steps).
- Display Issues: If the screen is dim, check the backlight setting. If the display is frozen, try restarting the device.
- Refrigerant Not Detected: Ensure the correct refrigerant type is selected in the device settings.
For persistent issues, refer to the detailed troubleshooting section in the included user manual or contact customer support.
9. Specifications
Below are the technical specifications for the QPKING LM160 Smart Digital Manifold Kit:

Image: A comprehensive table detailing the product specifications of the LM160, including measurement units, ranges, resolutions, accuracies for pressure, temperature, and vacuum, as well as the number of supported refrigerants and display type.
| Specification | Value |
|---|---|
| Pressure Measurement Unit | psi, KPa, MPa, bar, kg/cm² |
| Temperature Measurement Unit | °F, °C |
| Vacuum Measurement Unit | hPa, mbar, Torr |
| Pressure Range | 0-870psi, 0-60kg/cm², 0-60bar (rel) |
| Temperature Range | -67-257°F, -55-125°C |
| Vacuum Range | (rel)-14.7-0psi, -1-0bar |
| Overload | 942.5psi, 65bar, 65kg/cm² |
| Pressure Resolution | 0.1psi, 0.01bar, 1KPa, 0.005MPa, 0.01kg/cm² |
| Temperature Resolution | 0.1°F, 0.1°C |
| Vacuum Resolution | 1hPa, 1mbar, 1Torr |
| Temperature Accuracy | ±0.9°F (±1), ±0.5K (±1), ±0.5°C (±1) |
| Pressure Accuracy | ±0.5% of full range |
| Vacuum Accuracy | ±0.5% of full range |
| Number of Refrigerant Species | 95 |
| Display | Backlit display |
| Response Time | 0.5s |
10. Warranty & Support
QPKING offers a 3-year warranty for damages caused by non-human factors. During this period, we commit to resending parts for free if needed. For any inquiries, technical assistance, or warranty claims, please contact QPKING customer support. We aim to respond within 24 hours.
For the most up-to-date support information and contact details, please visit the official QPKING website or refer to the contact information provided in your product packaging.