1. Introduction
This manual provides detailed instructions for the assembly, operation, and maintenance of your ADVANCE OUTDOOR 7x12 ft Shelter Storage Shed. Please read this manual thoroughly before beginning assembly or use to ensure proper setup and safe operation. Retain this manual for future reference.
The ADVANCE OUTDOOR 7x12 ft Shelter is designed to provide portable storage and protection for various items such as motorcycles, boats, ATVs, garden tools, and other equipment. Its robust construction and thoughtful design aim to offer reliable shelter.

Image 1.1: The ADVANCE OUTDOOR 7x12 ft Shelter Storage Shed, shown with a lawnmower stored inside.
2. Safety Information
WARNING: Failure to follow these safety instructions may result in serious injury or property damage.
- Site Selection: Choose a level, stable surface for installation. Avoid areas prone to strong winds or poor drainage.
- Anchoring: Always anchor the shelter securely to the ground using the provided L-Type pegs and any additional anchoring methods suitable for your local weather conditions. In windy conditions, additional heavy-duty anchors and ropes are recommended.
- Assembly: Assembly typically requires two or more people. Do not attempt to assemble alone, especially when handling the frame and cover. Wear appropriate safety gear, including gloves, during assembly.
- Overloading: Do not overload the shelter with excessive weight or items that could compromise its structural integrity.
- Weather Conditions: Disassemble or reinforce the shelter during extreme weather conditions such as heavy snow, strong winds, or severe storms. The arched roof is designed for efficient drainage, but heavy snow accumulation should be cleared promptly.
- Ventilation: Ensure proper ventilation to prevent moisture buildup and condensation. The shelter features dual-layer vents for this purpose.
- Fire Hazard: Keep flammable materials and heat sources away from the shelter.
3. Package Contents
Before beginning assembly, verify that all components listed below are present and undamaged. If any parts are missing or damaged, contact ADVANCE OUTDOOR customer support immediately.
- Steel Frame Poles (various lengths and shapes)
- Connectors
- One-piece Canopy Cover (Heavy-Duty Tarp)
- Two Roll-up Doors with zippers and buckles
- L-Type Pegs (12 units, 0.32x11.81 inch / 8x300mm)
- Elastic Bungees
- Foot Pads
- Ratchet Straps for tightening cover
- Assembly Gloves (may be included)
4. Setup and Assembly
Assembly is designed to be straightforward with a tool-free frame. It is highly recommended that at least two people participate in the assembly process to ensure safety and ease of installation.
4.1. Preparation
- Unpack all components and lay them out in an organized manner.
- Identify all parts according to the parts list (refer to included diagram, not provided here).
- Clear the chosen installation area of any debris or obstacles. Ensure the ground is level.
4.2. Assembly Steps

Image 4.1: Visual guide for the four main assembly steps.
- Step 1: Install the Top Frame. Connect the arched steel poles using the appropriate connectors to form the roof structure. Ensure all connections are secure.
- Step 2: Install the Legs. Attach the vertical leg poles to the top frame. The frame uses snap buttons to lock components in place, ensuring a tool-less assembly.
- Step 3: Place Cover and Install Ground Bar. Carefully drape the one-piece canopy cover over the assembled frame. This step is easier with two people to align the cover properly. Once the cover is in place, install the ground bar (if applicable) and secure the cover to the frame using elastic bungees and ratchet straps. Ensure the cover is stretched tightly to prevent water pooling and wind damage.
- Step 4: Secure Doors. Attach the two roll-up doors to the front and back openings of the shelter. These doors are equipped with double zippers and buckles for flexible access.
- Step 5: Anchor the Shelter. Use the 12 upgraded L-Type pegs to firmly anchor the base of the shelter to the ground. For increased stability, especially in areas prone to wind, consider using additional heavy-duty anchors and ropes.
Note: Some instructions may show multiple steps in a single illustration. Pay close attention to detail. When dragging the roof/wall fabric onto the frame, having a second person to help align it is highly beneficial.
5. Operating Instructions
5.1. Roll-up Doors
The shelter features two roll-up doors at the front and back for easy access and improved air circulation. Each door is equipped with double zippers and buckles.
- To open, unzip the door completely and roll it upwards. Secure the rolled door using the attached straps or buckles to keep it in the open position.
- To close, unroll the door and zip it down. Ensure the zippers are fully closed to protect contents from weather.
5.2. Ventilation System
The shelter includes dual-layer vents on each side panel. These vents are designed to enhance airflow, prevent moisture accumulation, and reduce condensation caused by temperature changes or rain.

Image 5.1: Illustration of the dual airflow design, highlighting how large vents prevent condensation.
Ensure the vents remain unobstructed to maintain optimal air circulation within the shelter.
6. Maintenance
Regular maintenance will extend the lifespan of your ADVANCE OUTDOOR shelter.
- Cleaning: Clean the canopy cover periodically with mild soap and water. Avoid harsh chemicals or abrasive cleaners that could damage the material.
- Frame Inspection: Regularly inspect the steel frame for any signs of rust, damage, or loose connections. Tighten any loose bolts or connections as needed.
- Cover Tension: Check the tension of the canopy cover and ratchet straps regularly. Re-tighten if necessary to ensure the cover remains taut and prevents water pooling.
- Anchoring: Periodically check the ground anchors for stability, especially after strong winds or heavy rain. Re-secure or reinforce anchors if they appear loose.
- Snow Removal: In snowy regions, promptly remove any heavy snow accumulation from the roof to prevent structural stress.
7. Troubleshooting
7.1. Condensation Inside the Shelter
If you notice excessive condensation, ensure that the dual-layer vents are clear and unobstructed. Proper airflow is crucial for reducing moisture buildup. Consider opening the doors for a period during dry weather to air out the interior.
7.2. Shelter Instability in Wind
Ensure all L-Type pegs are fully inserted into the ground and the ratchet straps are tightened securely. For areas with frequent strong winds, it is highly recommended to use additional heavy-duty ground anchors and tie-down ropes (not included) to further secure the shelter.
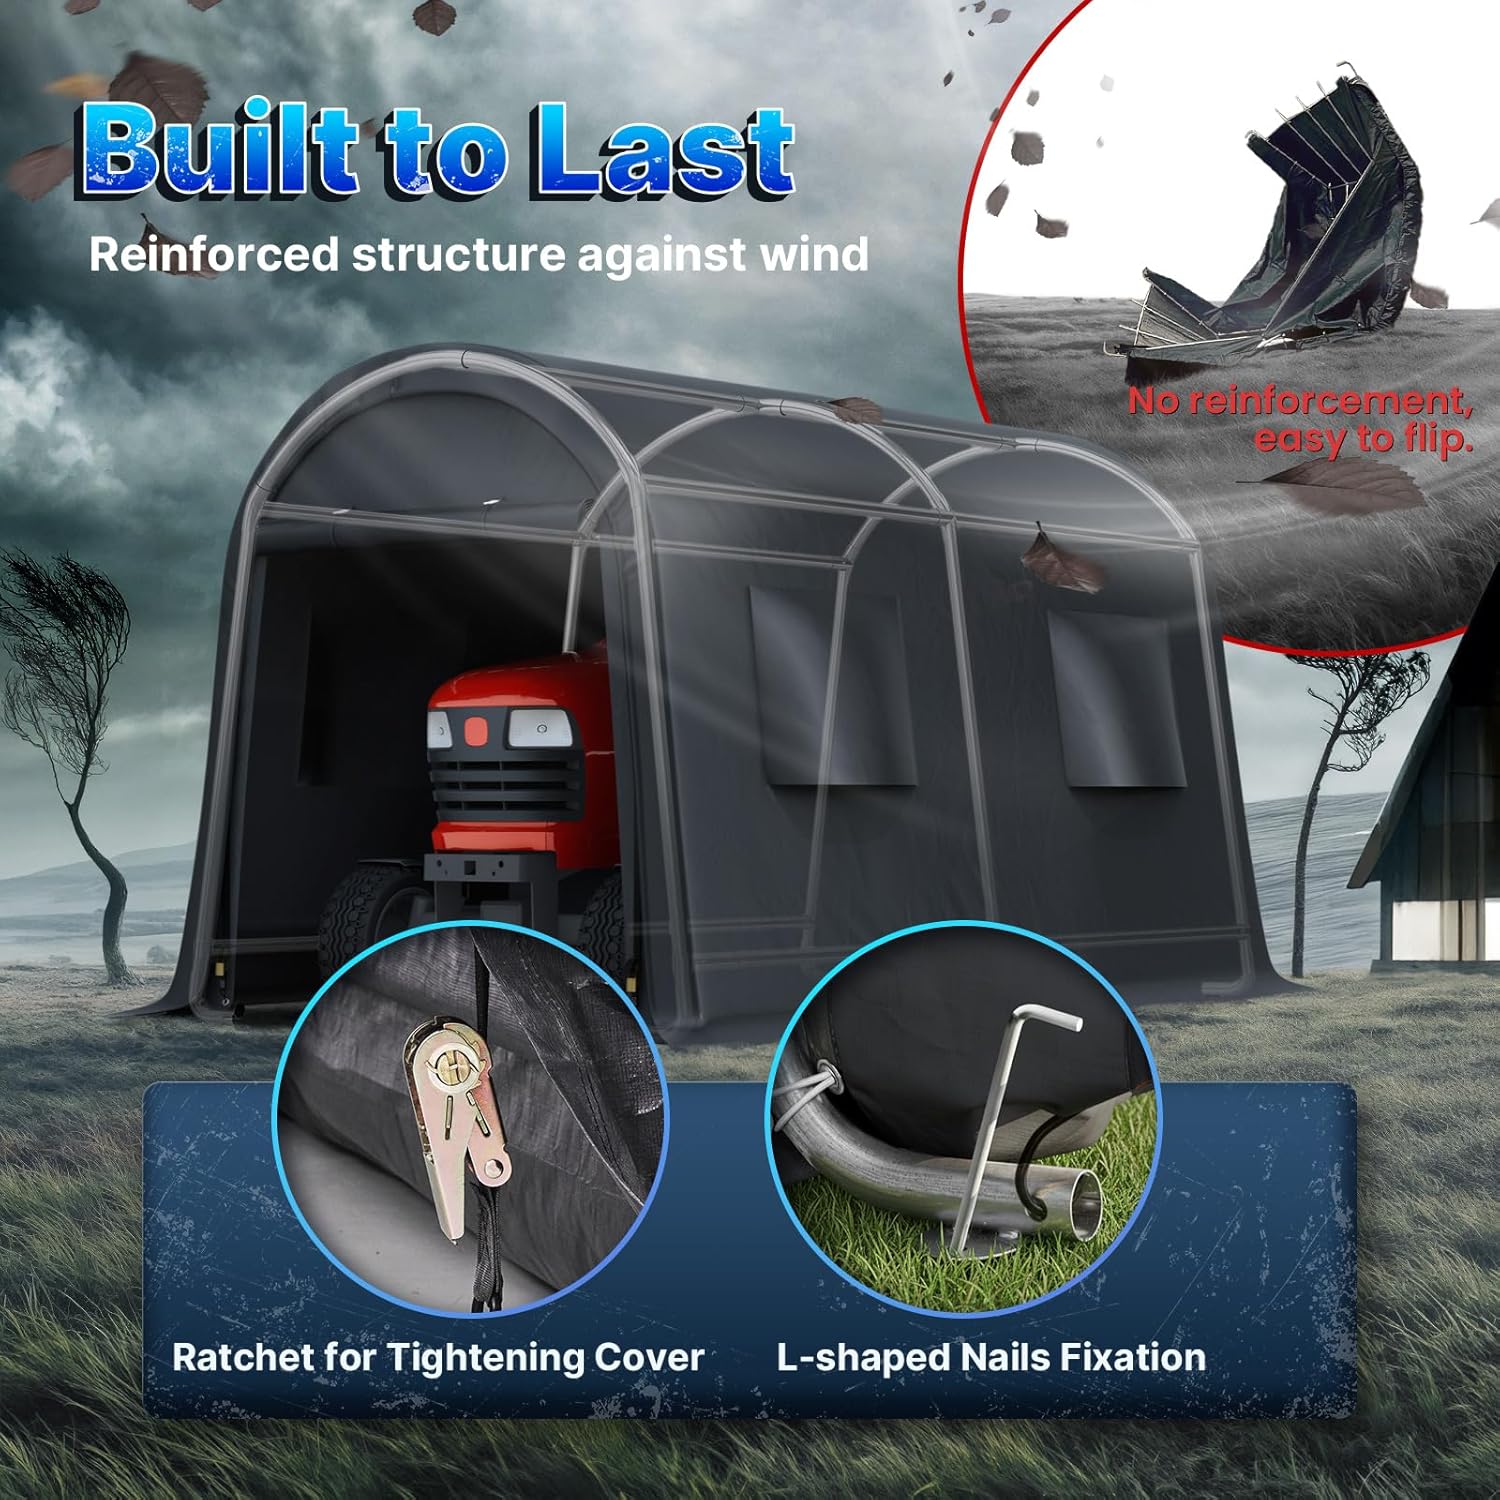
Image 7.1: Illustration of the reinforced structure, highlighting the ratchet system for cover tightening and L-shaped nails for ground fixation.
7.3. Difficulty with Zippers
If zippers are difficult to operate, ensure the canopy cover is properly tensioned. Sometimes, uneven tension can cause zippers to snag. Applying a silicone-based lubricant to the zipper teeth can also improve smooth operation.
8. Specifications

Image 8.1: Key dimensions of the 7x12 ft shelter.
| Feature | Detail |
|---|---|
| Brand | ADVANCE OUTDOOR |
| Model Number | 14DGY-01 |
| Size (L x W x H) | 144"L x 84"W x 85.2"H (7'x12') |
| Floor Area | 84 Square Feet |
| Material | Metal (Frame), Heavy-Duty PE Fabric (Cover) |
| Color | Dark Gray |
| Item Weight | 90 Pounds |
| UV Protection | 98% |
| Water Resistance Level | Water Resistant |
| Assembly Required | Yes |

Image 8.2: Detail of the high-density PE fabric, highlighting its UV-blocking, waterproof, and tear-resistant properties.
9. Warranty and Support
ADVANCE OUTDOOR provides comprehensive coverage for your shelter:
- Poles and Canopy Cover: One year coverage from the date of purchase.
- Other Accessories: Lifetime coverage for connectors, foot pads, pegs, anchors, and elastic bungees.
For warranty claims, missing parts, or technical assistance, please contact ADVANCE OUTDOOR customer support. Refer to your purchase documentation for specific contact details or visit the official ADVANCE OUTDOOR website.