1. Introduction
This instruction manual provides comprehensive guidance for the installation, operation, and maintenance of the ARO Espresso Aluminum Grinder Setting Dial. This accessory is designed to enhance the precision and ease of grind adjustments on compatible Eureka Mignon series grinders. The dial and adjustment knob are engineered for durability and consistent performance, offering a non-invasive modification to your grinder.

Image 1: Eureka Mignon grinder with the ARO Espresso Aluminum Grinder Setting Dial and knob installed.
2. Compatibility
The ARO Espresso Aluminum Grinder Setting Dial is compatible with a wide range of Eureka Mignon and Eureka Oro Mignon grinders. This device is designed for models where the adjustment knob is located on the right-hand side of the grinder.
Compatible Models Include:
- Specialita
- Silenzio
- Design
- Turbo
- Manuale
- Magnifico
- Classico
- Bravo
- Filtro
- Filtro Silent
- Crono
- Brew Pro
- Casa
- Facile
- Notte
- Zero
- Zero Brew
- Libra
- Oro XL
- Oro Single Dose
- Oro Single Dose Brew
- Oro Dolce Vita
- Oro Stark
Important Note: This device is NOT compatible with the Eureka Mignon Perfetto model due to its non-removable adjustment knob.

Image 2: Visual representation of compatible Eureka Mignon grinder models.
3. Components
The ARO Espresso Aluminum Grinder Setting Dial system consists of two primary components:
- Aluminum Dial Faceplate: This component features laser-engraved markings for precise grind adjustments. It is designed to fit around the grinder's hopper base.
- Solid Aluminum Knob: This replaces the original grinder adjustment knob, offering improved ergonomics and a 3:1 gear ratio for finer control.

Image 3: The aluminum dial faceplate and the solid aluminum adjustment knob.
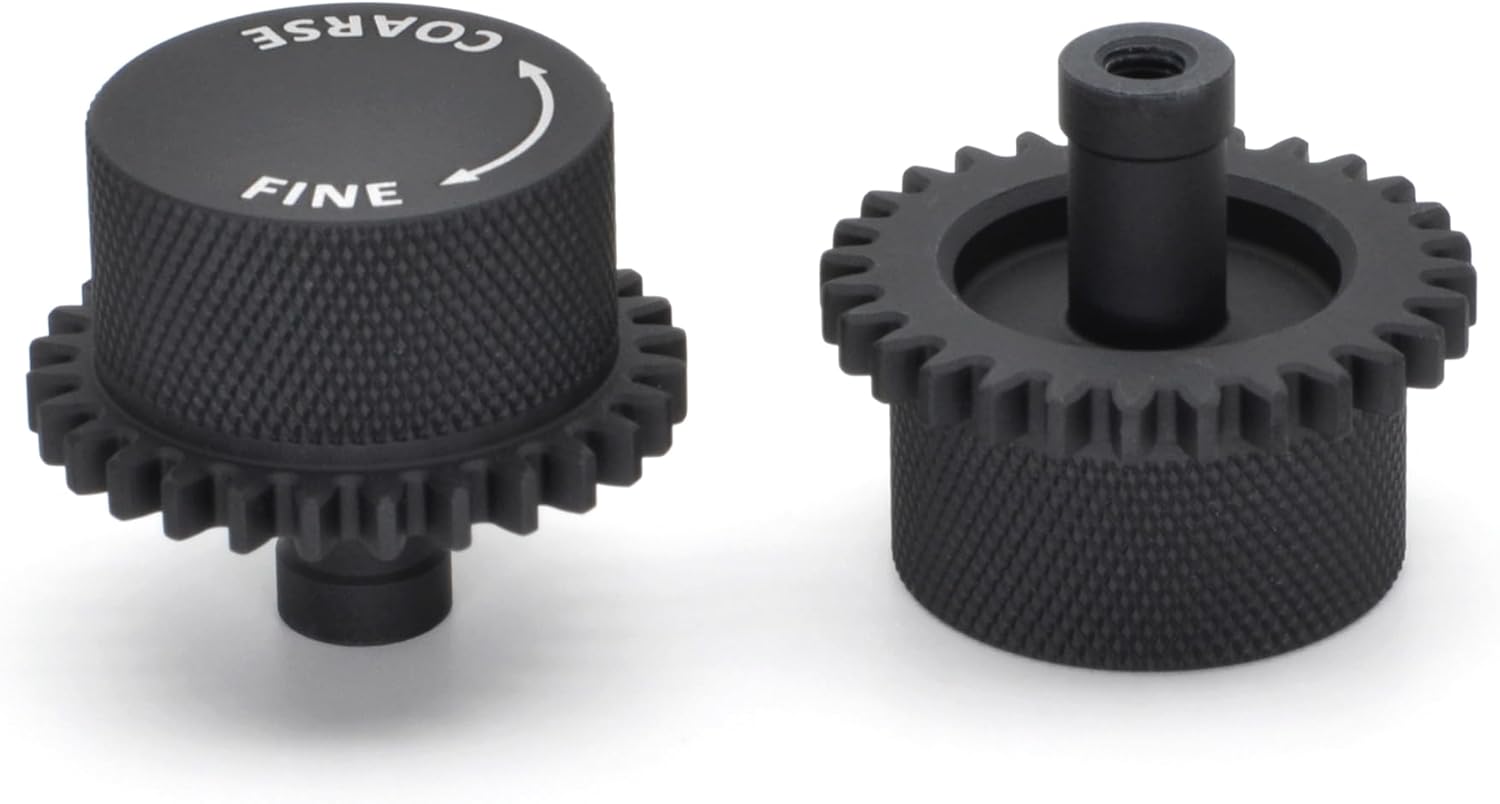
Image 4: Close-up of the solid aluminum knob, highlighting its construction.
The dial features a minimalistic aluminum faceplate with a matte finish and laser-engraved text for clarity. The base of the faceplate is constructed from a non-marring plastic to prevent scratches to your grinder. The solid aluminum knob ensures durability and consistent grind settings.

Image 5: Features of the ARO Espresso Grinder Setting Dial, including precision laser engraving and solid aluminum knob.
4. Setup and Installation
Installation of the ARO Espresso Aluminum Grinder Setting Dial is designed to be straightforward and non-invasive, preserving your grinder's integrity.
4.1. Installation Steps
- Prepare Your Grinder: Ensure your Eureka Mignon grinder is unplugged from the power source before beginning installation. Remove the bean hopper.
- Remove Original Knob: Carefully unscrew and remove the existing grind adjustment knob from your grinder.
- Place Dial Faceplate: Position the ARO Espresso Aluminum Dial Faceplate around the base of the grinder's hopper opening. Ensure it sits flush and the indicator arrow aligns with the desired "zero" point or a reference mark on your grinder.
- Install New Knob: Screw the new solid aluminum knob onto the grinder's adjustment shaft. Turn it gently until it is securely in place but do not overtighten.
- Calibrate Zero Point: The installation video provides detailed instructions on how to achieve your grinder's "zero" point (where the burrs just touch) and set the dial accordingly. This ensures accurate grind size referencing.
For a detailed visual guide, please refer to the official installation video provided by ARO Espresso. This video demonstrates the process step-by-step, including recalibration after deep cleaning.
5. Operating Instructions
The ARO Espresso Aluminum Grinder Setting Dial provides 100 precise increments for reliable grind size adjustments, from fine espresso to coarse French press.
5.1. Adjusting Grind Size
- Identify Current Setting: Note the current grind setting indicated by the dial.
- Turn Knob: Rotate the solid aluminum knob to adjust the grind size.
- Turning towards "FINE" (clockwise) will result in a finer grind.
- Turning towards "COARSE" (counter-clockwise) will result in a coarser grind.
- Utilize Increments: The 3:1 gear ratio of the knob allows for very fine adjustments. Each marked increment on the dial represents a precise change in grind size.
- Record Settings: For consistent results, especially when switching between different brewing methods or coffee beans, record your preferred grind settings. This allows for easy return to a specific grind size without extensive re-dialing.
The enhanced precision helps maintain your grind size reference point, reducing coffee waste during adjustments.
6. Maintenance
The ARO Espresso Aluminum Grinder Setting Dial requires minimal maintenance.
- Cleaning: Wipe the aluminum faceplate and knob with a soft, damp cloth to remove any coffee dust or residue. Avoid abrasive cleaners.
- Recalibration: After performing a deep cleaning of your Eureka Mignon grinder, it may be necessary to recalibrate the "zero" point of the grind setting dial. Refer to the installation video for instructions on recalibration.
7. Troubleshooting
| Problem | Possible Cause | Solution |
|---|---|---|
| Dial does not fit or is difficult to install. |
|
|
| Grind settings are inconsistent or drift. |
|
|
8. Specifications
- Product Name: ARO Espresso Aluminum Grinder Setting Dial
- Brand: ARO Espresso
- Model Compatibility: Eureka Mignon Series (various models, see Section 2)
- Material: Solid Aluminum (knob), Aluminum Faceplate with non-marring plastic base
- Color: Black
- Item Weight: Approximately 5.6 ounces
- Package Dimensions: Approximately 5.67 x 5.2 x 2.2 inches
- Grind Adjustment: 100 precise increments, 3:1 gear ratio
9. Support and Contact
For any questions regarding compatibility, installation, or general inquiries, please contact ARO Espresso customer service. As a small, family-operated business, ARO Espresso is dedicated to providing exceptional craftsmanship and personal customer service.
Refer to the product listing or packaging for specific contact information.