Introduction
The Monoprice CSW-12 is a powerful yet compact 12-inch subwoofer designed to enhance your audio experience with deep, rich bass. This manual provides essential information for setting up, operating, and maintaining your subwoofer to ensure optimal performance and longevity.
Important Safety Instructions
Please read and understand all safety instructions before operating this device. Keep this manual for future reference.
- Do not expose this device to water or moisture.
- Ensure proper ventilation around the subwoofer to prevent overheating.
- Only use attachments/accessories specified by the manufacturer.
- Protect the power cord from being walked on or pinched.
- Unplug this device during lightning storms or when unused for long periods.
- Refer all servicing to qualified service personnel.
Package Contents
Verify that your package contains the following items:
- Monoprice CSW-12 12in 400 Watt Compact Subwoofer
Product Overview
Familiarize yourself with the various parts and controls of your Monoprice CSW-12 subwoofer.

Front and side view of the Monoprice CSW-12 subwoofer, showcasing its compact design and front-firing driver with a bass port on the side.

Close-up view of the 12-inch woofer driver, typically covered by a removable grille (not shown).

Rear panel of the Monoprice CSW-12, showing the input connections, power switch, and control knobs.
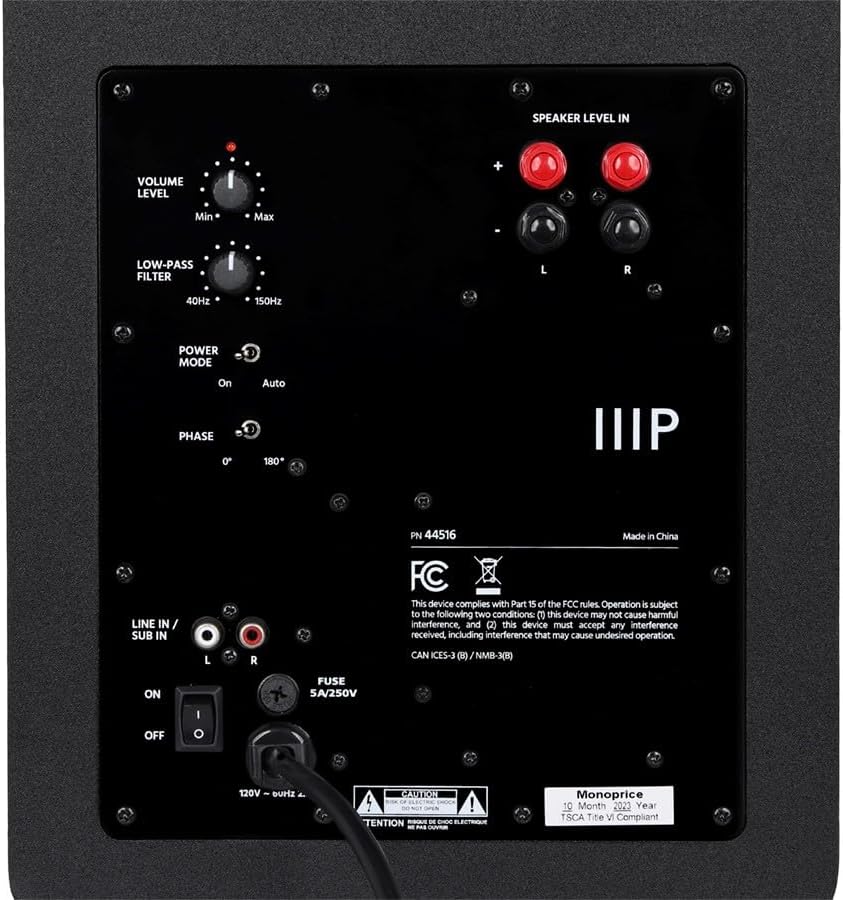
Detailed view of the control section on the rear panel, including Volume, Low-Pass Filter, Power Mode, and Phase controls.
Rear Panel Controls and Connections:
- Volume Level: Adjusts the overall output volume of the subwoofer.
- Low-Pass Filter: Controls the upper frequency limit of the subwoofer, typically adjustable from 40Hz to 150Hz.
- Power Mode: Selects the power state (On, Auto, Off). 'Auto' mode detects an audio signal to power on/off automatically.
- Phase: Switches the phase of the subwoofer output between 0° and 180° to optimize integration with main speakers.
- Line In / Sub In (RCA): Low-level RCA inputs for connecting to an AV receiver or pre-amplifier's subwoofer output.
- Speaker Level In: High-level speaker inputs for connecting directly to the speaker outputs of an amplifier or receiver without a dedicated subwoofer output.
- Power Switch: Main power toggle for the subwoofer.
- Fuse: Replaceable fuse for electrical protection.
Setup
Placement
The placement of your subwoofer can significantly impact its performance. Experiment with different locations to find the best bass response for your room. Common placements include:
- Corner Placement: Often provides the most bass output due to room gain.
- Near Main Speakers: Can improve integration with your main speakers for a more seamless soundstage.
- Listening Position: The 'subwoofer crawl' method involves placing the subwoofer at your listening position and crawling around the room to find where the bass sounds best, then placing the subwoofer there.
Connections
Ensure the subwoofer is powered off before making any connections.
- RCA Connection (Recommended):
- Connect an RCA cable from the 'Subwoofer Out' or 'LFE Out' jack on your AV receiver/processor to the 'Line In / Sub In' (L or R, or both if available) on the subwoofer.
- High-Level Speaker Connection:
- Connect speaker wires from the speaker outputs of your amplifier/receiver to the 'Speaker Level In' terminals on the subwoofer. Ensure correct polarity (+ to + and - to -).
- Then, connect your main speakers from the 'Speaker Level Out' terminals on the subwoofer (if available, otherwise connect main speakers directly to amplifier).
Operating
Initial Power On
- Ensure all connections are secure.
- Plug the subwoofer's power cord into a wall outlet.
- Set the 'Power Mode' switch to 'On' or 'Auto'.
- Turn on your AV receiver/amplifier and play some audio.
Adjusting Settings
- Volume Level Adjustment: Start with the volume knob at its minimum setting. Gradually increase the volume until the subwoofer's output blends seamlessly with your main speakers.
- Low-Pass Filter Adjustment: This control determines the highest frequency the subwoofer will reproduce. Adjust it to blend with the low-frequency cutoff of your main speakers. A common starting point is 80Hz for most bookshelf speakers. If your receiver has a built-in crossover, set the subwoofer's low-pass filter to its maximum (150Hz) or bypass it if possible.
- Phase Control: The phase switch (0° or 180°) helps ensure that the subwoofer's sound waves align with those of your main speakers at the listening position. Experiment with both settings to find which one provides the most impactful and coherent bass.
- Power Mode Settings:
- On: The subwoofer remains powered on continuously.
- Auto: The subwoofer will automatically power on when an audio signal is detected and enter standby mode after a period of inactivity.
- Off: The subwoofer is powered off.
Maintenance
Cleaning
To clean the subwoofer, use a soft, dry cloth. Do not use liquid cleaners or aerosol sprays, as they may damage the finish or internal components.
Storage
If storing the subwoofer for an extended period, ensure it is powered off and unplugged. Store it in a cool, dry place away from direct sunlight and extreme temperatures.
Troubleshooting
If you encounter issues with your subwoofer, refer to the table below for common problems and solutions.
| Problem | Possible Cause | Solution |
|---|---|---|
| No sound from subwoofer | Subwoofer not powered on; incorrect connections; low volume setting; no signal from source. | Check power switch and outlet; verify all cables are securely connected; increase subwoofer volume; ensure audio source is active and sending signal. |
| Distorted or muddy bass | Volume too high; incorrect phase setting; improper low-pass filter setting; poor placement. | Reduce volume; try switching phase (0°/180°); adjust low-pass filter for better blend; experiment with subwoofer placement. |
| Subwoofer hums or buzzes | Ground loop issue; faulty cable; interference. | Try plugging subwoofer into a different outlet; use a ground loop isolator; replace RCA cable; ensure power cables are not running parallel to audio cables. |
| Subwoofer does not turn on in 'Auto' mode | Input signal too low; 'Auto' mode sensitivity. | Increase the output level from your receiver/source; try setting the power mode to 'On'. |
Specifications
Detailed technical specifications for the Monoprice CSW-12 Subwoofer.
| Feature | Detail |
|---|---|
| Brand | Monoprice |
| Model | CSW-12 (44516) |
| Speaker Type | Subwoofer |
| Driver Size | 12 Inches |
| Amplifier Power | 400 Watts |
| Frequency Response | 20 Hz - 150 Hz (Adjustable Low-Pass Filter) |
| Connectivity | Wired RCA, Speaker Level Inputs |
| Phase Control | 0° / 180° |
| Power Mode | On, Auto, Off |
| Color | Black |
| Item Weight | 2.82 pounds |
| Mounting Type | Floor Standing |
| Power Source | Corded Electric |
| Country of Origin | China |
Warranty and Support
Warranty Information
The Monoprice CSW-12 comes with a Limited Warranty. Please refer to the official Monoprice website or your purchase documentation for specific warranty terms and conditions, including duration and coverage details.
Customer Support
For technical assistance, troubleshooting, or warranty claims, please contact Monoprice customer support. You can find contact information and additional resources on their official website:


