1. Introduction
This manual provides essential information for the safe and efficient operation, installation, and maintenance of your ORIKOOL 54" Commercial Display Freezer, Model SD1390F. Please read all instructions carefully before using the appliance to ensure proper function and longevity.

Image 1.1: Front view of the ORIKOOL SD1390F Commercial Display Freezer.
2. Safety Information
WARNING: Risk of electric shock. Disconnect power before servicing.
- Ensure the appliance is properly grounded.
- Do not operate with a damaged power cord or plug.
- Keep ventilation openings clear of obstructions.
- Do not store explosive substances such as aerosol cans with a flammable propellant in this appliance.
- Only qualified personnel should perform repairs.
- This appliance uses R290 refrigerant. Handle with care and ensure proper ventilation during installation and servicing.
3. Setup and Installation
3.1 Unpacking
Carefully remove all packaging materials, including tape and protective films. Inspect the freezer for any shipping damage. Report any damage immediately to the carrier and supplier.
3.2 Placement
Position the freezer on a flat, stable surface capable of supporting its weight (approximately 406 pounds empty). Allow adequate clearance around the unit for proper ventilation (at least 4 inches from walls). Avoid direct sunlight or heat sources.
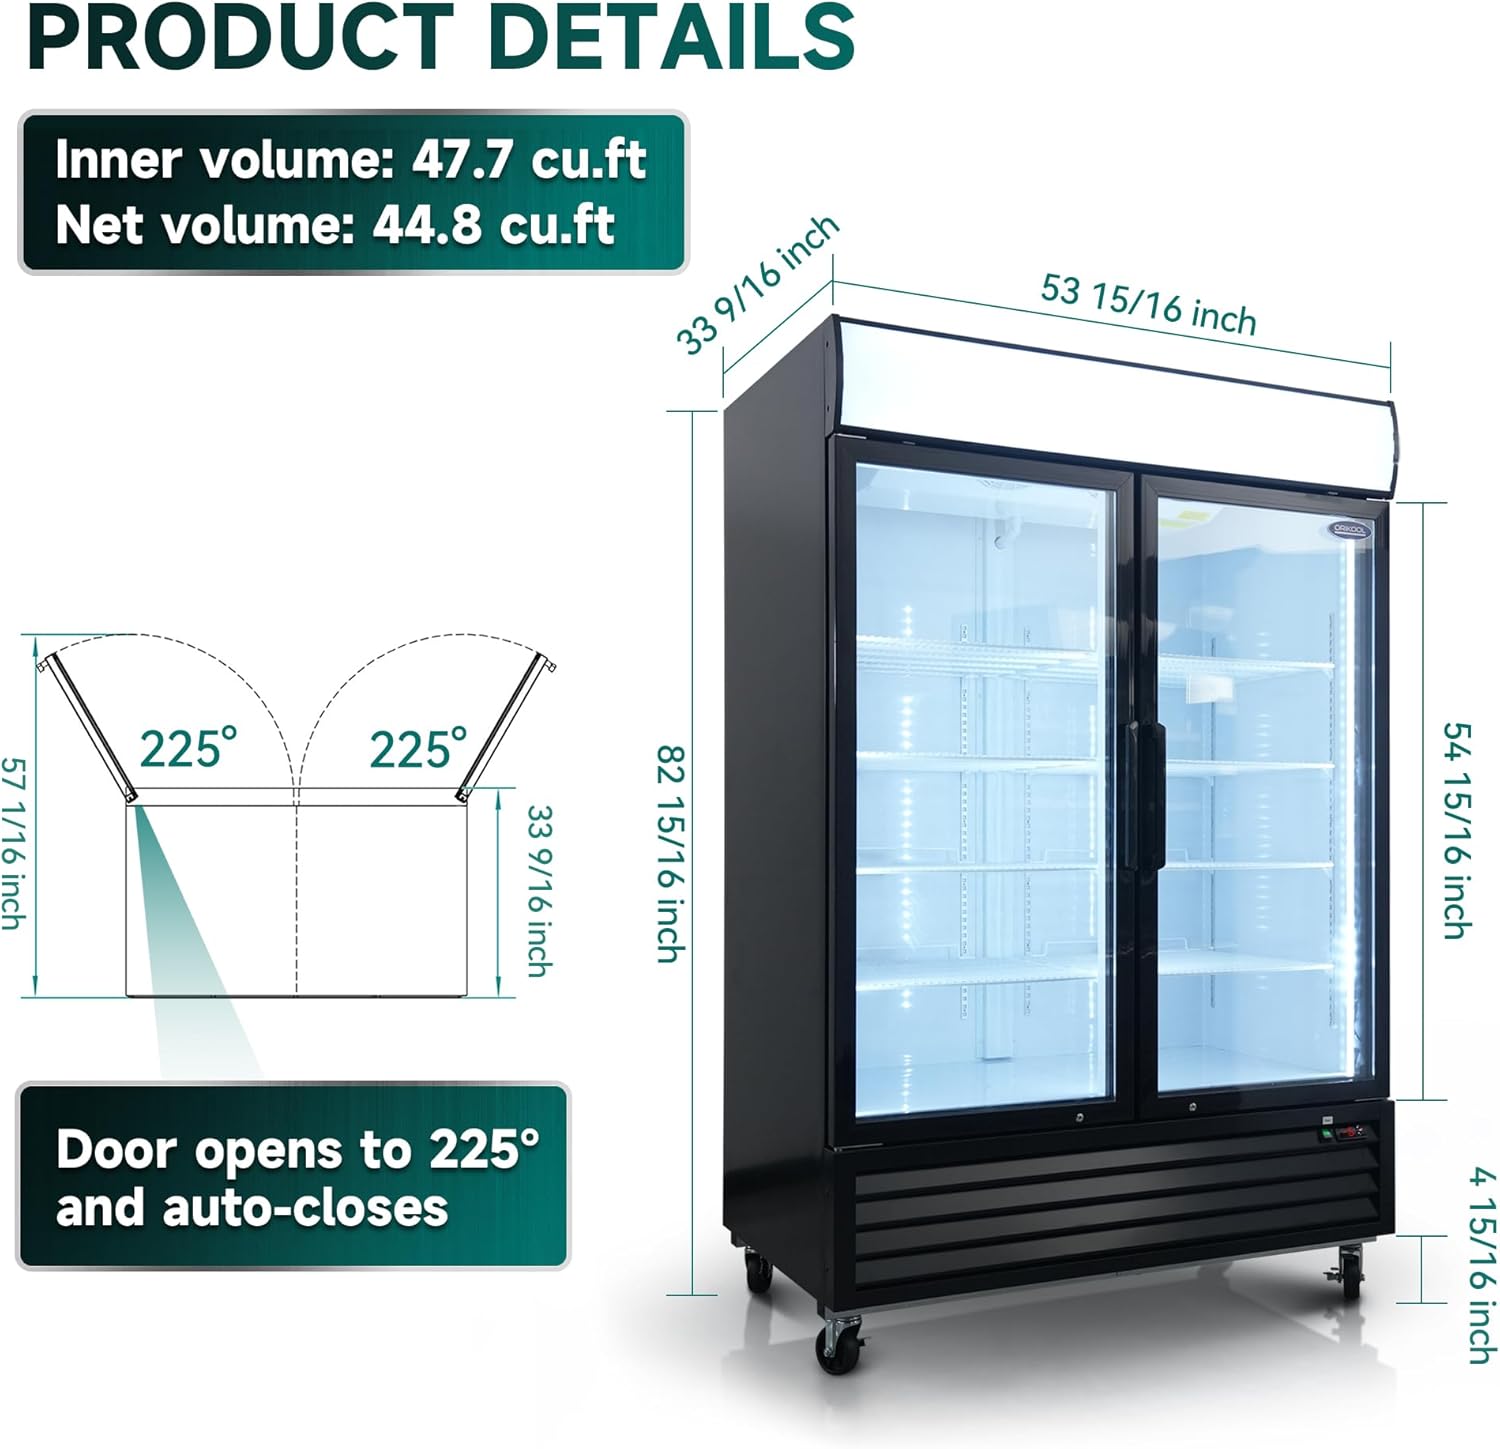
Image 3.1: Product dimensions and door opening mechanism.
3.3 Leveling
The freezer is equipped with universal casters, two of which have brakes. Ensure the unit is level by adjusting the casters. Engage the brakes once the freezer is in its final position to prevent movement.

Image 3.2: Thickened insulation and universal casters with brakes.
3.4 Power Connection
Connect the freezer to a dedicated 115 Volt, 60 Hz, 15 Amp grounded electrical outlet. Do not use extension cords or adapter plugs.
3.5 Initial Cleaning
Before first use, clean the interior and exterior surfaces with a mild detergent and warm water. Rinse thoroughly and dry completely.
3.6 Customizable Top Panel
The top panel is designed to be customizable, allowing for the display of branding or informational signage.

Image 3.3: Customizable top panel and safety door lock.
4. Operating Instructions
4.1 Powering On
After connecting to power, turn on the main power switch, typically located near the digital controller.
4.2 Temperature Control
The freezer features a CAREL digital controller for precise temperature management. The operating temperature range is typically maintained between -8°F and -1°F. Refer to the controller's specific manual for detailed programming instructions.

Image 4.1: CAREL Digital Temperature Control and Heated Door Frame.
4.3 Automatic Defrost
The unit is equipped with an automatic defrost system that activates approximately every eight hours. This process helps prevent ice buildup and maintains cooling efficiency.
4.4 Dynamic Fan Cooling
The dynamic fan cooling system ensures even temperature distribution throughout the cabinet, preventing hot spots and maintaining consistent freezing conditions.

Image 4.2: Dynamic Fan Cooling and Embraco Compressor.
4.5 Adjustable Shelves
The freezer includes 8 adjustable wire shelves. To adjust, lift the shelf, reposition the shelf clips to the desired height, and then place the shelf back onto the clips. Ensure shelves are securely seated before loading products.
4.6 Door Operation
The glass doors can open up to 225° for easy loading and unloading. They are designed to auto-close, reducing energy loss. A safety door lock is provided for securing contents.

Image 4.3: Key operational features of the freezer.
5. Maintenance
WARNING: Always disconnect power before performing any maintenance or cleaning.
5.1 Cleaning the Interior
Regularly clean the interior with a mild, non-abrasive detergent and warm water. Remove shelves and clean them separately. Rinse and dry all surfaces thoroughly to prevent odors and maintain hygiene.
5.2 Cleaning the Exterior and Glass Doors
Wipe down exterior surfaces with a soft cloth and mild cleaner. For glass doors, use a glass cleaner. The low-e triple hollow tempered glass provides superior insulation and strength.

Image 5.1: Comparison of glass and door opening features.
5.3 Gasket Maintenance
Inspect door gaskets regularly for cracks or tears. Clean gaskets with warm, soapy water to ensure a tight seal. A magnetic gasket helps reduce energy loss.
5.4 Condenser Coil Cleaning
The condenser coils should be cleaned periodically (every 3-6 months) to ensure optimal performance and energy efficiency. Use a brush or vacuum cleaner to remove dust and debris from the coils, typically located at the bottom rear of the unit.
5.5 Heated Door Frame
The heated door frame prevents condensation and ice buildup around the door seals, contributing to better insulation and reduced maintenance.
6. Troubleshooting
Before contacting service, review the following common issues and solutions:
| Problem | Possible Cause | Solution |
|---|---|---|
| Freezer not cooling | No power; thermostat set too high; condenser dirty; door left open. | Check power supply; adjust thermostat; clean condenser; ensure door is closed. |
| Excessive frost buildup | Door gasket not sealing; frequent door openings; high humidity. | Inspect/clean gasket; reduce door openings; ensure proper ventilation. |
| Unusual noise | Unit not level; fan obstruction; compressor issue. | Level the unit; check for obstructions around fans; contact service if compressor noise persists. |
| Water on floor | Drain line clogged; defrost water overflow. | Clear drain line; ensure drain pan is correctly positioned. |
If problems persist after attempting these solutions, please contact qualified service personnel.
7. Specifications
| Feature | Detail |
|---|---|
| Brand | ORIKOOL |
| Model Info | SD1390F |
| Item Weight | 406 pounds |
| Product Dimensions (D x W x H) | 33.54 x 53.94 x 82.95 inches |
| Capacity | 44.7 cu. ft. |
| Installation Type | Freestanding |
| Voltage | 115 Volts |
| Wattage | 860 watts |
| Defrost Type | Automatic |
| Door Material Type | Tempered Glass |
| Number of Shelves | 8 wire shelves |
| Certification | ETL |
| Refrigerant | R290 |
| Compressor | Embraco |
8. Warranty and Support
8.1 Warranty Information
This ORIKOOL Commercial Display Freezer comes with the following warranty:
- Compressor: 5-year warranty
- Parts: 2-year warranty
- Return Policy: 30-day return policy
Please retain your proof of purchase for warranty claims.
8.2 Customer Support
For technical assistance, warranty claims, or service inquiries, please contact ORIKOOL customer support. Refer to your purchase documentation for specific contact details or visit the official ORIKOOL website.


