ELIVED YD3033
ELIVED Ultra Slim TV Wall Mount User Manual
Model: YD3033
Introduction
Thank you for choosing the ELIVED Ultra Slim TV Wall Mount. This manual provides comprehensive instructions for the safe and proper installation, operation, and maintenance of your TV wall mount. Please read this manual thoroughly before installation and keep it for future reference. This mount is designed for most 26-60 inch LCD/LED/OLED TVs with VESA patterns from 75x75mm to 400x400mm, supporting up to 88 lbs.
Safety Information
WARNING: Failure to read and follow all instructions may result in personal injury, property damage, or voiding of warranty. If you have any questions, please contact customer service.
- Do not install into drywall alone. This mount requires installation into wood studs (12" or 16" spacing) or concrete/brick walls.
- Ensure the wall structure can safely support the combined weight of the mount and the TV.
- Use only the provided hardware. Do not over-tighten screws.
- Always use a stud finder to locate wood studs accurately.
- Keep children away from the installation area.
- Verify VESA pattern and TV weight compatibility before beginning installation.
Package Contents
Please verify that all components are present and undamaged before installation.

Image: All components of the ELIVED Ultra Slim TV Wall Mount, including the main mount assembly, VESA plate, extenders, and various hardware bags.
The package includes the main wall mount assembly, TV VESA plate, extender arms, and a hardware kit containing various screws, washers, spacers, a bubble level, and a small wrench for installation.
Setup and Installation
Follow these steps carefully for a secure installation. It is recommended to have two people for installation.
Step 1: Prepare the TV VESA Plate
Disassemble the TV plate from the main mount arm if it came pre-assembled. Attach the extender arms to the VESA plate, pre-tightening the screws to allow for adjustment.
Video: Demonstrates the initial steps of disassembling the TV plate and assembling the extender arms, followed by attaching the VESA plate to the TV. This video covers the first part of the installation process.
Step 2: Attach VESA Plate to TV
Align the VESA plate with the mounting holes on the back of your TV. Use the appropriate screws, washers, and spacers from the hardware kit to secure the plate. Ensure all screws are tightened securely.
Step 3: Mark the Mounting Holes on the Wall
Use a stud finder to locate the center of your wood studs. Mark the pilot hole locations on the wall using the provided template or the wall plate itself. Ensure the marks are level and within the maximum 16-inch center-to-center spacing for wood studs. For concrete/brick walls, mark directly.

Image: Illustrates the different wall types compatible with the mount: single stud, 12"/16" wood studs, and concrete/brick wall. A warning states: "Do Not Mount On Drywall Alone."
Step 4: Drill Pilot Holes
Using an electric drill, drill pilot holes at the marked locations. For wood studs, use a 7/32 inch (5.5mm) drill bit and drill to a depth of 2 3/4 inches (70mm). For concrete/brick walls, use a 3/8 inch (10mm) masonry drill bit and insert concrete anchors (not included, request if needed).
Step 5: Attach Wall Plate
Secure the wall plate to the wall using the lag bolts and washers. Tighten the lag bolts firmly, but do not over-tighten. Ensure the wall plate is level before fully tightening.
Step 6: Wall Plate Installation Integrity Test
After securing the wall plate, gently pull on the mount to ensure it is firmly attached to the wall and there is no wobbling or looseness. This confirms the integrity of your installation.
Step 7: Hang and Secure TV
Carefully lift the TV with the attached VESA plate and hook it onto the wall plate. Once the TV is securely hanging, tighten the security screws located on the bottom of the VESA plate to prevent accidental dislodging.
Operating Instructions
The ELIVED Ultra Slim TV Wall Mount offers various adjustments for optimal viewing.
Adjusting Tilt
The mount allows for a tilt range of +5° to -10° to reduce glare and achieve a comfortable viewing angle. Loosen the tilt adjustment screws on the VESA plate, adjust the TV to the desired angle, and then tighten the screws to secure it.

Image: A TV mounted on the wall, illustrating the tilt functionality with arrows indicating +5° and -10° tilt angles to reduce glare.
Adjusting Swivel
The articulating arm allows the TV to swivel up to ±45° (depending on TV size and wall distance) for flexible viewing from different positions in the room. Gently push or pull the TV to the desired swivel angle.
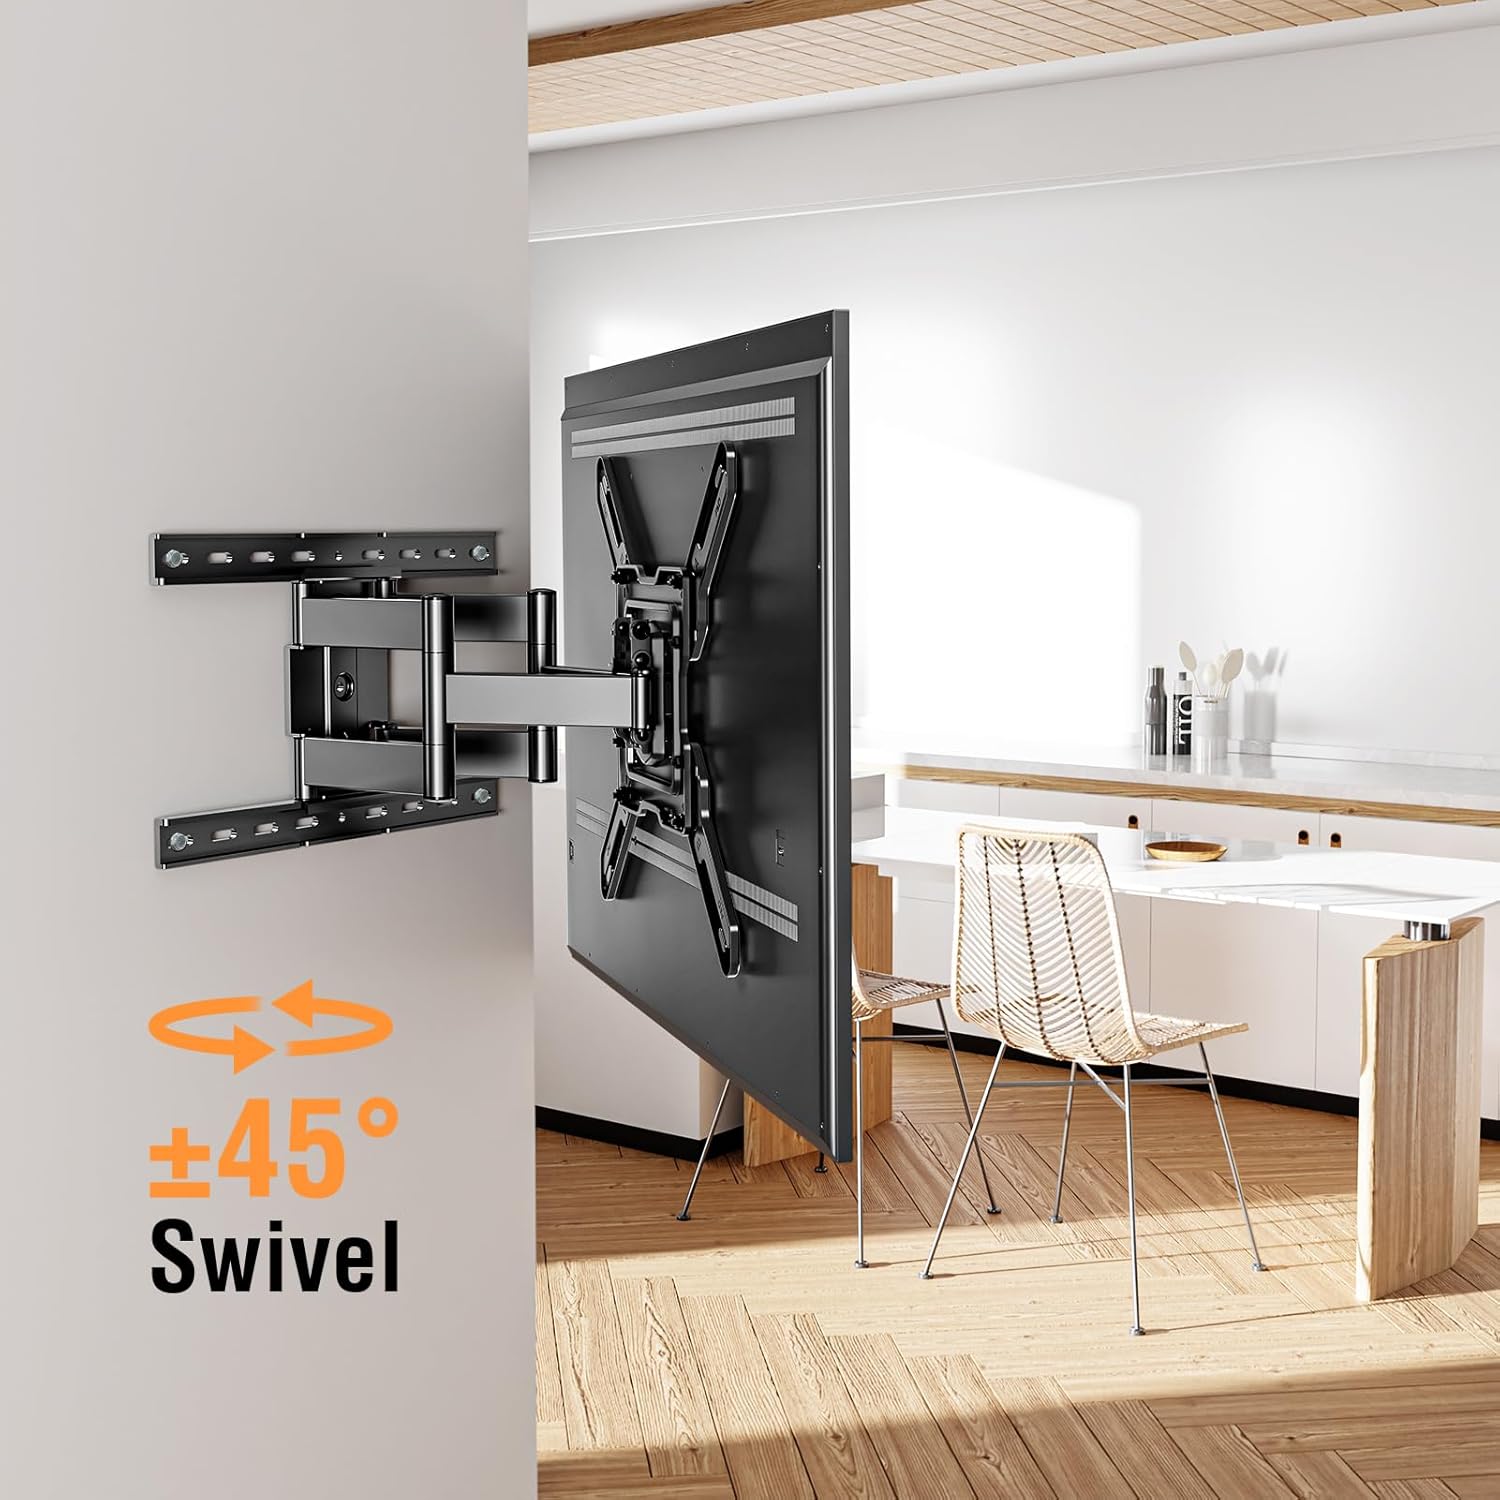
Image: A TV mounted on an articulating arm, showing arrows indicating a ±45° swivel range for flexible viewing.
Adjusting Level After Installation
The mount features a post-installation leveling adjustment of ±3°. If your TV is not perfectly level after installation, you can loosen the leveling screws, adjust the TV, and then re-tighten the screws.

Image: A TV mounted on the wall, illustrating the ±3° leveling adjustment feature, allowing for fine-tuning of the TV's horizontal position after installation.
Extension
The mount can extend up to 14 inches from the wall, providing ample space for cable management and access to ports.

Image: A TV mounted on an articulating arm, showing the arm extended from the wall with an arrow indicating an extension of up to 14 inches.
Video: Demonstrates the flush-to-wall design and the various adjustment capabilities of the ELIVED TV mount, including tilt, swivel, and leveling after installation.
Maintenance
Regular maintenance ensures the longevity and safe operation of your TV wall mount.
- Cleaning: Wipe the mount with a soft, dry cloth. Do not use abrasive cleaners or solvents.
- Inspection: Periodically check all screws and connections to ensure they are secure. Re-tighten if necessary.
- Movement: If the articulating arm becomes stiff, a small amount of silicone-based lubricant can be applied to the pivot points.
Troubleshooting
If you encounter any issues, refer to the following common problems and solutions.
| Problem | Possible Cause | Solution |
|---|---|---|
| TV is not level | Leveling screws are loose or not adjusted properly. | Loosen leveling screws, adjust TV to desired level, then re-tighten. |
| Mount feels loose on the wall | Lag bolts are not fully tightened or wall anchors are not secure. | Ensure lag bolts are tightened firmly into studs/anchors. If using anchors, verify proper installation. Do not over-tighten. |
| TV does not fit the mount | Incorrect VESA pattern or TV weight exceeds capacity. | Verify your TV's VESA pattern (75x75mm to 400x400mm) and weight (max 88 lbs) against the mount's specifications. |
| Articulating arm is stiff | Lack of lubrication or dust accumulation. | Apply a small amount of silicone-based lubricant to the pivot points. Clean any visible dust or debris. |
Specifications
- Model: YD3033
- TV Size Compatibility: Most 26-60 inch TVs
- VESA Compatibility: 75x75mm to 400x400mm
- Weight Capacity: Up to 88 lbs (40 kg)
- Wall Distance (Flush): 1.3 inches (3.3 cm)
- Extension from Wall: Up to 14 inches (35.5 cm)
- Tilt Angle: +5° to -10°
- Swivel Angle: ±45° (dependent on TV size)
- Level Adjustment: ±3°
- Wall Plate Dimensions: Approximately 17.8 x 11.89 inches
- Material: Heavy-duty alloy steel
- Color: Black
- Wall Compatibility: Single wood stud, 12"/16" wood studs, concrete/brick walls (Do not install into drywall alone)
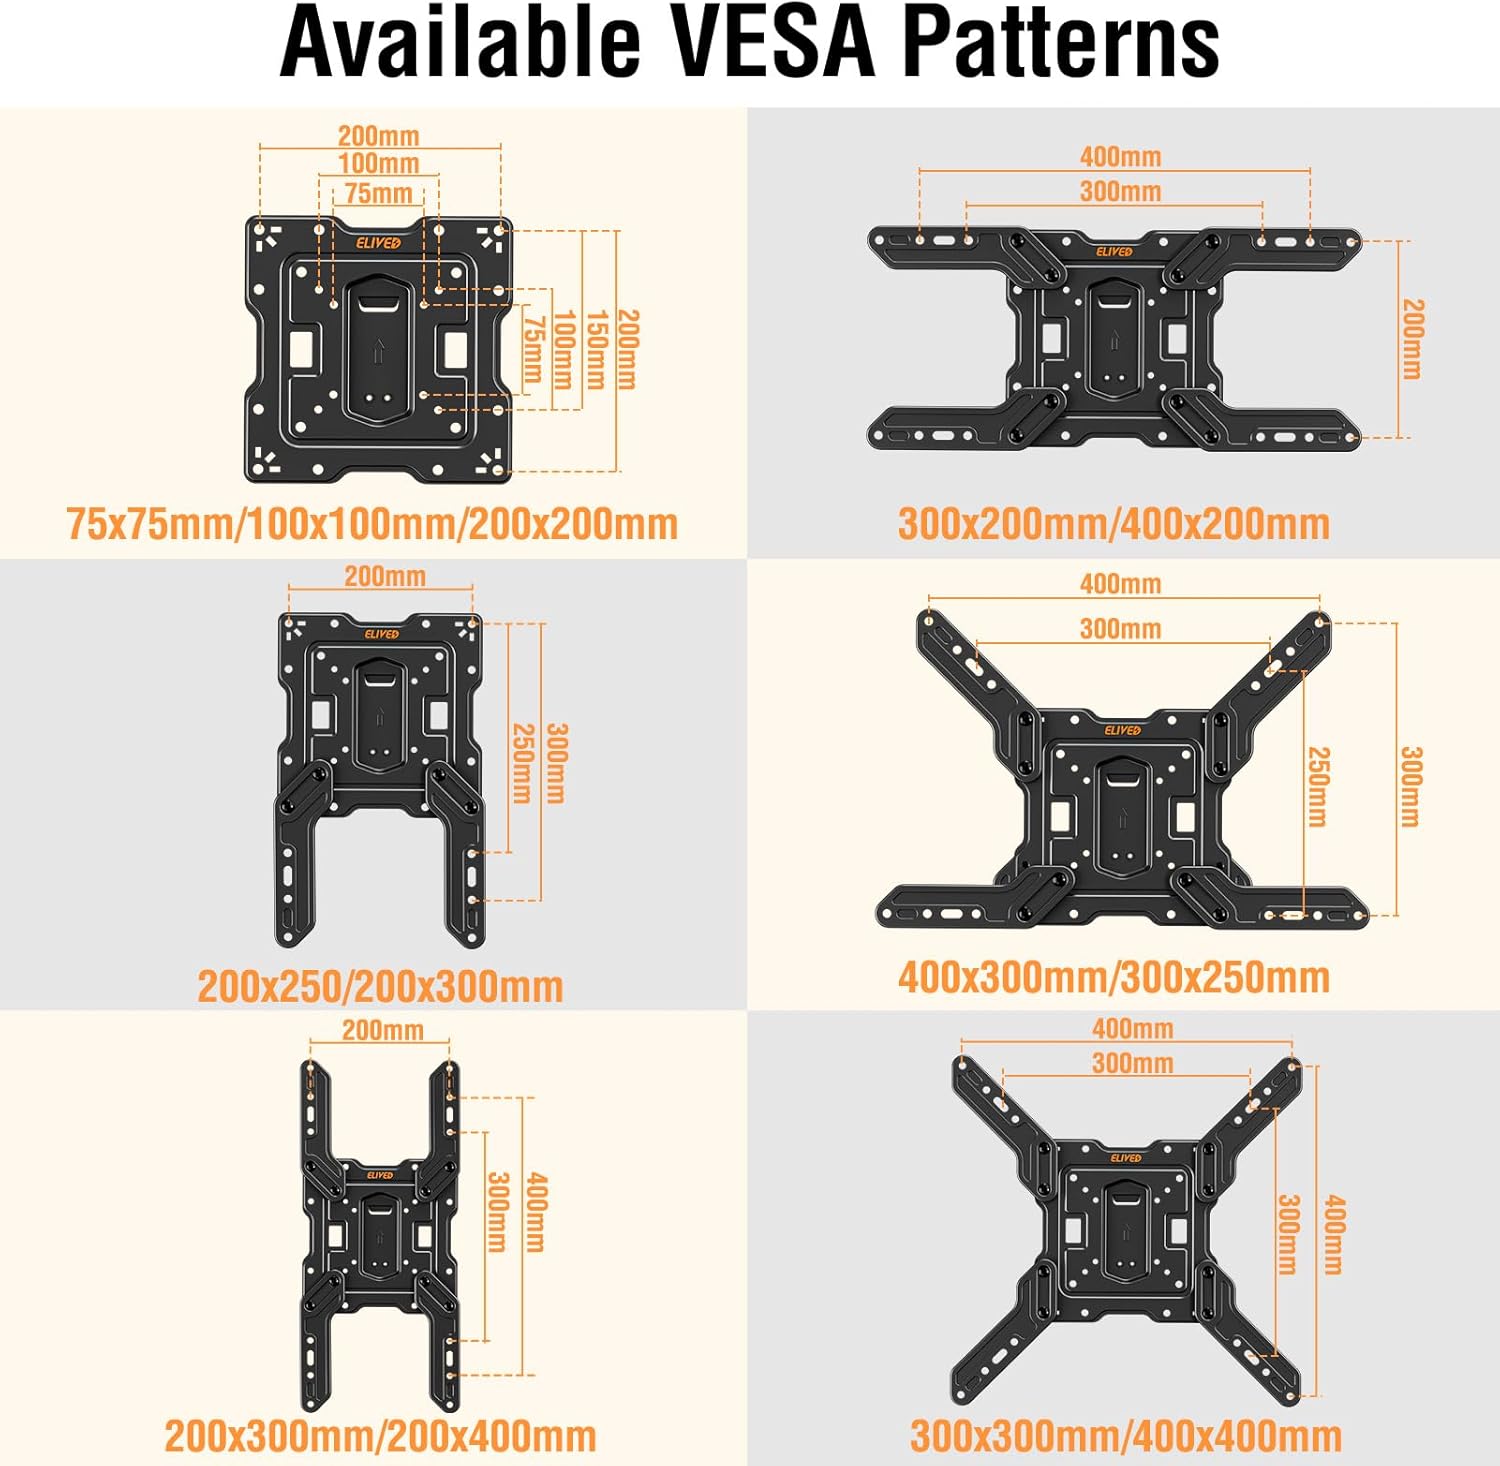
Image: Diagram showing various VESA mounting patterns supported by the ELIVED TV mount, including 75x75mm, 100x100mm, 200x200mm, 300x200mm, 400x200mm, 200x250mm, 200x300mm, 400x300mm, 300x250mm, 200x400mm, 300x300mm, and 400x400mm.

Image: A side-by-side comparison showing a TV mounted with a standard mount (sticking out from the wall) versus the ELIVED mount, which is 1.3 inches flush to the wall, resembling a picture frame.
Warranty and Support
For detailed warranty information, please refer to the product packaging or contact ELIVED customer support. Additional protection plans may be available for purchase.
For further assistance or technical support, please refer to the official User Manual PDF available online or contact ELIVED customer service directly.
Official User Manual (PDF): Download Here
Ask a question about this manual
Ask about setup, troubleshooting, compatibility, parts, safety, or missing instructions. Manuals+ will review the question and use this page’s manual context to help answer it.