TEYES CC3 2K
TEYES CC3 2K Car Radio Multimedia Video Player Navigation Stereo GPS Headunit User Manual
Model: CC3 2K
1. Introduction
This manual provides comprehensive instructions for the installation, operation, and maintenance of your TEYES CC3 2K Car Radio Multimedia Video Player Navigation Stereo GPS Headunit. Please read this manual thoroughly before using the product to ensure proper functionality and safety.

Image: Front view of the TEYES CC3 2K Headunit displaying its user interface.
2. Safety Information
Always observe the following safety precautions to prevent injury or damage to the device:
- Do not attempt to disassemble or modify the unit. This may cause damage and void the warranty.
- Ensure all wiring connections are secure and correctly insulated to prevent short circuits.
- Avoid operating the device in extreme temperatures or high humidity.
- Do not block ventilation openings on the unit.
- Consult a professional for installation if you are unsure about any steps.
3. Package Contents
Verify that all items listed below are present in the package:
- 1x Head unit (TEYES CC3 2K)
- 1x Power cable
- 1x USB cable
- 1x GPS antenna
- 1x AUX cable
- 1x 4G WiFi antenna
- 1x E-book (digital manual)
- 1x Frame (for BMW X5 E39 E53 1999-2006)
- 1x AHD 1080p rear camera
- 1x Cleaning cloth
- 1x Wiring diagram

Image: Visual representation of the TEYES CC3 2K Headunit and its included accessories.
4. Installation Guide
This section outlines the general steps for installing the TEYES CC3 2K head unit in compatible BMW X5 E39/E53 models (1999-2006). Professional installation is recommended.
4.1 Pre-Installation Checks
- Ensure the vehicle's ignition is off and the battery is disconnected before starting.
- Verify compatibility with your specific BMW X5 model and year.
- Familiarize yourself with the vehicle's existing dashboard layout and wiring.

Image: Comparison of a BMW X5 dashboard before and after installation of the TEYES CC3 2K head unit.
4.2 Removal of Existing Unit
- Carefully remove the trim pieces surrounding the factory radio.
- Unscrew and pull out the existing head unit.
- Disconnect all wiring harnesses and antenna cables from the old unit.
4.3 Head Unit Installation
- Attach the provided frame to the TEYES CC3 2K head unit.
- Connect the power cable, USB cables, GPS antenna, 4G WiFi antenna, and AUX cable to the corresponding ports on the new head unit. Refer to the included wiring diagram for detailed connections.
- Route the GPS and 4G WiFi antennas to an optimal location for signal reception, typically on the dashboard or under the windshield.
- If installing the rear camera, route its cable from the rear of the vehicle to the head unit and connect it to the designated input.
- Carefully slide the TEYES CC3 2K head unit with the frame into the dashboard opening.
- Secure the unit using the appropriate screws.
- Reattach the dashboard trim pieces.

Image: The OEM panel designed for integrating the TEYES CC3 2K head unit into the vehicle's dashboard.
4.4 Post-Installation
- Reconnect the vehicle battery.
- Turn on the ignition and power on the head unit.
- Perform initial setup, including language, time, and network settings.
- Test all functions: radio, navigation, Bluetooth, USB, and rear camera.
5. Operating Instructions
The TEYES CC3 2K operates on an Android system, offering a user-friendly interface. Navigate using the touchscreen and physical buttons (if applicable).
5.1 Basic Operation
- Power On/Off: Press and hold the power button.
- Volume Control: Adjust using the on-screen controls or steering wheel buttons.
- Home Screen: Tap the home icon to return to the main interface.
- App Drawer: Swipe up or tap the app icon to access all installed applications.

Image: Illustration of the head unit's compatibility with vehicle steering wheel controls for convenient operation.
5.2 Navigation
- Access the pre-installed navigation application from the home screen or app drawer.
- Enter your destination using the on-screen keyboard or voice command.
- The system supports various map types, including North America.
5.3 Multimedia Playback
- Radio: Select the "Radio" application to tune into FM/AM stations. Supports RDS.
- USB Playback: Connect USB devices to the available USB ports for audio and video playback. The unit features 3 USB outputs for data transfer.
- Bluetooth Audio: Pair your smartphone via Bluetooth to stream music.
- Video Playback: Supports various video formats.
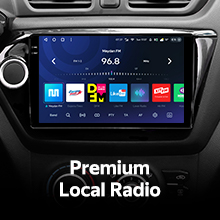
Image: Screenshot of the premium local radio interface on the TEYES CC3 2K head unit.
5.4 Connectivity
- Wi-Fi/Hotspot: Connect to a Wi-Fi network or use your phone's hotspot for internet access.
- 4G Internet: The unit supports 4G internet connectivity.
- Bluetooth: For hands-free calling and audio streaming, featuring an upgraded QCC3031QFN Qualcomm module.
- Wireless CarPlay & Android Auto: Built-in support for seamless smartphone integration.

Image: Close-up of the three USB output ports provided for data transfer and device connectivity.
5.5 Advanced Features
- Split Screen Mode: Utilize the "Freestyle Combination Split Screen Mode" to run two applications simultaneously.
- DSP Audio Processing: Features 2*DSP ADAU1701 + ROHM32107 for enhanced audio quality, including a 27-segment EQ, sound filtering, and optical/coaxial digital audio output.
- Rear View Camera: Real-time viewing of the vehicle's rear view and support for video recording with the included AHD 1080p rear camera.
- TEYES Vision & TEYES Yahu: Explore creative 3D software applications.
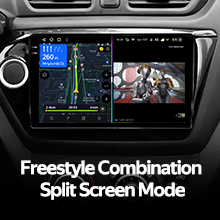
Image: The head unit displaying two applications simultaneously in split-screen mode.
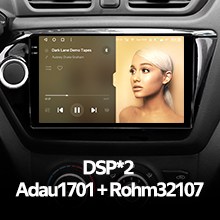
Image: User interface for the DSP audio processing, highlighting the dual DSP chips.
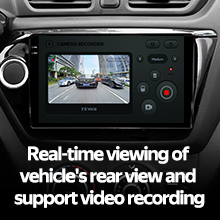
Image: Display showing real-time rear view camera feed with video recording functionality.
6. Maintenance
Proper maintenance ensures the longevity and optimal performance of your TEYES CC3 2K head unit.
- Cleaning: Use the provided cleaning cloth or a soft, dry cloth to wipe the screen and unit exterior. Avoid abrasive cleaners or solvents.
- Software Updates: Periodically check for and install software updates to ensure the latest features and bug fixes.
- Temperature: Avoid exposing the unit to direct sunlight for prolonged periods or extreme temperatures.
7. Troubleshooting
Refer to this section for common issues and their solutions. If the problem persists, contact customer support.
| Problem | Possible Cause | Solution |
|---|---|---|
| Unit does not power on. | Loose power connection, blown fuse, vehicle battery disconnected. | Check power cable connections. Inspect vehicle fuses. Ensure battery is connected. |
| No sound output. | Volume too low, audio cables disconnected, incorrect audio source selected. | Increase volume. Verify speaker wire connections. Select correct audio source (e.g., Radio, USB, Bluetooth). |
| GPS signal weak or lost. | GPS antenna improperly placed or disconnected. | Ensure GPS antenna is securely connected and placed in an unobstructed location. |
| Bluetooth connection issues. | Device not paired, Bluetooth off on phone/unit, interference. | Ensure Bluetooth is enabled on both devices. Re-pair the device. Move closer to the unit. |

Image: An icon representing the Frequently Asked Questions (FAQ) section, indicating support resources.
8. Specifications
| Feature | Detail |
|---|---|
| Model Number | CC3 2K |
| Display Size | 9.5 Inches |
| Display Technology | 2K In-cell Display, Gamut Coverage 157% |
| Operating System | Android 10 |
| Processor | 8 cores 2.0GHz |
| RAM | 6GB |
| ROM | 128GB |
| Connectivity | Bluetooth (QCC3031QFN Qualcomm), USB, Wi-Fi, Hotspot, 4G Internet |
| Audio Output Mode | Stereo |
| DSP | 2*DSP ADAU1701 + ROHM32107 |
| Audio Output | Optical and coaxial digital audio output |
| Special Features | Touchscreen, Built-in wireless CARPLAY and ANDROID AUTO, RDS support, TEYES Vision & TEYES Yahu software, Real-time rear view with recording. |
| Included Rear Camera | AHD 1080p |
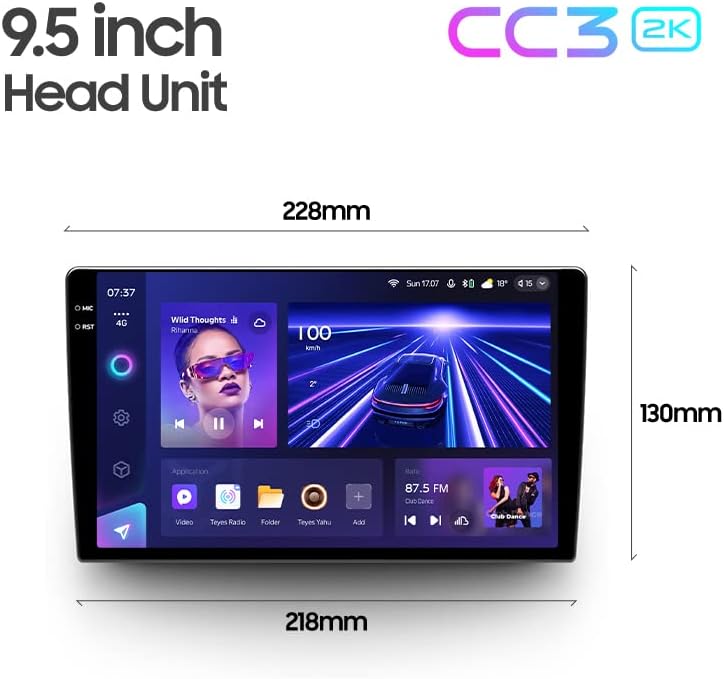
Image: Diagram showing the dimensions of the TEYES CC3 2K Headunit.
9. Warranty and Support
The TEYES CC3 2K Headunit comes with a 1-year warranty from the date of purchase.
For technical support, warranty claims, or further assistance, please contact TEYES customer service through their official website or the retailer where the product was purchased. Keep your proof of purchase for warranty validation.
Manufacturer: Shenzhen TEYES High tech Co., Ltd.
Ask a question about this manual
Ask about setup, troubleshooting, compatibility, parts, safety, or missing instructions. Manuals+ will review the question and use this page’s manual context to help answer it.