1. Introduction
The Thermalright Aqua Elite 120 V3 is an all-in-one (AIO) liquid CPU cooler designed for high-performance desktop systems. It features a fourth-generation pump head, a 120mm black aluminum fin radiator, protective mesh water pipes, and a 120mm ARGB fan. This design aims to provide efficient heat dissipation with low vibration and high durability. The cooler supports ARGB lighting synchronization with compatible motherboards, offering customizable visual effects.
2. Package Contents
Please verify that all components are present before proceeding with installation.
- CPU Water Cooler Unit (Pre-installed fan on radiator)
- Mounting Hardware for AMD (AM4/AM5)
- Mounting Hardware for Intel (LGA1150/1151/1155/1156/1200/2011/1700/1851)
- Thermal Compound
- FAN HUB (for power supply interface expansion)
- Plumbing Snaps (for cable management)
- User Manual (this document)

Image: All components of the Thermalright Aqua Elite 120 V3 Liquid CPU Cooler, including the radiator, waterblock, fans, and various mounting hardware.
3. Specifications
| Product Dimensions | 4.72"L x 0.98"W x 4.72"H |
| Brand | Thermalright |
| Power Connector Type | 4-Pin PWM |
| Voltage | 12 Volts (DC) |
| Wattage | 2.64 watts |
| Cooling Method | Water |
| Compatible Devices | Desktop |
| Noise Level | ≤25.6 Decibels |
| Material | Aluminum |
| Maximum Rotational Speed | 1500 RPM |
| Air Flow Capacity | 66.17 Cubic Feet Per Minute (MAX) |

Image: Detailed specifications of the Aqua Elite 120 V3 cooler, including dimensions, fan speed, noise level, and material.
4. Compatibility
The Thermalright Aqua Elite 120 V3 Liquid CPU Cooler is compatible with a wide range of AMD and Intel CPU sockets:
- AMD: AM4, AM5
- Intel: LGA1150, LGA1151, LGA1155, LGA1156, LGA1200, LGA2011, LGA2066, LGA1700, LGA1851

Image: Visual representation of supported Intel and AMD CPU sockets for the cooler.
5. Installation Guide
This section provides detailed instructions for installing your Thermalright Aqua Elite 120 V3 Liquid CPU Cooler. Please follow the steps carefully for proper installation.
5.1. AMD AM5/AM4 Installation
- Remove Motherboard Plastic Brackets: For AMD AM5 and AM4 motherboards, carefully remove the existing plastic retention brackets around the CPU socket. Keep the original backplate in place.
- Install Red Standoffs: Install the four red standoffs into the motherboard's mounting holes.
- Install Metal Brackets: Place the two AMD metal brackets onto the standoffs and secure them with the provided screws using a screwdriver.
Video: Official installation guide for the Thermalright Aqua Elite 120 V3 Liquid CPU Cooler, demonstrating the steps for AMD and Intel platforms.
5.2. Intel LGA1700 Installation
- Assemble Intel Backplate: Use the outer mounting holes on the Intel backplate. Fix the backplate screws using the blue washers.
- Install Assembled Backplate: Install the assembled Intel backplate from the back side of the motherboard, ensuring the backplate screws pass through the motherboard mounting holes.
- Install Intel Brackets: Install two Intel brackets onto the standoffs. The backplate screws will pass through the LGA1700 holes on these brackets.
- Secure Brackets: Secure the brackets with the provided nuts.
5.3. Common Procedures (All Sockets)
- Apply Thermal Compound: Apply a small amount of thermal compound onto the CPU Integrated Heat Spreader (IHS). Ensure even coverage.
- Remove Coldplate Protective Sticker: Before mounting, remove the protective sticker from the cooler's coldplate.
- Mount Waterblock: Carefully place the waterblock onto the CPU, aligning the waterblock bracket nuts with the screws on the installed brackets.
- Tighten Nuts: Tighten the nuts in a diagonal pattern until the waterblock is securely fastened. Do not overtighten.
5.4. Cable Connections
- Connect Fan PWM Power Cable: Connect the fan PWM power cable to synchronize fan speed.
- Connect Fan ARGB Cable: Connect the fan ARGB cable to synchronize the lighting signal.
- Connect Waterblock PWM Header: Connect the waterblock's 4-pin PWM header to your motherboard's CPU_OPT or WATER_PUMP socket to power the water pump.
- Connect ARGB Lighting Cable: Connect the ARGB lighting cable to a 3-pin 5V ARGB socket on your motherboard.
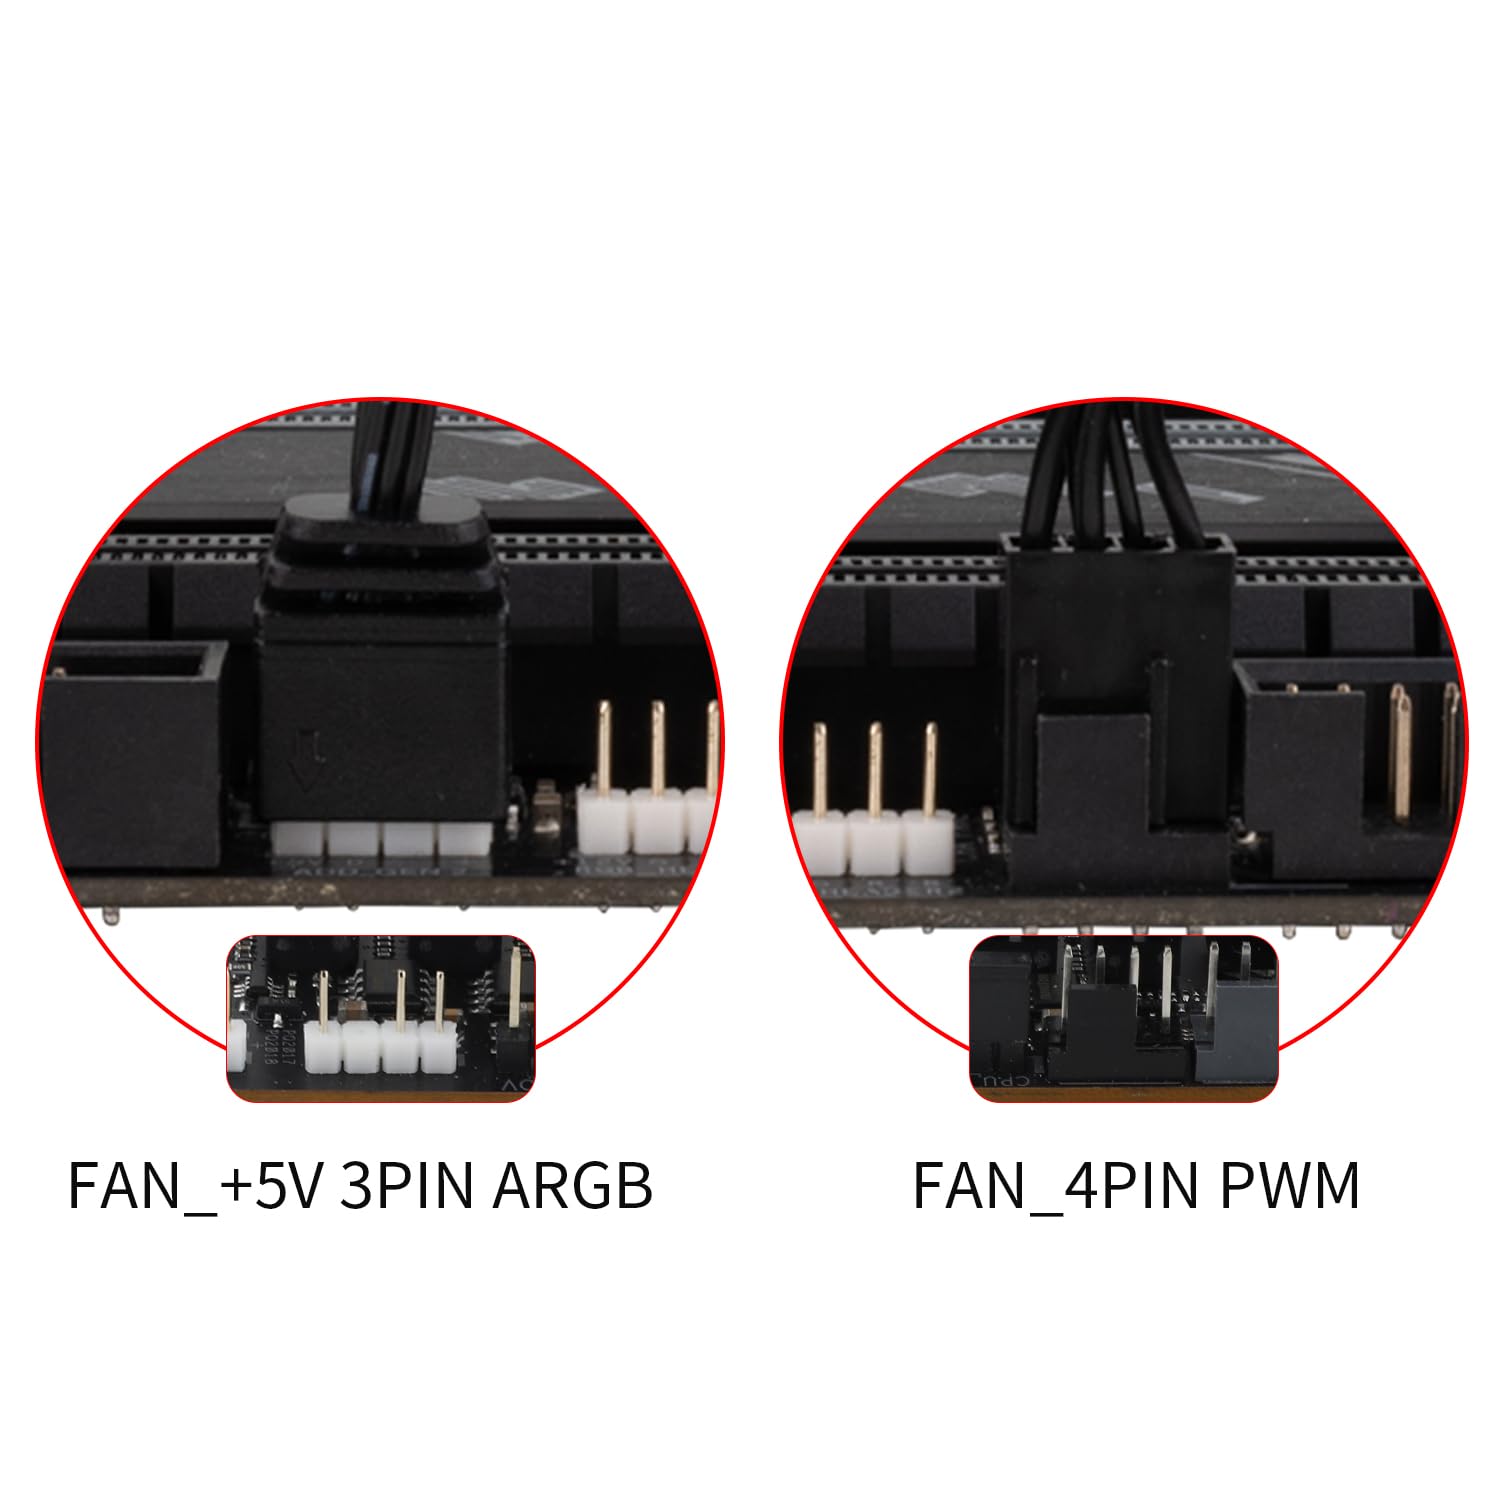
Image: Illustrates the various cable connections for the fans and waterblock, including PWM and ARGB headers.
6. Operating Instructions
Once installed, the Thermalright Aqua Elite 120 V3 operates automatically. The PWM function allows the fans to adjust their speed based on CPU temperature, providing optimal cooling and noise levels. The ARGB lighting can be controlled via your motherboard's software (if supported) to customize lighting effects.
- Fan Control: The dual TL-C12B-S V2 fans are equipped with PWM functionality, automatically adjusting speed (up to 1500RPM) according to CPU temperature for efficient cooling and reduced noise (≤25.6dBA).
- ARGB Lighting: The fan and water-cooling header support 5V 3-pin ARGB synchronization with compatible motherboards, offering 16 million color soft light effects. This allows for rich lighting customization and avoids insufficient lighting interfaces.

Image: Demonstrates the vibrant ARGB lighting effects on the waterblock and fan, highlighting the customizable aesthetic.
7. Maintenance
Regular maintenance ensures optimal performance and longevity of your liquid CPU cooler.
- Dust Removal: Periodically clean the radiator fins and fan blades to prevent dust buildup, which can impede airflow and reduce cooling efficiency. Use compressed air or a soft brush.
- Cable Management: Ensure all cables are neatly routed and secured using the provided plumbing snaps to prevent interference with fan blades or other components.
- Inspect Tubing: Occasionally check the water pipes for any signs of wear, kinks, or leaks. The protective polymer sleeves are designed for low liquid evaporation and extended lifespan.
- Thermal Compound: While not frequently required, if you ever need to remount the cooler, clean off old thermal compound and apply a fresh layer.
8. Troubleshooting
If you encounter issues with your Thermalright Aqua Elite 120 V3, refer to the following common solutions:
- No Fan Spin/No Lighting:
- Check if the fan PWM cable is securely connected to the CPU_FAN header on the motherboard.
- Ensure the ARGB cable is correctly connected to a 5V 3-pin ARGB header on the motherboard.
- Verify that the FAN HUB (if used) is properly powered and connected.
- Poor Cooling Performance:
- Confirm that the waterblock is securely mounted to the CPU and that thermal compound was applied correctly.
- Check for any obstructions (dust, cables) blocking airflow through the radiator.
- Ensure the pump is running by checking its connection to the CPU_OPT or WATER_PUMP header.
- Verify fan orientation for proper airflow (intake or exhaust, depending on case configuration).
- Unusual Noise:
- Check for loose fan screws or cables touching fan blades.
- Ensure the pump is not vibrating excessively against the case or other components.
- Air bubbles in the loop can sometimes cause gurgling noises; these usually dissipate over time.
9. Warranty and Support
Thermalright products are manufactured to high-quality standards. For warranty information, technical support, or service inquiries, please refer to the official Thermalright website or contact your local retailer. Keep your proof of purchase for warranty claims.
For further assistance, visit the Thermalright Store on Amazon.


