1. Introduction
The Sntieecr 276PCS DC Motor Kit is a comprehensive educational resource designed for DIY science projects, particularly for students interested in electrical engineering and STEM learning. This kit provides hands-on experience in building various circuits and models, fostering creativity and understanding of basic electrical principles.
This manual provides detailed instructions for the setup, operation, and maintenance of your Sntieecr DC Motor Kit. Please read it carefully before beginning any projects.

Image 1.1: Overview of the Sntieecr 276PCS DC Motor Kit, displaying all included components such as motors, propellers, battery holders, wires, and gears.
2. Safety Information
Your safety is paramount when working with electrical components. Please adhere to the following guidelines:
- This circuit kit is designed for users aged 8 and above. Adult supervision is strongly recommended during use.
- To prevent potential scalding from short circuits, it is crucial not to combine old and new batteries or different battery types.
- We advise using 3V batteries for optimal performance and safety.
- Limit usage to 3 minutes at a time. After 5-10 minutes, the circuit may heat up, increasing the risk of a short circuit. Allow components to cool down between uses.
- Always ensure all circuits are properly connected before switching on the power. Incorrect wiring can lead to short circuits and component damage.
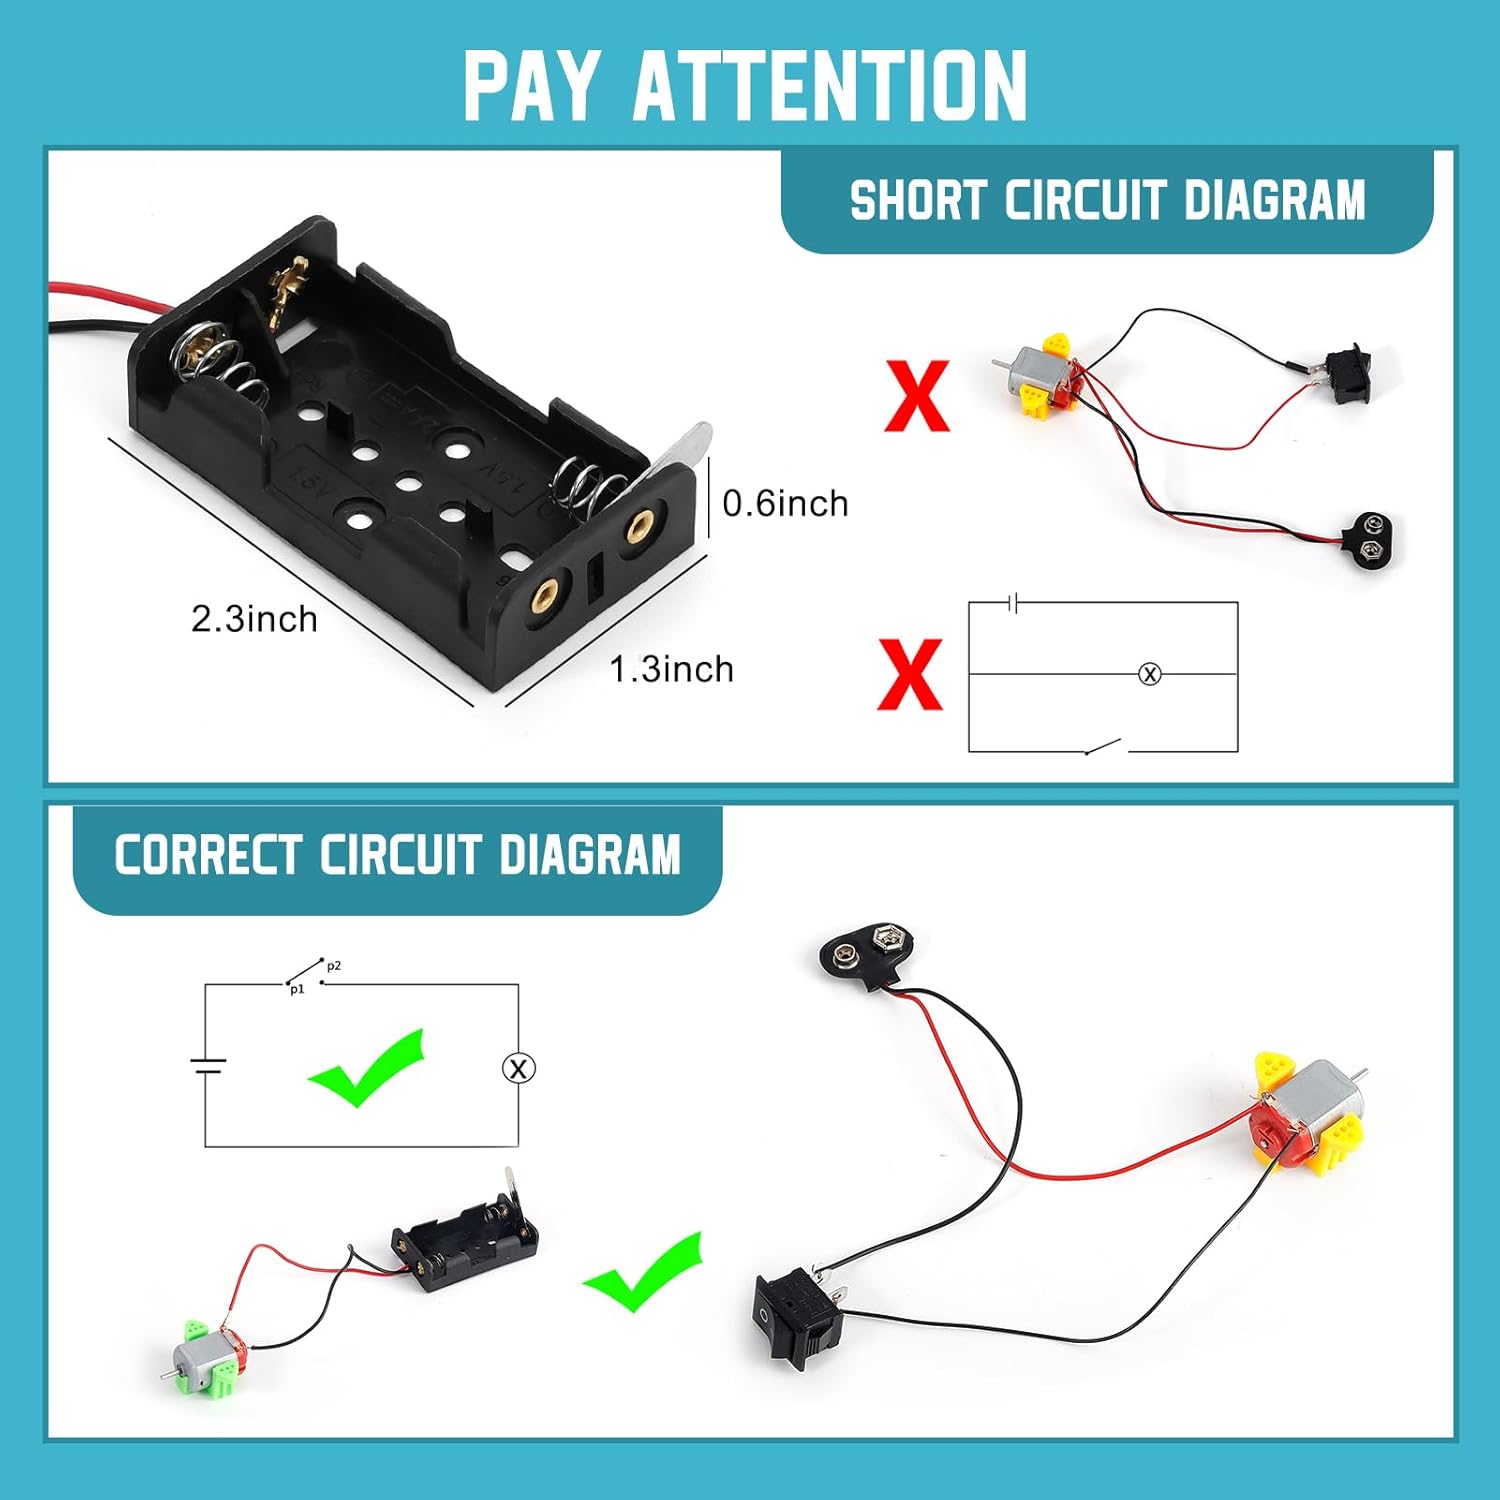
Image 2.1: A visual guide illustrating correct and incorrect circuit diagrams, emphasizing the importance of proper connections to avoid short circuits.

Image 2.2: An important warning graphic reiterating key safety points for users, including age recommendations and supervision requirements.
3. Components Overview
The Sntieecr 276PCS DC Motor Kit includes a wide array of components to facilitate diverse science projects. Below is a detailed list of the contents:
- 18 × DC Motors (130 Motor, approx. 16500RPM)
- 18 × Motor Holders (Green, Yellow, Silver)
- 18 × 2 AA Battery Holders
- 50 × Popsicle Sticks
- 18 × Vanes Propellers (60mm, 70mm, 75mm, 80mm, various colors and vane counts)
- 18 × Switches
- 3 × LED Lights (Yellow, Green, Red)
- 3 × Heat Shrink Tubes (40cm Φ2mm)
- 36 × Electronic Wires (Red & Black)
- 18 × 9V Battery Clip Connectors
- 68 kinds of Plastic Gears

Image 3.1: A comprehensive display of all individual components included in the kit, organized for easy identification.
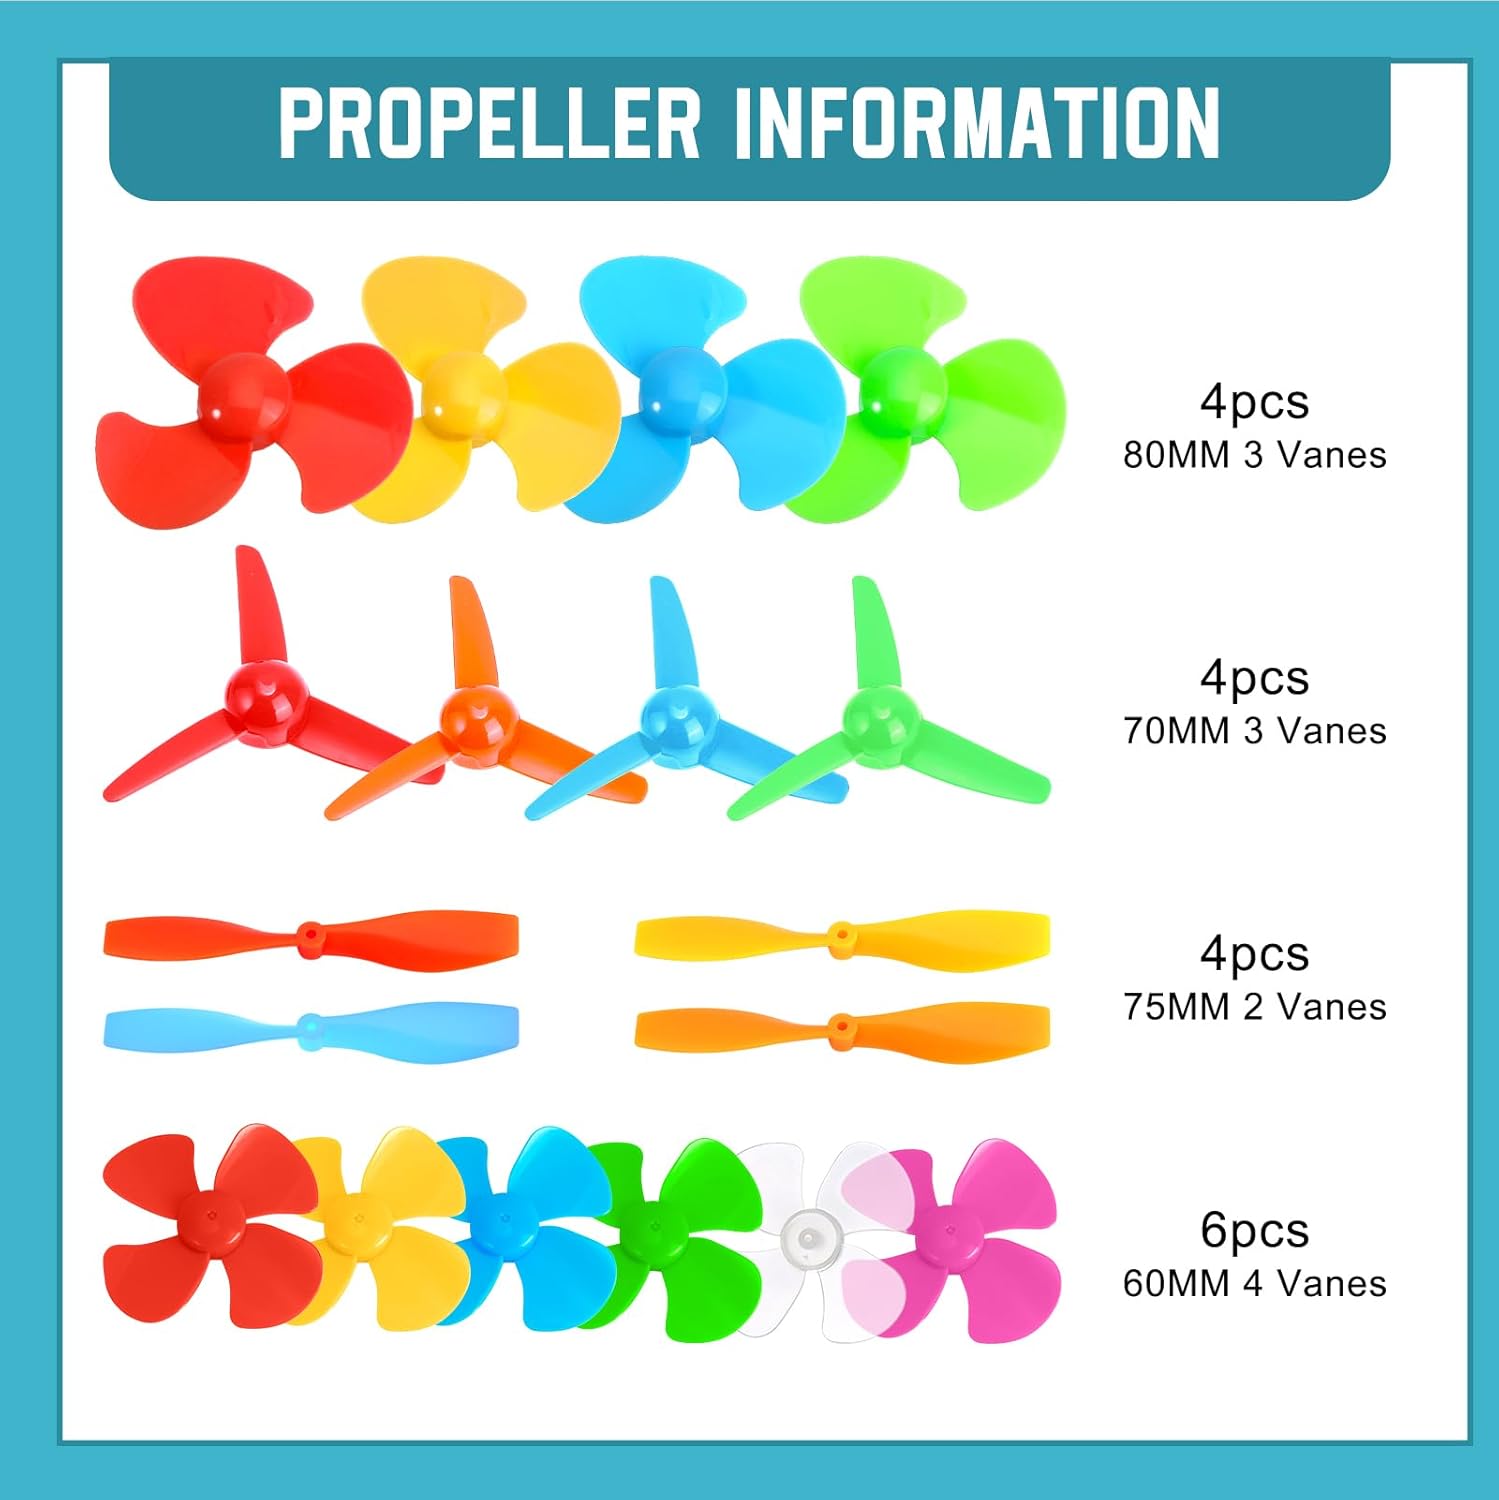
Image 3.2: Close-up view of the diverse range of propellers, detailing their sizes and vane configurations.
4. Setup and Assembly
This kit encourages creative and open-ended projects. While specific assembly instructions for every possible project are beyond the scope of this manual, the following general steps and tips will guide you in setting up basic circuits and models:
- Plan Your Project: Before connecting any components, conceptualize your project. Sketch a simple circuit diagram if necessary.
- Component Selection: Choose the appropriate motors, propellers, battery holders, switches, and wires for your design.
- Battery Installation: Insert 3V AA batteries into the 2 AA battery holders, ensuring correct polarity (+ and -). For 9V battery clip connectors, attach them to a 9V battery.
- Motor and Propeller Assembly: Attach the chosen propeller to the shaft of a DC motor. Secure the motor within a motor holder if needed for your project's structure.
- Wiring Connections: Use the red and black electronic wires to connect components. Red typically indicates positive (+) and black indicates negative (-). Ensure all connections are firm and secure to prevent intermittent operation or short circuits.
- Switch Integration: Incorporate switches into your circuit to control power flow to the motor or LED lights.
- Testing: Once all connections are made, and before applying full power, double-check your wiring against your planned circuit.
Important Tip: Please connect all the circuits properly before switching on the power.

Image 4.1: A young user engaged in assembling a component, demonstrating the hands-on nature of the kit.

Image 4.2: An example of a completed project, a small car, showcasing the potential applications of the kit's components.
5. Operating Instructions
Once your circuit is assembled and verified, operating the components is straightforward:
- Powering the Motor: Connect the motor to a 3V battery holder (with batteries inserted) or a 9V battery via the clip connector. The high torque strong magnetic brushed electric 130 Motor operates at approximately 16500 RPM with a 3V power source.
- Using Switches: If you've integrated a switch, toggle it to the 'ON' position to activate the motor or light. Toggle to 'OFF' to stop.
- LED Lights: Connect the LED lights into a circuit with a power source. Ensure correct polarity for the LED to light up.
- Experimentation: Explore different propeller sizes and types to observe their effect on air movement or propulsion. Experiment with gear ratios using the included plastic gears to understand mechanical advantage.
6. Maintenance
To ensure the longevity and optimal performance of your Sntieecr DC Motor Kit, follow these maintenance tips:
- Storage: Store all components in a dry, cool place, away from direct sunlight and moisture. The original packaging or a dedicated storage box is recommended to keep parts organized.
- Cleaning: Gently wipe components with a dry, soft cloth if they become dusty. Avoid using water or chemical cleaners.
- Battery Care: Remove batteries from holders when the kit is not in use for extended periods to prevent leakage and corrosion.
- Wire Inspection: Periodically check wires for any fraying or damage. Replace damaged wires to ensure safe operation.
7. Troubleshooting
If you encounter issues while using your kit, consider the following troubleshooting steps:
- Motor Not Running / LED Not Lighting Up:
- Check battery charge: Ensure batteries are fresh and correctly inserted with proper polarity.
- Verify connections: Confirm all wires are securely connected to the correct terminals. Loose connections are a common cause of failure.
- Inspect switch: Ensure the switch is in the 'ON' position and functioning correctly.
- Check for short circuits: Refer to the safety section and Image 2.1 to ensure your circuit does not have any unintended short circuits.
- Component damage: If a component appears damaged, replace it.
- Motor Running Slowly:
- Low battery: Replace batteries with fresh ones.
- Excessive load: The motor might be trying to move something too heavy or facing too much resistance. Reduce the load.
- Components Getting Hot:
- This indicates a potential short circuit or excessive current draw. Immediately disconnect power. Review your circuit for errors. Limit usage to 3 minutes as advised in the safety section.
8. Specifications
| Feature | Detail |
|---|---|
| Product Dimensions | 8.8 x 8.8 x 2.1 inches |
| Item Weight | 1.63 pounds |
| Model Number | D-020C |
| Manufacturer Recommended Age | 8 years and up |
| Motor Type | High torque strong magnetic brushed electric 130 Motor |
| Motor Speed | Approx. 16500 RPM (with 3V battery) |
| Power Source Recommendation | 3V batteries (e.g., 2 AA batteries) |
9. Warranty and Support
Sntieecr is committed to providing quality educational products. For any questions, concerns, or support regarding your DC Motor Kit, please contact Sntieecr customer service through the retailer's platform where you purchased the product. Please have your model number (D-020C) and purchase details ready.
While specific warranty details are not provided in this manual, Sntieecr aims for customer satisfaction. Do not attempt to repair damaged electrical components yourself; contact support for guidance.