1. Introduction
This manual provides detailed instructions for the installation and use of the NuIth 70-5521 Radio Wire Harness Adapter and 16-Pin Car Radio Wiring Harness. This product is designed to facilitate the installation of an aftermarket car stereo using existing factory wiring, specifically for compatible Ford, Lincoln, Mercury, and Hyundai vehicles, and various Pioneer stereo models. Please read this manual thoroughly before beginning installation.
Important Note: This product is not compatible with non-amplified factory systems.
2. Product Overview and Package Contents
The NuIth 70-5521 kit includes two main components:
- Radio Wire Harness Adapter (70-5521): Designed to connect to the vehicle's factory wiring.
- 16-Pin Car Radio Wiring Harness: Designed to connect to compatible Pioneer aftermarket stereos. This harness includes RCA plugs for subwoofer input.

Image 2.1: Overview of the NuIth 70-5521 Radio Wire Harness Adapter and 16-Pin Car Radio Wiring Harness with RCA plugs.
These harnesses allow for a clean and efficient installation of an aftermarket radio, utilizing the existing factory wiring without the need for cutting or splicing OEM wires.

Image 2.2: The NuIth car radio wiring harness with RCA plug, designed for replacing factory radios and installing aftermarket units using existing wiring.
3. Compatibility
The 70-5521 Radio Wire Harness Adapter is compatible with selected vehicle models, and the 16-Pin Car Radio Wiring Harness is compatible with specific Pioneer stereo models. Please verify your vehicle and stereo model against the lists below.
3.1 Vehicle Compatibility (70-5521 Adapter)
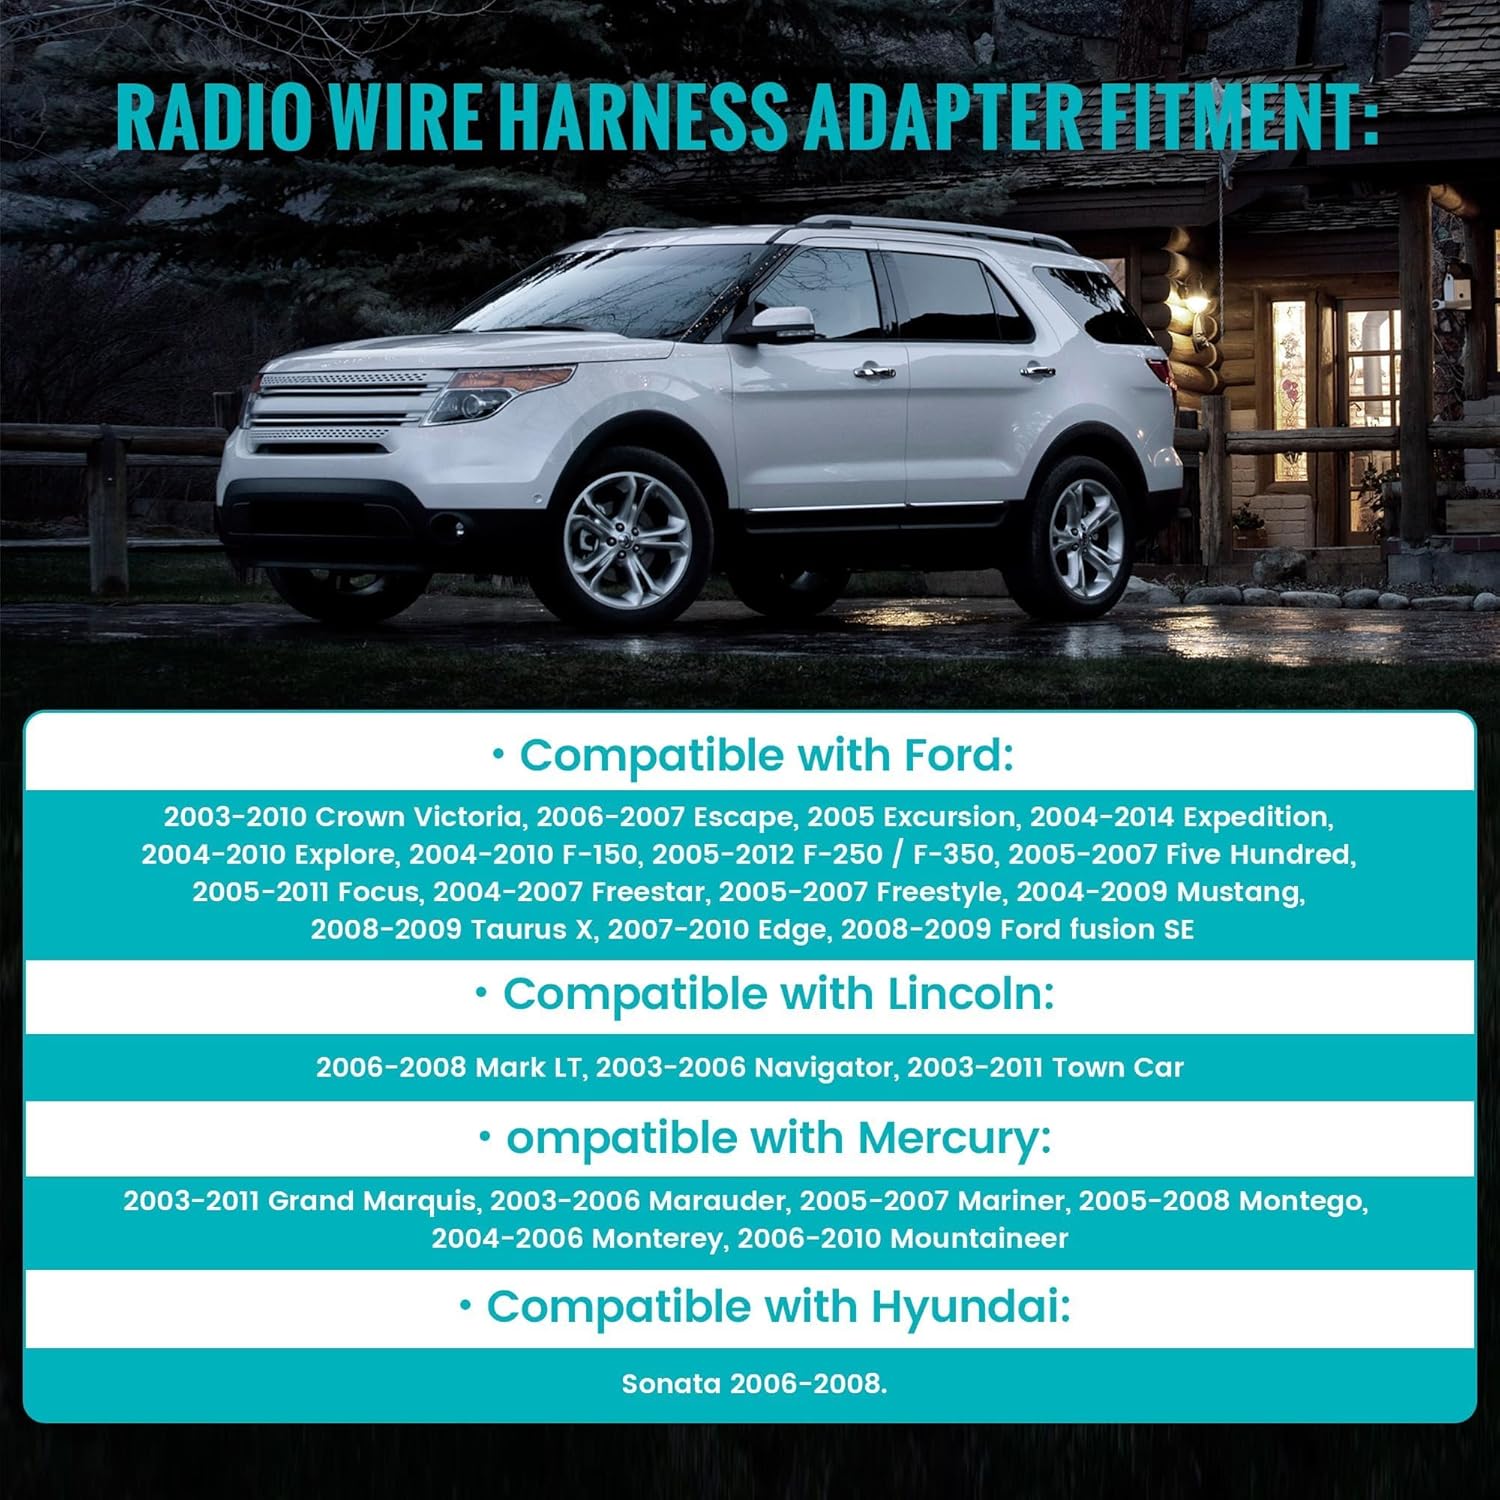
Image 3.1: Visual representation of compatible vehicle models for the radio wire harness adapter.
- Compatible with Ford:
- 2003-2010 Crown Victoria
- 2006-2007 Escape
- 2005 Excursion
- 2004-2014 Expedition
- 2004-2010 Explorer
- 2004-2010 F-150, 2005-2012 F-250 / F-350
- 2005-2007 Five Hundred
- 2005-2011 Focus
- 2004-2007 Freestar
- 2005-2007 Freestyle
- 2004-2009 Mustang
- 2008-2009 Taurus X
- 2007-2010 Edge
- 2008-2009 Ford Fusion SE
- Compatible with Lincoln:
- 2006-2008 Mark LT
- 2003-2006 Navigator
- 2003-2011 Town Car
- Compatible with Mercury:
- 2003-2011 Grand Marquis
- 2003-2006 Marauder
- 2005-2007 Mariner
- 2005-2008 Montego
- 2004-2006 Monterey
- 2006-2010 Mountaineer
- Compatible with Hyundai:
- 2006-2008 Sonata
3.2 Pioneer Stereo Compatibility (16-Pin Harness)
The 16-pin wiring harness is compatible with a wide range of Pioneer AVIC, AVH, and DEH series stereos. Please refer to the list below to confirm compatibility with your specific Pioneer model.

Image 3.2: Comprehensive list of Pioneer radio models compatible with the 16-pin wiring harness.
- Pioneer AVH Series: AVH-X1500DVD, AVH-X2500BT, AVH-X3500BHS, AVH-X4500BT, AVH-X5500BHS, AVH-X8500BHS; AVH-100DVD, AVH-200BT; AVH-P1400DVD, AVH-P2400BT, AVH-P3400BH, AVH-P4400BH, AVH-P8400BH, AVH-P3200, AVH-P3300, AVH-P3100, AVH-P4100, AVH-P4200, AVH-P2300.
- Pioneer AVIC Series: AVIC-X940BT, AVIC-Z140BH, AVIC-X910BT, AVIC-X920BT, AVIC-X930BT, AVIC-Z120BT, AVIC-Z130BT.
- Pioneer DEH Series: DEH-5, DEH-6, DEH-7, DEH-11E, DEH-15, DEH-16, DEH-17, DEH-27, DEH-27MP, DEH-270, DEH-1100MP, DEH-1500R, DEH-1600, DEH-1650, DEH-1700, DEH-1800, DEH-1900MP, DEH-2000MP, DEH-2100IB, DEH-2700, DEH-2800MP, DEH-3700MP, DEH-P25, DEH-P26, DEH-P35, DEH-P45MP, DEH-P250, DEH-P310UB, DEH-P350, DEH-P350MP, DEH-P360, DEH-P370MP, DEH-P390MP, DEH-P400UB, DEH-P401HD, DEH-P410UB, DEH-P450MP, DEH-P460MP, DEH-P500UB, DEH-P770MP, DEH-P4600MP, DEH-P5500MP, DEH-P6600, DEH-P3700, DEH-P3800MP, DEH-P4000UB, DEH-P4100UB, DEH-P4500MP, DEH-P4700MP, DEH-P4800MP, DEH-P4900IB, DEH-P5000UB, DEH-P5600MP, DEH-P5650MP, DEH-P5700MP, DEH-P6500, DEH-P660, DEH-P670MP, DEH-P750MP, DEH-P760MP, DEH-P2500, DEH-P2600, DEH-P2900MP, DEH-P3000IB, DEH-P3500, DEH-P3550MP, DEH-P3600.
4. Installation Instructions
Before beginning installation, ensure the vehicle's battery is disconnected to prevent electrical shorts. This harness is designed for a direct plug-and-play connection where applicable, but some wiring may be required to match the aftermarket stereo's specific functions.
4.1 Preparation
- Disconnect Battery: Always disconnect the negative terminal of the vehicle's battery before starting any electrical work.
- Remove Factory Radio: Carefully remove the existing factory radio from the dashboard. Refer to your vehicle's service manual for specific instructions on dash disassembly.
- Identify Factory Harness: Locate the factory wiring harness connected to the back of the original radio.
4.2 Wiring Connection
The NuIth 70-5521 harness features pre-stripped, color-coded wires for easy connection to your aftermarket Pioneer stereo's harness. Match the wires by color and function.

Image 4.1: Close-up of the pre-stripped, color-coded wires designed for simplified and safe installation without cutting OEM wiring.
- Connect Harnesses:
- Connect the 16-pin Pioneer-compatible harness to the back of your aftermarket Pioneer stereo. Ensure the connection is secure.
- Connect the 70-5521 vehicle-specific adapter harness to the factory wiring harness in your vehicle. This connection should be a direct plug-in.
- Wire Matching: Carefully match the corresponding wires from the 16-pin Pioneer harness to the 70-5521 vehicle adapter harness. Use crimp connectors or solder for secure and reliable connections. Ensure all connections are insulated with electrical tape or heat shrink tubing.
- RCA Connections: If your aftermarket stereo and vehicle system utilize a subwoofer, connect the red and white RCA plugs from the 16-pin harness to the corresponding subwoofer input jacks on your Pioneer stereo.

Image 4.2: The 16-pin stereo wiring harness connected to the rear of a Pioneer radio, highlighting the fuse location for verification.
Note: Always check the fuse on your Pioneer stereo to ensure it matches the required specifications, as indicated in the image above.
4.3 Final Steps
- Test Connections: Before fully reassembling the dashboard, reconnect the vehicle's battery and test the aftermarket stereo's functionality (power, audio, balance, fader, subwoofer output, etc.).
- Secure Wiring: Once all functions are verified, neatly bundle and secure all wiring to prevent rattles or interference.
- Reassemble Dashboard: Carefully reassemble the dashboard components and secure the new stereo in place.

Image 4.3: Examples illustrating the process of installing aftermarket radio wiring and connectors within a vehicle's dashboard.
5. Wiring Diagram (General)
Below is a general color-coding guide for standard car audio wiring. Always refer to your specific aftermarket stereo's manual for its exact wiring diagram, as colors can vary slightly between manufacturers.
| Wire Color | Function |
|---|---|
| Yellow | Constant 12V (Memory) |
| Red | Switched 12V (Accessory) |
| Black | Ground |
| Blue | Power Antenna / Remote Turn-On |
| Orange | Illumination / Dimmer |
| White | Front Left Speaker (+) |
| White/Black | Front Left Speaker (-) |
| Gray | Front Right Speaker (+) |
| Gray/Black | Front Right Speaker (-) |
| Green | Rear Left Speaker (+) |
| Green/Black | Rear Left Speaker (-) |
| Violet | Rear Right Speaker (+) |
| Violet/Black | Rear Right Speaker (-) |
The RCA connectors (Red and White) are typically for subwoofer pre-outs or auxiliary inputs, depending on your stereo's configuration.
6. Troubleshooting
If you encounter issues after installation, review the following common troubleshooting steps:
- No Power to Stereo:
- Check the vehicle's fuse box for blown fuses.
- Verify the yellow (constant 12V) and red (switched 12V) wires are correctly connected and receiving power.
- Ensure the black (ground) wire has a secure connection to a metal chassis point.
- No Sound:
- Confirm all speaker wires are correctly connected and not shorting.
- Check the stereo's fader and balance settings.
- Ensure the amplifier (if present) is receiving a remote turn-on signal (blue wire).
- Subwoofer Not Working:
- Verify the RCA cables are securely connected to the correct subwoofer output on the stereo and input on the amplifier.
- Check the subwoofer amplifier's power and remote turn-on connections.
- Ensure subwoofer settings are enabled on the Pioneer stereo.
- Intermittent Power/Sound:
- Inspect all wire connections for looseness or poor crimps/solder joints.
- Ensure no wires are pinched or damaged during dashboard reassembly.
- Compatibility Issues:
- Re-verify that your vehicle and Pioneer stereo model are listed as compatible in Section 3.
- Confirm that your factory system is not non-amplified, as this product is not compatible with such systems.
7. Specifications
- Model: NuIth 70-5521
- Material: Acrylonitrile Butadiene Styrene (ABS)
- Connector Type: Pioneer Connector (16-Pin), Vehicle-Specific Adapter (70-5521)
- Cable Type: Standard Wiring Harness
- Compatibility:
- Vehicle: Selected Ford, Lincoln, Mercury (2003-2012), Hyundai Sonata (2006-2008)
- Stereo: Various Pioneer AVIC, AVH, DEH series (refer to Section 3.2 for full list)
- Features: Pre-stripped wires, color-coded, includes RCA subwoofer input.
- Note: Not compatible with non-amplified factory systems.
8. Warranty and Support
NuIth products are manufactured to high-quality standards. For warranty information or technical support, please refer to the contact information provided with your purchase or visit the official NuIth website. Keep your purchase receipt as proof of purchase for any warranty claims.