Topyond F270
Topyond F270 WiFi Endoscope Camera User Manual
Model: F270
1. Introduction
This manual provides detailed instructions for the safe and effective use of your Topyond F270 WiFi Endoscope Camera. Please read this manual thoroughly before operating the device and retain it for future reference.
The Topyond F270 is a portable WiFi endoscope camera designed for industrial inspection. It features a 1080P resolution camera with 8 adjustable LED lights, an 8mm lens, and IP67 waterproof rating for the lens, making it suitable for various inspection tasks, including those in damp or submerged environments.
2. Safety Information
Observe the following safety precautions to prevent injury or damage to the device:
- Do not attempt to disassemble or modify the device. Unauthorized modifications can lead to malfunction and void the warranty.
- Keep the device away from extreme temperatures, direct sunlight, and corrosive liquids.
- Ensure the charging port is dry before connecting the USB charging cable.
- The lens is IP67 waterproof; however, the main control unit is not. Do not submerge the control unit in water.
- Use only the provided charging cable or a certified 5V/1A charger.
- This device is intended for inspection purposes only and should not be used for medical or personal examination.
3. Package Contents
Verify that all items are present in the package:
- WiFi Endoscope Camera (10-meter cable)
- USB Charging Cable
- Magnet Attachment
- Mirror Attachment
- Hook Attachment
- Replacement Buckles (2x)

Figure 3.1: Included accessories with the Topyond F270 WiFi Endoscope Camera.
4. Product Overview
Familiarize yourself with the components of your endoscope camera.

Figure 4.1: Topyond F270 WiFi Endoscope Camera connected to a smartphone.

Figure 4.2: Control unit with labeled buttons and charging interface.
- 1. Adjust the light button: Controls the brightness of the 8 LED lights on the camera.
- 2. Turn on/off button: Powers the device on or off.
- 3. Taking pictures button: Captures still images.
- 4. Charging interface: Micro USB port for charging the internal battery.
- 5. Signal indicator: Displays WiFi connection status and battery level.
5. Setup
5.1 Charging the Device
Before first use, fully charge the endoscope camera. Connect the provided USB charging cable to the charging interface (4) on the control unit and to a 5V/1A USB power adapter (not included). The signal indicator (5) will show charging status.
The internal 1800mAh lithium battery provides approximately 4 hours of working time on a full charge.
5.2 App Download and Installation
To view the camera feed and control the device, you need to download the companion application on your smartphone or tablet.
- Scan the QR code provided in the product packaging or search for the recommended app (e.g., "WiFi View" or similar, specific app name not provided in product data) in your device's app store (Google Play Store for Android, Apple App Store for iOS).
- Download and install the application.
5.3 Connecting via WiFi
Follow these steps to establish a WiFi connection between the endoscope and your smart device:
- Press and hold the "Turn on/off" button (2) on the control unit to power on the endoscope. The signal indicator (5) will illuminate.
- On your smartphone or tablet, go to your WiFi settings.
- Locate and connect to the WiFi network named "YPC_XXXXXX" or similar (the exact name will be on the device or in the app instructions). No password is typically required for this direct connection.
- Once connected, open the installed endoscope application. The camera feed should now be visible on your device's screen.

Figure 5.1: Wireless connection setup for the endoscope camera.
6. Operating Instructions
6.1 Power On/Off
Press and hold the "Turn on/off" button (2) for a few seconds to power the device on or off.
6.2 Adjusting LED Brightness
Press the "Adjust the light button" (1) repeatedly to cycle through different brightness levels for the 8 LED lights on the camera head. This helps illuminate dark inspection areas.
6.3 Taking Photos and Videos
While viewing the live feed in the app:
- To take a photo, press the "Taking pictures" button (3) on the control unit or use the corresponding button within the app.
- To record video, use the video recording function within the app.
Captured images and videos will be saved directly to your smartphone or tablet's gallery.
6.4 Using Attachments
The endoscope comes with several attachments for specialized tasks:
- Magnet: Useful for retrieving small metallic objects from hard-to-reach places.
- Mirror: Provides a side view for inspecting walls of pipes or other confined spaces.
- Hook: Can be used to retrieve small non-metallic items.
To attach, carefully slide the desired accessory onto the camera head until it is securely in place. Ensure the accessory does not obstruct the camera lens or LED lights.
6.5 Application Examples
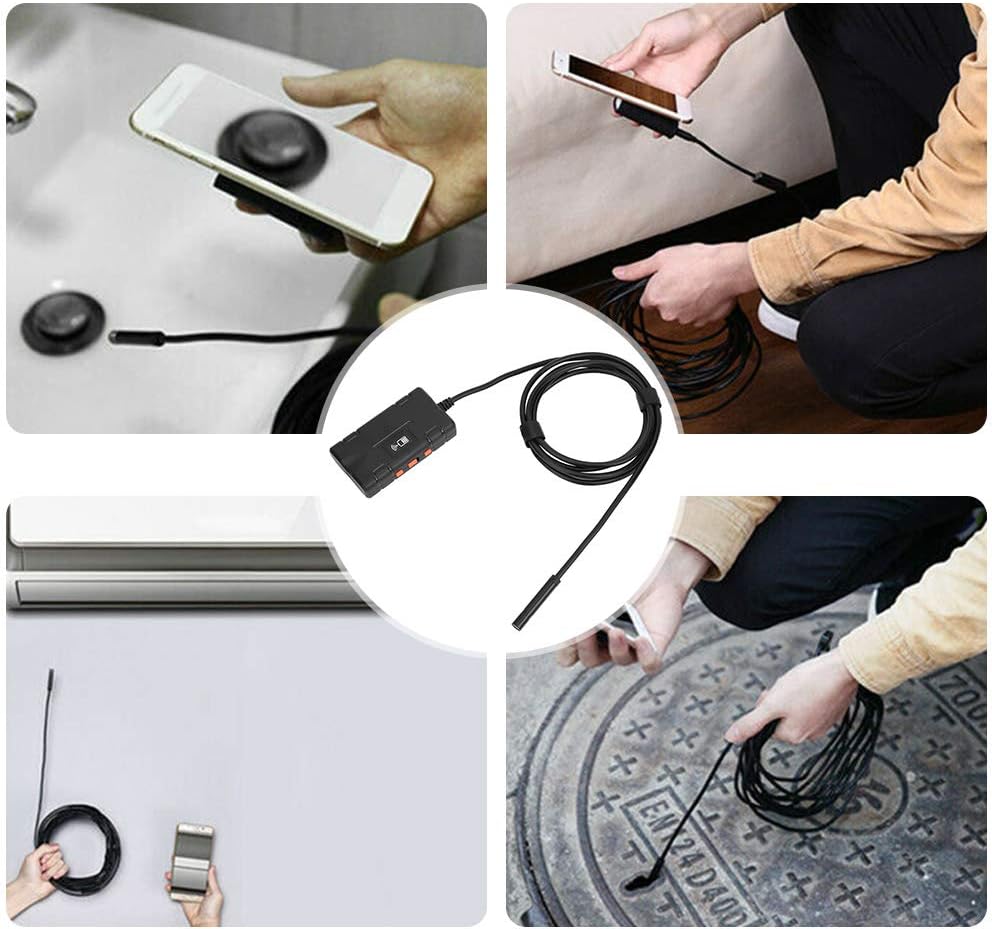
Figure 6.1: Various uses for the Topyond F270 endoscope camera.

Figure 6.2: Examples of endoscope use in household inspections.
7. Maintenance
- Cleaning the Lens: After use, especially in dirty or wet environments, gently wipe the camera lens with a soft, dry cloth. For stubborn dirt, a slightly damp cloth can be used, followed by drying. Do not use abrasive cleaners or solvents.
- Storage: Store the endoscope camera in a cool, dry place, away from direct sunlight and extreme temperatures. Coil the cable neatly to prevent kinks or damage.
- Battery Care: To prolong battery life, avoid fully discharging the battery frequently. If storing for an extended period, charge the battery to about 50% every few months.
8. Troubleshooting
| Problem | Possible Cause | Solution |
|---|---|---|
| No image on screen / App not connecting |
|
|
| Image is dark or unclear |
|
|
| Device not charging |
|
|
9. Specifications
| Model | F270 |
| Lens Diameter | 8mm |
| Camera Resolution | 1280 x 1080 (2.0MP) |
| Camera Light Source | 8 Adjustable LED Lights |
| Waterproof Rating (Lens) | IP67 |
| Focal Length | 5cm ~ ∞ |
| Viewing Angle | 70 Degrees |
| Battery | 1800mAh Lithium Battery |
| Working Hours | Approx. 4 hours |
| Power Input | DC 5V 500 mAh / 1A |
| Operating Temperature | 0-45 ℃ (32-113 ℉) |
| Photo Format | MJPEG |
| Video Format | MP4 |
| Cable Length | 10 meters (32.8 ft) |
| Item Weight | 0.23 Kilograms (8.1 ounces) |
10. Warranty and Support
Topyond products are designed for reliability and performance. For warranty information and technical support, please refer to the contact details provided with your purchase or visit the official Topyond website. Keep your purchase receipt as proof of purchase.
Ask a question about this manual
Ask about setup, troubleshooting, compatibility, parts, safety, or missing instructions. Manuals+ will review the question and use this page’s manual context to help answer it.