
Duex DX H110Z M2
Duex DX H110Z M2 Motherboard User Manual
Model: DX H110Z M2
1. Product Overview
The Duex DX H110Z M2 Motherboard is an entry-level micro-ATX motherboard designed to support 6th and 7th generation Intel processors. It is built on the Intel H110 chipset and provides support for DDR4 memory, SATA storage, and PCIe expansion. This manual provides essential information for setting up, operating, and maintaining your motherboard.
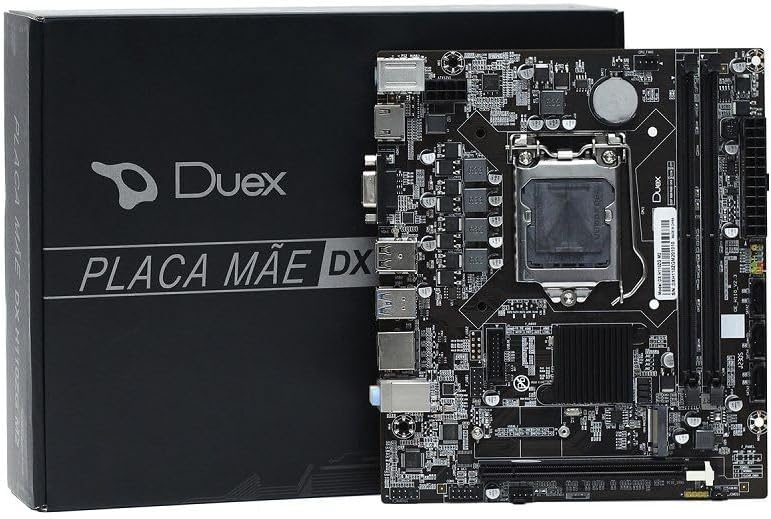
Figure 1: The Duex DX H110Z M2 Motherboard shown alongside its product packaging. The motherboard features an LGA 1151 CPU socket, two DDR4 DIMM slots, and various I/O ports.
2. Specifications
| Feature | Detail |
|---|---|
| Model | DX H110Z M2 |
| Processor Support | Intel Socket 1151 for 6th/7th Generation Core i7/i5/i3/Pentium/Celeron CPUs (supports Intel 14 nm CPU) |
| Chipset | Intel H110 |
| Memory | 2x 288-pin DDR4 Slots, up to 32GB, supports Dual-Channel DDR4 2133/2400/2666 MHz memory |
| BIOS | EFI BIOS |
| I/O Interface | 1x PS/2, 1x VGA, 1x DP, 1x HDMI, 2x USB 2.0, 2x USB 3.0, 1x RJ45, 1x Audio |
| Onboard Interface | 1x 24-pin ATX, 1x 8-pin ATX 12V, 3x USB connectors (supporting 5x USB 2.0), 1x F_AUDIO, 1x F_PANEL, 1x Speaker, 2x Fan, 3x Serial ATA, 1x COM |
| Integrated Sound | 6-channel HD Audio Codec, front audio interface, front stereo mic interface |
| Integrated LAN | 10/100/1000 Mbps LAN onboard |
| Expansion Slots | 1x PCI Express x16, 1x M.2, 1x PCIE x1, 1x WIFI slot |
| Product Dimensions | 20 x 30 x 20 cm |
| Product Weight | 200 g |
3. Setup Guide
Follow these steps to properly install your Duex DX H110Z M2 Motherboard into your computer system.
- Prepare Your Workspace: Ensure your workspace is clean, well-lit, and free of static electricity. Use an anti-static wrist strap or frequently touch a grounded metal object.
- Install the CPU:
- Carefully open the CPU socket lever on the motherboard.
- Align the CPU with the socket, matching the golden triangle on the CPU with the triangle on the socket.
- Gently place the CPU into the socket. Do not force it.
- Close the CPU socket lever to secure the CPU in place.
- Install the CPU Cooler: Apply thermal paste (if not pre-applied) and install the CPU cooler according to its manufacturer's instructions. Connect the CPU fan cable to the CPU_FAN header on the motherboard.
- Install RAM Modules:
- Open the clips on both ends of the DDR4 memory slots.
- Align the notch on the RAM module with the key in the DIMM slot.
- Press down firmly on both ends of the RAM module until the clips snap into place.
- Mount the Motherboard: Install the necessary standoffs in your PC case. Carefully place the motherboard onto the standoffs, aligning the screw holes. Secure the motherboard with screws.
- Connect Power Cables:
- Connect the 24-pin ATX power cable from your power supply to the main power connector on the motherboard.
- Connect the 8-pin ATX 12V power cable (or 4-pin, depending on your PSU) to the CPU power connector.
- Connect Storage Devices: Connect your SATA SSDs/HDDs to the SATA ports on the motherboard using SATA data cables. Connect the power cables from your PSU to these devices. If using an M.2 SSD, install it into the M.2 slot and secure it with the provided screw.
- Connect Front Panel Cables: Connect the power switch, reset switch, HDD LED, power LED, and USB/audio headers from your PC case to the corresponding pins on the motherboard's front panel header (F_PANEL). Refer to the motherboard's silkscreen labels for correct pin alignment.
- Install Expansion Cards: Insert any necessary PCI Express cards (e.g., graphics card, Wi-Fi card) into the appropriate slots and secure them.
- Connect Peripherals: Connect your monitor, keyboard, mouse, and other peripherals to the rear I/O ports.
4. Operating Instructions
Once your system is assembled, follow these general operating guidelines.
- First Boot: After assembly, ensure all connections are secure. Power on your system. The system should display the BIOS/UEFI screen.
- BIOS/UEFI Configuration:
- Press the designated key (usually DEL or F2) during startup to enter the BIOS/UEFI setup.
- Configure boot order, system time, and other essential settings as needed.
- Save changes and exit the BIOS/UEFI.
- Operating System Installation: Insert your operating system installation media (USB drive or DVD) and follow the on-screen prompts to install your preferred OS.
- Driver Installation: After OS installation, install the necessary drivers for your motherboard (chipset, LAN, audio, graphics, etc.). These are typically found on the manufacturer's website or an included driver CD/USB.
- System Stability: Monitor your system's temperature and performance. Ensure proper airflow within your PC case to prevent overheating.
5. Maintenance
Regular maintenance helps ensure the longevity and optimal performance of your motherboard.
- Dust Removal: Periodically clean dust from inside your PC case, especially from the motherboard, CPU cooler, and fan vents. Use compressed air or a soft brush. Ensure the system is powered off and unplugged before cleaning.
- BIOS/UEFI Updates: Check the Duex website for the latest BIOS/UEFI updates. Updates can improve compatibility, stability, and performance. Follow the update instructions carefully to avoid damaging the motherboard.
- Driver Updates: Keep your system drivers (chipset, LAN, audio, etc.) updated to ensure compatibility and optimal performance with your operating system and hardware.
- Cable Management: Ensure cables inside your PC case are neatly organized to improve airflow and prevent obstruction of components.
- Environmental Conditions: Operate the motherboard in a cool, dry environment. Avoid extreme temperatures, humidity, and direct sunlight.
6. Troubleshooting
This section provides solutions to common issues you might encounter with your motherboard.
- No Power/No Boot:
- Check all power connections (24-pin ATX, 8-pin ATX 12V) from the power supply to the motherboard.
- Ensure the power supply is switched on and plugged into a working outlet.
- Verify that the front panel power switch cable is correctly connected to the motherboard.
- Try reseating RAM modules and expansion cards.
- No Display:
- Ensure your monitor is connected to the correct video output (motherboard integrated graphics or discrete graphics card).
- Check the monitor's power and input source.
- Reseat your graphics card (if applicable) and ensure its power cables are connected.
- Try booting with only one RAM stick.
- System Instability/Crashes:
- Check CPU and system temperatures. Overheating can cause instability.
- Run memory diagnostic tools to check for faulty RAM.
- Ensure all drivers are up to date.
- Check for loose connections or components.
- Peripheral Not Detected:
- Try connecting the peripheral to a different USB port.
- Ensure the peripheral's drivers are installed.
- Check BIOS/UEFI settings to ensure USB ports are enabled.
- BIOS Reset: If you encounter issues after changing BIOS settings, you can reset the BIOS to default settings. This can usually be done by:
- Entering the BIOS setup and selecting "Load Optimized Defaults" or similar option.
- Clearing the CMOS by removing the CMOS battery for a few minutes (with the system unplugged) or using the CLR_CMOS jumper on the motherboard (refer to motherboard diagram).
7. Warranty and Support
For warranty information and technical support, please refer to the official Duex website or contact your local retailer. Keep your proof of purchase for warranty claims.
Online Resources:
- Visit the official Duex website for driver downloads, BIOS updates, and FAQs.
- Consult online forums and communities for peer support and additional troubleshooting tips.
Related documentsDX H110Z M2


Ask a question about this manual
Ask about setup, troubleshooting, compatibility, parts, safety, or missing instructions. Manuals+ will review the question and use this page’s manual context to help answer it.