Introduction
This manual provides detailed instructions for the installation, operation, and maintenance of your METEESER Single Din Car Stereo. This unit features a 10.4-inch adjustable touchscreen, Apple CarPlay, Android Auto, Bluetooth connectivity, FM radio, and support for a backup camera. Please read this manual thoroughly before use to ensure proper functionality and safety.

Figure 1: METEESER Single Din Car Stereo main unit and accessories.
Key Features
- 10.4-Inch Adjustable Touchscreen: High-resolution 1280*800 display with adjustable viewing angles and landscape/portrait modes.
- Apple CarPlay & Android Auto: Wired connectivity for seamless smartphone integration, including navigation, calls, and music.
- Bluetooth 4.2: Dual-pass Bluetooth for hands-free calling and wireless audio streaming with built-in and external microphones.
- HD Backup Camera Support: Includes an IP69 waterproof reversing camera with night vision and automatic screen switching.
- FM Radio: Save up to 18 FM station presets.
- 16-Band EQ Audio: Customizable sound preferences for an optimized audio experience.
- Phone Mirror Link: Connect iOS/Android smartphones to display content on the stereo screen.
- Voice Control: Integrated voice control technology for various functions.
- USB/AUX/TF Card Support: Multiple input options for media playback.
- Dash Cam Support: Connect an external car driving recorder (not included) for enhanced safety.
What's in the Box
Please verify that all components are present before beginning installation:
- METEESER Single Din Car Stereo Unit
- Backup Camera
- External Microphone
- Power Cable
- Horn Cable
- Mounting Brackets (2 sets)
- User Manual (this document)

Figure 2: Package contents and wiring diagram overview.
Setup and Installation
1. Vehicle Fit Check
Ensure your vehicle's dash opening size is compatible with the single din touchscreen radio's installation dimensions: 176mm (L) x 90mm (W) x 50mm (H) / 6.9 x 3.5 x 2 inches. If the opening is not suitable, a dash kit may be required (not included).
2. Physical Installation
- Detach the short sleeve: Carefully remove the short sleeve from the radio body.
- Insert short sleeve: Insert the short sleeve into your car's radio installation aperture.
- Secure the iron clip: Use mounting tools to press the iron clip onto the short sleeve, fastening it to the car.
- Push in the radio body: Slide the radio body into the short sleeve until it clicks into place.

Figure 3: Easy installation steps for the main unit.
3. Wiring Diagram
Refer to the diagram below for proper wiring connections. Ensure all connections are secure before powering on the unit.
| Connection Point (A) | Description | Connection Point (B) | Description |
|---|---|---|---|
| A1 | Back | B1 | Right Rear Speaker+ |
| A2 | Brake | B2 | Right Rear Speaker- |
| A3 | Key 1 | B3 | Right Front Speaker+ |
| A4 | Battery+ | B4 | Right Front Speaker- |
| A5 | Antenna | B5 | Left Front Speaker+ |
| A6 | ILL | B6 | Left Front Speaker- |
| A7 | Ignition Switch | B7 | Left Rear Speaker+ |
| A8 | Ground | B8 | Left Rear Speaker- |
Additional connections include: Radio Antenna, Video Output 1 & 2, CVBS Input, Right/Left Audio Output, Reverting Video Input, and Audio Input.
4. Backup Camera Installation
The included HD reversing camera requires proper connection for automatic display when reversing.
- Connect the camera's power cable (red wire) to the car's reversing light positive (+).
- Connect the camera's ground wire (black wire) to a suitable ground point on the car chassis.
- Connect the video signal cable from the camera to the "Reverting Video Input" on the car stereo unit.
- Ensure the external ground plate of the car radio is correctly matched and secured.

Figure 4: Backup camera wiring diagram.
Operating Instructions
1. Screen Adjustment
The 10.4-inch touchscreen can be manually adjusted to your preferred viewing angle. It supports both landscape and portrait modes for optimal usability.

Figure 5: Screen orientation options (vertical and horizontal).
2. Apple CarPlay & Android Auto
Connect your smartphone via a USB cable to enable Apple CarPlay or Android Auto. This allows access to navigation, phone contacts, messages, and music directly on the stereo's screen.

Figure 6: Wired CarPlay and Android Auto connection.
3. Bluetooth Connectivity
Pair your mobile device with the stereo via Bluetooth 4.2 for hands-free calling and wireless audio streaming. The unit includes both a built-in microphone and an external microphone for clear communication.
- Navigate to the Bluetooth settings on the stereo.
- Enable Bluetooth on your mobile device and search for available devices.
- Select "METEESER" (or similar device name) from the list and confirm pairing.

Figure 7: Bluetooth interface for calls and audio.
4. FM Radio
Access the FM radio function to listen to live news, traffic updates, and music. You can save up to 18 of your favorite stations as presets.
- Select the "Radio" icon from the main menu.
- Use the scan function to find stations or manually tune to a frequency.
- Press and hold a preset button to save the current station.

Figure 8: FM Radio interface.
5. Audio Settings (16-Band EQ)
Customize your audio experience using the 16-band equalizer. Choose from predefined settings (Classic, Rock, Jazz, Pop, Flat) or create your own user-defined sound profile.

Figure 9: 16-Band Equalizer settings.
6. Phone Mirror Link
Use the Mirror Link feature to display your smartphone's screen content directly on the car stereo. This allows you to view videos and other applications from your phone.

Figure 10: Phone Mirror Link functionality.
7. Voice Control
Utilize the integrated voice control technology to manage various functions, such as navigation, music playback, and calls, without taking your hands off the wheel.
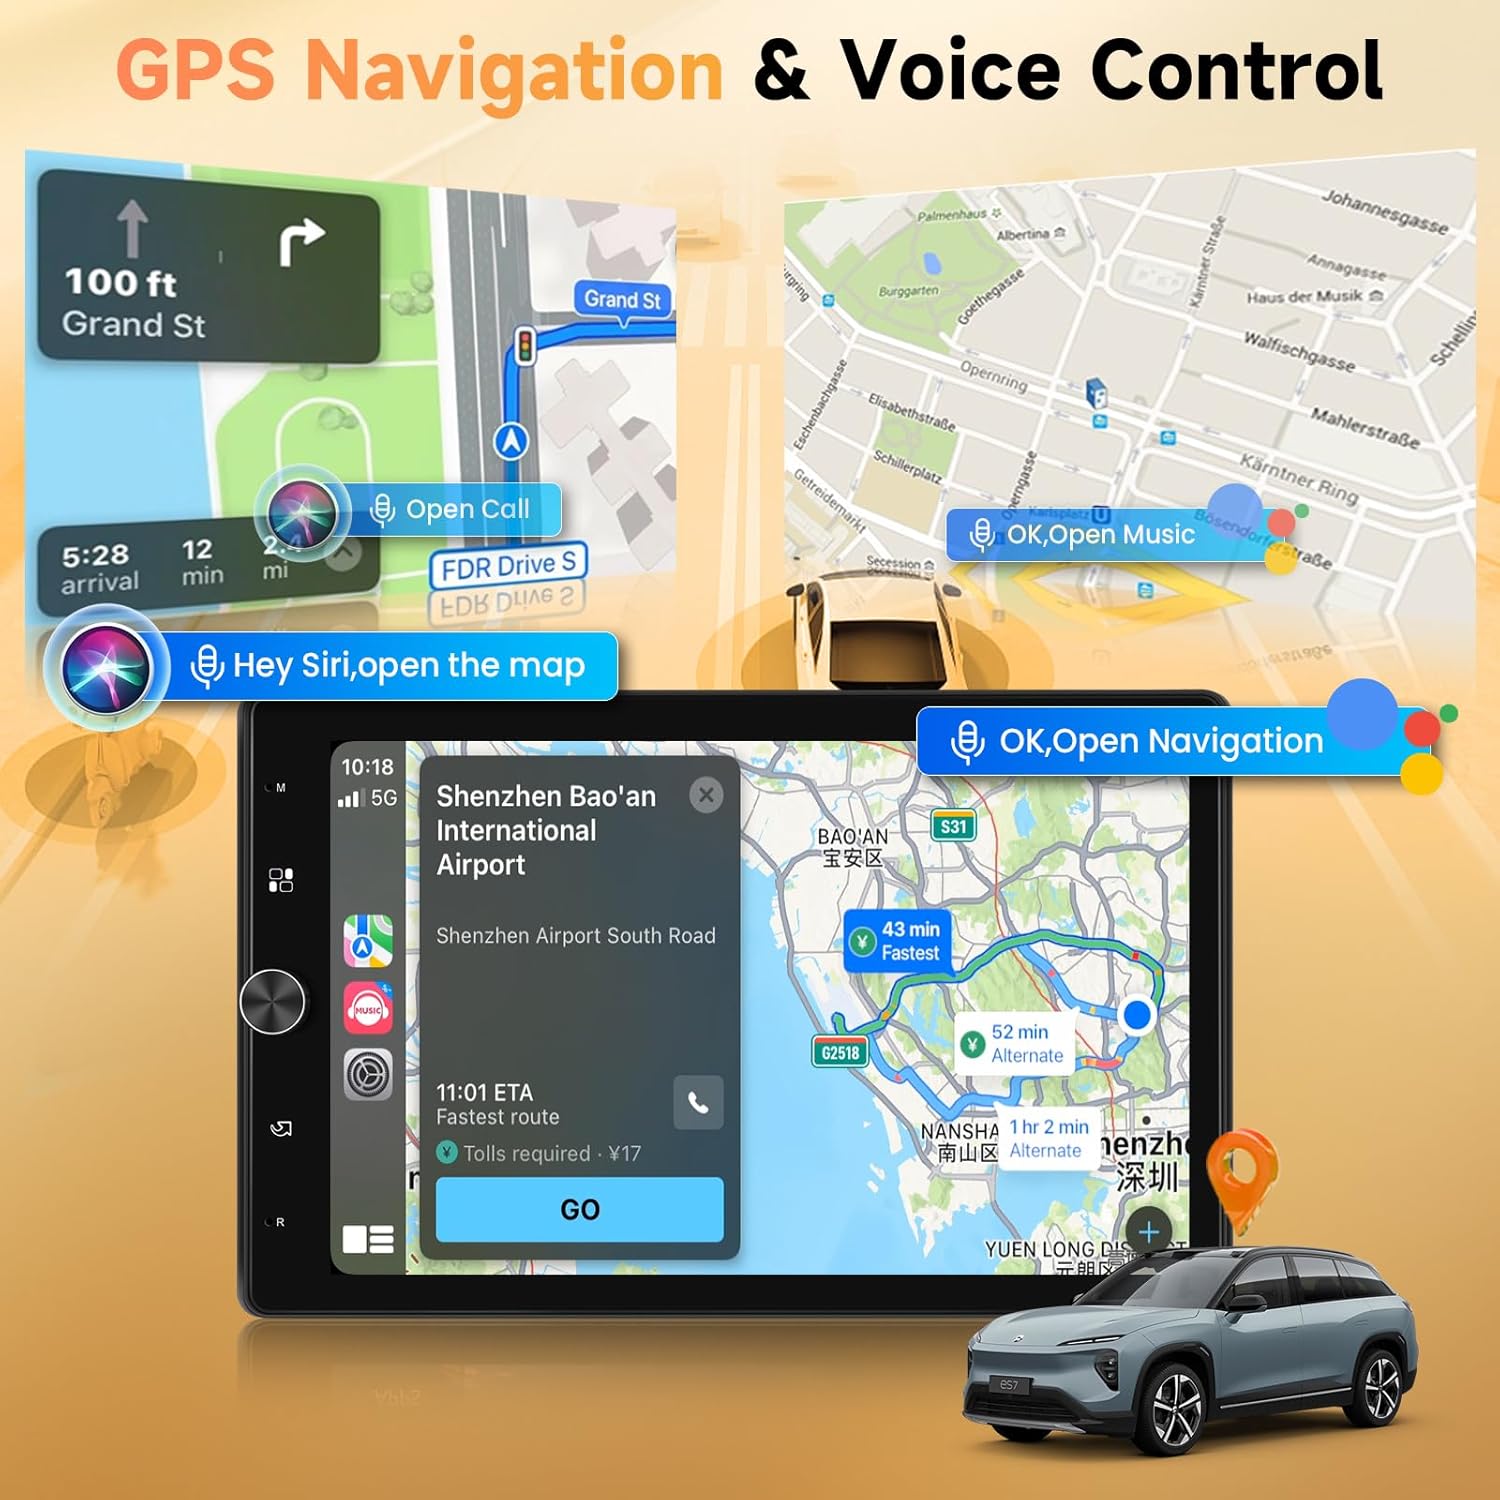
Figure 11: Voice control for navigation and other functions.
8. USB/AUX/TF Card Playback
The unit supports media playback from USB drives, AUX input, and TF (MicroSD) cards. Insert your storage device into the corresponding port to access your media files.

Figure 12: USB, TF Card, and AUX-in ports.
9. Backup Camera Display
When the vehicle is shifted into reverse, the stereo automatically displays the feed from the connected HD backup camera, providing a clear view of the area behind your car. The camera features night vision and a 170° view angle.
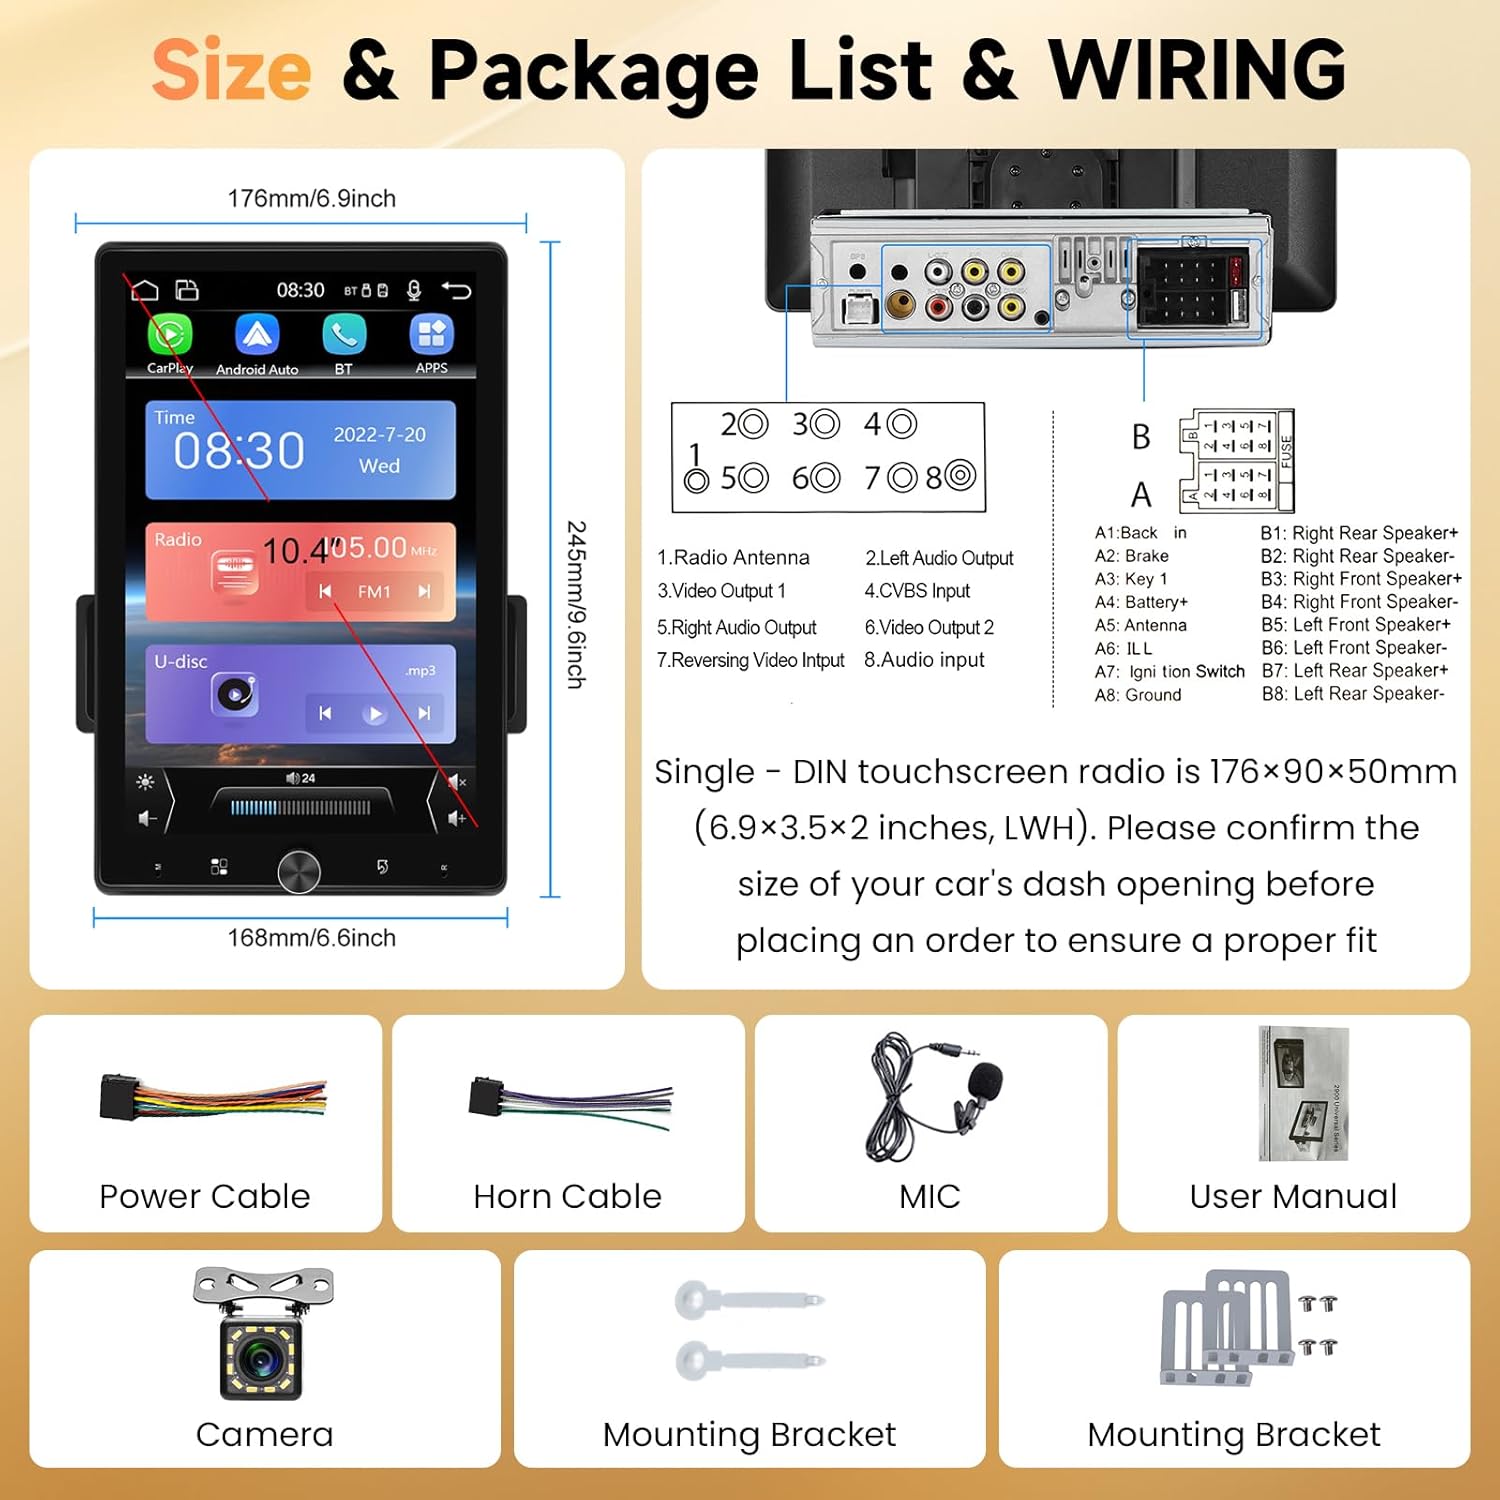
Figure 13: Backup camera display and features.
10. Dash Cam Support
The unit supports connection to an external car driving recorder (dash cam), which can be purchased separately. This allows you to record your driving for added safety and evidence.

Figure 14: Dash Cam integration.
Specifications
| Feature | Detail |
|---|---|
| Model Name | B0CL54GCTW |
| Display Size | 10.4 Inches |
| Display Resolution | 1280*800 |
| Connectivity Technology | Bluetooth 4.2, USB, AUX, TF Card |
| Special Features | 10.4 inch Touchscreen, Manual Rotated Touch Screen, Wired Carplay/Android Auto, Mirror Link, Voice Control, 16-Band EQ, FM Radio, Backup Camera Support, Dash Cam Support |
| Audio Output Mode | Stereo |
| Mounting Type | Dashboard Mount (Single Din) |
| Installation Size (LWH) | 176 x 90 x 50 mm (6.9 x 3.5 x 2 inches) |
| Item Weight | 3.72 pounds |
| Package Dimensions | 11.89 x 9.06 x 7.05 inches |
| Manufacturer | METEESER |
Troubleshooting
If you encounter issues with your METEESER car stereo, please refer to the following common solutions:
- No Power: Check all power connections, including the battery+, ignition switch, and ground wires. Ensure the fuse is not blown.
- No Sound: Verify speaker connections. Check audio settings (volume, EQ, balance, fader). Ensure the correct audio source is selected.
- Bluetooth Connection Issues: Ensure Bluetooth is enabled on both the stereo and your mobile device. Delete previous pairings and try reconnecting. Move closer to the unit.
- CarPlay/Android Auto Not Working: Ensure your phone is connected via a quality USB cable. Check your phone's settings for CarPlay/Android Auto permissions. Try a different USB port if available.
- Backup Camera Not Displaying: Check the video input connection and the power supply to the camera. Ensure the reversing signal wire is correctly connected to the stereo.
- Screen Unresponsive: Try restarting the unit. If the issue persists, a factory reset might be necessary (refer to advanced settings in the on-screen menu).
For further assistance, please contact customer support.
Warranty and Support
Your METEESER Car Stereo comes with a 2-Year Warranty. METEESER also provides Lifetime Technical Support to ensure your satisfaction.
Contacting Support:
If you require technical assistance or have questions, please contact METEESER Tech customer service.
- Locate the seller "METEESER Tech" on the product purchase page.
- Click on the "Ask a question" button to send an email to support.
Alternatively, you may reach out via email: asd85hk@163.com


Figure 15: Support contact methods and warranty information.

