BIELMEIER BCSK-4P5
BIELMEIER Electric Staple Gun User Manual
Model: BCSK-4P5 | Brand: BIELMEIER
1. Introduction
The BIELMEIER 2-in-1 Electric Staple Gun and Brad Nailer is a versatile and user-friendly tool designed for various home improvement, upholstery, carpentry, and DIY projects. This cordless device offers convenience and efficiency, eliminating the need for compressors, hoses, or wires. Its lightweight and compact design ensures comfortable use for extended periods.

Image Description: The main product image displays the white and black BIELMEIER Electric Staple Gun alongside its accessories, including staples, brad nails, a staple remover, and a USB-C charging cable.

Image Description: This image highlights the advantages of the electric staple gun, such as being rechargeable, versatile, easy to use, efficient, powerful, and safe, contrasting them with the disadvantages of manual staplers like muscle fatigue, time consumption, and unreliable precision.
2. Package Contents
Your BIELMEIER Electric Staple Gun package includes the following items:
- BIELMEIER 2-in-1 Electric Staple Gun / Brad Nailer
- 1200 x T50 Staples (1/4 - 9/16 inch)
- 400 x 18 GA Brad Nails (9/16 - 5/8 inch)
- Staple Remover
- USB Type-C Charging Cable
- User Manual
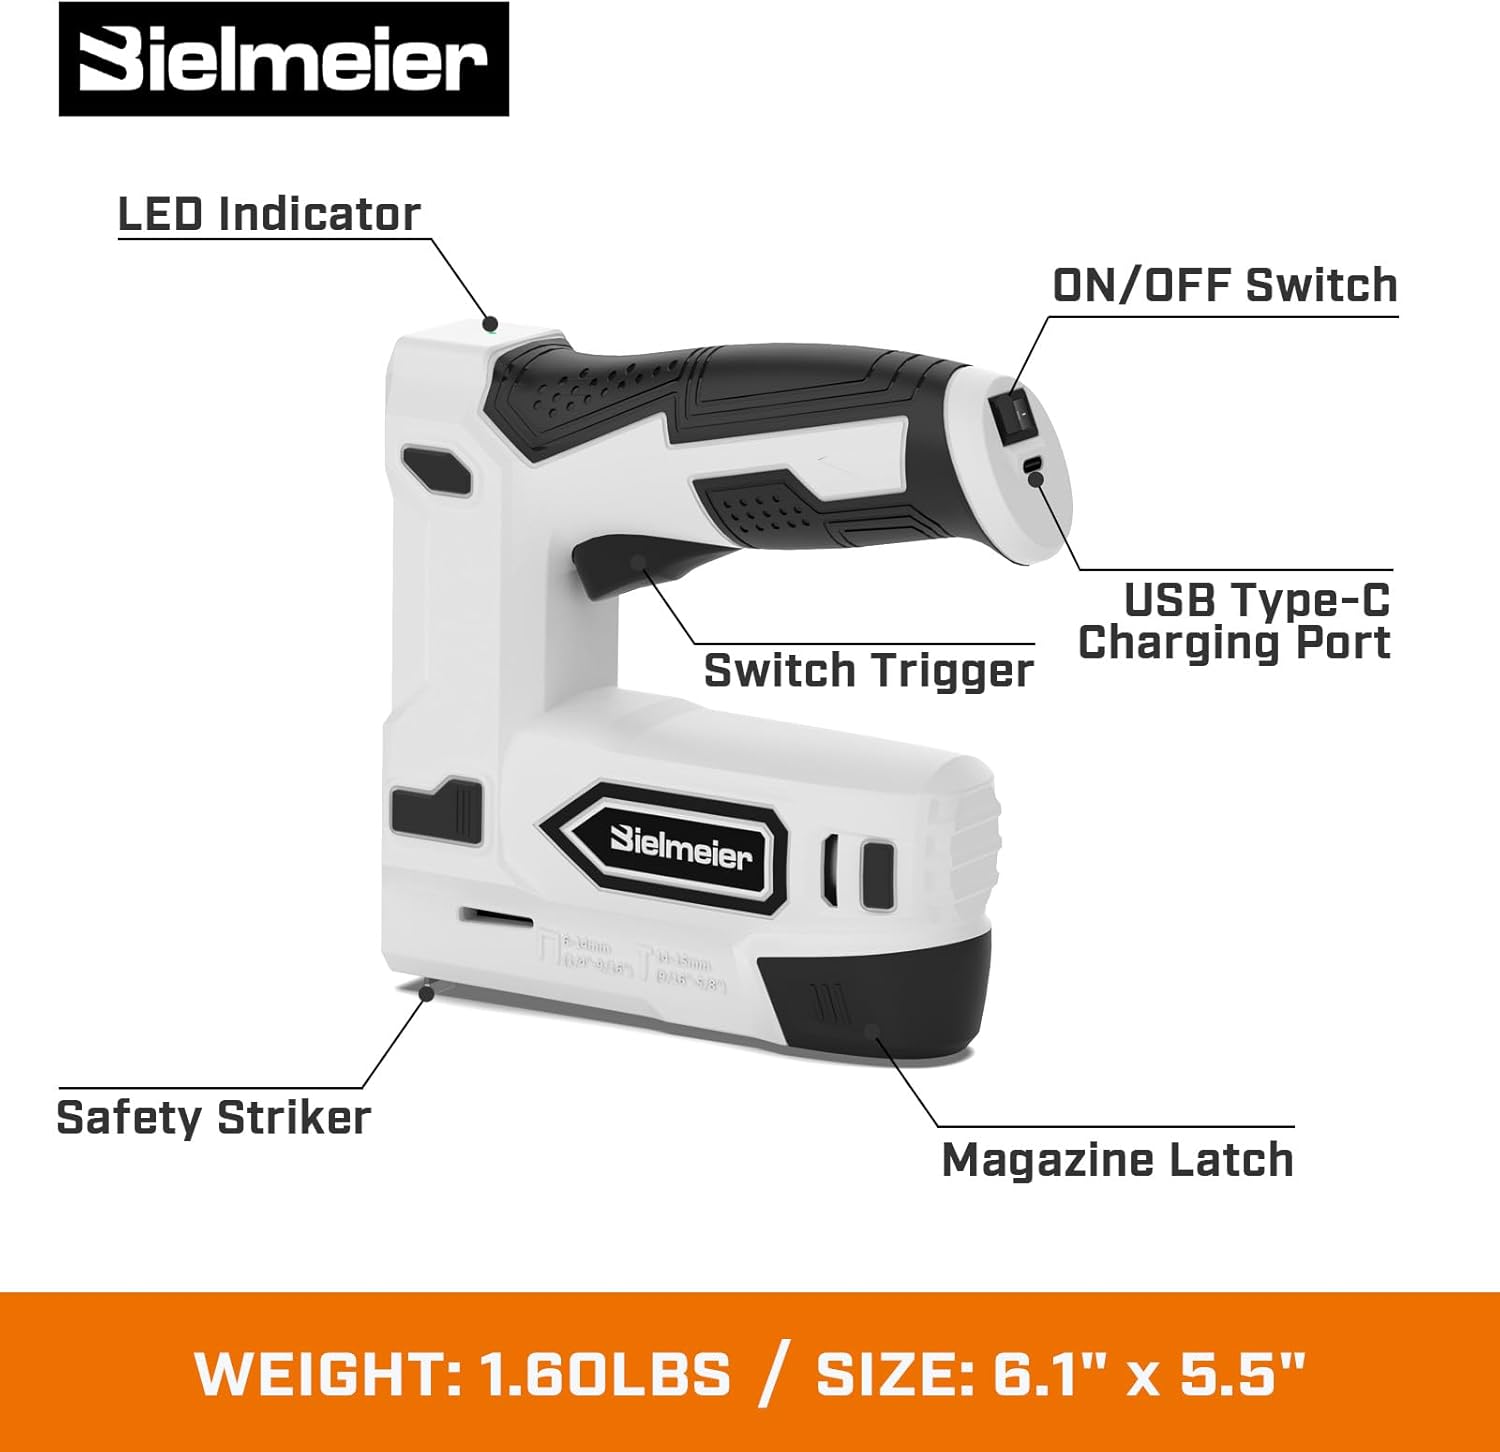
Image Description: A detailed diagram of the electric staple gun with key components labeled: LED Indicator, ON/OFF Switch, USB Type-C Charging Port, Switch Trigger, Safety Striker, and Magazine Latch. The image also indicates the tool's weight (1.6lbs) and size (6.1" x 5.5").

Image Description: This image visually confirms the inclusion of 1200 T50 staples and 400 18GA brad nails, along with the staple gun and remover, emphasizing the comprehensive kit.
3. Safety Instructions
To ensure safe operation and prevent accidental firing, the BIELMEIER Electric Staple Gun is equipped with three safety switches:
- Power On/Off Button: Located on the handle, this switch controls the main power to the device. Always turn the power switch off (position "0") when not in use or during charging.
- Contact Striker: The tool will only fire when the contact striker at the nose of the gun is fully depressed against the work surface.
- Activate Trigger: The trigger can only be engaged when the contact striker is depressed.
When the contact striker is fully depressed and the tool is ready to fire, an LED indicator light will turn green, signaling safe operation. Always wear appropriate personal protective equipment, such as safety glasses, when operating the staple gun.

Image Description: This diagram visually explains the optimal usage, showing how the safety striker must be fully depressed against the surface for the LED indicator to light up green, indicating readiness to fire.
4. Setup
4.1 Charging the Battery
The BIELMEIER Electric Staple Gun is powered by a 1,500mAh lithium-ion battery. To charge the device:
- Ensure the power switch is in the "0" (off) position.
- Connect the USB Type-C charging cable to the charging port on the tool's handle.
- Connect the other end of the USB cable to a compatible USB power source (e.g., wall adapter, computer USB port).
- The charging LED indicator will illuminate to show charging status. A full charge typically takes approximately 2 hours.
Important: Do not use the staple gun during charging.
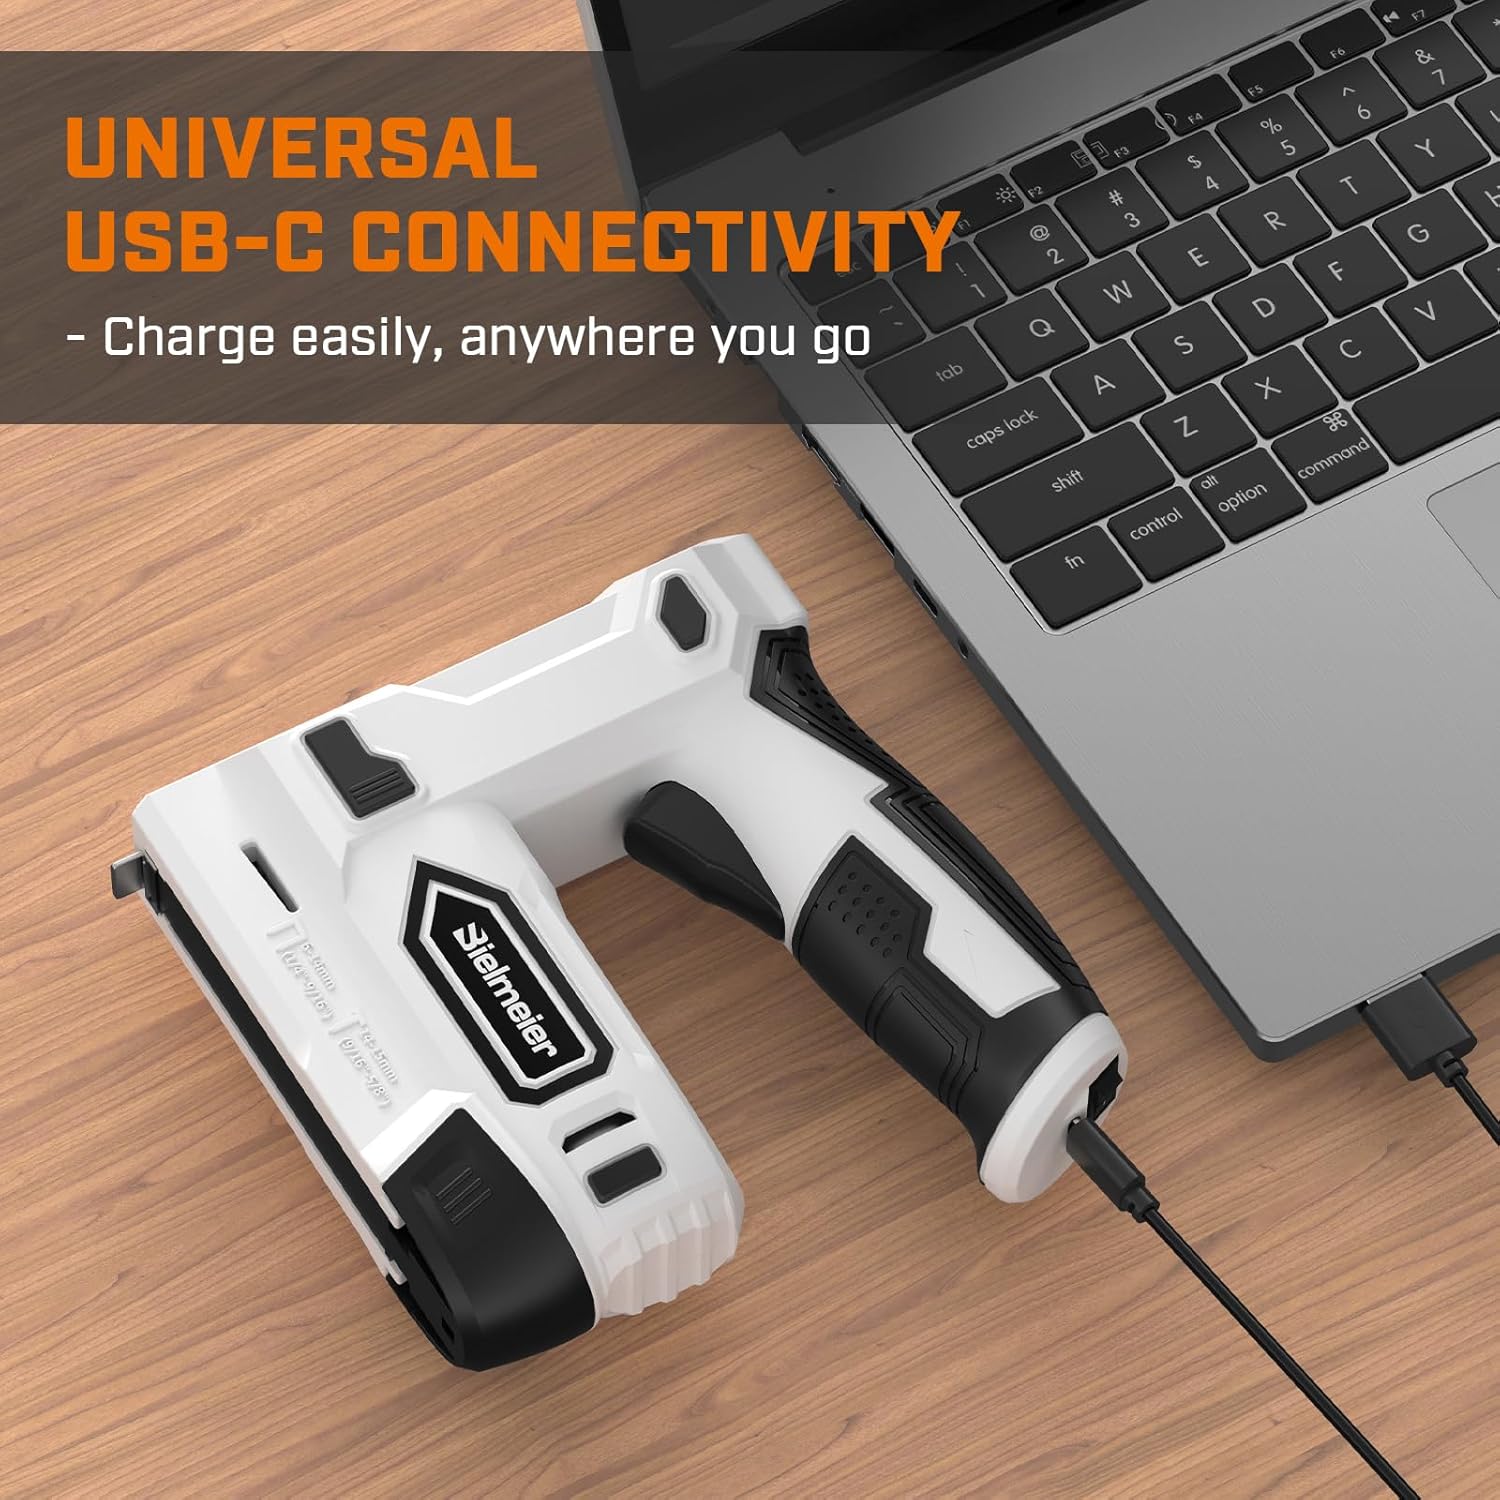
Image Description: The electric staple gun is shown connected to a laptop via its USB-C port, illustrating its universal charging capability.

Image Description: This image provides a close-up view of the USB-C charging port and the LED indicator, which signals when the battery is fully charged.
4.2 Loading Staples and Nails
The tool features a quick-release bottom loading magazine for easy installation of fasteners. It is compatible with T50 staples (1/4 - 9/16 inch) and 18 GA brad nails (9/16 - 5/8 inch).
- Squeeze the pusher assembly and pull it out from the bottom of the magazine.
- For staples, place the staple strip into the magazine with the points facing upwards.
- For nails, place the nail strip into the left side of the magazine with the sharp edge pointing upwards.
- Push the pusher assembly back into the magazine until it locks securely into place.

Image Description: A step-by-step visual guide demonstrating the process of loading staples into the gun's bottom-loading magazine.

Image Description: This image provides a more detailed visual breakdown of the loading process for both staples and nails, showing the correct orientation for each.

Image Description: A visual representation of the compatible sizes for 18GA brad nails (9/16"-5/8" or 14-15mm) and T50 staples (1/4"-9/16" or 6-14mm).
5. Operating Instructions
Once the battery is charged and fasteners are loaded, you can begin using your BIELMEIER Electric Staple Gun:
- Turn the power switch to the "I" (on) position.
- Place the nose of the staple gun firmly against the work surface. Ensure the contact striker is fully depressed. The LED indicator will turn green when ready.
- Press the activate trigger to fire a staple or nail.
- Release the trigger and lift the tool from the surface.
The tool can consistently shoot up to 850 staples per charge and fire up to 50 pins per minute, making it efficient for various tasks.

Image Description: The image shows the staple gun in action, demonstrating its capability to continuously fire up to 850 staples on a single charge into a wooden surface.
5.1 Official Product Video
Video Description: This official video from the seller, Pop Store US, demonstrates the key features and operation of the Bielmeier 4V Staple Gun (Model BCSG-4K), including loading staples and firing into various materials. It highlights the tool's ease of use and cordless convenience.
6. Maintenance
Regular maintenance ensures the longevity and optimal performance of your staple gun:
- Cleaning: Keep the tool clean and free from dust and debris. Use a dry cloth to wipe down the exterior. Avoid using harsh chemicals or abrasive cleaners.
- Storage: Store the staple gun in a dry, cool place, away from direct sunlight and moisture. Ensure the power switch is off before storing.
- Staple Jams: If a jam occurs, use the included staple remover to carefully clear the jammed fasteners. The transparent window allows for easy monitoring of staple levels to prevent unexpected jams.
7. Troubleshooting
If you encounter issues with your staple gun, refer to the following common troubleshooting tips:
- Tool Not Firing:
- Check if the power switch is in the "I" (on) position.
- Ensure the contact striker is fully depressed against the work surface and the LED indicator is green.
- Verify that the battery is sufficiently charged. Recharge if necessary.
- Check for any jammed staples or nails in the magazine.
- Staples/Nails Not Fully Driven:
- Ensure the tool is held firmly and pressed flush against the work surface when firing.
- Verify that you are using the correct type and size of fasteners for your material.
- The tool is designed for light to medium-duty tasks. Very hard materials may require a more powerful tool.
For persistent issues not covered here, please contact BIELMEIER customer support.
8. Specifications
| Feature | Specification |
|---|---|
| Brand | BIELMEIER |
| Model Number | BCSK-4P5 |
| Power Source | 4V Max Lithium Ion Battery (1500mAh) |
| Charging Time | Approx. 2 hours |
| Staple Compatibility | T50 Staples (1/4 - 9/16 inch / 6-14mm) |
| Nail Compatibility | 18 GA Brad Nails (9/16 - 5/8 inch / 14-15mm) |
| Continuous Firing (Staples) | Up to 850 per charge |
| Firing Rate (Pins) | Up to 50 per minute |
| Item Weight | 1.6 lbs (approx. 2.48 pounds packaged) |
| Material Type | Aluminum, Plastic |
| Package Dimensions | 7.48 x 6.85 x 2.24 inches |
9. Warranty and Support
For information regarding product warranty, returns, or technical support, please refer to the contact information provided with your purchase or visit the official BIELMEIER website. Keep your purchase receipt for any warranty claims.
Ask a question about this manual
Ask about setup, troubleshooting, compatibility, parts, safety, or missing instructions. Manuals+ will review the question and use this page’s manual context to help answer it.