Sunrosa 3476G
Sunrosa Frameless Glass Shower Panel User Manual
Model: 3476G | Brand: Sunrosa
1. Product Overview
The Sunrosa Frameless Glass Shower Panel is designed to provide a modern and functional addition to your bathroom. This fixed shower glass panel features a sleek frameless design, 3/8" (10mm) clear tempered glass, and integrated shelving for convenience. It is suitable for walk-in shower installations and offers reversible installation for flexible layout options.
Key features include:
- Dimensions: Adjustable width from 33 5/8" to 34", height of 76".
- Premium Craftsmanship: High-quality aluminum alloy and 3/8" (10mm) clear easy-clean tempered glass, ANSI certified.
- Convenient Shelf Design: Two adjustable-height shelves inside and one large fixed shelf outside, plus a central opening for hanging towels.
- Enhanced Water Control: Helps minimize water spills compared to traditional shower curtains.
- Reversible Installation: Can be installed for both right or left wall configurations.

Image 1.1: The Sunrosa Frameless Glass Shower Panel installed in a contemporary bathroom, showcasing its clear glass and brushed gold accents.
2. Safety Information
Please read all instructions carefully before installation and use. Failure to follow these instructions may result in injury or product damage.
- Always wear appropriate personal protective equipment (PPE) during installation, including safety glasses and gloves.
- Tempered glass, while strong, can shatter if struck at the edges or corners. Handle with extreme care.
- Ensure the installation surface (wall) is structurally sound and capable of supporting the weight of the glass panel.
- Do not overtighten screws, as this can damage the glass or hardware.
- Keep children and pets away from the installation area.
- If any parts are damaged or missing, do not proceed with installation. Contact customer support immediately.

Image 2.1: Detail of the 3/8-inch (10mm) tempered glass, highlighting its safety and easy-to-clean properties.
3. Package Contents
Verify that all components are present and undamaged before beginning installation. If anything is missing or damaged, contact Sunrosa customer service.
| Item | Description | Quantity |
|---|---|---|
| Glass Panel | 3/8" (10mm) Tempered Glass Shower Screen | 1 |
| Wall Profile | Aluminum Alloy Wall Channel | 1 |
| Fixed Shelf | Large Aluminum Alloy Shelf (for outside) | 1 |
| Adjustable Shelves | Smaller Aluminum Alloy Shelves (for inside) | 2 |
| Hardware Kit | Screws, anchors, gaskets, silicone sealant (not always included, check packaging) | 1 Set |
4. Setup and Installation
4.1. Before You Begin
- Measure Accurately: Ensure your shower opening dimensions are within the product's adjustable range (33 5/8" to 34" width, 76" height).
- Required Tools: Drill, level, tape measure, pencil, silicone gun, caulk, screwdriver set, safety glasses, gloves.
- Clear the Area: Remove any obstacles from the shower area.
- Review Diagrams: Familiarize yourself with the installation diagrams provided.
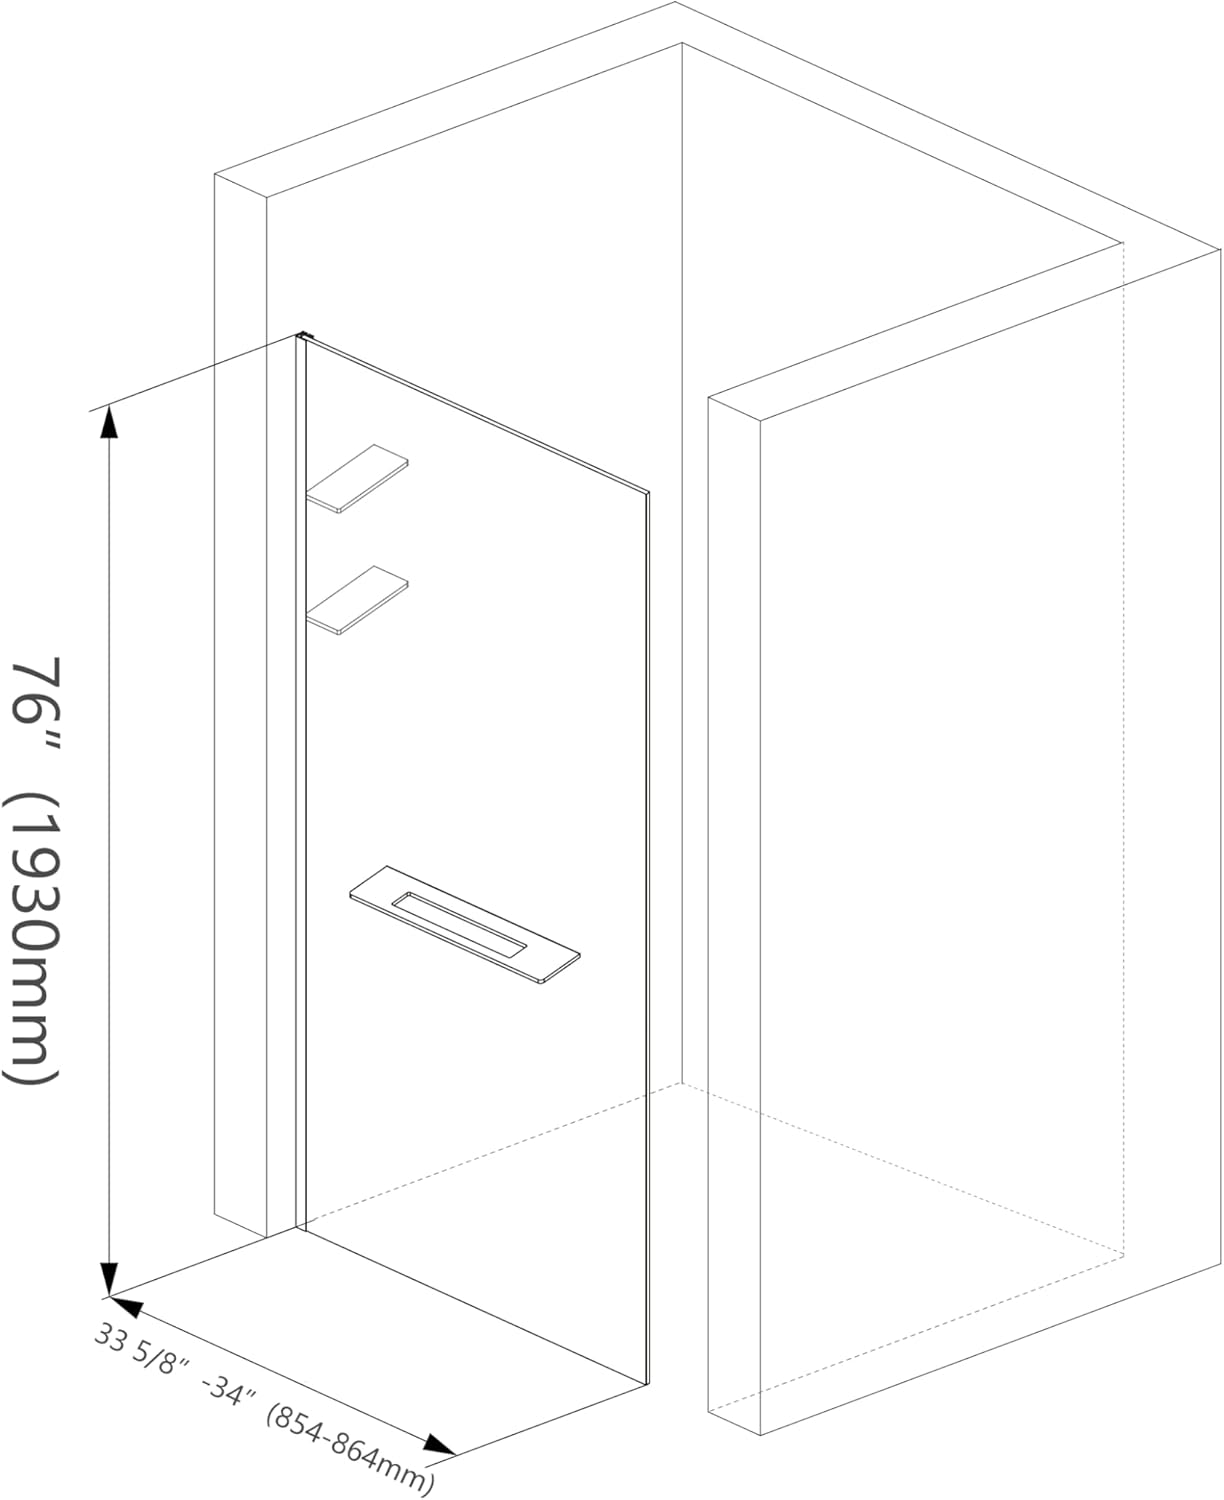
Image 4.1: Dimensional diagram of the Sunrosa shower panel, indicating its height and adjustable width.
4.2. Installation Steps
- Prepare the Wall: Using a level, mark a vertical line on the wall where the wall profile will be installed. Ensure it is perfectly plumb.
- Install Wall Profile: Position the aluminum wall profile along the marked line. Mark the drilling points through the pre-drilled holes in the profile. Drill holes and insert wall anchors. Secure the wall profile to the wall using the provided screws.
- Insert Glass Panel: Carefully lift the glass panel and slide its edge into the installed wall profile. Ensure the glass is fully seated and level.
- Secure Glass Panel: Secure the glass panel within the wall profile using the set screws or clips as per the specific hardware design. Do not overtighten.
- Install Shelves:
- Fixed Shelf: Attach the large fixed shelf to the designated slot on the outside of the glass panel.
- Adjustable Shelves: Insert the two smaller adjustable shelves into the slots on the inside of the glass panel. Adjust their height as desired and secure them.
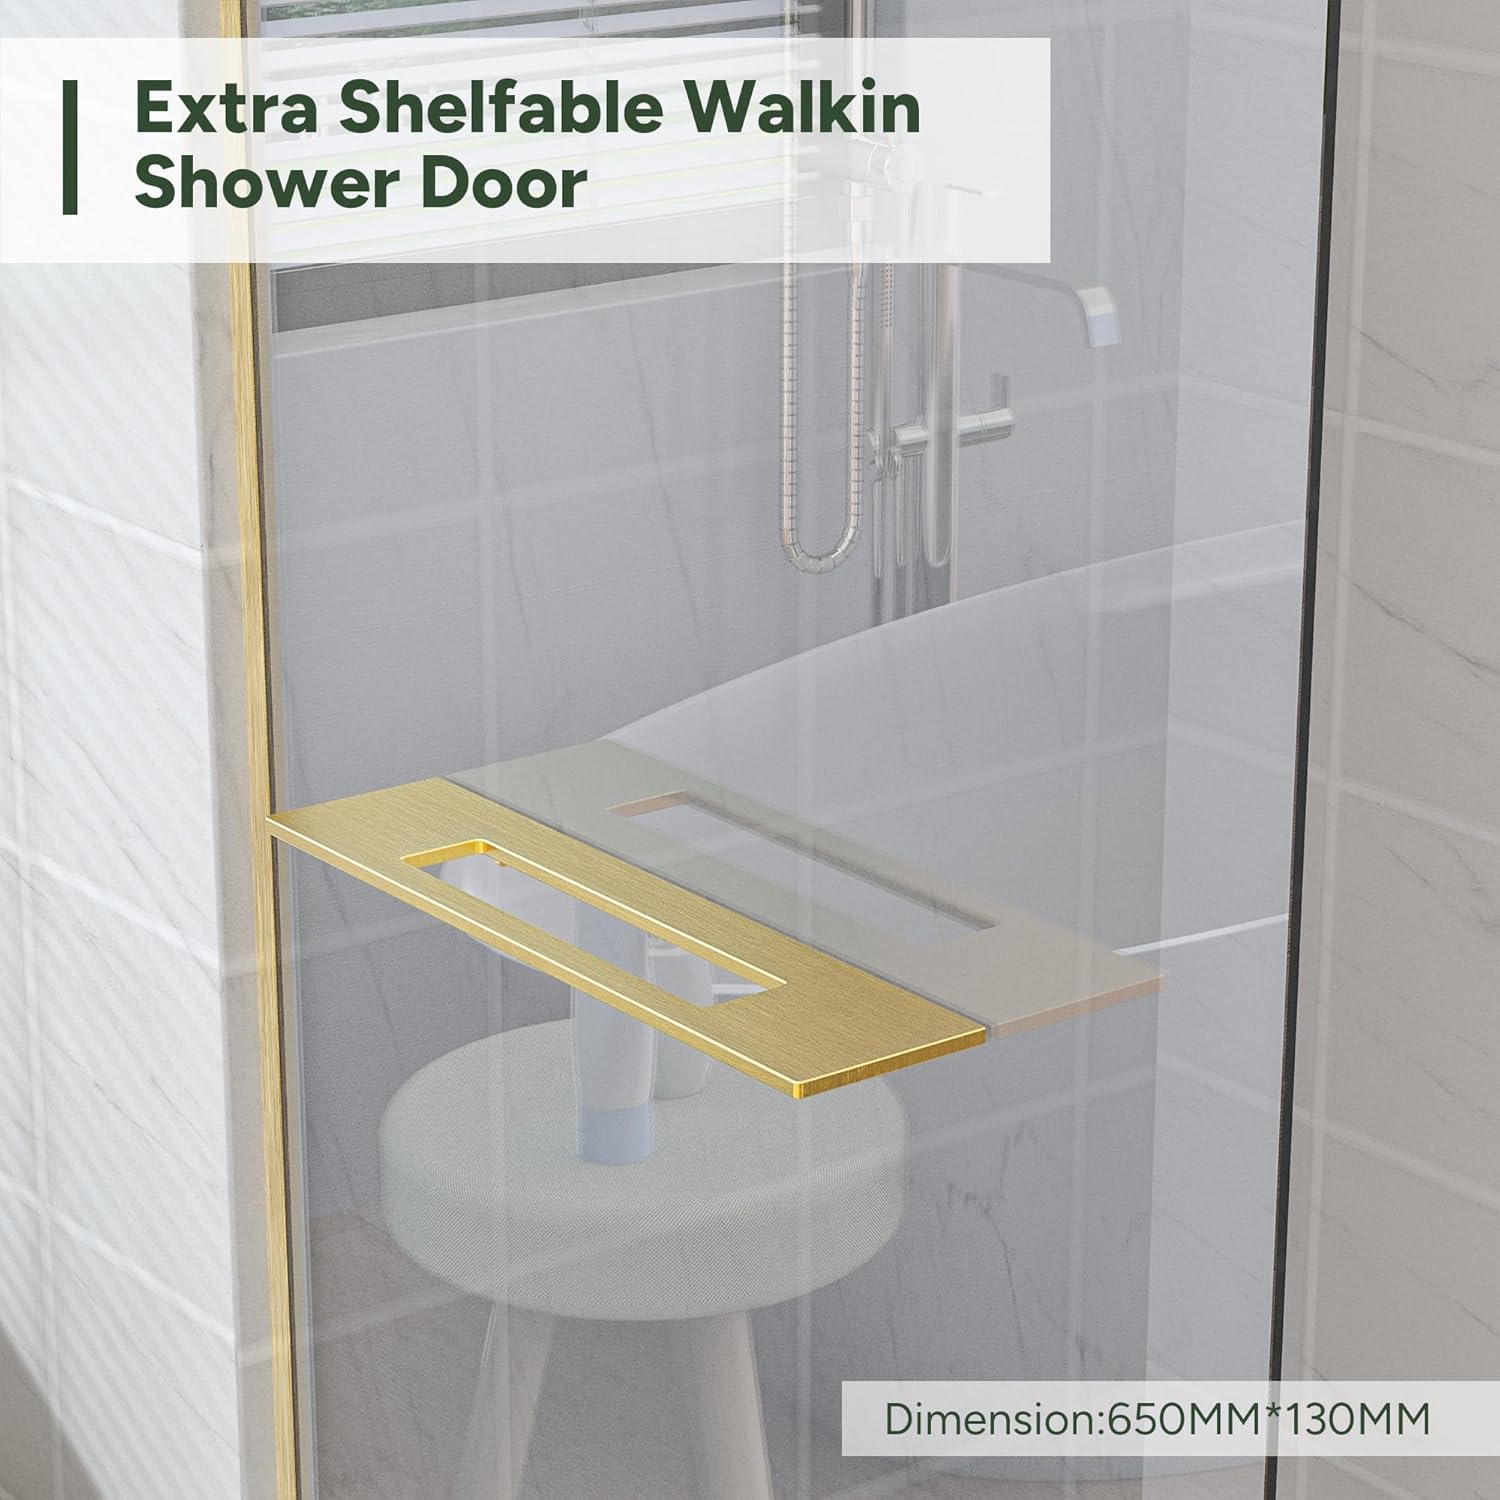
Image 4.2.1: Detail of the large fixed shelf, designed for convenient access to items like phones or speakers.

Image 4.2.2: Illustration of the two adjustable shelves, demonstrating their height flexibility for various bath products.
- Apply Silicone Sealant: Apply a continuous bead of high-quality silicone sealant along all exterior seams where the glass meets the wall and the shower base. Allow adequate drying time before using the shower (typically 24-48 hours, refer to sealant instructions).
- Reversible Installation: The panel is designed for reversible installation, allowing it to be mounted on either the left or right side of your shower opening.

Image 4.2.3: Diagram showing the reversible nature of the shower panel, allowing for left or right-hand installation.
5. Operating Instructions
The Sunrosa Frameless Glass Shower Panel is a fixed installation designed for walk-in showers. Its primary function is to contain water within the shower area while providing an open and accessible entry.
- Water Containment: The panel is designed to minimize water splashing outside the shower area. For optimal performance, ensure proper shower head placement and water pressure.
- Shelf Usage: Utilize the integrated shelves for storing bath products. The two adjustable shelves inside can be positioned at your preferred height. The fixed shelf outside is ideal for items like a phone or speaker, keeping them dry and accessible.
- Towel Hanging: The central opening on the panel serves as a convenient towel bar.
6. Maintenance and Care
Proper care will ensure the longevity and pristine appearance of your Sunrosa shower panel.
- Glass Cleaning: Clean the tempered glass regularly with a soft cloth and a non-abrasive glass cleaner. For best results and to prevent water spots, wipe down the glass after each use. Avoid harsh chemicals, abrasive pads, or scouring powders, as these can damage the glass or its easy-clean coating.
- Hardware Cleaning: Clean the aluminum alloy profiles and shelves with a soft, damp cloth. For stubborn spots, use a mild soap solution. Do not use abrasive cleaners or solvents, which can damage the finish.
- Silicone Sealant: Periodically inspect the silicone sealant for any signs of wear, cracking, or mold. Reapply sealant as necessary to maintain a watertight seal.
- General Inspection: Regularly check all screws and connections to ensure they remain tight. Do not overtighten.
7. Troubleshooting
| Problem | Possible Cause | Solution |
|---|---|---|
| Water leaking from base or wall connection. | Inadequate or damaged silicone sealant. | Ensure all seams are properly sealed with high-quality silicone. Reapply if necessary, allowing full cure time. |
| Glass panel feels wobbly or loose. | Wall profile not securely fastened or glass not properly seated. | Check that the wall profile is firmly attached to the wall. Ensure the glass panel is fully inserted and secured within the profile. Do not overtighten screws. |
| Shelves are not holding position. | Shelves not properly engaged or secured. | Ensure shelves are correctly inserted into their slots and any securing mechanisms are engaged. |
| Water spots or streaks on glass. | Hard water deposits or improper cleaning. | Clean with a non-abrasive glass cleaner. Consider using a squeegee after each shower to minimize water spots. |
8. Specifications
- Brand: Sunrosa
- Model Number: 3476G
- Dimensions: 0.24 x 34 x 75.98 inches (Glass thickness: 3/8" or 10mm)
- Adjustable Width: 33 5/8" to 34"
- Height: 76"
- Material: Tempered Glass, Aluminum Alloy
- Color: Brushed Gold
- Style: Contemporary
- Item Weight: 94.8 pounds
- Assembly Required: Yes
- UPC: 616050968407
9. Warranty and Support
Sunrosa provides friendly after-sales service for this product. For warranty claims, technical assistance, or any questions regarding your Sunrosa Frameless Glass Shower Panel, please contact our customer support team.
Please have your model number (3476G) and purchase information ready when contacting support.
For more information, visit the official Sunrosa Store: Sunrosa Store on Amazon
Related Documents - 3476G
 |
Sunrosa NKI6121-H Frameless Sliding Shower Door Installation Guide Step-by-step installation instructions for the Sunrosa NKI6121-H frameless sliding shower door. Includes parts list, tools required, safety precautions, and detailed assembly steps. |
 |
Sunrosa NAX6222 Shower Door Installation Instructions Detailed installation guide for the Sunrosa NAX6222 frameless shower door, providing step-by-step instructions, parts list, preparation tips, and warranty information for a successful installation. |
 |
NKI6121 Shower Door Installation Instructions | Sunrosa Detailed installation guide for the Sunrosa NKI6121 sliding frameless shower door. Includes parts list, safety warnings, and step-by-step assembly instructions. |
 |
Sunrosa NKK6122 Frameless Shower Door Installation Instructions Detailed installation guide for the Sunrosa NKK6122 frameless shower door. Includes parts list, step-by-step instructions, safety precautions, and aftercare advice. |
 |
NAR6310A Shower Glass Panel Installation Instructions Detailed installation guide for the NAR6310A shower glass panel, including parts list, required tools, and step-by-step assembly instructions. |
 |
Sunrosa NKK6122-1 Sliding Shower Door Installation Instructions Detailed installation guide for the Sunrosa NKK6122-1 frameless sliding shower door. Includes parts list, required tools, step-by-step assembly instructions, and aftercare advice. Ensure proper installation for a safe and functional shower enclosure. |
Ask a question about this manual
Ask about setup, troubleshooting, compatibility, parts, safety, or missing instructions. Manuals+ will review the question and use this page’s manual context to help answer it.