Introduction
This manual provides detailed instructions for the assembly, operation, and maintenance of your Vida Designs 2-Drawer Shoe Cabinet. Please read these instructions carefully before assembly and use to ensure proper function and longevity of the product. Keep this manual for future reference.
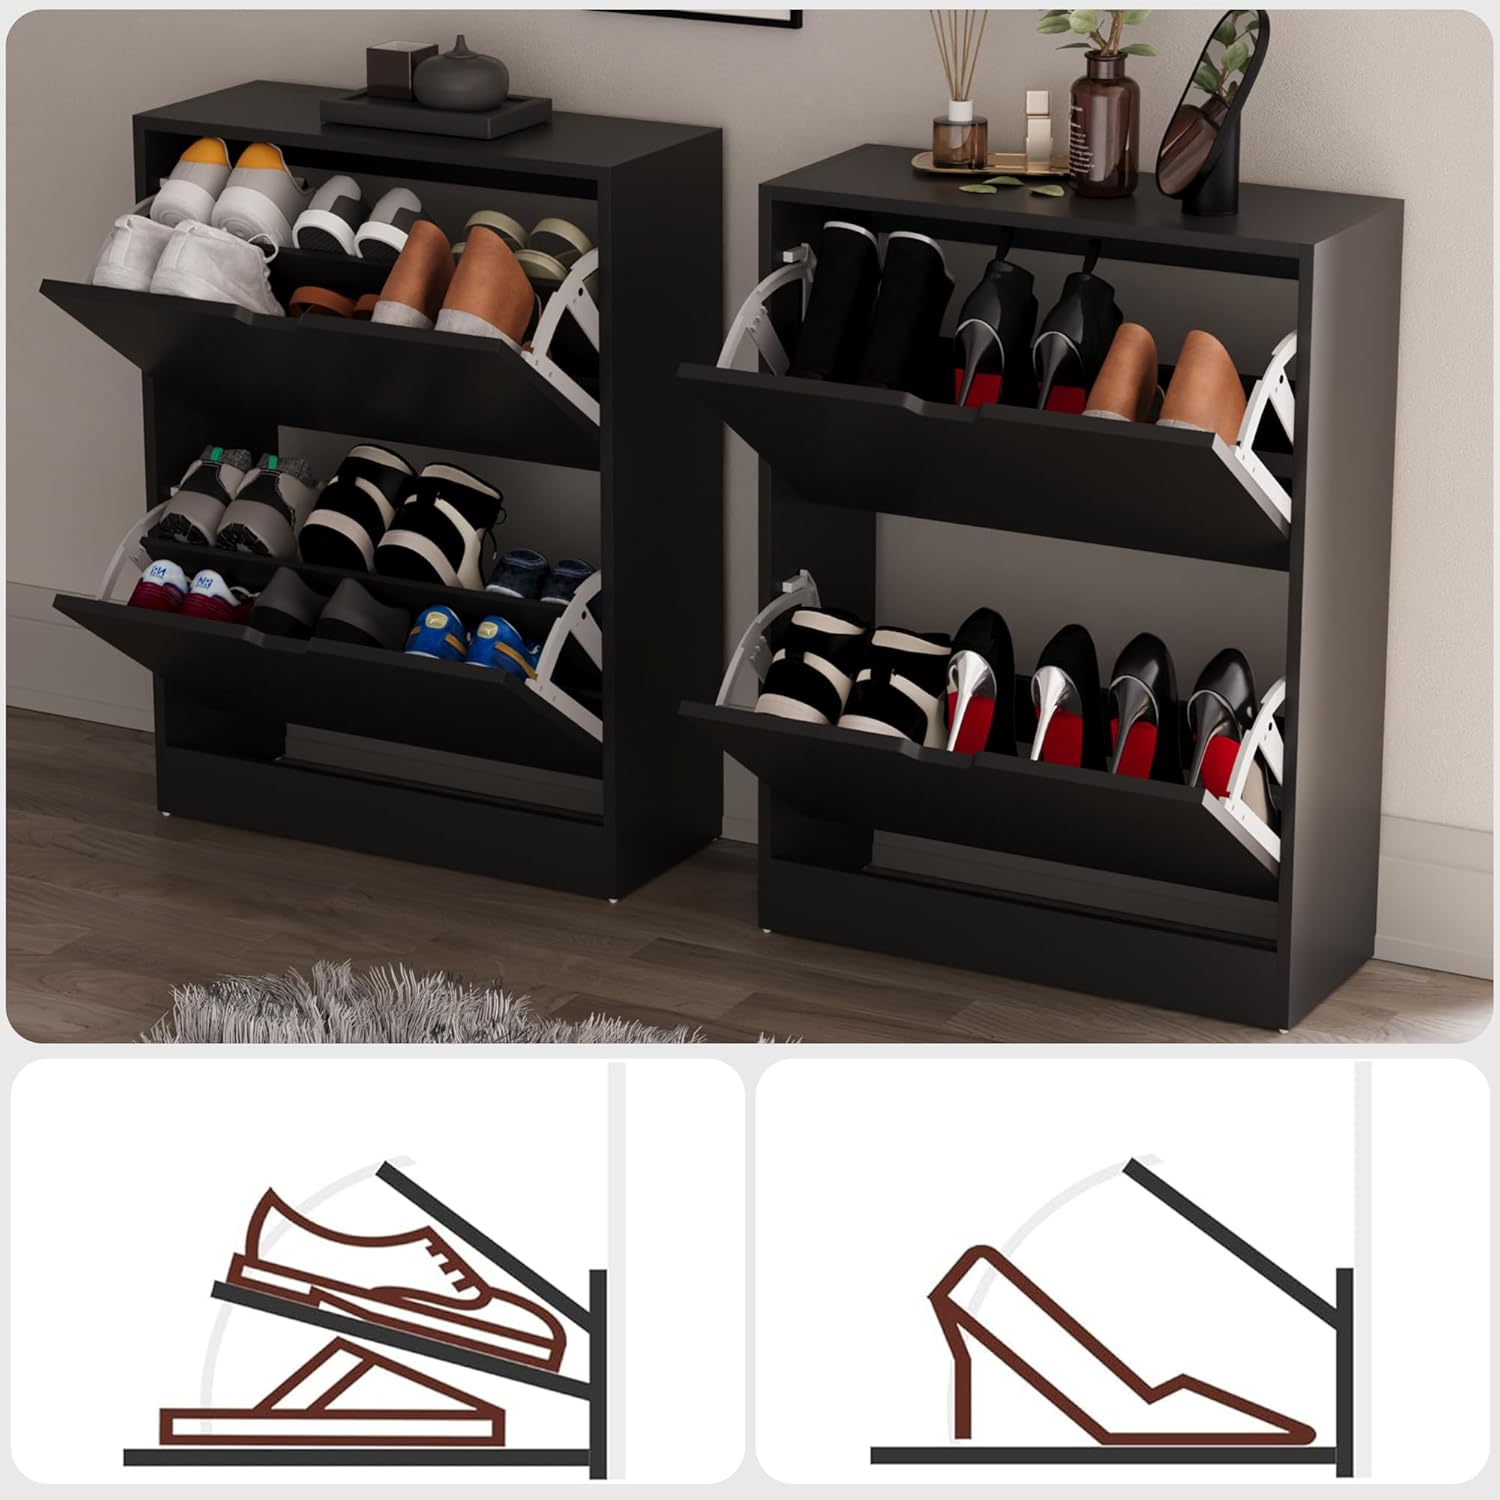
The Vida Designs 2-Drawer Shoe Cabinet is designed for efficient space utilization, offering a stylish and compact storage solution for footwear in various living spaces such as hallways, entryways, or living rooms. It features two spacious pull-down drawers with adjustable shelves to accommodate different shoe types.
Safety Information
- Always follow assembly instructions carefully.
- Ensure all fittings are securely tightened before use.
- Do not overload the drawers.
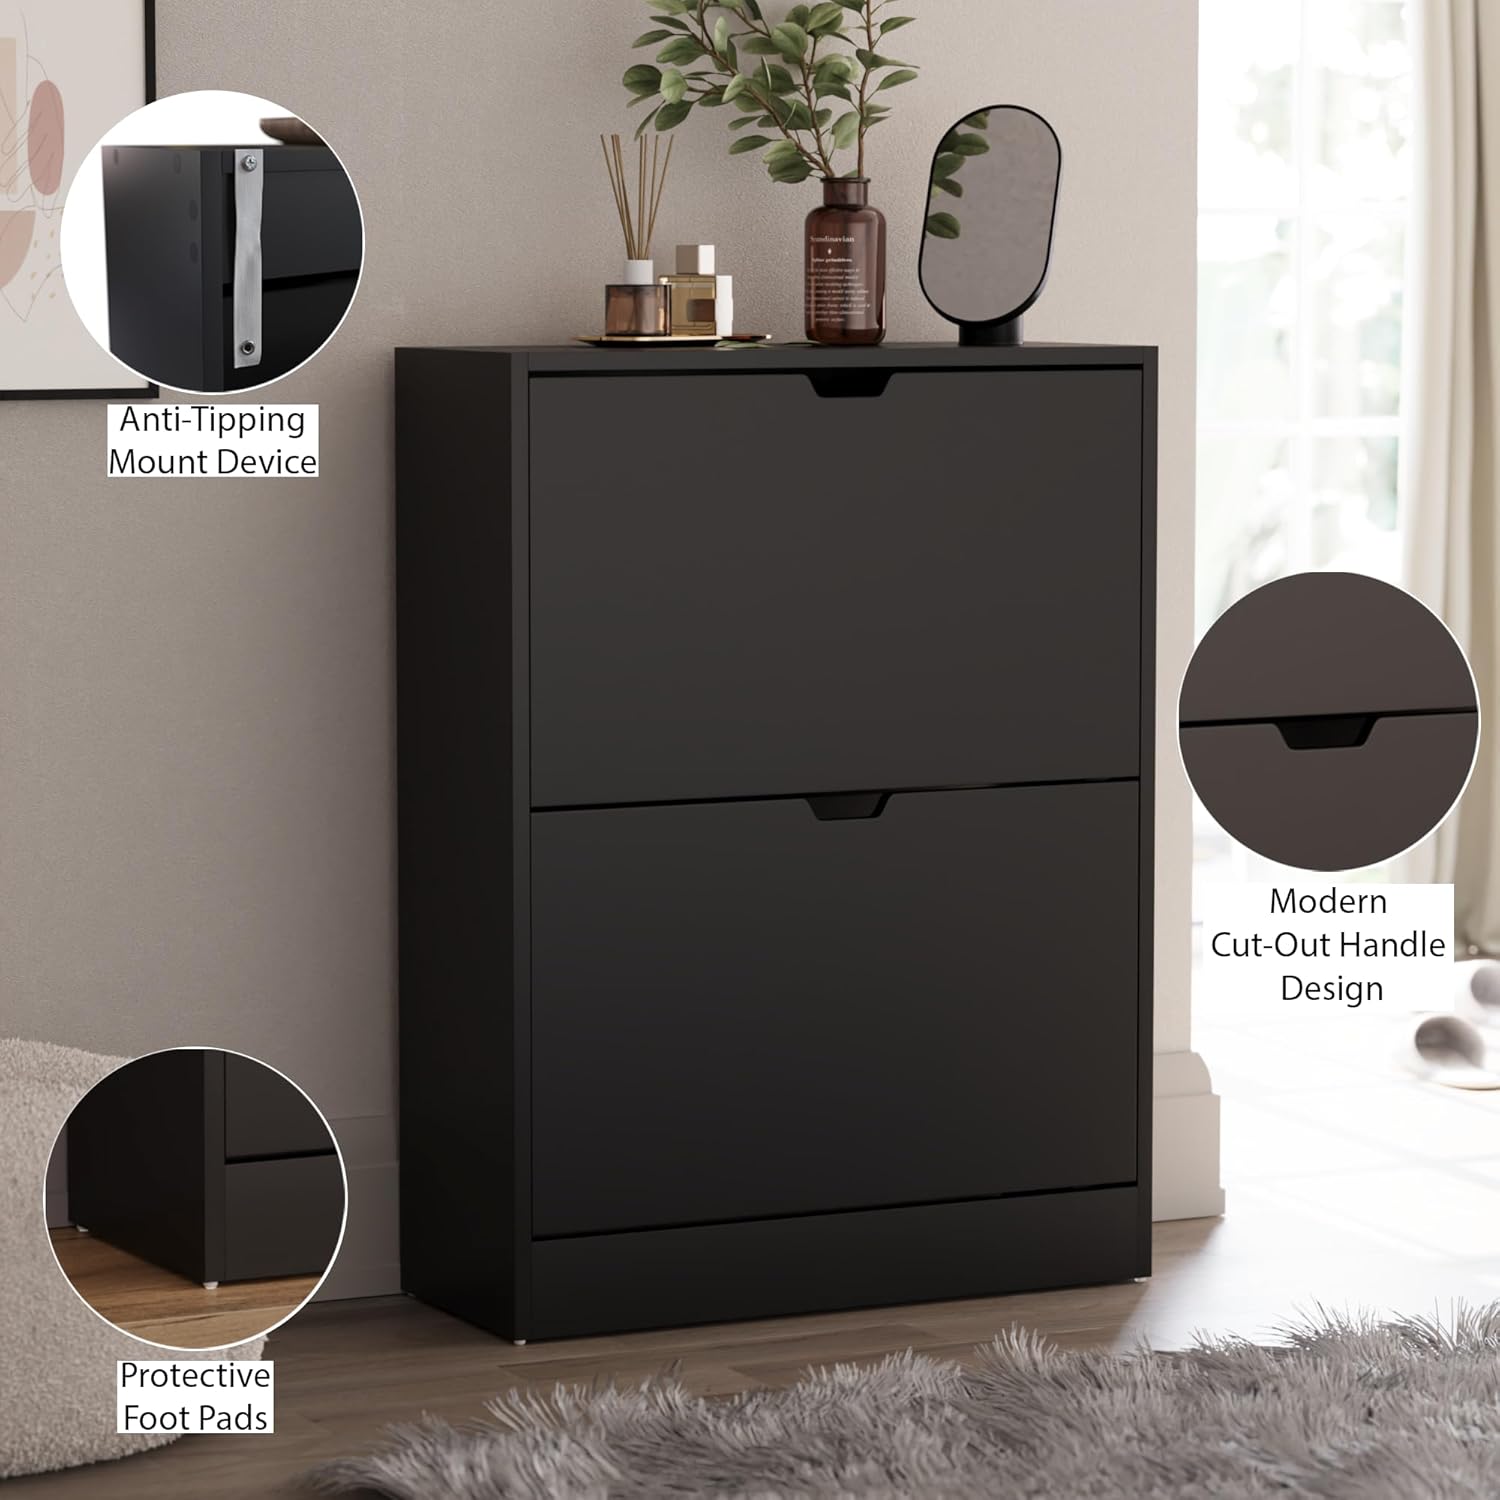
- For safety, it is recommended to use the anti-tipping device provided to secure the cabinet to a wall, especially in households with children or pets.
- Keep small parts out of reach of children during assembly.
Package Contents
Before beginning assembly, verify that all parts listed below are present and undamaged. If any parts are missing or damaged, please contact customer support.
| Part | Description | Quantity |
|---|---|---|
| Cabinet Panels | Side panels, top panel, bottom panel, back panel | Various |
| Drawer Fronts | Two pull-down drawer fronts | 2 |
| Adjustable Shelves | Internal shelves for shoe compartments | 2 |
| Hardware Pack | Screws, dowels, cam locks, drawer mechanisms, anti-tipping kit | 1 set |
Setup and Assembly
Assembly of the Vida Designs Shoe Cabinet is designed to be straightforward. Please follow these steps carefully. It is recommended to have two people for assembly.
Tools Required:
- Phillips Head Screwdriver
- Hammer (for dowels)
- Drill (for wall mounting anti-tipping device, if applicable)
Assembly Steps:
- Unpack and Identify Parts: Lay out all components on a clean, soft surface to prevent scratches. Refer to the parts list to identify each piece.
- Assemble the Main Frame: Connect the side panels to the top and bottom panels using the provided screws and dowels. Ensure cam locks are securely fastened.
- Install Back Panel: Slide or nail the back panel into the grooves or onto the back of the assembled frame.
- Attach Drawer Mechanisms: Secure the drawer tilting mechanisms to the inside of the cabinet and to the drawer fronts according to the diagrams.
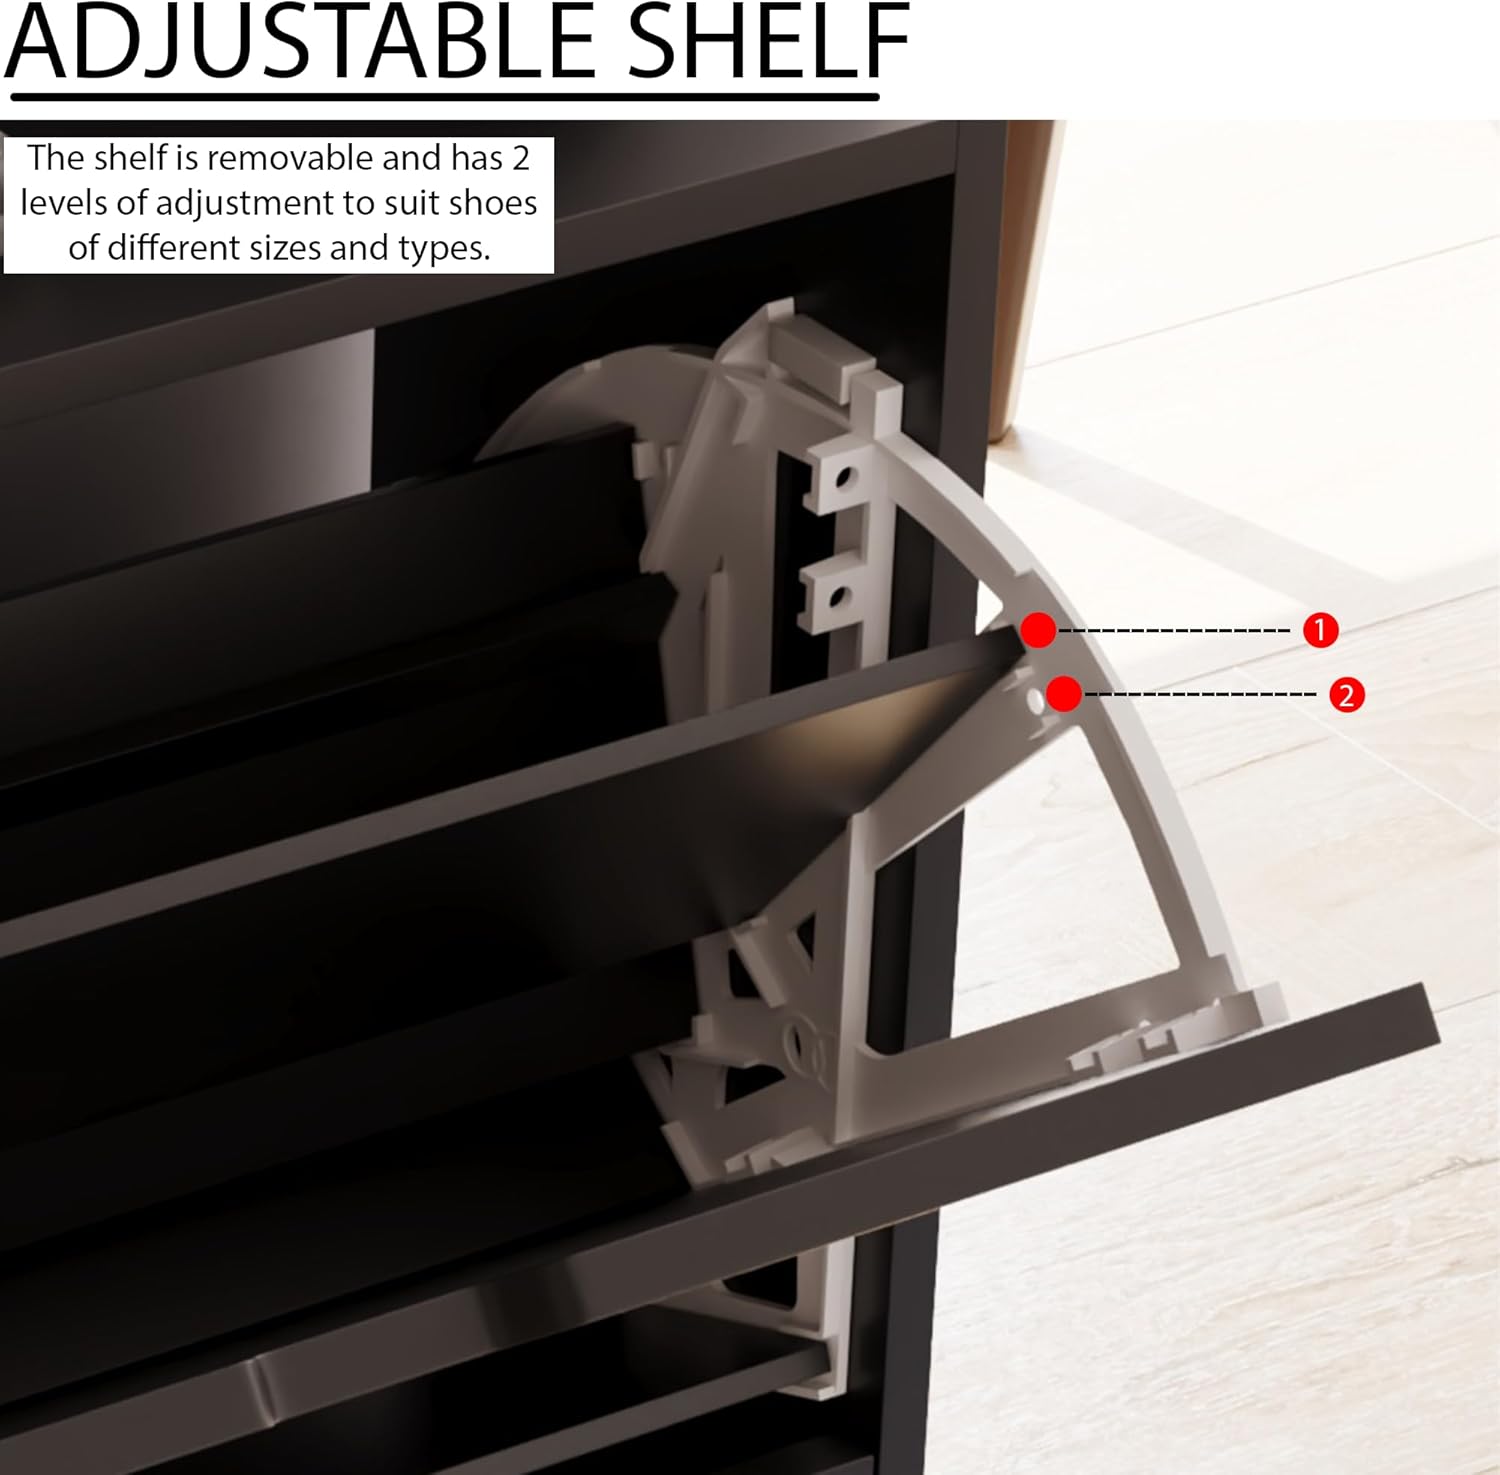
- Insert Adjustable Shelves: Place the adjustable shelves into the desired slots within each drawer compartment. These shelves can be removed or adjusted to accommodate different shoe sizes.
- Attach Drawer Fronts: Carefully attach the assembled drawer fronts with their mechanisms to the main cabinet frame.
- Install Protective Foot Pads: Affix the protective foot pads to the bottom corners of the cabinet to prevent floor scratches.
- Secure Anti-Tipping Device: For enhanced stability and safety, attach the anti-tipping device to the top rear of the cabinet and secure it to a wall stud using appropriate wall anchors (not always included, depending on wall type).


Operating Instructions
The Vida Designs Shoe Cabinet is designed for simple and intuitive use.
Storing Shoes:
- To open a drawer, gently pull the top edge of the drawer front outwards. The drawer will tilt down, revealing the shoe compartments.
- Place shoes neatly within the compartments. The adjustable shelf allows for flexible storage; remove or reposition it if needed to fit taller footwear like boots or high heels.
- To close the drawer, push the drawer front upwards until it clicks securely into place.
Adjusting Shelves:
- Open the drawer completely.
- Carefully lift the adjustable shelf from its current position.
- Reinsert the shelf into the desired set of slots to change the height of the compartments. Ensure it is securely seated.

Maintenance
Proper maintenance will ensure the longevity and appearance of your shoe cabinet.
- Cleaning: Wipe surfaces with a soft, damp cloth. Avoid abrasive cleaners or harsh chemicals, as these can damage the finish.
- Dusting: Regularly dust the cabinet with a dry, soft cloth.
- Fittings: Periodically check all screws and fittings to ensure they remain tight. Retighten if necessary.
- Placement: Avoid placing the cabinet in direct sunlight or near heat sources, as this can cause discoloration or warping of the wood material.
Troubleshooting
| Problem | Possible Cause | Solution |
|---|---|---|
| Drawers do not open/close smoothly. | Misaligned drawer mechanism or loose fittings. | Check that the drawer mechanisms are correctly installed and all screws are tightened. Ensure no obstructions are present. |
| Cabinet feels wobbly. | Loose assembly screws or uneven floor. | Retighten all assembly screws. Ensure the cabinet is on a level surface. Utilize the anti-tipping device for added stability. |
| Shoes do not fit in compartments. | Adjustable shelf is in the wrong position. | Adjust the internal shelf to a different height setting to accommodate taller footwear. |
Specifications
| Feature | Detail |
|---|---|
| Brand | Vida Designs |
| Model Number | 3331755 |
| Color | Black |
| Material | Engineered Wood |
| Product Dimensions (L x W x H) | 24 x 60 x 80 cm (9.4 x 23.6 x 31.5 inches) |
| Item Weight | 13.3 Kilograms (29.3 lbs) |
| Special Feature | Adjustable Shelf, Space-saving Design, Anti-tipping Mount Device, Protective Foot Pads, Modern Cut-Out Handle Design |
| Number of Drawers | 2 |
| Recommended Use | Shoe Storage |
| Mounting Type | Floor Mount |
| Country of Origin | China |
Warranty and Support
For any questions, missing parts, or issues not covered in this manual, please contact Vida Designs customer support. Please have your model number (3331755) and purchase information ready when contacting support.
Information regarding specific warranty terms may be available on the Vida Designs official website or through your retailer at the time of purchase. Please retain your proof of purchase for warranty claims.
Contact Information:
- Please refer to your purchase documentation or the Vida Designs official website for the most current contact details.


