Introduction
This manual provides detailed instructions for the safe and effective use of the lanema HW300-MINI Digital Coating Thickness Gauge. This instrument is designed for non-destructive measurement of coating and paint thickness on metal substrates. It is widely used in manufacturing, metal processing, chemical industry, commodity inspection, and automotive applications.
Safety Information
- Keep the device dry. Avoid exposure to moisture.
- Do not attempt to disassemble or modify the device.
- Use only the specified battery type (2 x 1.5V AAA).
- Store the device in a stable environment, away from extreme temperatures and strong magnetic fields.
- Dispose of batteries and the device according to local regulations.
Package Contents
Please check the package for the following items:
- HW300-MINI Digital Coating Thickness Gauge
- Calibration Films (e.g., 0.10mm, 0.25mm, 0.50mm, 1.00mm, 2.00mm)
- Substrate Plate (e.g., Aluminum or Steel)
- Wrist Strap
- User Manual (this document)

Image: The HW300-MINI device, its packaging, calibration films, and a wrist strap.
Product Overview
The HW300-MINI is a compact and portable coating thickness gauge featuring an LCD display and intuitive controls. It automatically identifies the substrate material (Ferrous or Non-Ferrous) and provides precise thickness measurements.
Device Components

Image: Front view of the HW300-MINI gauge, highlighting the LCD screen and control buttons.
- Measurement Probe/Sensor
- LCD Display
- um/mm/mils Button: Changes measurement units.
- AUTO F/NF Button: Toggles between automatic substrate detection and manual selection (Ferrous/Non-Ferrous). Also used for calibration.
- AUTO OFF Button: Power on/off.
- ZERO CAL Indicator (on screen)
- Battery Compartment (on the back)
Setup
1. Battery Installation
- Locate the battery compartment on the back of the device.
- Open the battery cover.
- Insert two (2) 1.5V AAA batteries, ensuring correct polarity (+/-).
- Close the battery cover securely.
2. Powering On/Off
Press and hold the "AUTO OFF" button to power the device on or off. The LCD display will illuminate upon power-on.
Operating Instructions
1. Basic Measurement
- Power on the device.
- Place the measurement probe firmly and perpendicularly onto the coated surface you wish to measure.
- The device will automatically detect the substrate type (Fe for Ferrous, NFe for Non-Ferrous) and display the coating thickness on the LCD.
- Lift the device from the surface to take another measurement.

Image: A hand demonstrating the use of the HW300-MINI gauge on a car's painted surface.
2. Changing Measurement Units
Press the "um/mm/mils" button to cycle through the available measurement units: micrometers (um), millimeters (mm), and mils.
3. Calibration
Regular calibration ensures measurement accuracy. The HW300-MINI supports automatic zero-point calibration and multi-point calibration.
Automatic Zero-Point Calibration
- Ensure the device is powered on.
- Place the probe directly onto a bare (uncoated) metal substrate (e.g., the included substrate plate).
- Press and hold the "AUTO F/NF" button until "ZERO CAL" appears on the screen, then release. The device will calibrate to zero.
Multi-Point Calibration (using calibration films)
- Perform zero-point calibration first.
- Place a known thickness calibration film (e.g., 0.50mm) onto the bare metal substrate.
- Place the probe onto the calibration film.
- Adjust the displayed value to match the film's thickness using the "um/mm/mils" and "AUTO F/NF" buttons (refer to the on-screen prompts or detailed manual for specific button combinations for adjustment).
- Repeat for other calibration films if higher accuracy across a range is required.
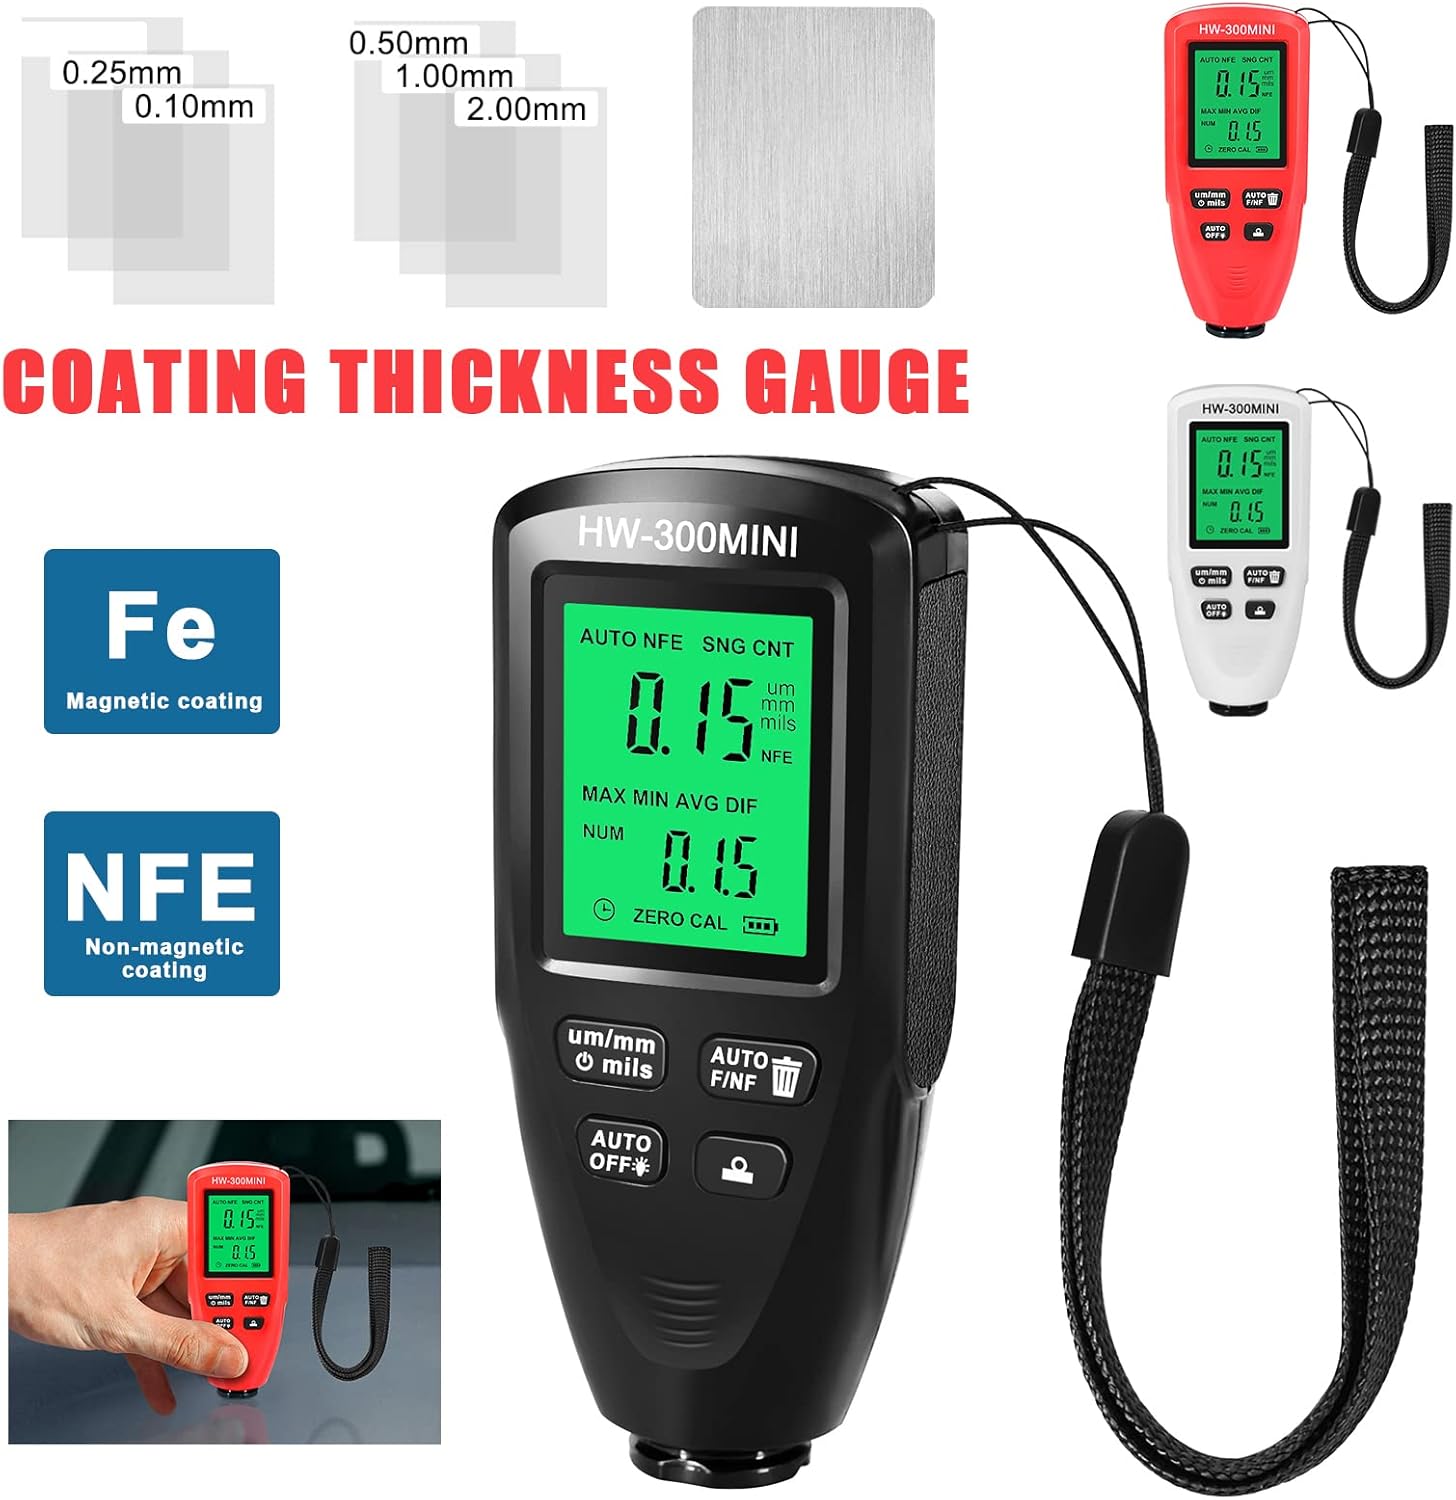
Image: The HW300-MINI gauge shown with various calibration films and a metal substrate, illustrating the calibration process.
4. Data Display Interpretation
The LCD displays various information:
- Current Measurement: The largest number on the screen.
- Units: um, mm, or mils.
- Substrate Type: Fe (Ferrous) or NFe (Non-Ferrous).
- AUTO: Indicates automatic substrate detection mode.
- MAX: Maximum recorded thickness.
- MIN: Minimum recorded thickness.
- AVG: Average recorded thickness.
- DIF: Difference between MAX and MIN.
- NUM: Number of measurements taken.

Image: A detailed view of the HW300-MINI's LCD screen, showing various measurement parameters like current thickness, units, substrate type, and statistical data.
Maintenance
Cleaning
Wipe the device with a soft, dry cloth. Do not use abrasive cleaners or solvents. Ensure the probe tip is clean and free of debris for accurate readings.
Storage
When not in use for extended periods, remove the batteries to prevent leakage. Store the device in its original packaging or a protective case in a cool, dry place.
Troubleshooting
- Device does not power on: Check battery installation and ensure batteries are not depleted. Replace if necessary.
- Inaccurate readings: Perform zero-point and multi-point calibration. Ensure the probe is clean and placed firmly on the surface. Verify the substrate is clean and free of rust or debris.
- Display shows "Err": This may indicate a measurement error or an issue with the sensor. Try recalibrating or restarting the device. If the problem persists, contact support.
Specifications
| Parameter | Value |
|---|---|
| Model | HW300-MINI |
| Measurement Range | 0-2000um |
| Measurement Accuracy | (3% + 1um) |
| Power Supply | 2 x 1.5V AAA Batteries (not included) |
| Operating Temperature | -10°C to 50°C (14°F to 122°F) |
| Dimensions | Approx. 9.5 x 4 x 2.2 cm (3.74 x 1.57 x 0.86 inches) |
| Substrate Compatibility | Ferrous (Fe) and Non-Ferrous (NFe) metals |
Warranty and Support
For warranty information or technical support, please refer to the retailer's policy or contact the manufacturer directly. Keep your purchase receipt as proof of purchase.