1. Introduction
This manual provides essential instructions for the assembly, operation, and maintenance of your vidaXL Galvanized Steel Outdoor Storage Shed. Please read this manual thoroughly before beginning assembly or using the product to ensure safe and correct usage. This shed is designed to provide a durable and spacious outdoor storage solution for tools, gardening equipment, and other outdoor items.

Image 1: The vidaXL Galvanized Steel Outdoor Storage Shed situated in an outdoor garden environment.
2. Safety Information
WARNING: Failure to follow these safety instructions may result in injury or property damage.
- Always wear appropriate personal protective equipment (PPE) during assembly, including gloves and eye protection.
- Ensure the assembly area is clear of obstructions and children or pets.
- Assemble the shed on a level, stable surface.
- Do not attempt to assemble the shed during strong winds or adverse weather conditions.
- This product contains chemicals known to the State of California to cause cancer and birth defects or other reproductive harm. Wash hands after handling.
- Secure the shed to the ground after assembly to prevent tipping in high winds. Anchoring hardware may be required and is not always included.
- Do not store flammable liquids or hazardous materials inside the shed.
- Keep the shed door closed when not in use to prevent unauthorized access or accidental entry.
3. Package Contents
The vidaXL Galvanized Steel Outdoor Storage Shed is delivered as an assembly kit. Please verify all components are present and undamaged before beginning assembly. Refer to the detailed parts list provided in your separate assembly manual for specific component identification.
Typical contents include:
- Galvanized steel panels for walls and roof
- Frame components (beams, supports)
- Sliding door assembly
- Air vent components
- Fasteners (screws, bolts, nuts)
- Assembly manual
4. Setup and Assembly Instructions
Assembly of the vidaXL storage shed requires careful attention to detail. It is recommended that at least two adults perform the assembly. A comprehensive assembly manual is included with your product, providing step-by-step diagrams and instructions.
4.1 Tools Required (Not Included)
- Work gloves
- Safety glasses
- Screwdriver (Phillips head recommended)
- Wrench or socket set
- Measuring tape
- Level
- Drill (optional, for pilot holes if needed)
4.2 Pre-Assembly Steps
- Site Preparation: Choose a level, well-drained area for your shed. A concrete slab or treated timber foundation is recommended for optimal stability and longevity.
- Unpack and Identify Parts: Carefully unpack all components and compare them against the parts list in your assembly manual. Report any missing or damaged parts immediately.
- Organize Components: Group similar parts together to streamline the assembly process.
4.3 Assembly Overview
Follow the detailed instructions in your provided assembly manual. The general sequence involves:
- Assembling the base frame.
- Attaching wall panels.
- Installing the roof structure and panels.
- Mounting the sliding door assembly.
- Installing air vents and any remaining trim.
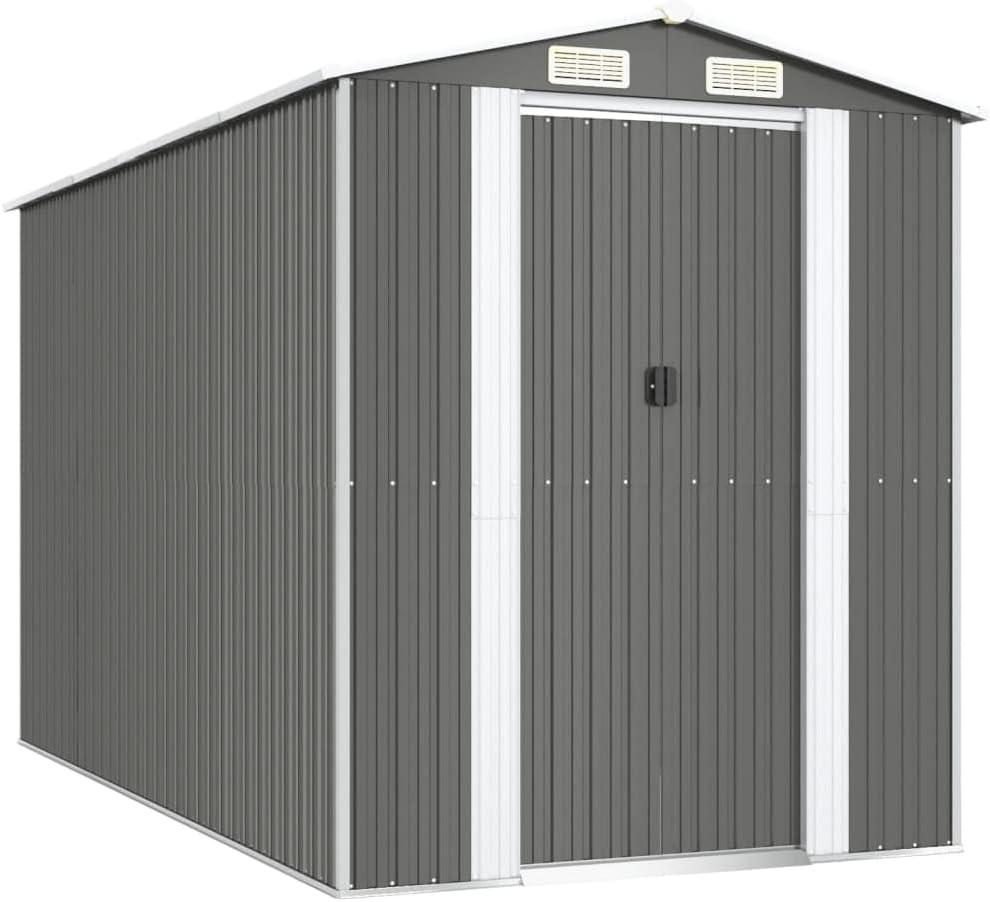
Image 2: Front view of the assembled shed, showcasing the closed sliding door and roof vents.
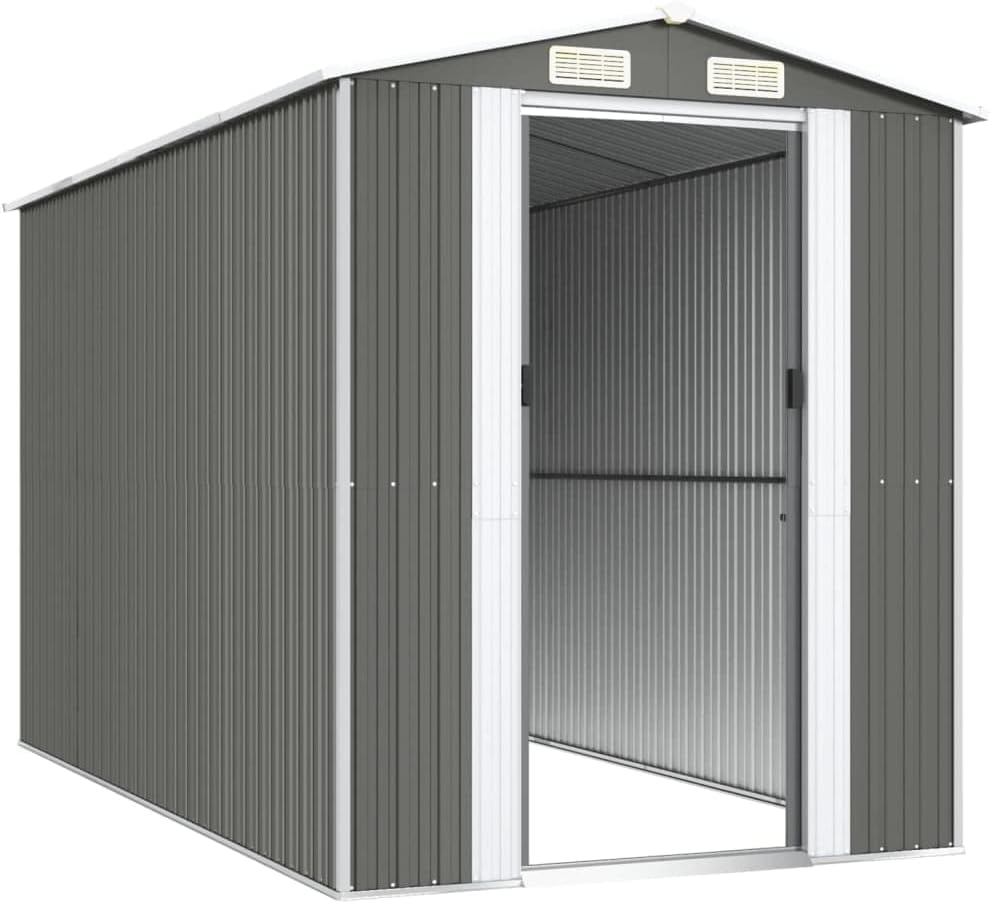
Image 3: Front view of the shed with the sliding door open, revealing the interior space.

Image 4: Side view of the assembled shed, showing the corrugated galvanized steel panels.
5. Operating Instructions
5.1 Sliding Door Operation
The shed features a convenient sliding gate for access. To open, gently slide the door along its track. To close, slide it back until it meets the frame. Ensure the track is clear of debris for smooth operation.

Image 5: Detail of the ergonomic handle on the sliding door for easy opening and closing.
5.2 Air Ventilation
The shed is equipped with integrated air vents located near the roofline. These vents facilitate air circulation, helping to reduce moisture buildup and maintain a fresh environment inside the shed. No manual operation is required for the vents; they are designed for passive airflow.
6. Maintenance
Regular maintenance will extend the life and appearance of your vidaXL storage shed.
- Cleaning: Clean the exterior of the shed periodically with mild soap and water. Avoid abrasive cleaners or harsh chemicals that could damage the galvanized steel finish. Rinse thoroughly with clean water.
- Door Tracks: Keep the sliding door tracks clean and free of dirt, leaves, or other debris to ensure smooth operation. Lubricate tracks with a silicone-based spray if movement becomes stiff.
- Fasteners: Periodically check all screws and bolts for tightness, especially after strong winds. Tighten any loose fasteners.
- Rust Inspection: Although made of galvanized steel, inspect for any signs of rust, particularly in areas where the coating might be scratched or damaged. Address any rust spots promptly with appropriate rust-inhibiting paint.
- Ventilation: Ensure air vents remain unobstructed to allow for proper airflow.
7. Troubleshooting
- Door sticks or is difficult to slide:
- Check the door tracks for debris and clean them thoroughly.
- Ensure the shed is assembled on a level surface. Uneven ground can cause the frame to twist, affecting door alignment.
- Apply a silicone lubricant to the door rollers and tracks.
- Water leakage inside the shed:
- Inspect roof panels and wall seams for proper overlap and secure fastening.
- Check for any gaps around the base or door frame. Seal with appropriate outdoor sealant if necessary.
- Ensure the shed is on a raised foundation to prevent water ingress from the ground.
- Shed feels unstable:
- Verify all fasteners are securely tightened.
- Ensure the shed is anchored to the ground using appropriate anchoring kits (sold separately).
- Confirm the foundation is level and stable.
8. Specifications
| Feature | Detail |
|---|---|
| Brand | vidaXL |
| Model Number | 3147440 |
| Color | Light Grey |
| Material | Galvanized Steel |
| Product Dimensions (W x L x H) | 75.6" x 140.6" x 87.8" (192 cm x 357 cm x 223 cm) |
| Item Weight | 136.6 Pounds (62 kg) |
| Assembly Required | Yes |
| Ventilation | Integrated Air Vents |
| Door Type | Sliding Gate (31.5" W x 76.4" H) |
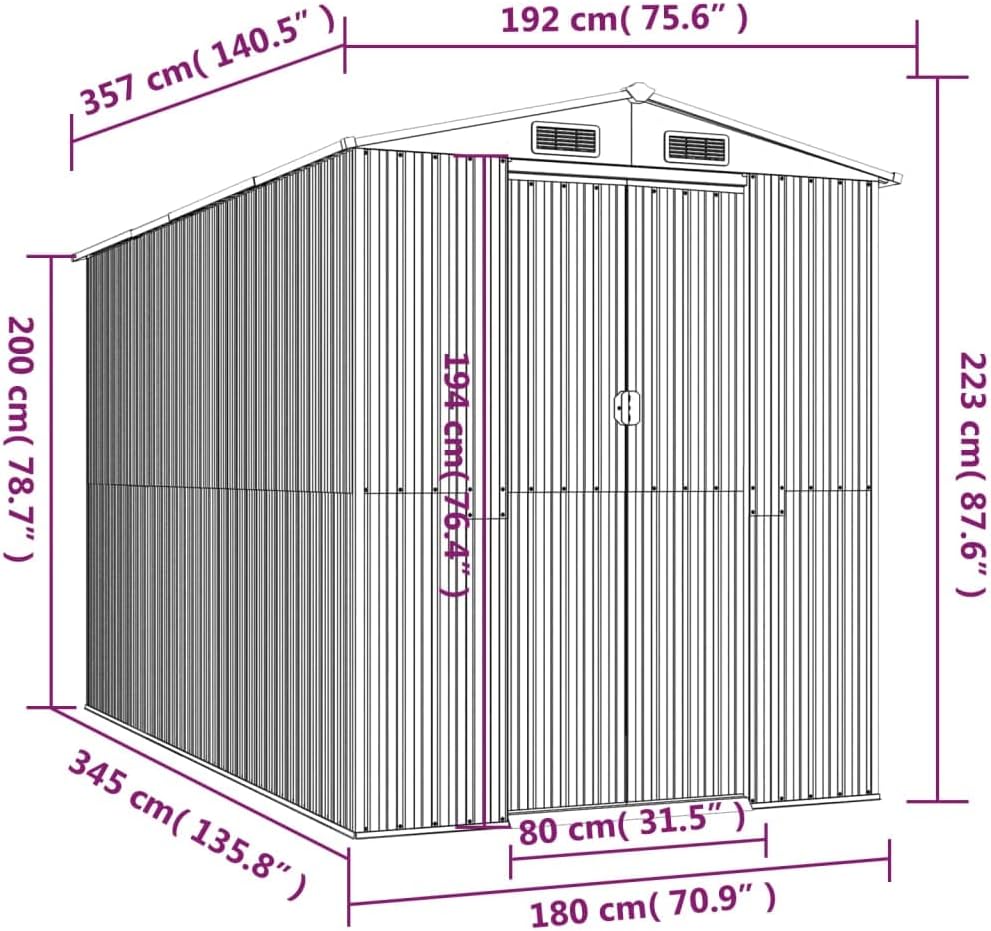
Image 6: Dimensional diagram of the shed, indicating width, length, and height measurements in both inches and centimeters.
9. Warranty and Support
For specific warranty details, please refer to the documentation included with your purchase or contact your retailer. vidaXL offers customer support for product inquiries and assistance.
If you require assistance with assembly, missing parts, or have questions regarding your shed, please contact vidaXL customer service. Contact information can typically be found on the product packaging or the official vidaXL website.
Return Policy: This product typically includes a 30-day easy return policy. Please consult your purchase receipt or retailer for specific return conditions.