Introduction
Thank you for choosing the ER KANG PC06 Power Cage Home Gym Package. This comprehensive instruction manual provides essential information for the safe assembly, operation, and maintenance of your new fitness equipment. Please read this manual thoroughly before assembly and use to ensure proper function and safety.

Image: The ER KANG PC06 Power Cage, showcasing its multi-functional design with integrated pulley system, barbell, and various accessories.
Safety Information
Your safety is paramount. Adhere to all warnings and instructions. Failure to do so may result in serious injury or equipment damage.
- Consult a physician before starting any exercise program.
- Always inspect the equipment for loose parts, damage, or wear before each use. Do not use if damaged.
- Ensure all bolts and nuts are securely tightened before and during use.
- Maintain a clear area of at least 2 feet (0.6 meters) around the power cage during operation.
- Do not exceed the maximum weight capacities: Rackable Weight Capacity: 1500 lbs, Storage Capacity: 1000 lbs, Functional Trainer Capacity: 500 lbs, Pull-up Bar Capacity: 500 lbs.
- Use proper lifting techniques and exercise form to prevent injury.
- Keep children and pets away from the equipment during use.
- This equipment is designed for home use only.
Package Contents
Verify that all components listed below are present before beginning assembly. If any parts are missing or damaged, contact ER KANG customer support.

Image: A visual representation of the ER KANG K6 Cage Bundle, illustrating the main power cage structure alongside all included attachments and accessories.
- Power Cage Frame (Uprights, Crossbars, Base)
- T-bar x 1
- Lat Pull Down Bar x 1
- Tricep Rope x 1
- Cable Bar x 1
- Cable Handle x 2
- Weight Storage Pins x 2
- Battle Rope Anchor x 1
- J-hook x 2
- Dip Bar x 2
- Detachable Landmine x 1
- Footboard x 1
- Barbell Spring Clamp x 2
- Safety Bar Spring Clamp x 2
- Assembly Hardware (bolts, nuts, washers)
Setup and Assembly
Assembly typically requires two people. Ensure you have adequate space and the necessary tools (e.g., wrenches, socket set) before starting.

Image: An annotated diagram of the ER KANG K6 Power Cage, highlighting key components such as the multi-grip pull-up bar, integrated functional trainer, J-hooks, dip bar, safety bar, weight plate holders, landmine attachment, and footboard.
- Unpack and Organize: Carefully unpack all components and lay them out. Identify each part using the provided diagram and part numbers.
- Assemble Base Frame: Connect the base crossbars to the base uprights using the specified hardware. Ensure all connections are secure but do not fully tighten bolts until the entire frame is assembled.
- Attach Uprights: Secure the main uprights to the base frame. The PC06 features 2'' x 2'' column size with 1'' holes.
- Install Top Crossbars and Pull-up Bar: Attach the top crossbars and the multi-grip pull-up bar to the uprights.
- Assemble Pulley System: Install the pulleys and route the cables according to the detailed instructions in your separate assembly guide (if provided). Ensure cables run smoothly and are not twisted. Lubricate with silicone spray if needed.
- Attach Accessories: Install the J-hooks, safety bars, dip bars, weight storage pins, and landmine attachment in their designated positions. The J-hooks and safety bars are designed for quick adjustment.
- Final Tightening: Once the entire structure is assembled and stable, go back and fully tighten all bolts and nuts.
- Test Stability: Gently shake the assembled power cage to ensure it is stable and all connections are secure.
Operating Instructions
The ER KANG PC06 Power Cage offers a versatile range of exercises. Always ensure proper setup and safety precautions before beginning any workout.
Using the Squat Rack
The J-hooks and safety bars allow for safe barbell exercises like squats and bench presses. Adjust the J-hooks to the desired height for racking the barbell. Position the safety bars slightly below your lowest squat or bench press point to catch the barbell in case of failure.

Image: A user demonstrating proper form for a barbell squat within the ER KANG Power Cage, highlighting the use of the rack for strength training.
Utilizing the Pulley System
The integrated cable crossover system allows for a wide range of exercises, including lat pulldowns, cable rows, tricep pushdowns, and cable crossovers. Attach the desired handle (lat pull down bar, tricep rope, cable bar, cable handle) to the carabiner. Adjust the height of the pulley system using the pop-pin and quick-adjust mechanism.

Image: A user engaging in cable exercises, showcasing the versatility of the integrated pulley system for various upper body workouts.
Multi-Grip Pull-up Bar
The multi-grip pull-up bar offers various grip options (wide, neutral, close) for targeting different muscle groups during pull-ups and chin-ups.
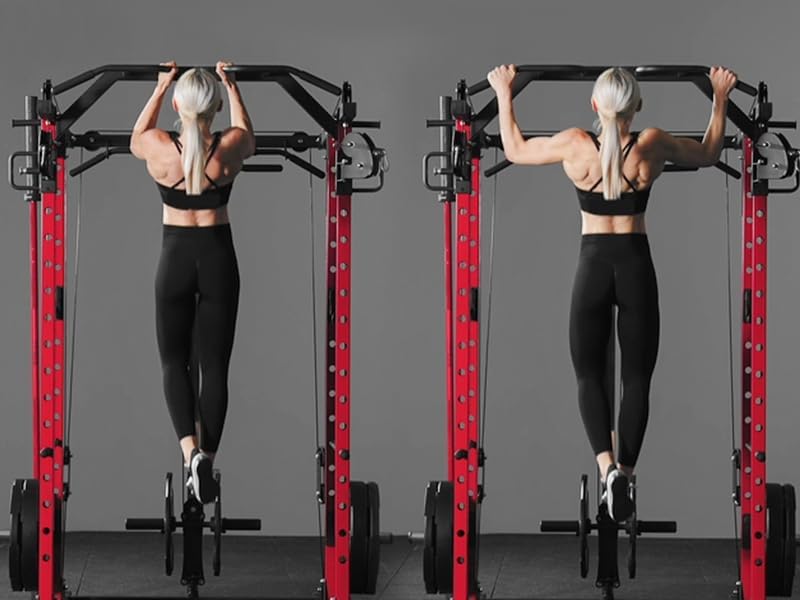
Image: A user performing pull-ups on the multi-grip pull-up bar, demonstrating its use for bodyweight exercises.
Landmine Attachment
The detachable landmine attachment fits both 1'' and 2'' barbells, allowing for rotational exercises, rows, and presses. Insert one end of your barbell into the landmine sleeve.
Band Pegs
The 6 band pegs can be used on the top or bottom rods for resistance training or 'Reverse Banding' to assist with movements like pull-ups or squats, providing assistance at the bottom of the lift.
Dip Bars
Attach the dip bars to the uprights at a comfortable height for performing dips, targeting chest, shoulders, and triceps.
Maintenance
Regular maintenance ensures the longevity and safe operation of your ER KANG Power Cage.
- Cleaning: Wipe down the frame and components with a damp cloth after each use to remove sweat and dust. Avoid abrasive cleaners.
- Inspection: Periodically check all bolts, nuts, and connections for tightness. Retighten as necessary. Inspect cables for fraying or wear.
- Lubrication: Apply a light silicone-based lubricant to the pulley system cables and moving parts every few months or if you notice any friction or squeaking.
- Storage: Store the power cage in a dry, climate-controlled environment to prevent rust and material degradation. Utilize the integrated storage hooks and weight storage pins for accessories and weights.
Troubleshooting
Here are solutions to common issues you might encounter:
- Squeaking Noise from Pulley System: Apply a silicone-based lubricant to the cables and pulleys. Ensure cables are properly routed and not rubbing against any edges.
- Rack Feels Unstable: Check all assembly bolts and nuts. Ensure they are fully tightened. Verify the power cage is on a flat, level surface.
- Difficulty Adjusting J-hooks/Safety Bars: Ensure the pop-pins are fully disengaged before attempting to move. Clean any debris from the adjustment holes.
- Cable Snagging: Inspect the cable path for any obstructions or sharp edges. Ensure the cable is not twisted.
Specifications

Image: A graphic detailing the performance specifications of the ER KANG K6 Power Cage, including rackable weight capacity, storage capacity, functional trainer capacity, pull-up bar capacity, product weight, and upright dimensions.
| Specification | Value |
|---|---|
| Model Number | K6-R (PC06) |
| Product Dimensions (L x W x H) | 128.02 x 170.18 x 220.98 cm (54''L x 67''W x 87''H) |
| Item Weight | 99.8 kg (230 lbs) |
| Rackable Weight Capacity | 1500 lbs |
| Storage Capacity | 1000 lbs |
| Functional Trainer Capacity | 500 lbs |
| Pull-up Bar Capacity | 500 lbs |
| Outer Material | 14 Gauge Steel |
| Column Size | 2'' x 2'' |
| Hole Size | 1'' |
Warranty and Support
For warranty information, product support, or to order replacement parts, please contact ER KANG customer service through the retailer where you purchased the product or visit the official ER KANG website. Please have your model number (PC06) and purchase date available when contacting support.