
1. Introduction
This manual provides detailed instructions for the safe and effective use of your MASKO Airbrush Kit. Please read this manual thoroughly before operating the device and retain it for future reference. This kit is designed for various creative applications, including art painting, model design, body art, nail decoration, and temporary tattoos.

Image: An artist using the airbrush kit to paint on canvas, demonstrating its use for fine art applications.

Image: A person applying a temporary body art design with the airbrush, showcasing its suitability for body painting.

Image: Examples of airbrush applications including cake decoration and nail art, highlighting the kit's versatility.
2. Safety Instructions
Always observe the following safety precautions to prevent injury or damage to the equipment:
- Ensure the work area is well-ventilated to avoid inhaling paint fumes.
- Wear appropriate personal protective equipment (PPE), such as a respirator mask, safety glasses, and gloves.
- Keep the airbrush kit away from children and pets.
- Do not operate the compressor near flammable liquids or gases.
- Always disconnect the power supply before cleaning or performing maintenance.
- Do not exceed the maximum operating pressure of 4 bar.
- Use only paints and cleaning solutions compatible with airbrush equipment.
- Avoid pointing the airbrush gun at yourself or others.
- Ensure all connections are secure before operation.
3. Package Contents
Your MASKO Airbrush Kit includes the following components:

Image: All components of the MASKO Airbrush Kit, including the compressor, airbrush guns, hoses, and accessories.
Single-Action Airbrush Gun Components:
- 1 x Single-Action Airbrush Gun Body
- 1 x 0.8 mm Tip (pre-installed)
- 2 x Glass Paint Pots
- 1 x 1.5 m Air Hose
- 1 x Pressure Gas Regulator Tip
- 1 x M5 1/4 inch Adapter
- 1 x M5 1/8 inch Adapter
- 1 x Pipette
Double-Action Airbrush Gun Components:
- 1 x Double-Action Airbrush Gun Body
- 1 x 0.3 mm Tip (pre-installed)
- Alternative Tips: 0.2 mm, 0.3 mm, 0.5 mm
- Needles: 0.2 mm, 0.3 mm, 0.5 mm
- 1 x 2 m Air Hose
- 1 x M10 1/4 inch Adapter
- 4 x Pipettes
- 10 x Cleaning Tools (brushes and needles)
- 1 x Miniature Wrench
Compressor Components:
- 1 x Cylinder Piston Compressor
- 1 x Pressure Gauge (up to 7 bar) with Pressure Regulator
- 1 x Air Filter
- Rubber Feet (pre-installed)
- Airbrush Gun Holder Tip
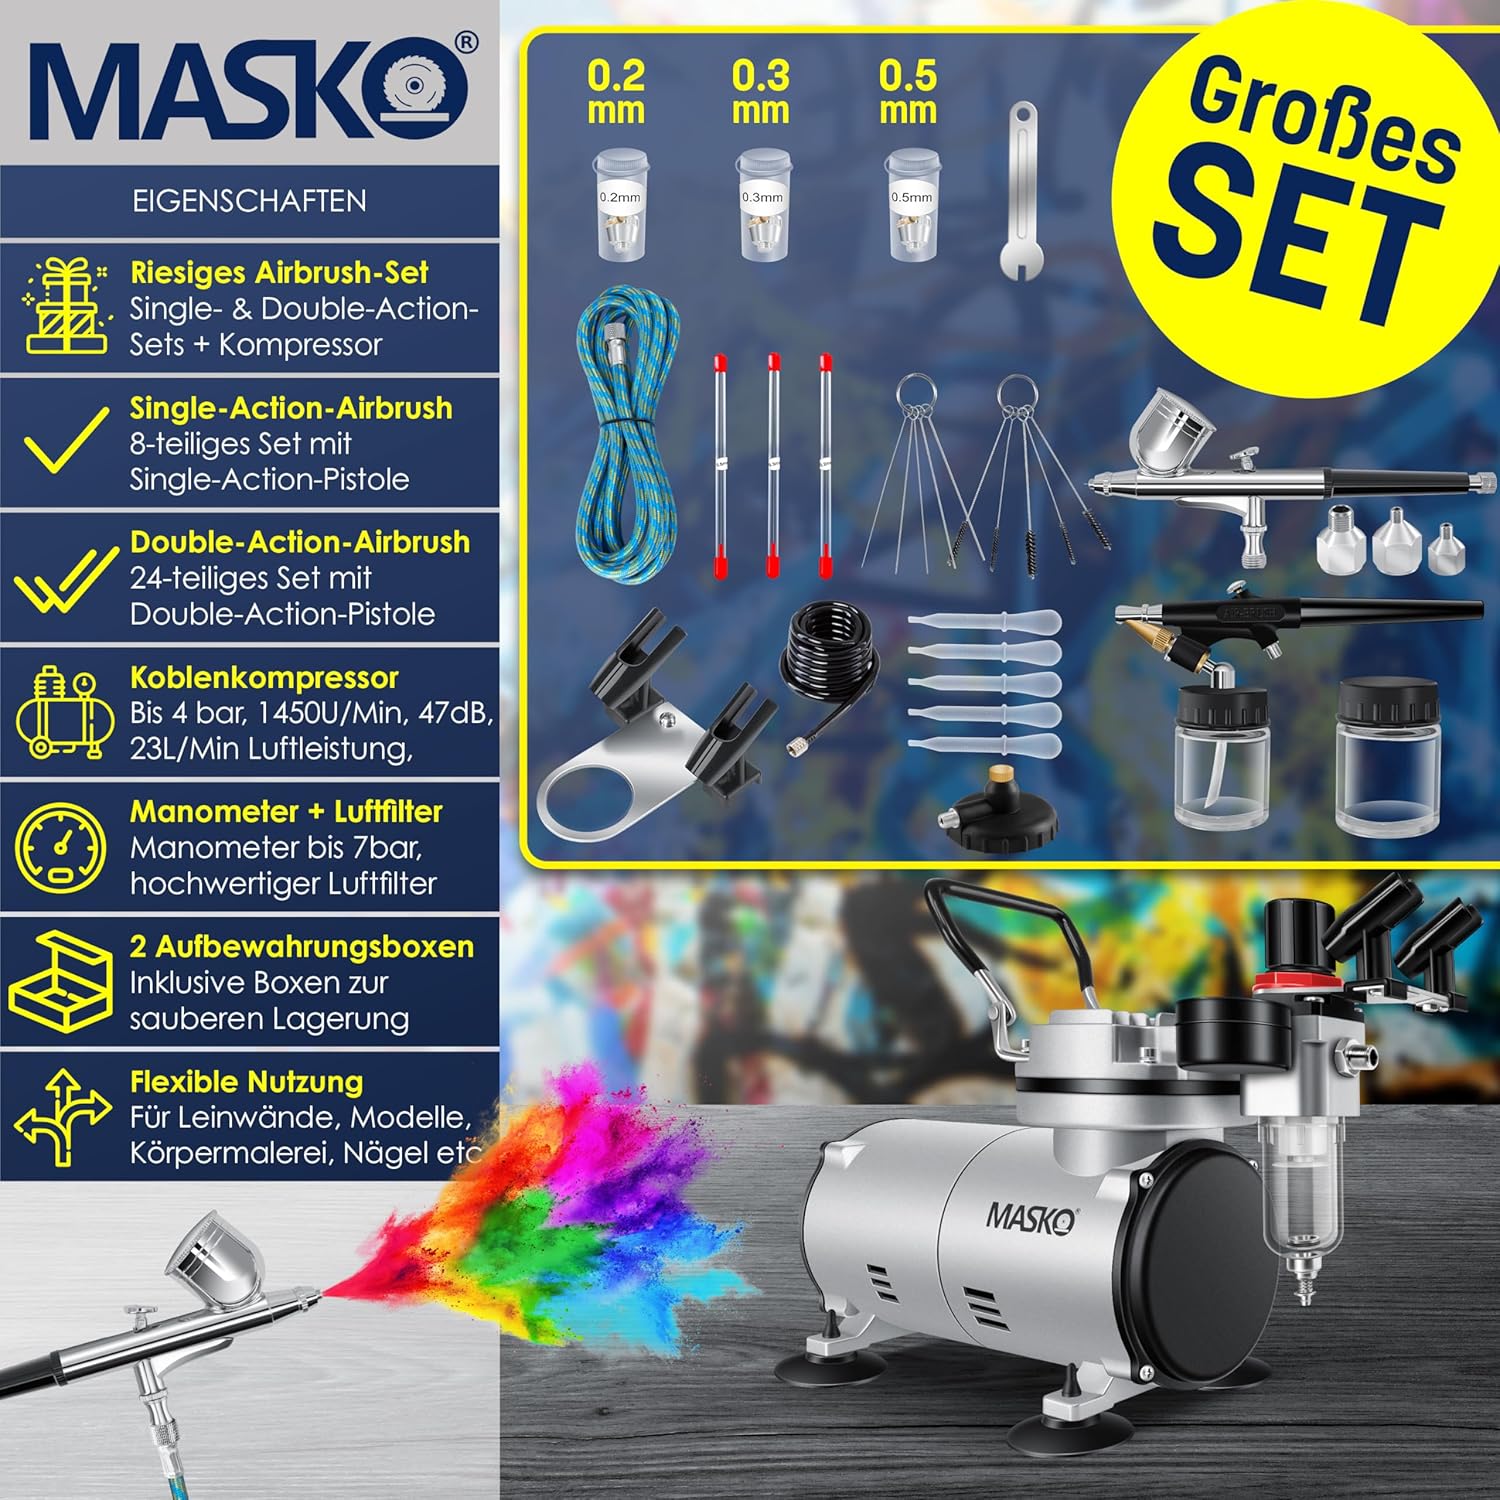
Image: An overview diagram highlighting key features and included accessories such as different nozzle sizes, hoses, and the compressor.
4. Setup Instructions
- Unpacking: Carefully remove all components from the packaging. Inspect for any damage.
- Compressor Placement: Place the compressor on a stable, level surface. Ensure adequate ventilation around the unit.
- Attach Air Filter: Screw the air filter onto the designated port on the compressor.
- Connect Air Hose: Connect one end of the appropriate air hose (1.5m for single-action, 2m for double-action) to the compressor's air outlet. Secure tightly.
- Connect Airbrush Gun: Attach the other end of the air hose to your chosen airbrush gun. Use the provided adapters if necessary.
- Power Connection: Plug the compressor's power cord into a suitable electrical outlet.
- Fill Paint Cup: Prepare your paint according to the manufacturer's instructions for airbrushing. Fill the paint cup or glass pot of the airbrush gun with the prepared paint. Do not overfill.

Image: Detailed view of the compressor's pressure gauge and various nozzle sizes (0.2mm, 0.3mm, 0.5mm) for the airbrush guns.
5. Operating Instructions
General Operation:
- Power On: Turn on the compressor. The pressure gauge will indicate the current pressure.
- Adjust Pressure: Use the pressure regulator knob on the compressor to set the desired operating pressure (typically between 1-3.5 bar, depending on paint and application).
- Test Spray: Before applying to your project, perform a test spray on a scrap surface to check paint consistency and spray pattern.
Single-Action Airbrush Gun:
The single-action airbrush controls only the airflow with the trigger. The paint flow is adjusted separately, usually by a needle stop screw at the back of the gun.
- Airflow: Press the trigger down to release air.
- Paint Flow: Adjust the paint flow by turning the needle stop screw. A wider opening allows more paint.
- Spraying: Once airflow is established, paint will be drawn and sprayed.
Double-Action Airbrush Gun:
The double-action airbrush provides independent control over both airflow and paint flow using a single trigger.
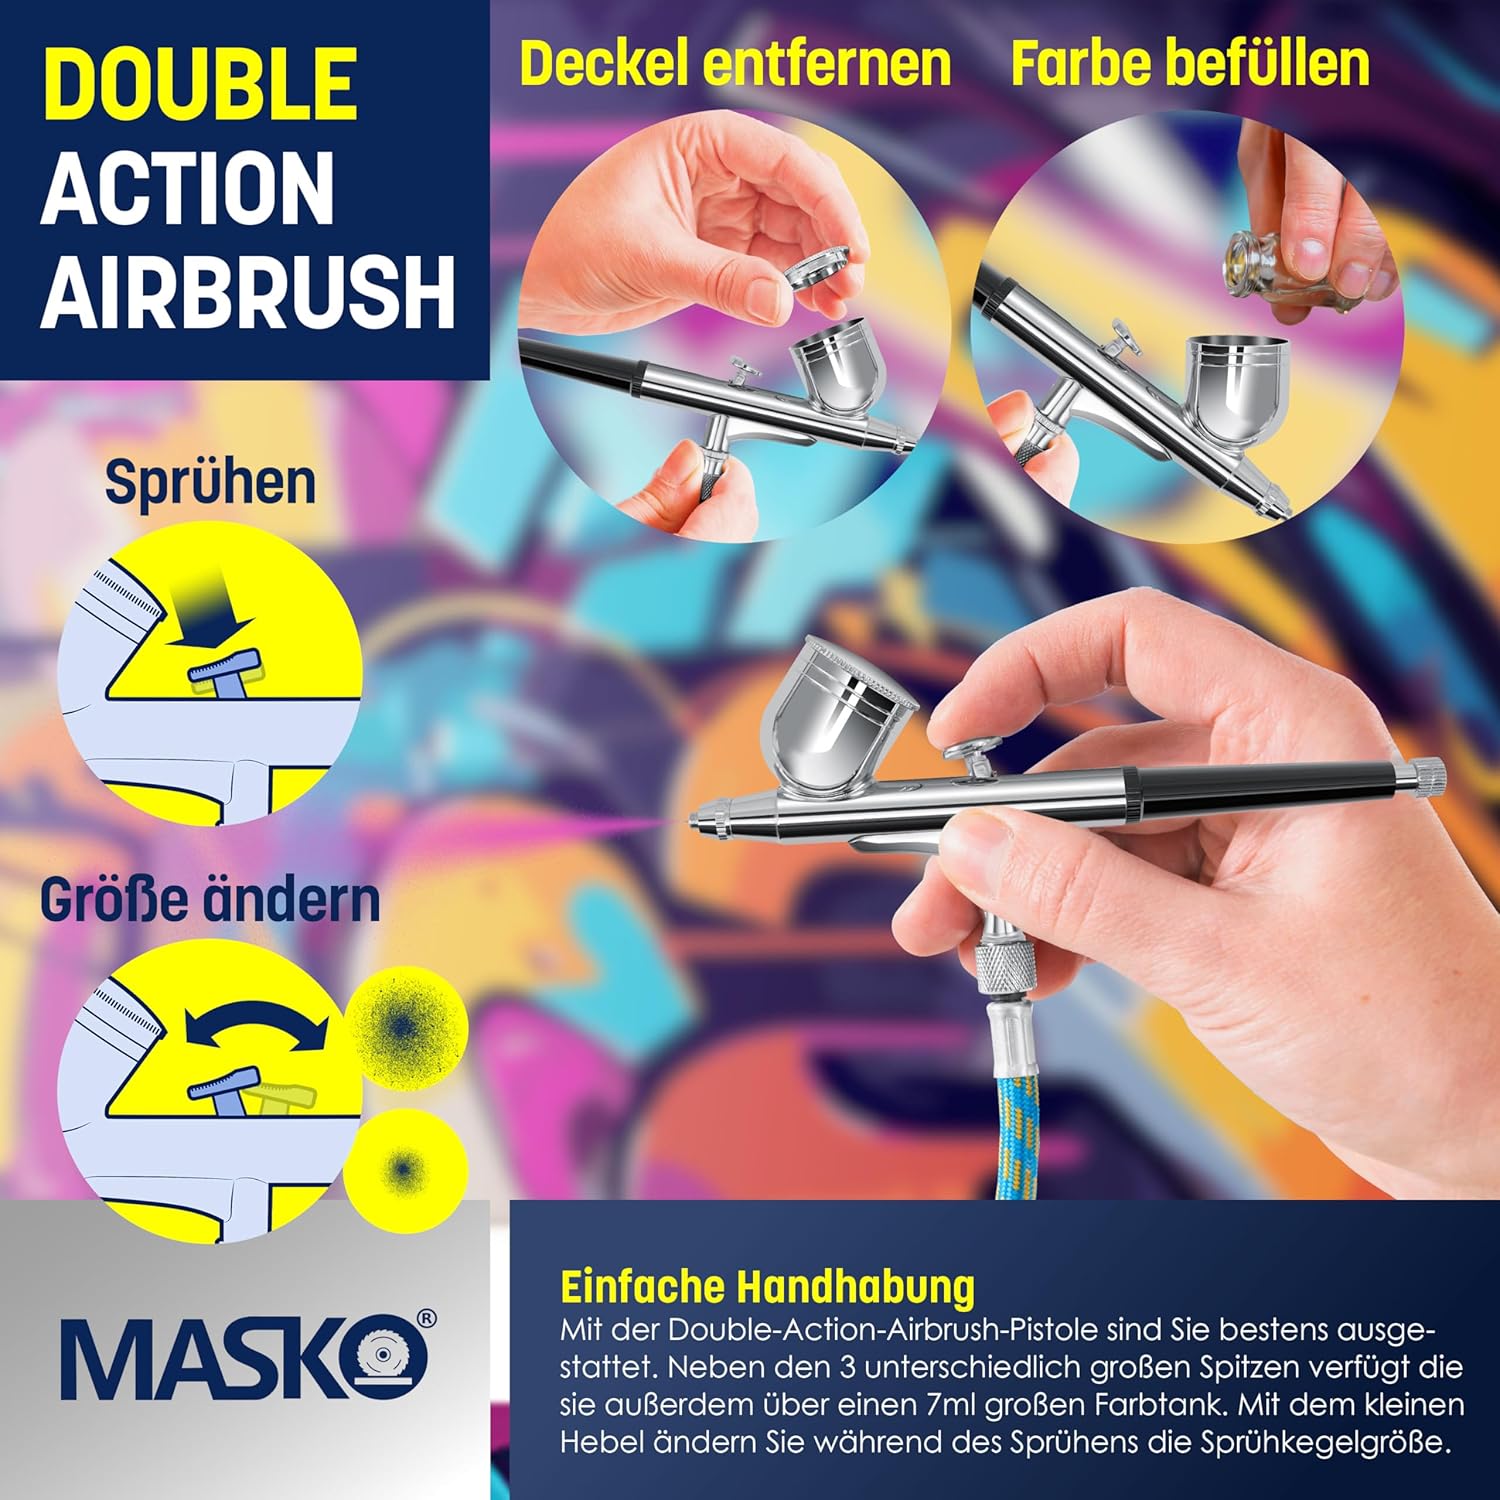
Image: Visual guide on how to operate the double-action airbrush, showing trigger movement for air and paint control, and how to change spray size.
- Airflow: Press the trigger down to release air.
- Paint Flow: While holding the trigger down, pull it back to release paint. The further back you pull, the more paint is released.
- Fine Control: This allows for precise control over line thickness and shading by varying both air and paint simultaneously.
Changing Nozzles and Needles:
To change the nozzle and needle for different spray patterns:
- Ensure the airbrush gun is disconnected from the air supply and empty of paint.
- Carefully unscrew the nozzle cap and then the nozzle itself.
- Remove the needle from the front or back of the airbrush gun.
- Insert the desired new needle, then screw on the corresponding new nozzle and nozzle cap.
- Ensure all parts are tightened gently but securely to prevent air leaks.
6. Maintenance and Cleaning
Regular cleaning and maintenance are crucial for the longevity and optimal performance of your airbrush kit.
After Each Use:
- Empty Paint: Empty any remaining paint from the cup/pot.
- Flush with Cleaner: Fill the paint cup with an appropriate airbrush cleaner or water (if using water-based paints). Spray through until the cleaner runs clear.
- Back-Flush (Double-Action): For double-action airbrushes, cover the nozzle with your finger or a cap and pull the trigger back to allow air to bubble back into the paint cup. This helps dislodge paint from the nozzle area.
- Wipe Down: Wipe the exterior of the airbrush gun and paint cup with a clean cloth.
Deep Cleaning (Periodically or when Clogged):
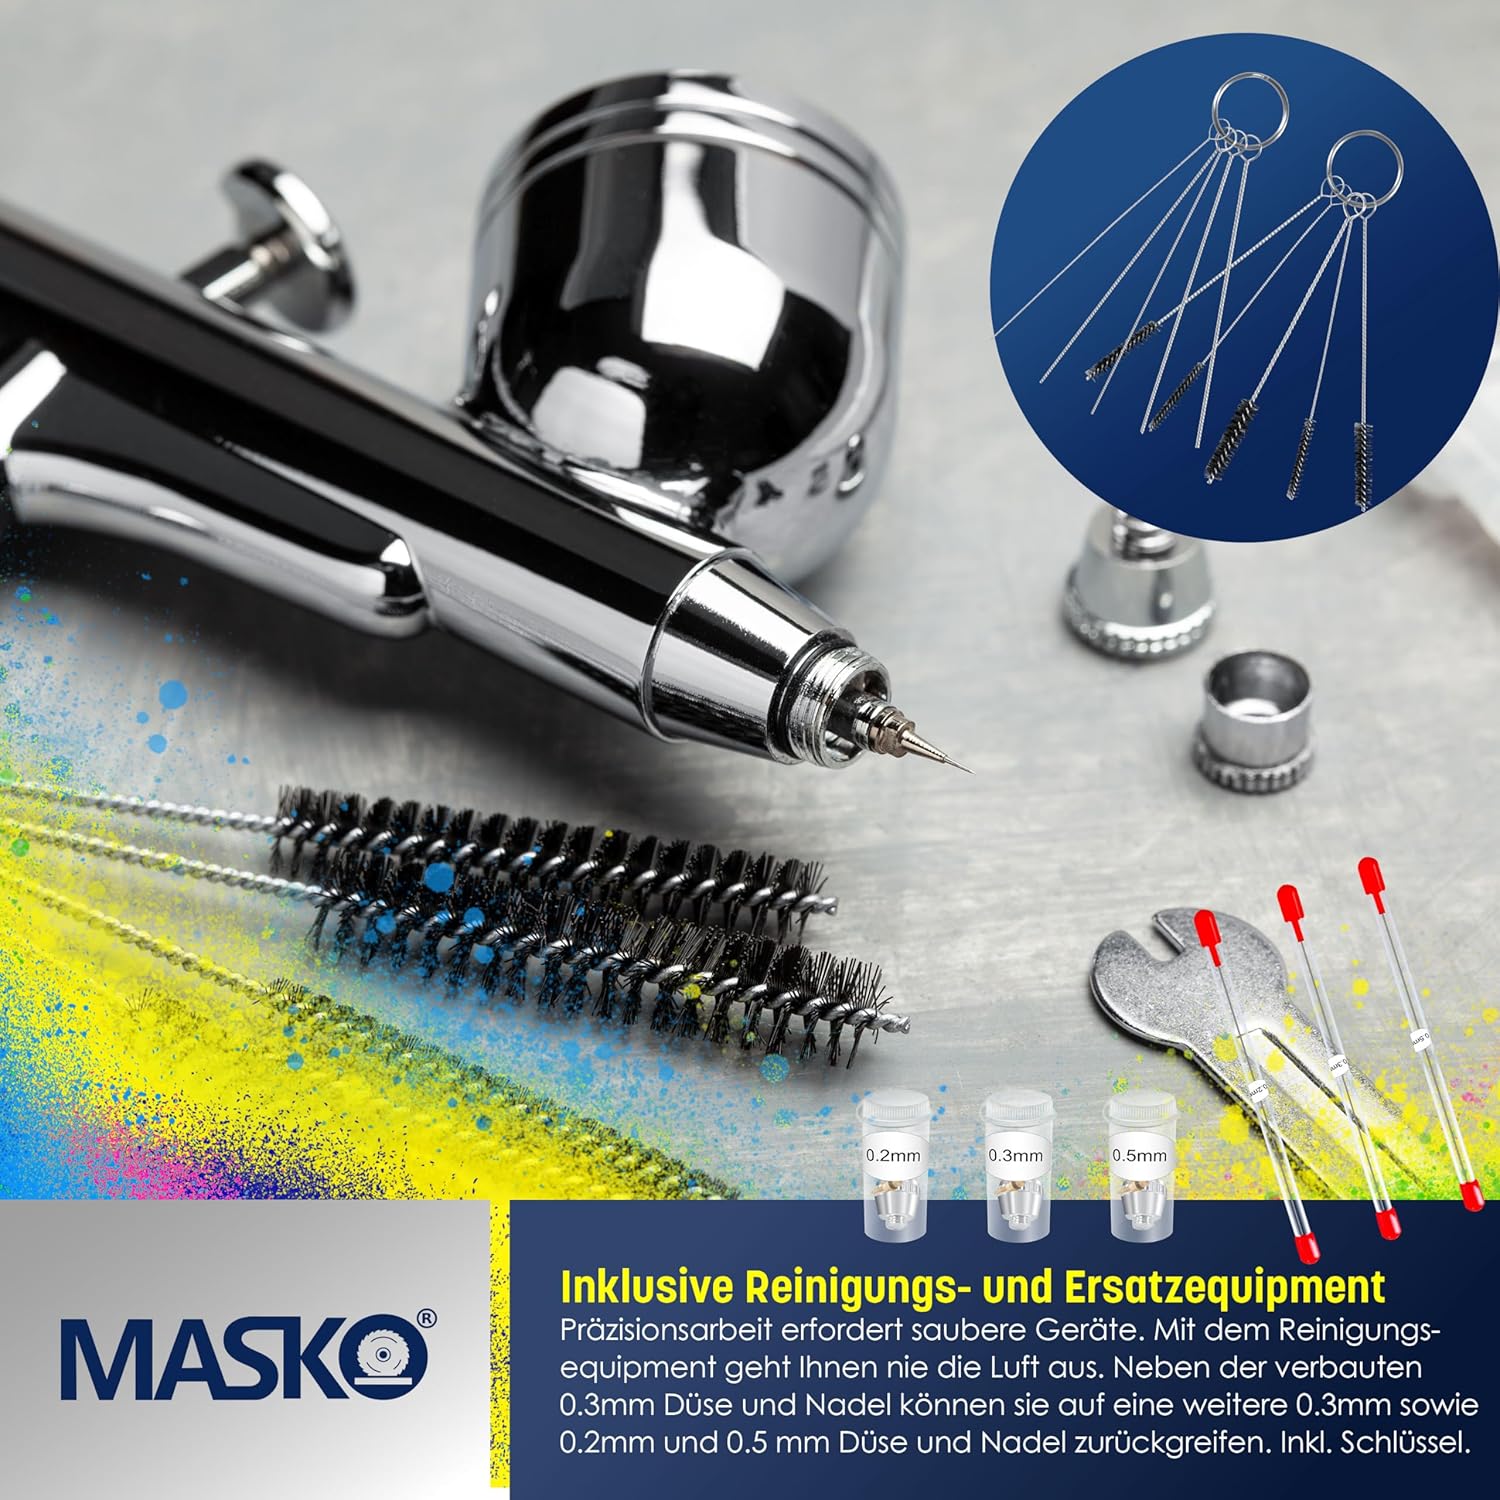
Image: A set of specialized cleaning tools, including various brushes and thin needles, essential for thorough airbrush maintenance.
- Disassemble: Carefully disassemble the airbrush gun, removing the needle, nozzle, and nozzle cap. Refer to the diagram or your airbrush gun's specific instructions for disassembly.
- Soak Parts: Soak the disassembled parts (excluding the main body with seals) in airbrush cleaner for a few minutes.
- Brush and Clean: Use the provided cleaning brushes and needles to thoroughly clean all paint passages, the nozzle, and the needle. Be gentle to avoid bending the needle or damaging the nozzle.
- Rinse: Rinse all parts with clean water.
- Reassemble: Reassemble the airbrush gun, ensuring all parts are correctly seated and tightened.
Compressor Maintenance:
- Air Filter: Periodically check and clean or replace the air filter to ensure clean air supply.
- Drain Moisture: If your compressor has a moisture trap, drain it regularly to remove accumulated water.
- Storage: Store the compressor in a dry, dust-free environment.
7. Troubleshooting
| Problem | Possible Cause | Solution |
|---|---|---|
| No air flow | Compressor off; hose disconnected; clogged air passage. | Check power, reconnect hose, clean airbrush. |
| No paint flow / sputtering | Clogged nozzle/needle; paint too thick; low air pressure; loose nozzle. | Clean airbrush thoroughly, thin paint, increase pressure, tighten nozzle. |
| Uneven spray pattern | Bent needle; damaged nozzle; paint consistency issues. | Inspect/replace needle/nozzle, adjust paint thinning. |
| Air bubbles in paint cup | Loose nozzle; cracked nozzle; dirty nozzle. | Tighten nozzle, inspect for damage, clean nozzle. |
| Compressor overheating | Poor ventilation; prolonged use. | Ensure proper ventilation, allow compressor to cool down. |
8. Technical Specifications

Image: A detailed diagram illustrating the compressor's dimensions and key technical specifications such as max pressure, airflow, and noise level.
- Model Number: 25540_mfn
- Maximum Pressure: 4 bar
- Operating Pressure: 1-3.5 bar
- Airflow: 23 l/min
- Noise Level: 47 dB
- Weight: 3.6 kg
- Power: 1.5 HP
- Revolutions Per Minute (RPM): 1450 rpm
- Nozzle Sizes Included: 0.2 mm, 0.3 mm, 0.5 mm, 0.8 mm
- Country of Origin: China
9. Warranty and Support
For warranty information and customer support, please refer to the documentation provided with your purchase or contact MASKO customer service directly. Keep your proof of purchase for warranty claims.